The Settings Configuration area allows overall configuration of the project management functionality of the system.
Only users with administration rights can access the Project Settings pages.
To access Project Settings section, navigate to Framework > Project Settings from the top menu.
 The following settings are available for configuration:
- Project Code
- Project Types and Workflow Link
- IPM List System Positions
- Project Position
- Staff
- Manage Users
- Project Class
- Progress Calculation
- Calendar
- Email Template
- Email Rules
- Assessment Template
- IPM Lists
- Baseline Comparison
- Hyperlink
- Risk Assessment
- Budget Type
- Preliminary Budget Line
- Project Register View
- Project Budget View
- Project Portfolio View
- Organisational Budget
- Asset Configuration
- Asset Setup
- Workflow
- Stakeholder Analysis
- System Settings
- Time Entry Configuration- This is only available if the time entry module is activated for your organisation.
- Discussion Group
- Lessons Learned
Project Code
You will be able to define a custom project coding system which will automatically increment the project code when new projects are added.
You can either define a general project coding system or a project coding system for each project type by following the steps below;
1) Defining a general coding system
STEP 1: Go to Framework> Project Settings> Project Code
STEP 2: Select the 'General' option from the 'Project code is based on' dropdown list.
STEP 3: Enter the required data as described below and click 'Save'.
Field | Description/Instructions | Mandatory/Optional |
Prefix | This will act as the first set of code used for all project codes | Optional |
Enter Start Number | This will kick off the auto number which will automatically increment when new projects are being added | Optional |
Suffix | This will act as the last two characters of the project code. Ideally this can be used to differentiate project from the date of creation. | Optional |
This numbering will be applied to all new projects created from the Project Details object.
2) Project coding based on project type
STEP 1: Go to Framework> Project Settings> Project Code

STEP 2: Select the "Project Type" option from the 'Project code is based on' dropdown list. Then you will be able to view a grid with the below columns;
- Project Type: Shows the project types in the system
- Prefix: Allows you to enter a ‘prefix’ for the project code. ‘Prefix’ will act as the first set of code used for project codes.
- Suffix: Allows you to enter a ‘suffix’ for the project code. ‘Suffix’ will act as the last set of code used for project codes.
- Start Number: Allows you to enter a start number to kick off the auto number, which will automatically increment when new projects of the respective project type are being created.

STEP 3: Enter the requisite data and click 'Save'.
For example, if the admin does the following configurations for the project type ‘Major Projects’, the projects of that type will have a project code such as “MP-1-20/21”.
- Prefix: MP-
- Suffix: -20/21
- Start Number: 1
The system will assign the following default values for each project type. You can change the default configurations, if needed.
- Prefix: The first letters of each word in the name of the project type will be capitalized and be set as the prefix. For example, prefix for the project type ‘Major Projects’ will be “MP”. If there are project types that have the same first letters in their names, a number will automatically be added next to the prefix to make the prefix for the respective project type unique.
- Suffix: “-“ followed by the current reporting year (i.e. “-20/21”) will be set as the suffix
- Start Number: “1” will be the set as the start number.
When you create a new project, the system will automatically assign a code for that project based on the ‘Prefix’, ‘Suffix’ and ‘Start Number’ configured for the respective project type from Project Settings> Project Code.
Note: Once the above feature is activated, the new codes will only be applied to the new projects created. Hence, the project codes of the existing projects will remain unchanged. Please contact Camms Support, if you wish to apply the above feature to the existing projects.
Project Types & Workflow Links
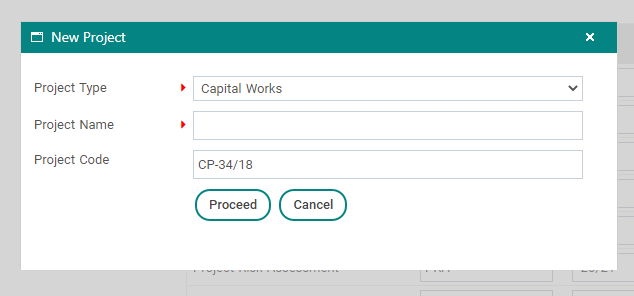
Project Types must be configured so you can categorise their projects according to the project type. The project type will appear within the 'Project Type' drop down list when defining a new project.
STEP 1: Go to Framework> Project Settings > Project Types and Workflow
STEP 2: Click 'Add new Project Type'.
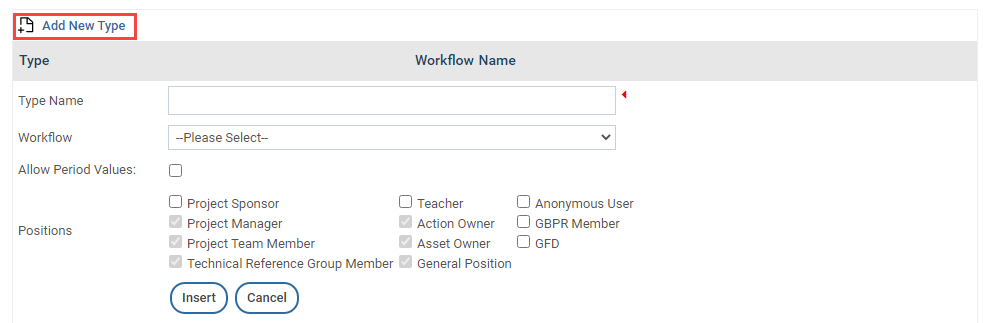
STEP 3: Enter a title.
STEP 4: Select a workflow to be linked to the Project Type. A project type must be linked to a workflow which is what determines the internal structure of any project. Thus, you cannot delete a project type which has already been associated with a project via the workflow link..
STEP 5: By selecting 'Allow Period Values', the administrator can determine if monthly budgeting should be activated. This functionality gives the flexibility for the administrator to categorize which types of projects needs monthly budgeting.
If selected, budget values in Preliminary Budget object will be displayed by month. If un-selected, budget values will be displayed by year (default will be yearly).
STEP 7: Click INSERT. You can use the edit/delete icons to modify or remove an existing project type as required.
IPM List System Positions
System Positions page facilitates the Camms.Project administrator to assign responsible system positions to manage Camms.Project/IPM Lists.
Existing project positions are not used since those are defined for project levels and custom lists are managed outside the project level.
Standard system roles: Administrator, Project Manager and Project Creator positions are included as default in this area. For each system position, 'Can View', 'Can Add', 'Can Edit' and 'Can Delete' permissions are given.
IPM Administrator is a Super Role with all permissions, hence, aforesaid check-boxes are ticked and greyed-out.
When 'Can View' permission is un-ticked, rest of the permissions will become un-ticked and disabled.
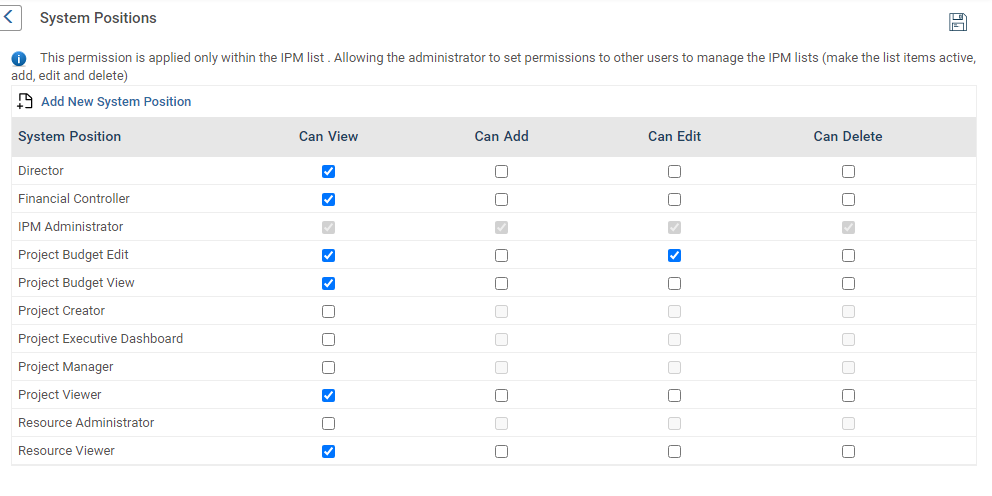
In order to add a new System Position (only Administrators can add new entries):
First click on 'Add New System Position' icon.
Enter the position name and click insert.
 Project Position
Project Position defines the level of security for each user of the system within a project. For example, the IPM Administrator has full security rights whereas a normal user has only limited security rights. As project positions are assigned to users on a per project basis, user security levels can vary from project to project.
STEP 1: Go to Framework> Project Settings> Project Position.
STEP 2: Click Add new Project Position.

STEP 3: Enter a title and a description for the position.
STEP 4: Administrator to link a position for a project type. A project position can be linked to multiple project types. This allows the project team to formulate the team from a unique set of project positions that are linked to the project type. STEP 5 : You can choose to designate this position to the default Responsible Position by ticking the box. This enables the staff member in that position to be synchronised with the action which the project is linked to.
STEP 6 : Navigate to the Permissions tab, and select the permissions you want to apply to this position. You can select varying combinations of add, edit, delete and finish/signoff permissions on a per object basis. Please note that some objects can be configured in a way that makes certain fields invisible or read-only regardless of your Project Position.

Title / Object | Can View | Can Add | Can Edit After Sign Off | Can Edit | Can Delete | Can Finish / Sign Off |
Project Details | In default, ‘can view’ will be ticked for all objects, meaning all objects can be viewed by the position holder.
If a certain project position(s) should be restricted viewing certain objects, then administrator can do so by un-ticking the ‘can view’ tick box against the object for the particular position.
| Can add data to any field in this object. |
If ticked relevant position will be able to edit the object after sign off
| Can modify data present within any field in this object. | Can remove the data in any field in this object. | Can click the FINISH button within the Finish tab at the end of this object. |
Project Board (refers to ALL instances of Project Board and Team Object) | Can assign new project board members. | Can modify current project board members. | Can remove current project board members. | |||
Project Linkage | Can create a project linkage. | Can edit existing project linkage. | Can remove existing project linkage. | |||
| Interplan Linkage | Can create a linkage between an action or a task with the project | Can edit existing linkage Can edit action filters when the project is linked to an action | Can remove existing linkage | |||
Project Budget Implementation | Can add data to any field in this object. | Can modify data present within any field in this object. | Can remove the data in any field in this object. |
| ||
| Project Budget Preliminary | Can add data to any field in this object. | Can modify data present within any field in this object | Can remove the data in any field in this object. | |||
Assessment (refers to Assessment Model Object) | Can conduct a new project assessment. | Can modify an existing project assessment via re-assessment. | ||||
Task (refers to Task Planning Object) | Can add new data to Gantt chart. | Can modify existing data present within the Gantt chart. | Can delete existing data from the Gantt chart. | |||
Task Progress (refers to Task Update Object) | ||||||
Evaluation (refers to Evaluation Assessment Object) | Can conduct a new project assessment. | Can modify an existing project assessment via re-assessment. | ||||
Sign Off (refers to ALL Sign Off Objects) | Can approve, reject or defer | Can modify an approval status already set. | Can reset the sign off status | N/A | ||
Close Project | Can select a staff member from the dropdown list and tick the checkbox. | Can reopen a closed project. | Can click the FINISH button within the Finish tab at the end of this object | |||
KPIs | Can add KPI comments. | Can modify KPI comments. | Can delete KPI comments. | |||
Risk Assessment | Can create new risk assessments. | Can edit existing risk assessments. | Can delete existing risk assessments. | |||
Business Case | Can create new business cases. | Can modify existing business cases. | Can delete existing business cases. | |||
Project Outputs | Can add data to this object. | Can modify data present within this object. | Can remove the data present within this object. | |||
Stakeholder Analysis | Can carry out new stakeholder analyses. | Can modify existing stakeholder analyses. | Can delete existing stakeholder analyses. | |||
Issue Register (refers to ALL instances of Issue Register Object) | Can add new issues. | Can modify existing issues. | Can delete existing issues. | |||
Attach Document (refers to ALL instances of Attach Document Object) | Can upload new documents and attach new URLs. | Can replace existing documents and URLs with different ones. | Can delete existing documents and URLs. | |||
Lessons Learned | Can add data to this object. | Can modify data present within this object. | Can remove the data present within this object. | |||
Assess Project Result | Can add data to this object. | Can modify data present within this object. | Can remove the data present within this object. | |||
Objectives Assessment | Can rate and provide comments for the objectives set. | Can modify existing ratings and comments. | Can delete existing ratings and comments. | |||
Project Scope (refers to Project Scope/Notes Object) | Can add data to any field in this object. | Can modify data present within any field in this object. | Can remove the data in any field in this object. | |||
Custom Object (refers to ALL instances of Custom Object) | Can add data to any field in this object. | Can modify data present within any field in this object. | Can remove the data in any field in this object. | |||
Quick Update (refers to Quick Update page) | N/A | Can modify existing progress information only - status, percent complete and comments. | N/A | N/A | ||
 | Business Rules The Final Approval object's security is automatically taken from the Signoff Object's securities. Planning Link Object's security is automatically taken from Project Linkage object securities. Thus there is no separate security option for the above two objects. There are certain fields which are Disabled for certain objects (i.e. Can Add is disabled for the Details object) and these will be disabled for all positions for that object (which means for the Details object none of the Board and Team members can add) |
STEP 7: Select the permissions that are suited for the new position, and click 'Insert'.
 | Use the adjacent buttons to edit or delete a saved record. A spell check button is also available at the top right corner. |
STEP 8: Use the up/down arrows if you need to re-order the list of positions which will be visible within a Project's Board and Team object.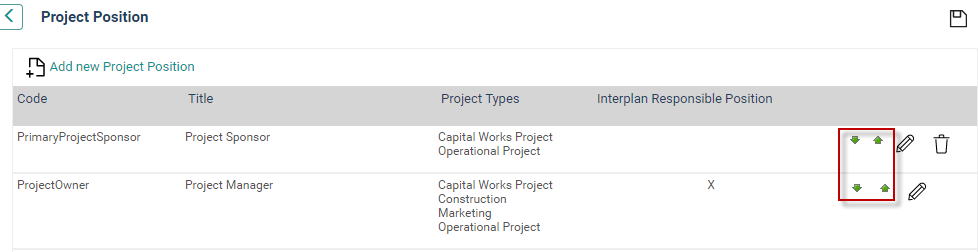
Staff
In order to achieve the outcomes required from an organisation’s project management plan, it is important to assign project responsibilities to individual officers. This will ensure ownership of planned outcomes and enable proper assignment of responsibility for updating.
To create a new staff member, follow the steps below.
STEP 1: Go to Project Settings > Staff.

Click on the 'Add New Staff' icon below the Staff heading.
 STEP 2: Enter basic details such as name, position and contact details (phone and email address). A valid email address will ensure that staff receive automatic email notifications generated via the system.
STEP 3: Define the Directorate or Business Unit which the new staff member is attached to from the Organisational Link dropdown list. Defining these organisation links allows the system to recognise what Directorate or Business Unit they belong and displays information accordingly.
STEP 4: Click on the image placeholder if you want to associate an image with this entity. You can select an existing image or upload a photograph of the staff member through the file browser in the pop-up window (which opens up when you click on the image placeholder).
STEP 5: If the 'Active' check box is selected, then you can activate the user within the system. If the check box is ticked off, that particular staff member's name will not appear in the Responsible Officer dropdown lists throughout the system (user will be deactivated).
STEP 6: Click the 'Save' button.
Use the EDIT or DELETE buttons to modify or delete a record respectively. You can also search for existing staff members by entering keywords in 'Search' text-box and if you want to edit a staff member details, click on the 'Pencil' icon next to its name to edit details.
 | After a staff member is added to the system, assign a security role via Manage Users option. |
Manage Users
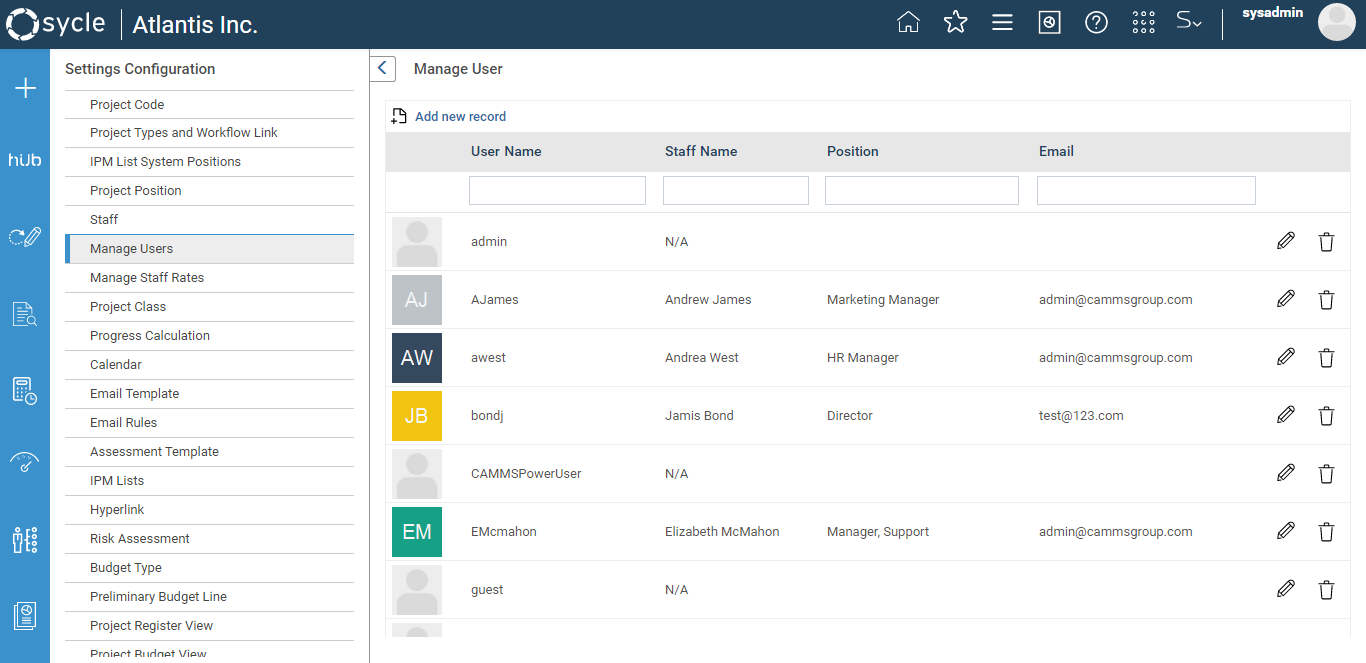
The Manage Users area is used to manage user accounts including their access details and security permissions.
The user accounts are created after adding staff members via Staff screen.
STEP 1: To access manage users area, navigate to the Project Settings > Manage Users.
The Manage Users area displays all your current system users as a grid.
STEP 2: To create a new user, click on the 'Add New Record' icon.
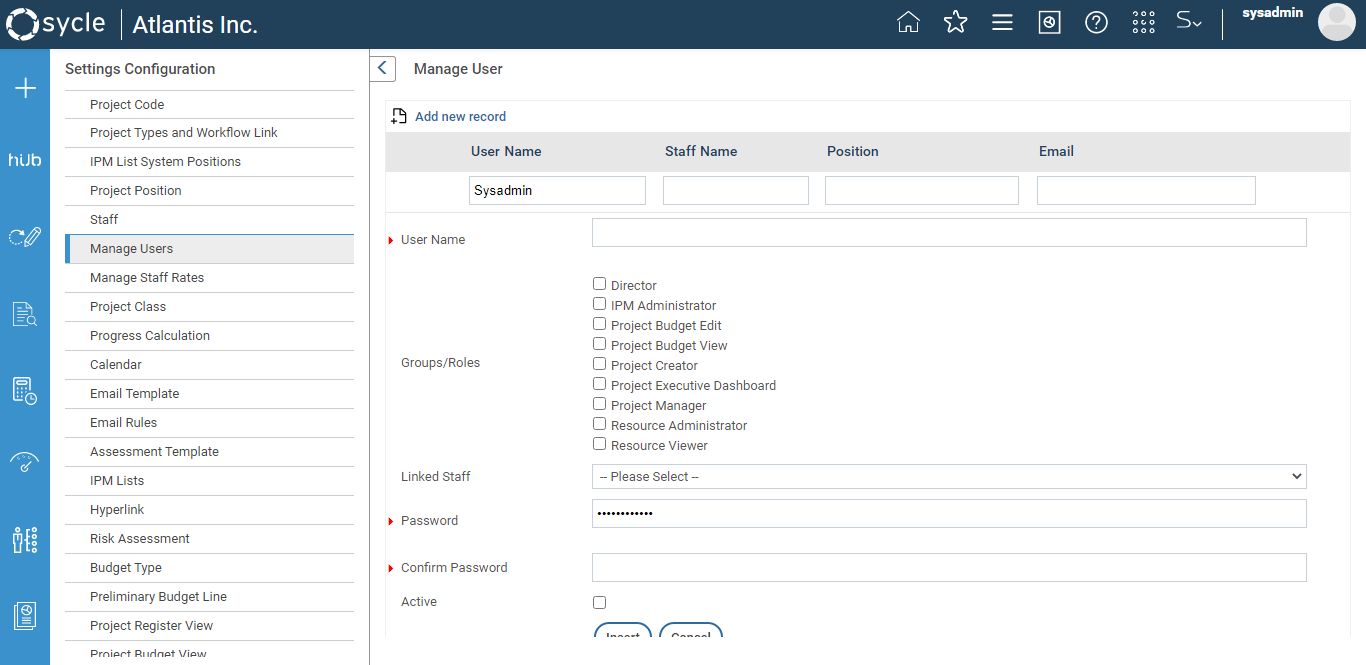
STEP 3: Type in a username and welcome salutation. Consider using the same naming protocol as in your network. This saves users from having to remember more than one username. Where the system is self-hosted, integration with Active Directory can ensure a universal login for your users.
STEP 4: Select a security role for a user. You can select a combination of security roles for a user, however the highest security level will override the lower levels. If one role allows your permission to carry out a certain action and another role doesn’t, the user WILL be allowed to carry out that action. For example, if a user has Project Creator AND IPM Administrator permissions together, he or she will be allowed to do the same actions within the system as a user with IPM Administrator user role.
STEP 5: Select the name of the staff member from the 'Linked Staff' drop down list. The linked staff member must be the same person as you are setting up the login for which is set up within the Staff area. This linkage allows the system to recognise the user and display the homepage responsibilities correctly.
STEP 6: Define a password and set the user as Active by ticking the box. Inactive users will not appear in staff lists throughout the system.
STEP 7: Click the 'Save' icon.
Project Class
All projects in the system are catagorised in to three classes; parent, child and independent. Within this section, you will be able to customise project class indicators according to your organisational preference. These can be displayed in various areas (e.g. Project explorer, Portfolio project etc.) and reports in the system to distinguish the projects according to it’s class).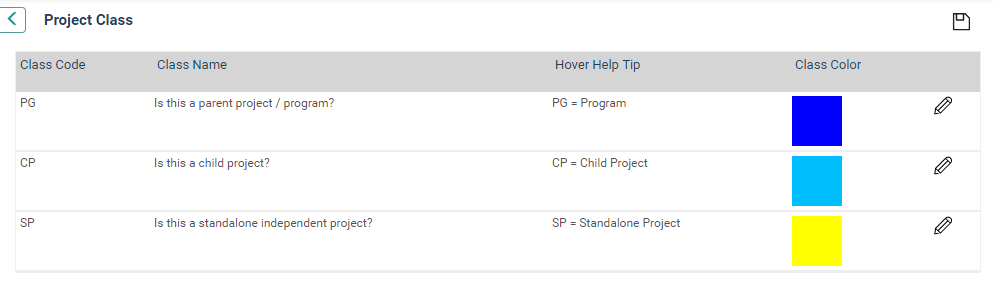
STEP 1: Click the "Edit" icon to modify the details.
STEP 2: Modify the class code, name, hover help tip and change the class color according to your preference and click "Update".
Progress Calculation
Within progress calculation, you can define the project progress calculation option and progress thresholds that will be used throughout the system. 
Project progress calculation Options
Here you can define the calculation method for project progress that would be used throughout the system.
STEP 1: Select a Project Calculation Method that you prefer to be used as the default progress calculation method throughout the system.
Action based progress - Selecting 'action based' will mean that for any project that is linked to an action, the progress will be taken to be the progress that the user enters for the action.
Project based progress - Selecting ‘Project based progress' will mean that project progress will be calculated based on progress recorded against project/phase duration.
System defaults to 'action based progress'.
|
|

STEP 2: Select a Project Based Progress Calculation Method that would be used to calculate project based progress throughout the system.
Task Completion to date by Project - Progress will be calculated based on the durations of the project (actual and target). If this option is selected, when a project is linked with Planning area, Action users will not be able to manually update the progress of the action in planning area (as the progress will be automatically updated based on the project progress).
Automatic Achievement - The elapsed duration the project has been in progress as a percentage of the duration of the project from forecast/actual start to forecast/actual finish.
Task Duration - The actual total task days completed as a percentage of the forecast total project task days.
Refer Project Progress Calculation to see examples.
Project Progress Calculation
Example:
Time now = 26/9/12
Current baseline = Proposed (phase 2)
Task schedule is as follows:
Task | Scheduled Duration | Start Date | Finish Date | % complete |
Task 1 | 100 | 17/07/2012 | 03/12/2012 | 0 |
Task 2 | 10 | 23/07/2012 | 03/08/2012 | 100 |
Task 3 | 10 | 30/07/2012 | 10/08/2012 | 100 |
Target = [ # Working days from current baseline start to Now/# Working days from current baseline start to finish] *100
= [<17/7/ to 26/9> / <17/7 to 3/12>]*100
= [51/100] * 100
= 51%
Auto Achievement Progress Calculation Method
Actual = [ Working days from Actual start date to Now/ # Working days from forecast start to finish] * 100
= [<17/7/ to 26/9>/ <17/7 to 3/12>] * 100
= [51/100] * 100
= 51%
Performance = (Target/Actual) *100
= (51/51) *100
= 100%
Total Duration Calculation Method
Task Days complete = Sum [ (# Days for each task *% Complete)/100]
T1 : [(100*0)/100] = 0
T2: [(10*100)/100] = 10
T3: [(10*100)/100] = 10
Sum of task days = 20
Actual = [# Task Days Completed/ # Total Task Days Scheduled] * 100
= [20/120] *100
= 16.67%
Performance = (Actual/Target) *100
= (16.67/51) *100
= 32.68%
Progress Threshold Setting
STEP 1: Specify ‘On track’ and ‘Off Track’ figures and click the "Save" icon.
The progress threshold defined here will be synchronised with the ‘Action Progress Threshold’ in planning area and vise versa.
 | Business Rule Project/action Progress >= On Track value = On Track = Green Project/action Progress <= Off Track value = Off Track = Red |
Calendar
Within calendar section, you will be able to create multiple calendar versions which can be later linked to project workflows.
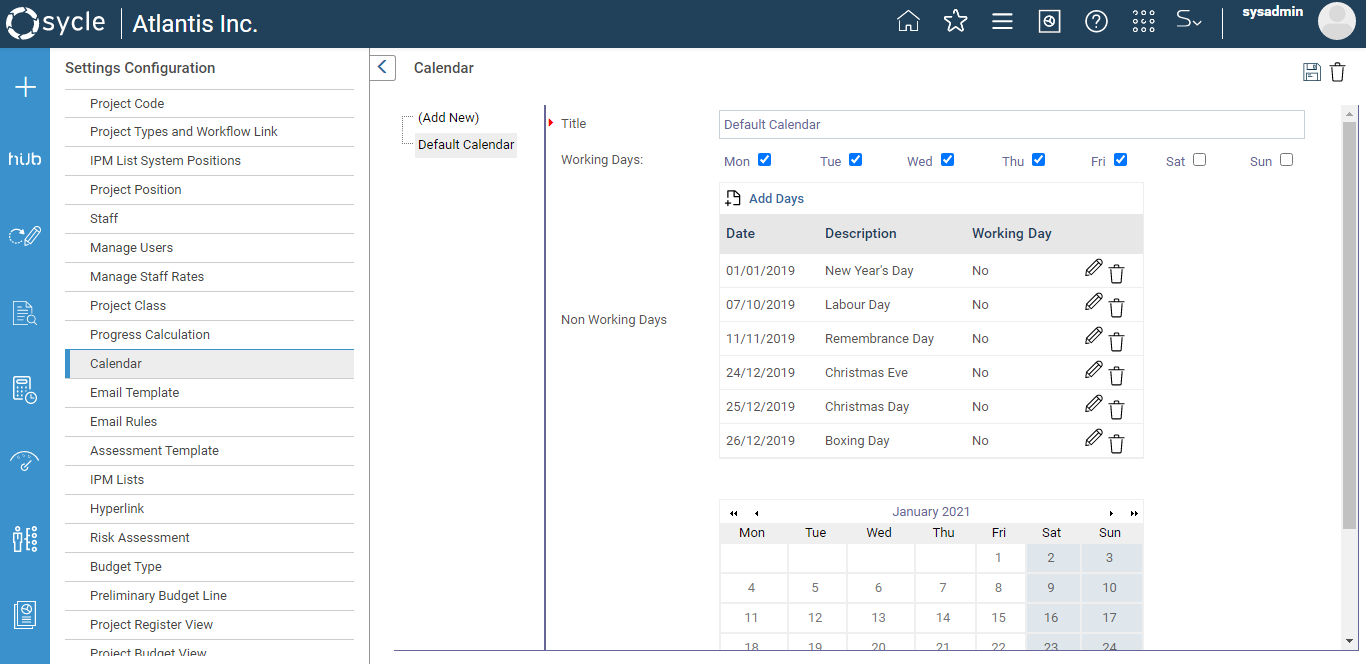
STEP 1: To create a new calendar version, click ‘Add New’.
 STEP 2: Enter a title for the new calendar version.
STEP 3: To change a working day of the week for the entire calendar, use the tick box adjacent to the abbreviation for the day.
STEP 4: To add any special holidays, click ‘Add Days’. Enter a short description and specify the date. Click insert to save the record. Similarly, you can change a holiday (Eg: a Saturday or a Sunday) to a working day by specifying the required date and ticking 'Working day' tick box. Click Insert.
STEP 5: To save the new calendar version, click on ‘Save’ icon.
The calendar in the bottom of the screen displays the modifications made to the calendar. All nonworking days are displayed with a teal blue highlight. You can hover over the dates to see a description.
Email Templates
You can define email templates which can be subsequently applied within the workflow.
STEP 1: Go to Framework > Project Settings > Email Template
STEP 2: Click 'Add New Email Template'.
STEP 3: Design the email template by entering data as indicated below.
Field | Description/Instructions | Mandatory/Optional |
Type | Dropdown allows selection of system defined email types: Generic Email, Sign Off Request and Sign Off Complete.
| Mandatory |
Title | Name of email template | Mandatory |
Subject | Email subject you can add Snippets to the Subject line by clicking on the Insert Snippet Code
| Mandatory |
Body | Content shown within email body. Snippets can be inserted within the email body using the The snippet options are as follows:
| Mandatory |

 icon. Snippets are pre configured by CAMMS and can be used to quickly insert content to the email body. The snippets automatically populate the email body with data from the system (such as data from the Project Details screen) when the email is generated.
STEP 4: Click 'Insert' to add the new email template to the system.
 | Multiple 'Sign-Off request’, ‘Sign-Off complete’ and ‘Generic’ email templates can be created and later used within workflows as required. Repeat Steps 1 to 4 if you wish to add more Email templates. |
Email Snippets
| Snippet Name | Description | Snippet View |
| Sign-Off Request | Inserts a predefined sign-off request to the email template.
The data fields defined in this snippet are populated from the data in the system once the email is generated.
Developed by CAMMS. Refer table below for additional information. | For approval by: [STAFF_TO], Project: [PROJECT_NAME] Task: [TASK_NAME] is ready for your review and determination in order to progress to the next step in the workflow. [SIGNOFF_LINK] Approval requested by: [STAFF_FROM] |
| Sign-Off Request with Commands | Inserts a predefined sign-off request to the email template. User can directly Sign-Off using the links given in the Email body itself.
The data fields defined in this snippet are populated from the data in the system once the email is generated. Developed by CAMMS. Refer table below for additional information. | For approval by: [STAFF_TO], Project: [PROJECT_NAME] Task: [TASK_NAME] is ready for your review and determination in order to progress to the next step in the workflow. Accept - To approve the project to proceed to the next step in the workflow. Reject - To decline approval for the project to proceed any further. Defer - To put the project on hold at this point. Approval requested by: [STAFF_FROM] |
| Sign-Off Complete | Inserts a sign off complete notification to the email template.
The data fields defined in this snippet are populated from the data in the system once the email is generated.
Developed by CAMMS. Refer table below for additional information. | Dear [STAFF_TO], Project: [PROJECT_NAME] Task: [TASK_NAME] Is [STATUS]. Regards, [STAFF_FROM] |
| Task Complete | This inserts a task completion notification to the email template.
The data fields defined in this snippet are populated from the data in the system once the email is generated.
Developed by CAMMS. Refer table below for additional information. | Dear [STAFF_TO], IPM Task Complete Project: [PROJECT_NAME] Task: [TASK_NAME] Is [STATUS]. Regards, [STAFF_FROM] |
| Task Update | This inserts a task update notification to the email template.
Data fields used in this snippet collect the data from the system and generates an automated email.
Predefined by CAMMS. Refer table below for additional information. | Dear [STAFF_TO], This Email message is a IPM Task update notification. Task details are as follows: Project: [PROJECT_NAME] Task: [TASK_NAME] Percentage Complete: [STATUS]% Best Regards, IPM Administrator Note: Please do not reply to this message as this is an auto generated email. |
| Task Reminder | Inserts a task reminder notification to the email template.
Predefined by CAMMS. Refer table below for additional information. | Dear [STAFF_TO], This Email message is a IPM Task updation reminder. Task details are as follows: Project: [PROJECT_NAME] Task: [TASK_NAME] Percentage Complete: [STATUS]% Best Regards, IPM Administrator Note: Please do not reply to this message as this is an auto generated email. |
| Project Update | Inserts a project update notification to the email template.
Predefined by CAMMS. Refer table below for additional information. | Dear IPM User(s), This Email message is an IPM Project update notification. Project details are as follows: Project: [PROJECT_NAME] Project Start Date: [PROJECT_START_DATE] Project End Date: [PROJECT_END_DATE] Project Revised Start Date: [PROJECT_REVISED_START_DATE] Project Revised End Date: [PROJECT_REVISED_END_DATE] Project Completion Date: [PROJECT_COMPLETION_DATE] Project Status: [PROJECT_STATUS] Project Percentage Completed: [PROJECT_PERCENT_COMPLETE] Project Progress Comment: [PROJECT_PROGRESS_COMMENT] Project Capital Amendment: [PROJECT_CAPITAL_AMENDMENT] Programme Summary: [PROJECT_PROGRAMME_SUMMARY] Exception: [PROJECT_EXCEPTION_FIELD] Current color of Baseline Comparison: [PROJECT_BASELINE_COMPARISON_RAG_CURRENT_COLOR_TITLE] Previous color of Baseline Comparison: [PROJECT_BASELINE_COMPARISON_RAG_PREVIOUS_COLOR_TITLE]
Best Regards, IPM Administrator Note: Please do not reply to this message as this is an auto generated email. |
| Project Name | Inserts a PROJECT_NAME data field to the email template.
Refer table below for additional information. | NA |
| Task Name | Inserts a TASK_NAME data field to the email template.
Refer table below for additional information. | NA |
| Staff To | Inserts a STAFF_TO data field to the email template.
Refer table below for additional information. | NA |
| Staff From | Inserts a STAFF_FROM data field to the email template.
Refer table below for additional information. | NA |
| Status | Inserts a STATUS data field to the email template.
Refer table below for additional information. | NA |
| Start Date | Inserts a PROJECT_END_DATE data field to the email template.
Refer table below for additional information. | NA |
| Revised Start Date | Inserts a PROJECT_REVISED_START_DATE data field to the email template.
Refer table below for additional information. | NA |
| Revised End Date | Inserts a PROJECT_REVISED_END_DATE data field to the email template.
Refer table below for additional information. | NA |
| Completion Date | Inserts a PROJECT_COMPLETION_DATE data field to the email template.
Refer table below for additional information. | NA |
| Percent Complete | Inserts a PROJECT_STATUS data field to the email template. | NA |
| Progress Comment | Inserts a PROJECT_PROGRESS_COMMENT data field to the email template.
Refer table below for additional information. | NA |
| Capital Amendment | Inserts a PROJECT_CAPITAL_AMENDMENT data field to the email template.
Refer table below for additional information | NA |
| Programme Summary | Inserts a PROJECT_PROGRAMME_SUMMARY data field to the email template.
Refer table below for additional information. | NA |
| Exception Field | Inserts a PROJECT_EXCEPTION_FIELD data field to the email template.
Refer table below for additional information. | NA |
| Baseline Comparison RAG Current Color | Inserts a PROJECT_BASELINE_COMPARISON_RAG_CURRENT_COLOR_TITLE data field to the email template.
Refer table below for additional information. | NA |
| Baseline Comparison RAG Previous Color | Inserts a PROJECT_BASELINE_COMPARISON_RAG_PREVIOUS_COLOR_TITLE data field to the email template. Refer table below for additional information. | NA |
| Command Accept | Inserts a link to accept the sign off request to the email template. | NA |
| Command Reject | Inserts a link to reject the sign off request to the email template. | NA |
| Command Deferred | Inserts a link to differ the sign off request to the email template. | NA |
| Sign-off link | Inserts a link to navigate the user directly to the current Sign Off phase. | NA |
| Task List | Shows a table with the following information on tasks/milestones. Note: This snippet can be used in tasks related email templates which are used in consolidate email notifications | A table with the following information; - Project Code - Project Title -Task Title - Start Date - End Date |
Fields in Email Snippets
The table below lists the fields that captures data from the system and display in the email.
Data Field | Description |
STAFF_TO | This field is populated by the name of the receiver of the email. |
PROJECT_NAME | Defines the title of the project. |
TASK_NAME | Defines the title of the task. |
STAFF_FROM | Defines the sender of the email. |
STATUS | Defines the status of the task. This displays the value of percentage complete. |
PROJECT_START_DATE | Defines the start date of the project. |
PROJECT_END_DATE | Defines the end date of the project. |
PROJECT_REVISED_START_DATE | Defines the revised start date of the project. |
PROJECT_REVISED_END_DATE | Defines the revised end date of the project. |
PROJECT_COMPLETION_DATE | Defines the project completion date. |
PROJECT_STATUS | Defines the status of the project. |
PROJECT_PERCENT_COMPLETE | Defines the percentage complete of the project. |
PROJECT_PROGRESS_COMMENT | Displays the project progress comment. |
PROJECT_CAPITAL_AMENDMENT | Displays the amendments to the project capital. |
PROJECT_PROGRAMME_SUMMARY | Displays the project programme summary. |
PROJECT_EXCEPTION_FIELD | Displays the project exception selection. |
PROJECT_BASELINE_COMPARISON_RAG_CURRENT_COLOR_TITLE | Displays the name of the current colour in baseline comparison. |
PROJECT_BASELINE_COMPARISON_RAG_PREVIOUS_COLOR_TITLE | Displays the name of the previous colour in baseline comparison. |
SIGNOFF_LINK | Displays a link that would take the user to the relevant signoff object in the corresponding project. |
STEP 5: Use 'Edit' to modify an existing email template as required.
STEP 6: Once the email template is set up, click 'Update' to save it in the system.
STEP 7: Use 'Delete' to remove an email template.
 |
|
Email Rules
Please refer the "Email Rules" article for more information.
Assessment Templates
Please refer the "Assessment Templates" article for more information.
IPM Lists
Administrators can configure responsible system positions within this section.
In order to add a new system position, first select the relevant workflow and click on 'Add Position' button.
Select the System Position from the dropdown and click 'Insert'.
If a user has permission to ‘view’ a particular IPM list item(s). Then user should be able to navigate to those list(s) only.
Based on the permission configured for the list screen,
- If ‘add ‘ permission is not given then ‘Add list item’ icon will be disabled.
- If ‘edit’ permission is not given then edit icon will be disabled.
- If ‘delete’ permission is not given then delete icon will be disabled.
IPM administrator is the super role within the application hence users with this permission will be able to access all areas of the all the IPM lists (these users do not have to be included in the IPM list areas again)
Making a list item active/inactive
List Items can be marked Active/Inactive.
This will be applied to all the list items which are used in different objects (Project Details, Custom, Gantt etc.)
IPM List Items will be available based on visibility configuration. The custom lists displayed in the project area are the list items which are marked 'Active'.
Only the ‘Active’ list items (where the check-box is ticked) will be displayed in the end users dropdown.
When an active list item is made inactive after using it for a project(s) then that list item will remain as it is in those projects.
The selected inactive list items will be displayed when the dropdown is expanded for that project and the user can select a different list item if needed.
Example 1: If a list item is used for a project (I.e. ‘Roads & Infrastructure’ list item is selected from Asset Management Plan List dropdown for the Road Assets project and saved by the user) and later ‘Roads & Infrastructure’ list item is made inactive, then when the Road Assets project is accessed by the user and when Asset management Plan list dropdown is expanded, the user will see the ‘Roads & Infrastructure’ list item.
Example 2: List 1 items ABC, 123 and XYZ are made inactive. The user for Project 1 has previously selected ABC from List 1. If the user wants to change the selected item for List 1 in Project 1, only ABC + other active list items will be shown for list 1, therefore items 123, XYZ will not be shown. After selecting a different list item (other than ABC) and saving it. And upon next viewing the list 1 items for Project 1, ABC, 123 and XYZ list items will not be available in list 1 for Project 1.
Custom Lists
This setting allows IPM Administrator to define custom lists which can be configured for 'Project Details' object, 'Task Planning' object as well as the Custom Object for selection.
Follow the steps below to configure the IPM Lists settings.
STEP 1: Go to Framework> Project Settings> IPM lists.
STEP 2: Click any one of the list to access the screen depicted below and click the 'Add New List Item'.
 STEP 3: Enter the required data.
STEP 4: Click 'Insert'. Use 'Edit' to modify the custom list name. Use 'Delete' to remove an existing item.
STEP 5: List can be made active or inactive using the check box against each list item. By default all list items are active and user with correct permission to this area can make a list item inactive. Only the ‘Active’ list items (where the check-box is ticked) will be displayed in the dropdown.
 | It is mandatory that at least one list is left within this area. This is because the system does not allow the deletion of all custom lists. |
Baseline Comparison
The Baseline Comparison setting allows an IPM Administrator to define the baseline comparison criteria which is essential in evaluating revision of the task date.
STEP 1: Go to Framework> Project Settings> Baseline Comparison.
STEP 2: Click 'Add new Baseline Comparison'.
STEP 3: Specify the following details.
Field | Description/Instruction | Mandatory/Optional |
Project Task Criteria Name | Name of the project task criteria | Mandatory |
Calculation method | Dropdown allows selection of the calculation option. Available calculation options are:
| Mandatory |
Min Value | Sets the minimum value for a particular option | Mandatory |
Max Value | Sets the maximum value for a particular option | Mandatory |
Criteria colour | Click 'Edit' ( | Mandatory |
 ) to define a colour for the option.
STEP 4: Click Insert to add the new baseline comparison.
| Baseline value = Action Completion Date - Revised Action Completion date |

STEP 5: Use the 'Edit' option to modify the baseline comparison details. All the fields can be modified.
STEP 6: Use the 'Delete' option to remove any baseline comparison criteria.
Hyperlink
The Hyperlink setting allows you to define a URL to a system or website of choice. The hyperlinked URL is then displayed within the Project Detail area. This can be, for example, a link to your financial management system, document management system, etc.
Follow the steps below to configure the Hyperlink setting.
STEP 1: Go to Framework> Project Settings> Hyperlink.
STEP 2: Enter a URL.
STEP 3: Click 'Save' icon.
Risk Assessment
The Risk Assessment allows you to adjust various settings used within the Risk Assessment object. It comprises a range of tabs which can be utilised to define variables and criteria for the risk assessment process.
The following can be configured using Risk Assessment configuration page:
Tab Name | Purpose |
Initial Settings | Configure various system options. |
Criteria | Enable users to set up the calculations for Initial, Current and Future risk assessments. |
Rating Type | Allows definition of risk ratings based on your risk matrix. |
Calculations | Enable users to set up the calculations for Initial, Current and Future risk assessments. |
Categories | Define categories for enhanced filtering, analysis and reporting. |
Treatment | Setup different risk treatment types. |
Sequence | Setup an automatic numbering system for risk assessments. |
Custom Controls | Edit various fields within the Risk Review tab. |
| Risk Review Commentary | Enable and update the risk review related commentary fields |
Consequence Table | Setup a consequence reference grid. |
Likelihood Table | Setup a likelihood reference grid. |
Risk Templates | Define templates to save time when creating large numbers of assessments. |
Legislation and Business Process | Define legislations and business processes which can be linked to risks. |
| Field Configuration | Customise the fields which are made visible within the different phases of risk assessments. |
Review Frequency | Setup custom frequencies which can be used for email notifications and alerts. |
Custom Lists | Customise the dropdown list available in the Risk Fields area. |
STEP 1: Go to 'Framework> Project Settings> 'Risk Assessment'.
Initial Settings
The Initial Settings screen will be utilized to toggle several input options used within risk assessment process.
- Activate/Deactivate Future risk assessments: Tick the 'Future Assessment' tick box to record Future or target projections for your organisation’s risks. Upon selection an additional tab will be visible in the assessment page for your risks.
- Activate/Deactivate multiple risk owners: By ticking the ‘Multiple Risk Owners’ tick box you will allow each risk to have a primary risk responsible officer and one or more secondary responsible officers. Only the primary risk responsible officer will be mandatory when creating a risk assessment. This will enable you to then locate these risks when filtering by 'Responsible Officer' on other areas of the application as well as in reports.
- Make the input of a risk code mandatory: Tick ‘Risk Code Required’ to make the Risk Code field compulsory when creating a risk assessment. You can set this to auto-generate a sequential number via the Risk Sequence area.
- Make the input of risk identification information mandatory: Tick the ‘Risk Identified Required’ tick box to make the Risk Identified date field compulsory. It will also make the associated Risk Identifier field compulsory where the person who first reported the risk must be recorded.
After ticking or unticking (activating or deactivating) a row item, ensure you click the 'Update'  icon to save your selection.

Criteria
Risk Criteria
The risk criteria screen allows you to configure and manage Risk Criteria which is the terms of reference (standards, measures, or expectations) used in making a judgement or a decision on the significance of the risk to be assessed.
STEP 1: Select the 'Risk Criteria' tab.
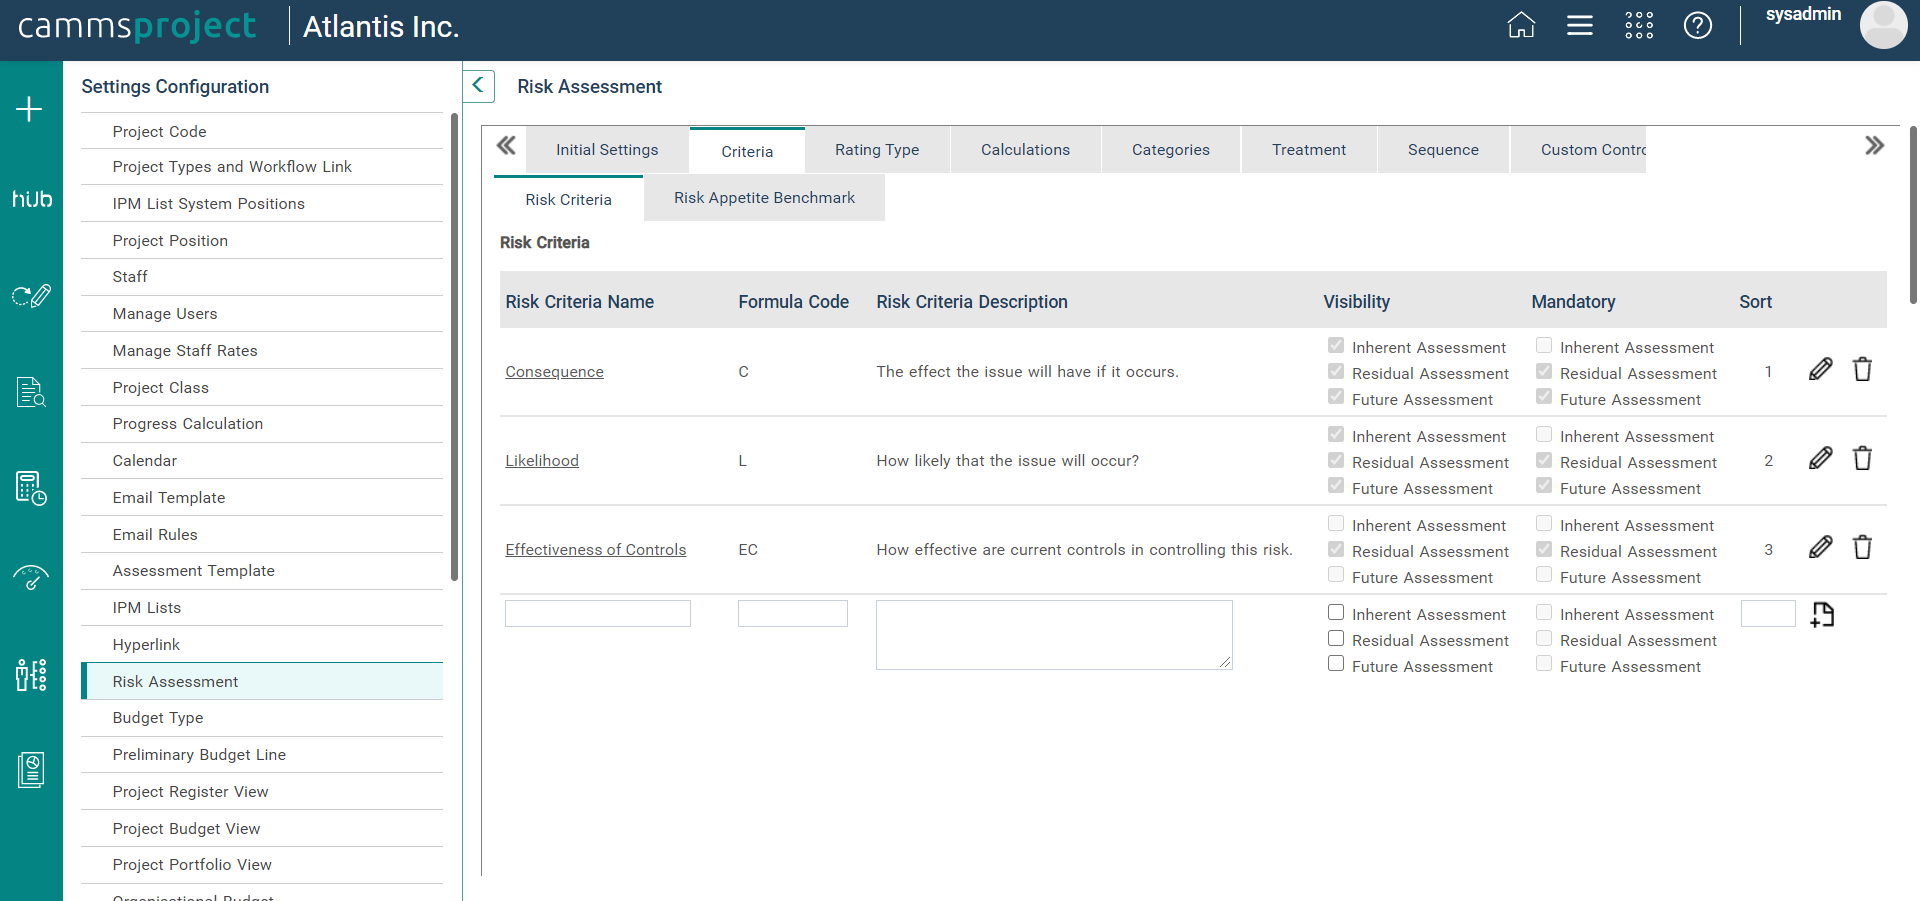
STEP 2: To define a new criteria record, enter a name, a short code and a description. This description will display when users hover their cursor over this in the risk assessment area where the selection for this criteria record will be made.
STEP 3: Under Visibility, select the assessment phases for which risk rating calculations the criteria should be used. For example, Likelihood and Consequence are often used for initial assessments, whereas Effectiveness of Controls is also often used in the current assessment (along with Likelihood and Consequence) when completing a review.
Note: While the 'Making the criteria non-compulsory' setting is ON, If the visibility of criteria is configured for a specific risk assessment stage and the same criteria is not used under the calculation configuration, the criteria is shown as an optional field in the user's rating grid. |
STEP 4: The Sort field indicates the positioning of the Risk Criteria in the available assessment phases. If two or more fields have the same ‘Sort’ value, they will appear in alphabetical order.
| Note: If the Sort value is given as 1, then the Risk Criteria field will display in the X-axis in the heat map grid. And if the Sort value is given as 2, then the field will display in the Y-axis on the heat map. |
STEP 5: Click the add icon to save.
STEP 6: To edit an existing item, click on the edit icon . Then to save, click on the update icon
 .
.
When a Risk Criteria record is saved, the name turns into a hyperlink which can be clicked to navigate directly to its Risk Criteria Rating screen.
Note: Use the adjacent buttons to edit |
 or delete
 a saved record. You will not be allowed to delete a value if there are linked risks to it. Hence please make sure to remove all linkages from within the risk prior to deleting a criteria value
Risk Appetite Benchmark
The Appetite Benchmark values against each category can be defined here if the feature is enabled for you.

STEP 1: To define a new criteria record, enter a name and a numerical value for the criteria which will be the benchmark. This value will be used to determine the appetite rating comparison with the risk score for the risk. Click on add to save.
STEP 2: To edit an existing item, click on the edit icon . Then to save, click on the update icon .
Note: Use the adjacent buttons to edit |
Rating Type
A risk rating is the overall rating given for a combination of risk criteria, based on your risk matrix. For example, a Likelihood of ’Likely’ and a Consequence of ’Moderate’ may give an overall risk rating of ‘High'.
For each of the Risk Rating types, you may select the color you wish to display in the graph.

STEP 1: Click the 'Rating Type' tab. There are two options available to select from the dropdown 'Select Screen Type' and you can set up the risk ratings for your risk assessments as well as control ratings for your control assessments from here. Either option would behave in the same manner as explained below.
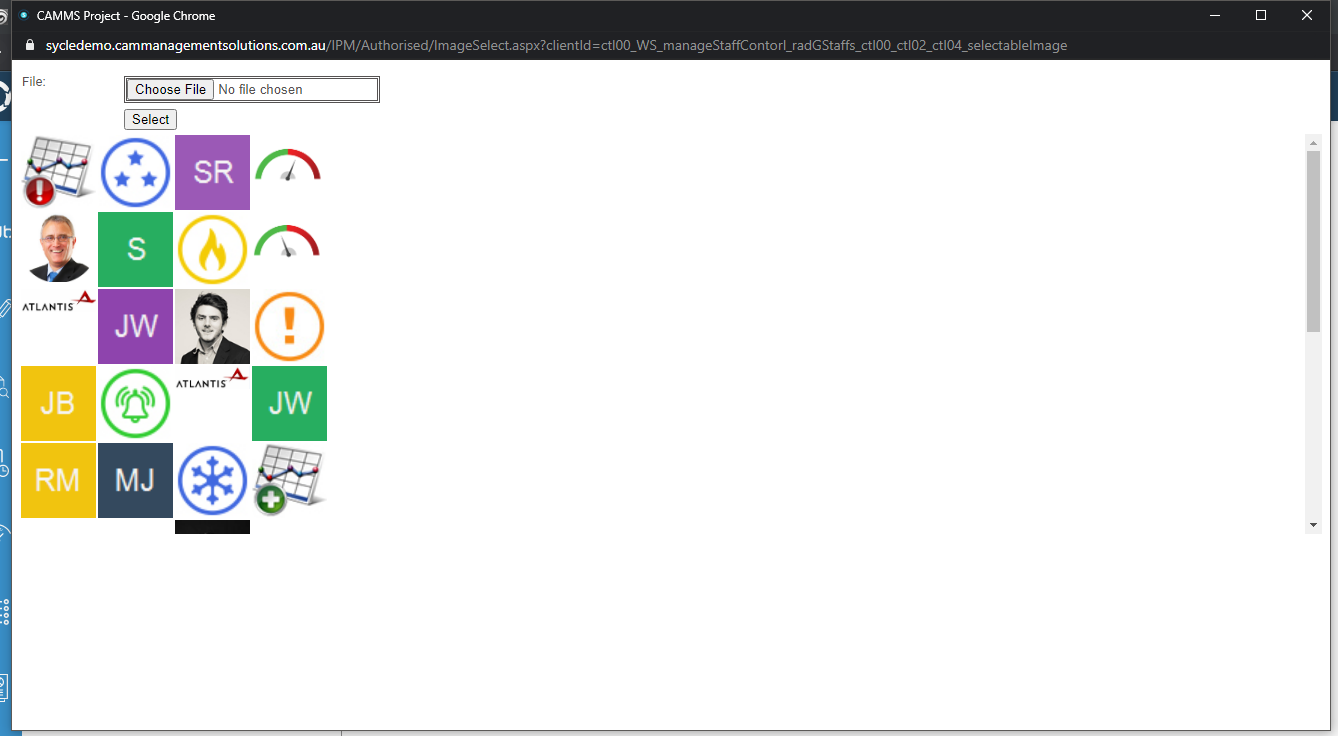
STEP 2: To define a rating, enter a name and associate an image with it which will be used throughout the system.
STEP 3: Click on one image to make your selection.
STEP 4: To upload a new image, click 'Browse' to look for a file on your computer. Make sure you use a small but high-quality picture.
STEP 5: Click 'Select' to confirm your choice.
To change the image, simply click on the image and repeat the previous steps 3-6.
You can set the color for your rating type. This color will be used to represent the rating in graphs and charts.
STEP 6: Select a color for the rating by clicking on the color palette and then clicking on one of the colors available.

STEP 7: Click Close to exit the palette.
STEP 8: Enter a sequence number which will determine the order in which the rating will appear in dropdown lists throughout the system.
STEP 9: Enter a frequency value to determine the automatic population of the risk review frequency based on the selection of the risk rating value for a risk in the current risk assessment. This will be shown and applicable only when the setting ' Update Frequency From Rating ' is enabled under settings in the Configuration area. In the case of controls, this will determine the control frequency value
STEP 10: Click the Plus icon to add it to the table.
Note: Use the adjacent buttons to edit or delete or delete a saved record. a saved record. |
Calculations
The Risk Calculations enable users to set up the calculations for Initial, Current/Revised and Future risk assessments.
STEP 1: Click the 'Calculations' tab.
Each phase of your assessment can be setup to calculate its risk rating in a different way. The tabs in this area will allow you to select the available phases which you can define risk rating calculations for
The grid displays rows for each risk rating record you defined in the risk rating area.

STEP 2: Specify a formula using the 'Formula Syntax'.
Only the operators and criteria options in the Formula Syntax can be entered into the risk rating Formula but you may enter numerical figures within your formulae.
STEP 3: Click 'Edit'  to modify any minimum and maximum values present.
You must make sure that there are no gaps between the maximum values of a rating and the minimum value of the next highest rating. This will ensure that any combination of Risk Criteria will generate a Risk Rating.
STEP 4: Click the 'update'  button.
Note: While the "Making the criteria non-compulsory" setting is ON, If the visibility of criteria is configured for a specific risk assessment stage and the same criteria is not used under the calculation configuration, the criteria is shown as an optional field in the user's rating grid.
| Note: There is no validation of the risk rating formula if the calculation results in a rating above or below the minimum and maximum values of the respective risk ratings. If a risk rating does not appear in an assessment after the correct fields have been selected and the assessment is saved, the risk rating formula must be adjusted. |
If you are unsure of how to enter a formula, use the default formula provided by Camms.
Click on any additional phase tabs and repeat the above steps if you want to define different formulas for the calculation of their risk ratings.
Note: Use the adjacent buttons to edit |
 or delete
 a saved record.
Categories
Risk categories enable you to link risks to primary and secondary risk categories for enhanced filtering, analysis and reporting. Example categories may be Financial, Health and Safety, Political.
STEP 1: Click the 'Categories' tab.
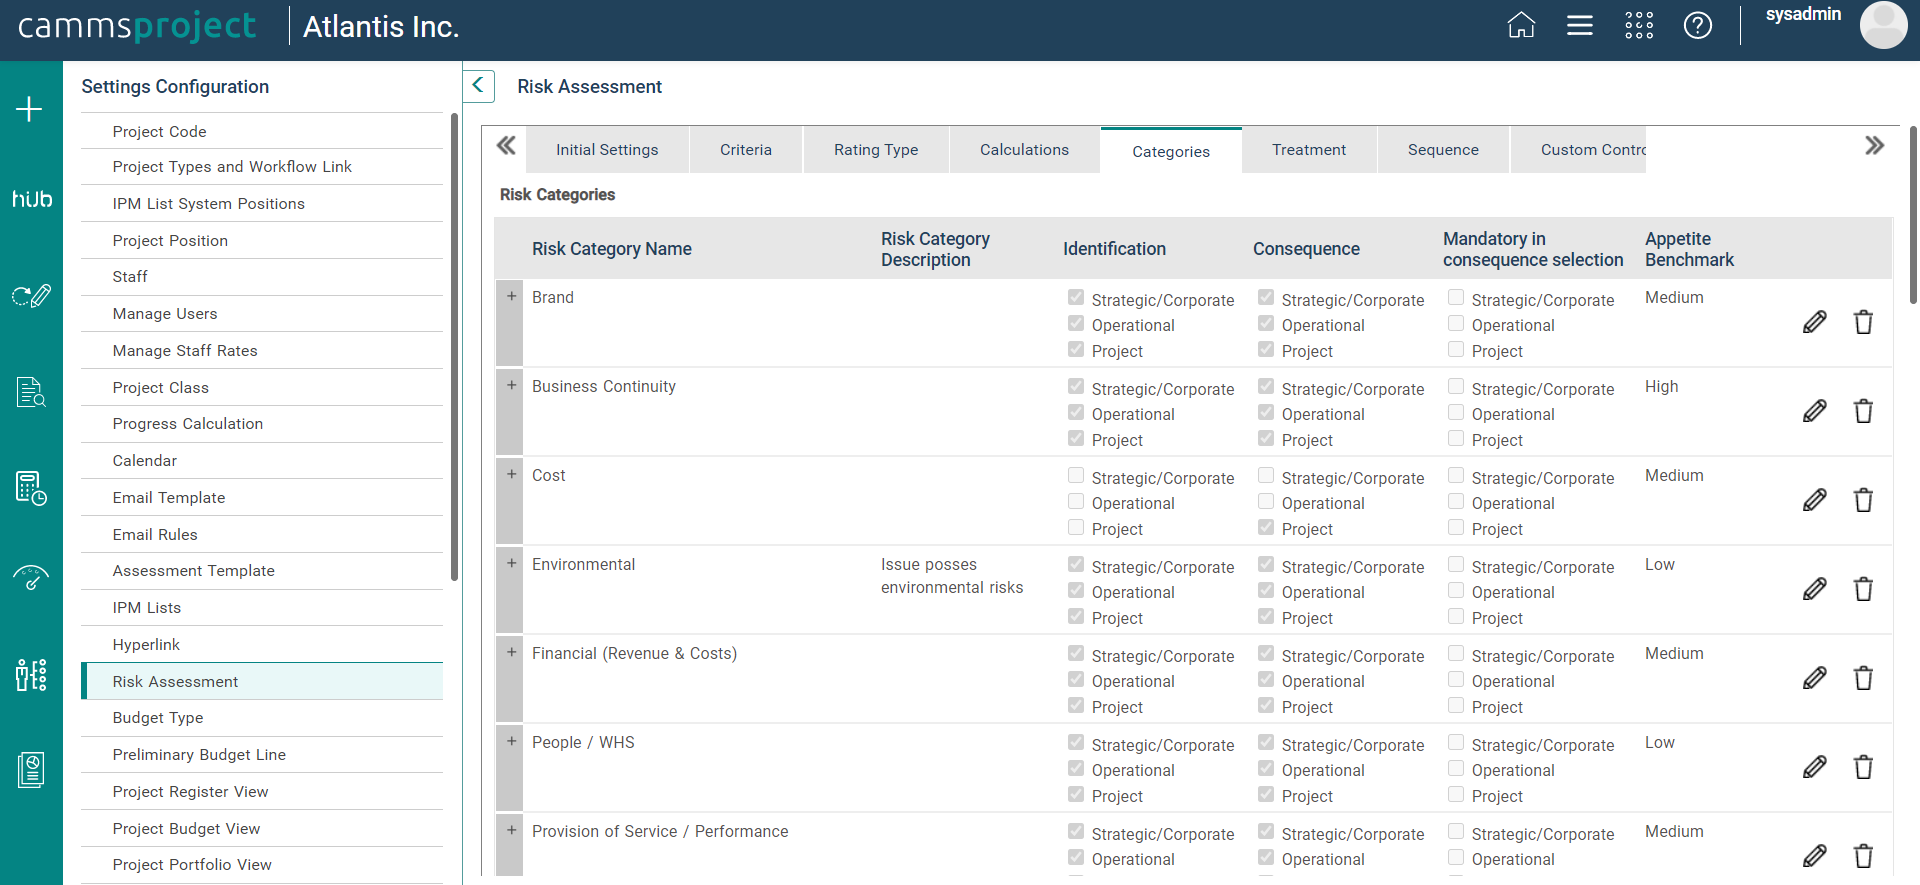
STEP 2: Type in a name and description in the text boxes provided.
STEP 3: Click the Plus  icon to save.
You can also define sub categories by expanding the main risk category (using the expand icon).
STEP 4:Type in a name and description for the sub category (if applicable).
STEP 5:Click the  icon to save.
STEP 6: By using the Risk Identification area you can map Risk categories to project risk type for identification. Only the selected categories will appear within the risk detail screen (primary category/secondary category dropdowns).

STEP 7: By Clicking the Risk “Consequence checkbox” it will define a risk category as a consequence category for the risk type. Only the selected categories for the risk type will be displayed in the consequence table in end user’s view.

STEP 8: By Clicking the Risk “Mandatory in consequence selection checkbox” it will define a risk category as a mandatory entity needing this user to select a consequence rating for the risk type.

STEP 9: If the Risk Appetite feature is enabled for you, this area will have an additional column 'Appetite Benchmark' available showing all appetite criteria values you have added at 'Criteria' section above. You will be able to select and assign a benchmark value for each category.

Treatment
This section allows you to edit the Risk treatment options. You may also have different treatment options for different Risk Categories.
STEP 1: To set up risk treatments, click the 'Treatment' tab.

STEP 2:Type in a name and description in the text boxes provided.
You can also enter a sort order which will determine the position this item will appear in the list.
You can also select a risk category which when selected as the primary risk category within an assessment will offer the corresponding Treatment option. The “Show In All” option will display the treatment for all risk categories.
STEP 3:Click the Plus  icon to save.
Note: Use the adjacent buttons to edit  or delete or delete  a saved record. a saved record. |
Sequence
The sequence tab allows you to configure automatic risk numbering. You may apply the sequence or customise them for the project risk type.
STEP 1:Click the 'Sequence' tab.

First decide whether the numbering system you define should apply to all risk types (this will be applicable only if you have Camms.Risk module activated) or whether you want to define a numbering system only for project risk type. If you chose the former, the next dropdown will be greyed out.

However, if you opted to define different numbering systems for each risk type, you can select 'Project Risk' from the next dropdown.

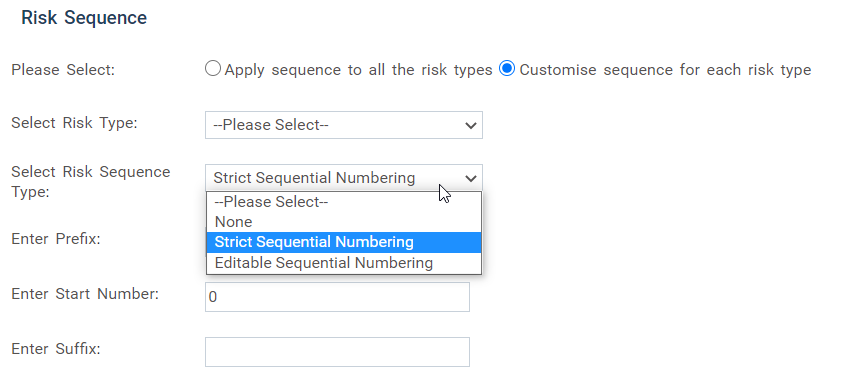
STEP 2: Next select the Risk Sequence Type and specify whether it can be edited once a number is generated.
- Strict Sequential Numbering: Means that the Risk Codes will be non-editable, and strict on the numbering sequence.
- Editable Sequential Numbering: Means that the Risk Codes will be editable, however the sequence will still be automatic.
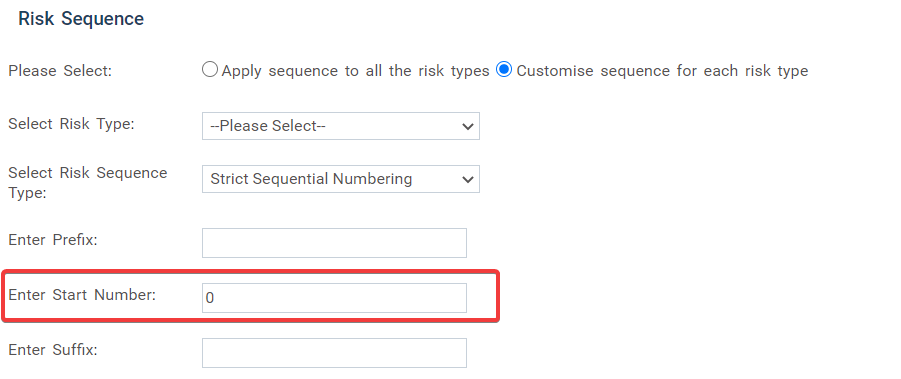
STEP 3: Enter a prefix, suffix, and a start number for the numbering to proceed sequentially. Note: if you have no risks created in the system already, it should default to 1, otherwise it will count up the number of risks you have in the system, and default for the next number in line to start the next risk sequencing.
STEP 4:Click the 'Save'  icon to save the details.
If you opted to define separate numbering systems for the different risk types, make sure you repeat this process for each one.
Risk Review Commentary
Risk Review Commentary controls are used to manage the risk comment fields within the Risk Review tab and other updating areas for risks.
Four fields are available;
1. Risk owner Comments (default editable)
2. Previous 6 months highlights (default not visible)
3. Management Comment (default not visible)
4. Next 6 months planned activities (default not visible)

To edit, click on the edit icon. From here you can change the Risk Review rules to be Editable, Not Visible and Read only.
When configuration is set to ‘Editable’ or ‘Read Only’, fields will be appear in Risk Review screen, My Quick Update> My Risks and the Risk tab in Project Hub.
The position will determine the order in which the comment fields will appear in the Risk Review screen.

Consequence Table
This area allows you to define a consequence reference table. The consequence reference table is meant to assist users in choosing a consequence level for risks by illustrating the description of Consequence (for if the risk were to occur) against each Risk Category defined.
STEP 1: Click ‘Consequence Table'
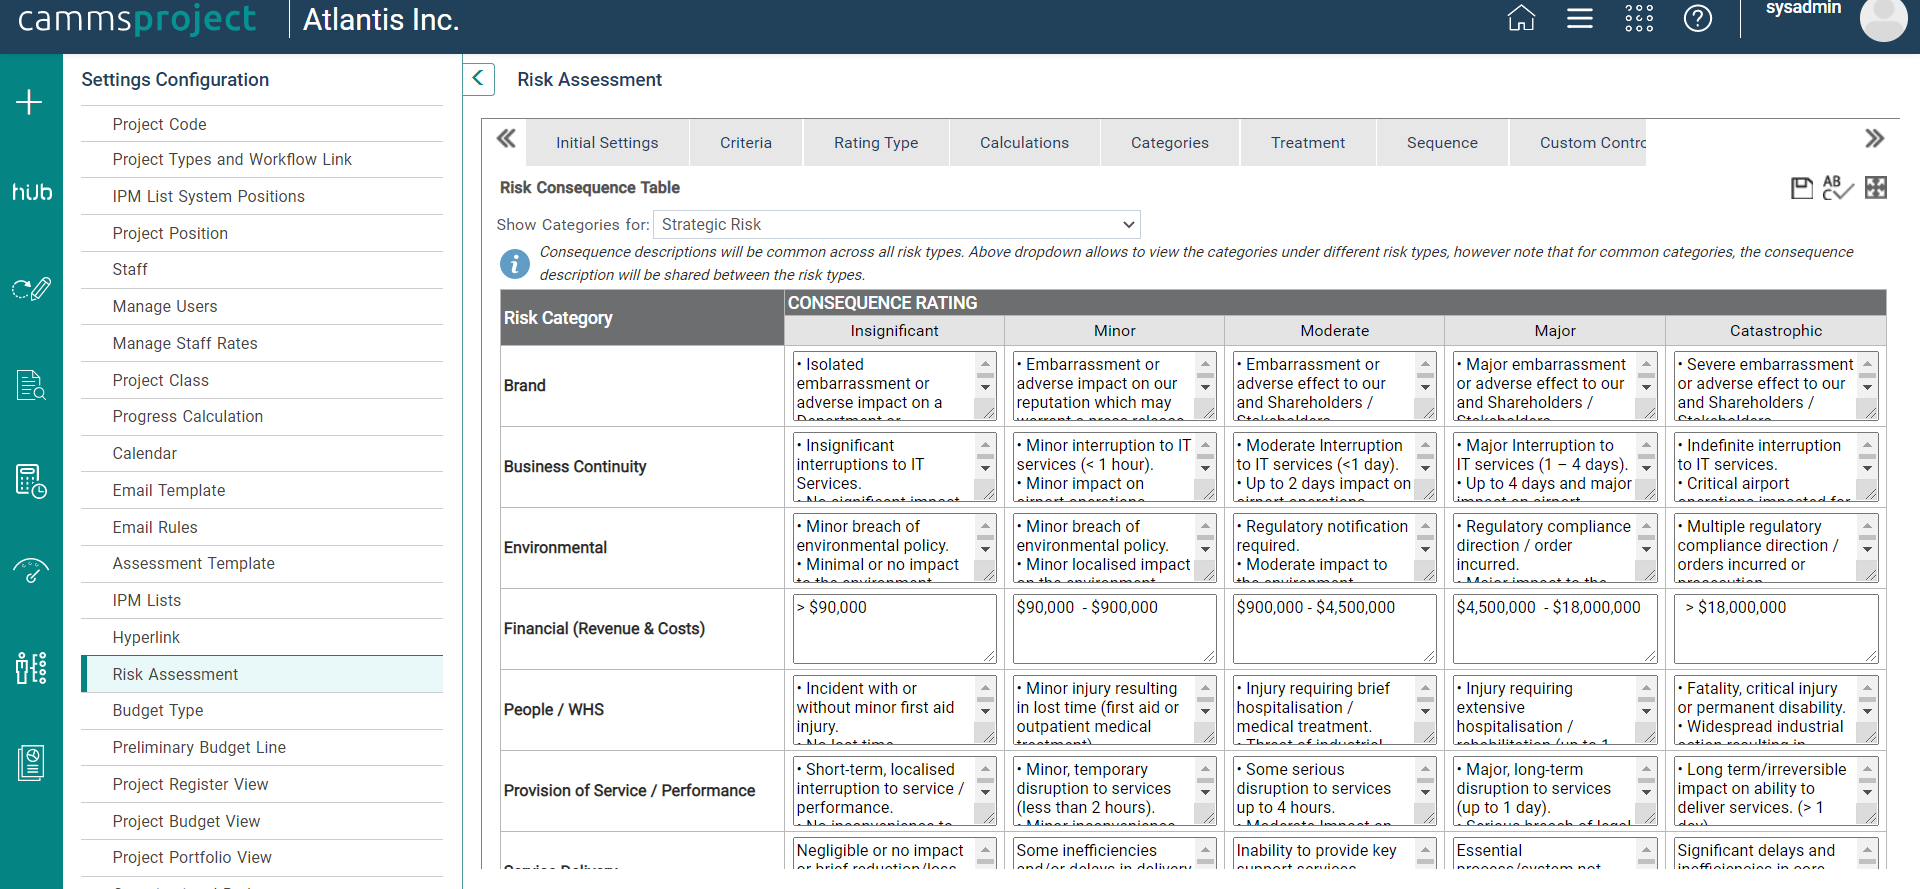
STEP 2: Select the 'Project Risk' from the ‘select risk type’ dropdown.

STEP 3:Simply click inside each cell and type in any text as needed.
Click on the ‘Maximise’ button in order to maximise the screen for data input:

STEP 4:Click the Save  icon to save the details.
This will appear in the assessment areas as follows when assessing the criteria:


Based on the settings you have enabled, one or more Impact ratings can be selected and saved from here.
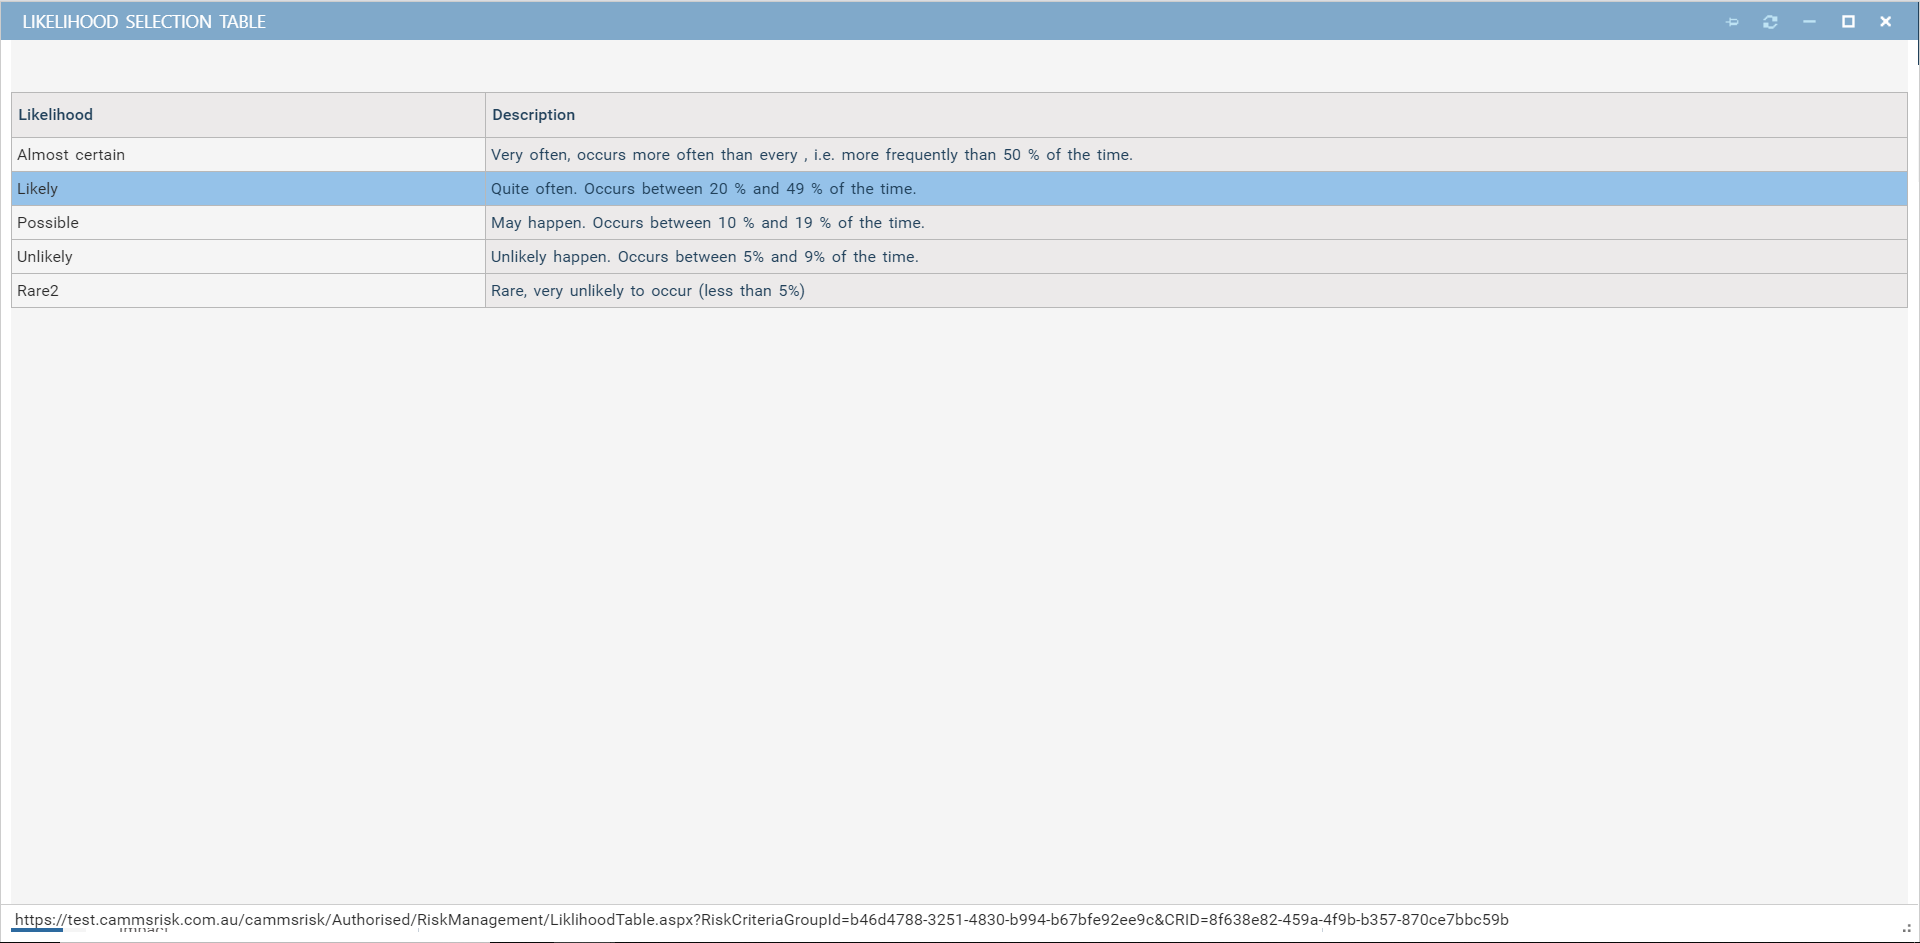
Likelihood Table
Here, you can define a likelihood reference table. Similar to the consequence reference table this is meant to assist users in choosing a likelihood level for risks by illustrating the Likelihood Rating with an extended description. This tab enables Risk Managers to define and edit this grid.
STEP 1: Click 'Likelihood Table'. Likelihood ratings defined within the Criteria area are listed on the left.

STEP 2: Click Edit and type in a description in the adjacent text boxes.
This will appear in the assessment areas as follows when assessing the criteria:
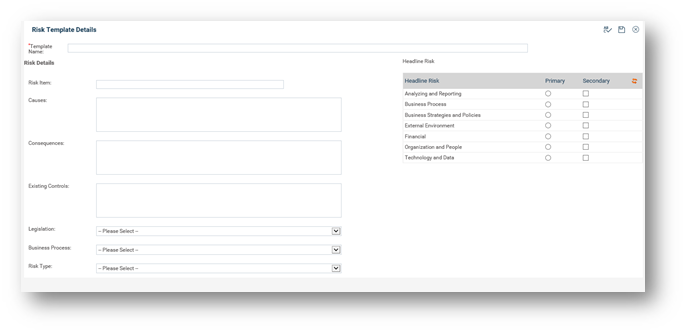
Risk Templates
This area allows you to define templates with information which can be used during the Risk setup to save time when creating a large numbers of assessments. It excludes those criteria that generate a rating and make it easier for users to add risks that may be common across the organisation.
STEP 1:Click ‘Risk Templates'.

STEP 2:Click the New  icon to create a new risk template.
STEP 3:Define a name for your template and enter all data that will be common to the risks your users will be creating.
| Note: The template is only restricted to these fields that are displayed currently. |
STEP 4: Click the Save  icon to save the details.
Within risk assessments, this appears as a button which pops up a window to display the available templates when clicked. Users can click on the desired template to make their selection which will populate their blank risk assessment with data.
You can duplicate the existing template by clicking the Duplicate  button. To delete, click on the delete
  button.
Legislation & Business Process
This area allows you to define legislations and business processes which can be linked to risks.
Within risk assessments, users will have the ability to select a Legislation and/or Business Process that the risk applies to via a dropdown list which can appear on the initial, current/revised or future risk assessment tabs depending on your organisational preference. The field however must be enabled within the ‘Field Configuration’ section – these menu items allow you to define the list items in the drop downs.
These can then be used to filter and generate reports.
STEP 1: Click 'Legislation' or 'Business Process' tab as appropriate.


STEP 2:Type in a name and description in the text boxes provided.
STEP 3:Specify the position it should appear in the relevant dropdown list in the Risk Assessment area.
STEP 4:Click the Add  button.
Note: The fields must be configured within the Field Configuration area. |
Field Configuration
This section will let you customise and configure fields within the different phases of risk assessments.
In addition to the standard fields, the following fields can be customised and activated for Risk Assessment templates:
- 10 multiline text fields
- 20 custom list fields
- 5 tick boxes
- 10 custom (single line) text fields
- 5 custom date fields
- 5 custom numeric fields
The following features are available in this section:
- Rearrange fields according to the order you prefer it to be displayed, for each risk assessment phase, risk control, and risk action.
- Specify a label name to be displayed for each field, for each risk assessment phase, risk control, and risk action.
- Specify a help text to be displayed for each field.
- Specify the visibility and if the field is mandatory for each of the risk assessment phases, risk control, and risk action.
- Specify the visibility of the field under the 'My Quick Update' page.
- Show/hide the 'Risk Review' tab across all pages for a risk type.

Rearrange the order of fields
There are two methods how this can be done:
1. Dragging and dropping row
STEP 1: Access the project risk, risk control, or risk action tab by clicking on the main tabs.
STEP 2: Within Project Risk tab, access the risk assessment phase by clicking on the assessment phase sub tab.
STEP 3: Click and hold the field from the three horizontal dots in the right corner of the row, and drag and drop the field to the new position to be displayed.
STEP 4: Click on the save button, placed at the top left corner of the window.
2. From Ordering column
This method is easy to use if the field or fields are placed right at the bottom of the list.
STEP 1: Access the project risk, risk control, or risk action tab by clicking on the main tabs.
STEP 2: Within Project Risk tab, access the risk assessment phase by clicking on the assessment phase sub tab.
STEP 3: Select the field by ticking the checkbox in the left corner below the Ordering column, and move it one up, one down, to the top, or to the bottom of the list to be displayed, using the top, up, down, bottom buttons placed at the top left corner of the window.
STEP 4: Click on the save button, placed at the top left corner of the window.

Enter a label name for a field
STEP 1: Access the project risk, risk control, or risk action tab by clicking on the main tabs.
STEP 2: Within Project Risk tab, access the risk assessment phase by clicking on the assessment phase sub tab.
STEP 3: In the row next to the field, under the 'Label Name' column, enter the label you wish the field to display. You can have different labels for the different assessment phases.
STEP 4: Click on the save button, placed at the top left corner of the window.

Add a help text to a field
STEP 1: Access the project risk, risk control, or risk action tab by clicking on the main tabs.
STEP 2: Within Project Risk tab, access the risk assessment phase by clicking on the assessment phase sub tab.
STEP 3: In the row next to the field, under the 'Help Text' column, enter the help text you wish the field to display when hovered over it. You can have different help text for the different assessment phases.
STEP 4: Click on the save button, placed at the top left corner of the window.

Making a field visible and/or mandatory
STEP 1: Access the project risk, risk control, or risk action tab by clicking on the main tabs.
STEP 2: Within the Project Risk tab, access the risk assessment phase by clicking on the assessment phase sub tab.
STEP 3: In the row next to the field, under the column you wish to show/hide and/or make it mandatory, tick on the checkbox next to the 'Visible' value to make it visible and untick to hide the field. Likewise, tick the checkbox next to the 'Mandatory' field to make the field mandatory and untick to make it optional. You can change these settings for the different assessment phases.
STEP 4: Click on the save button, placed at the top left corner of the window.

The below table lists down the default configuration of the ‘Visibility’ and ‘Mandatory’ state of all standard fields.
| Note: Based on a Client's requirement, the checkboxes will be configured accordingly. |
Risk Standard Fields | Inherent/Initial | Revised | Future | |||
Visibility | Mandatory | Visibility | Mandatory | Visibility | Mandatory | |
Risk Code | Ticked & Disabled | Ticked & Enabled | Enabled | Disabled | Enabled | Disabled |
Risk Active Status | Ticked & Disabled | Ticked & Disabled | Enabled | Disabled | Enabled | Disabled |
Risk Title | Ticked & Disabled | Ticked & Disabled | Enabled | Disabled | Enabled | Disabled |
Business Unit | Enabled | Enabled | Enabled | Disabled | Enabled | Disabled |
Responsibility Center | Enabled | Enabled | Enabled | Disabled | Enabled | Disabled |
Team | Enabled | Enabled | Enabled | Disabled | Enabled | Disabled |
Risk Owner | Ticked & Disabled | Ticked & Disabled | Enabled | Disabled | Enabled | Disabled |
Secondary Risk Owner | Enabled | Enabled | Enabled | Disabled | Enabled | Disabled |
Risk Category | Ticked & Disabled | Ticked & Disabled | Enabled | Disabled | Enabled | Disabled |
Risk Subcategories | Enabled | Enabled | Enabled | Disabled | Enabled | Disabled |
Secondary Risk Category | Enabled | Enabled | Enabled | Disabled | Enabled | Disabled |
Risk Identified | Ticked & Disabled | Enabled | Enabled | Disabled | Enabled | Disabled |
Risk Identifier | Ticked & Disabled | Enabled | Enabled | Disabled | Enabled | Disabled |
Legislation | Enabled | Enabled | Enabled | Enabled | Enabled | Enabled |
Business Process | Enabled | Enabled | Enabled | Enabled | Enabled | Enabled |
Organisation Hierarchy Links | Enabled | Enabled | Enabled | Enabled | Enabled | Enabled |
Links | Enabled | Enabled | Enabled | Enabled | Enabled | Enabled |
SWOT Type | Enabled | Enabled | Enabled | Enabled | Enabled | Enabled |
Causes | Enabled | Enabled | Enabled | Enabled | Enabled | Enabled |
Consequences | Enabled | Enabled | Enabled | Enabled | Enabled | Enabled |
Risk Assessment | Enabled | Enabled | Enabled | Enabled | Enabled | Enabled |
Risk Appetite Rating | Enabled | Enabled | Enabled | Enabled | Enabled | Enabled |
Risk Appetite Benchmark | Enabled | Enabled | Enabled | Disabled | Enabled | Disabled |
Monte Carlo Analysis | Enabled | Enabled | Enabled | Enabled | Enabled | Enabled |
Risk Treatment | Enabled | Enabled | Enabled | Enabled | Enabled | Enabled |
Controls | Enabled | Enabled | Enabled | Enabled | Enabled | Enabled |
Solutions | Enabled | Enabled | Enabled | Enabled | Enabled | Enabled |
Making a field visible in the My Quick Updates page
STEP 1: Access the project risk, risk control, or risk action tab by clicking on the main tabs.
STEP 2: Within Project Risk tab, access the risk assessment phase by clicking on the assessment phase sub tab.
STEP 3: In the row next to the field, under the 'Quick Update' column, tick/untick on the 'Visible' checkbox you wish to show/hide the field in the 'My Quick Update' page expand detailed view. You can change these settings for the different assessment phases.
STEP 4: Click on the save button, placed at the top left corner of the window.

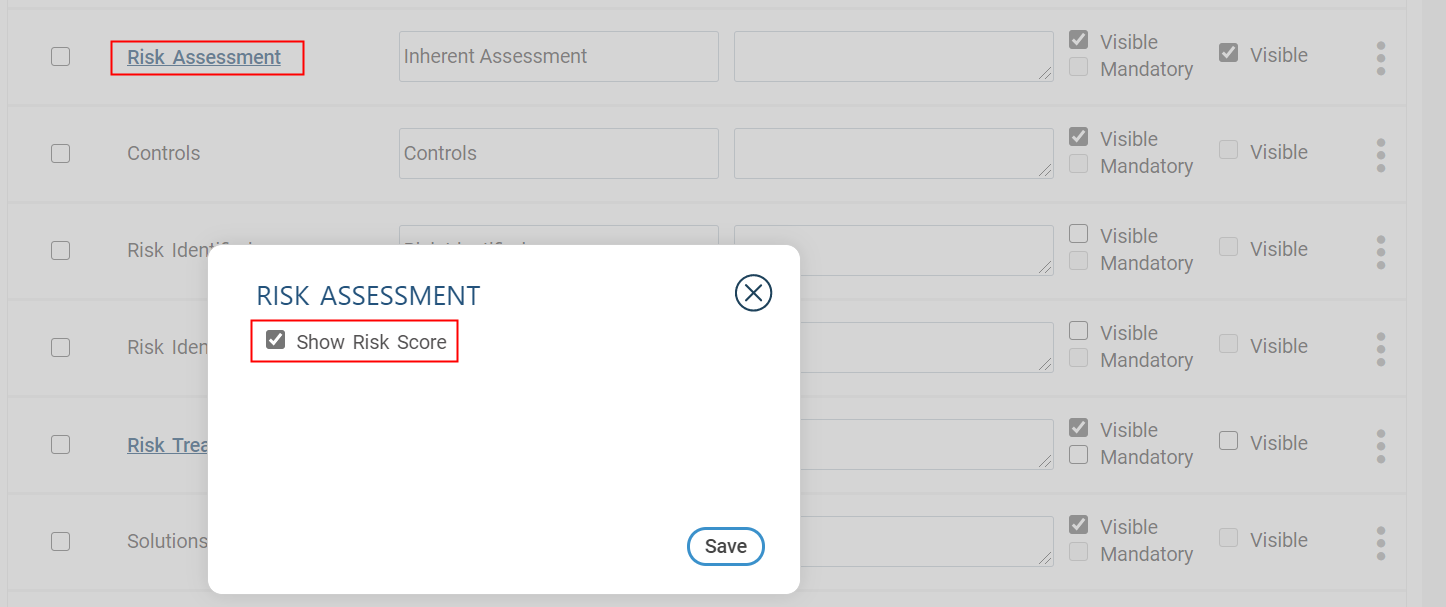
Hyperlinked fields
The following hyperlinked fields will contain extra settings that could be enabled, assessment wise:
- Risk Assessment – Show Risk Score: By ticking this setting, the Risk Score will be displayed in the Detail pages.
- Risk Appetite Rating – Show Appetite Score: By ticking this setting, the Appetite Score will be displayed in the Detail pages.
- Risk Treatment – Ability Select Multiple Risk Treatments: By ticking this setting, you will be able to select multiple treatments.
STEP 1: Click on a hyperlinked field.
STEP 2: Click on the checkbox to enable the setting.
STEP 3: Click 'Save' at the bottom of the popup window.
Risk Review tab
Click on project risk type main tab and click on the 'Risk Review' subtab to access its fields.
Hiding the Risk Review tab in the workflow
You can hide the entire Review tab along with its fields across all windows by clicking on the 'Show Tab' toggle switch.
- The OFF toggle switch will hide the Risk Review tab and its fields for configuration.
- The ON toggle switch will show the Risk Review tab and its fields as before, to perform field configurations.

- When the 'Show Tab' toggle is OFF, the ‘Next Review Date’ column in the risk register within the Risk Assessment object and the ‘Review’ tab within the risk workflow will be hidden.
- Based on the 'Show Tab' toggle status, all columns/fields related to the risk Review tab will be hidden from the following sections:
- Project Hub> Risks
- My Quick Update> My Risks
Risk Controls
Click on the Risk Controls main tab to set the ‘Mandatory’ state of all fields under Risk Controls separately, in the Control Detail page, Control Risk Detail, and Risk Grid.

The configurations in the risk controls section will behave as below:
| Setting | Function |
| Unique for Risk | Enable the field to be unique for the risk with which the control is linked to. This would mean that even though the control is commonly managed, fields marked as unique per risk will be maintained per risk. For example, if the 'Control Effectiveness Rating' was marked as 'Unique' for the risk, the field value will be maintained different within each risk as opposed to if its not marked as unique, it will be a common value across all risks with which its linked to. |
| Control Detail | Enable the field to be visible and/or mandatory in the Control Details area accessed by clicking on the control title hyperlink through the Control Register. |
| Control Risk Detail | Enable the field to be visible and/or mandatory in the Control Details area accessed by clicking on the control title hyperlink through the Risk with which its linked to. |
| Risk Grid | Enable the field to be visible and/or mandatory in the control grid table within a risk assessment. |
| Quick Update | Enable the field to be visible in the My Quick Update> Risk Controls page. |
The below additional configurations will be available under this section:
Controls: Enables the Risk control grid within the assessments.
Risk treatment: Enables the Risk treatments grid within the assessments.
Solutions: Enables the Risk actions grid within the assessments.
Monte Carlo Analysis: Enables the Monte Carlo Analysis within the assessments
For all of the above fields, below properties can be set:
Label Name: The name of the field/control
Visible: Set the visibility of the field/control in Inherent/Residual and Future assessment tabs
Mandatory: Set if the field/control is mandatory or not in Inherent/Residual and Future assessment tabs
Additional properties of the Monte Carlo Analysis and related fields can be accessed by clicking on the hyperlinked field name.
| Field | Description |
Best Case Scenario ($) | Used to capture the best case scenario of any financial impact linked with the risk. A label reference and a description can be added from this area to guide the end users on the intended input within the risk. |
Most Likely Scenario ($) | Used to capture the most likely scenario of any financial impact linked with the risk. A label reference and a description can be added from this area to guide the end users on the intended input within the risk. |
Worst Case Scenario ($) | Used to capture the worst case scenario of any financial impact linked with the risk. A label reference and a description can be added from this area to guide the end users on the intended input within the risk. |
Show Quantitative Range Assumptions | Used to show the quantitative range assumption values for the risk. This is a text field where the end user can input details on the assumptions made for entering the figures for best/most likely and worst case scenarios. A tick box configuration to allow the text fields to show within the assessment. Three text input areas under each scenario option is available and can be shown/hidden based on your preference for the assessment. |
| Likelihood (%) | Used to capture the likelihood percentage for the above best/most likely and worst case scenario predictions. This is a numeric data field which will allow the end users to enter a likelihood value between 0-100 as a percentage. |
Risk Actions
Click on the Risk Actions main tab to configure the visibility of the Risk Action grid, Risk Action details page, My Quick Update grid, and My Quick Update details page. Additionally, configure the fields as mandatory or not.
This page will have a two-tab view labelled as ‘Details’ and ‘Links’.
- Details – Configure risk action fields here.
- Links – The visibility of the ‘Links’ Tab within the Action details page can be configured by ticking the ‘Show Links’ checkbox within this tab for a risk action. This tab enables you to create a linkage between a risk action and an audit action.
Note: This checkbox will be unticked and disabled if Camms.Audit has not been activated.
Custom Lists
This section is designed to enable Risk managers to define customised dropdown lists depending on the requirements. Once these dropdown lists are defined, they can be renamed and enabled to appear on Risk Assessment screens via the ‘Field Configuration’ area.
In order to define a customised dropdown list -
STEP 1- Click the 'Custom Lists' tab
This will take you to a screen which will show a list of Custom Lists.

STEP 2 -Choose the specific Custom List which you want to customise, based on the field setup within Field Configuration.
A list will appear enabling you to add/amend the List item and Sequence. Update the information according to the way you wish to customise the list.
STEP 3 -The customised lists (selection items) are now setup.
You can amend the name of the list and enable if it should appear on Risk Assessment screens as you wish.
Example: If you have CustomListField5 enabled within the Field Configuration area, you can add in the list items under CustomListField5 within Custom Lists:
Budget Types
This area allows you to define Budget Types which can be associated with specific projects.
STEP 1: Go to Framework> Project Settings> Budget Type 
STEP 2: Click 'Add new Project Budget Type'.
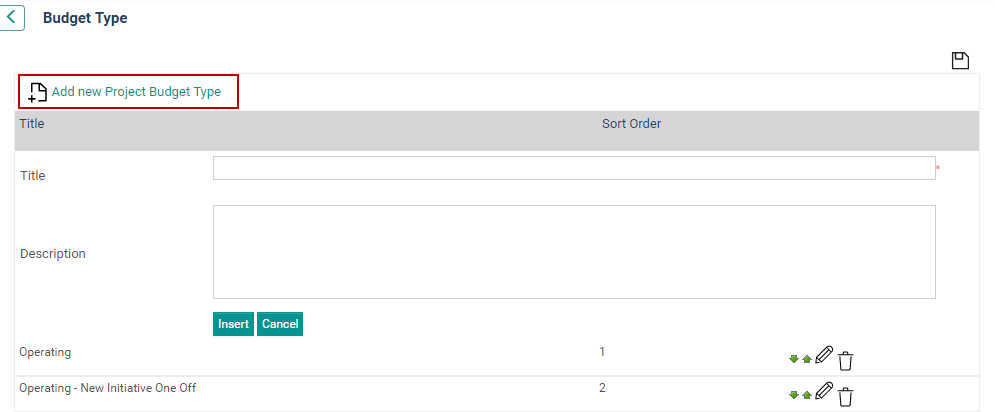
STEP 3: Enter a name and a description for the budget type and click 'Insert'.
 | Use the adjacent buttons to edit or delete a saved record. A spell check button is also available at the top right corner. |
STEP 4: Use the up/down arrows if you need to re-order the list of budget types which will be visible within the Project Expenditure tab of the Project Details object if activated.
Preliminary Budget Line
The Preliminary Budget Line setting can be used to set an initial budget estimate for a project within Project Details. There are six types of budgets, which can be defined for the preliminary budget line. They are Income, Expenditure, Ongoing expenses, Operational costs, Source of funds and Outputs. Once defined, then they can be assigned for the projects.
Follow the steps below to define the Preliminary Budget Line.
STEP 1: Go to Framework> Project Settings> Preliminary Budget Line.
STEP 2: Click 'Add new Budget Line'.

STEP 3: Enter a name, account number and choose the budget type.
STEP 4: Click 'Insert' to add the new budget line.
STEP 5: Use 'Edit' to modify existing budget line as required.

STEP 6: Use 'Delete' to remove the budget line. The system generates a dialog box prompting confirmation for deleting the selected budget line. Click 'OK' to confirm the delete.
STEP 7: Once the Preliminary Budget Line settings are finalised, click 'Save' to save the settings in the system.
 | Preliminary Budget lines defined here are available at the project level within the 'Preliminary Budget' object.
|
Project Register View
The Project Register View setting customises the columns displayed on the Project Register to suit the organisational needs. The settings defined on this page applies to the Project Register for all users. Through Project Register, you can configure the Home page grid and Search Fields independently.
Follow the steps below to set the columns and search options for the Project Register.
STEP 1: Go to Framework> Project Settings> Project Register View.
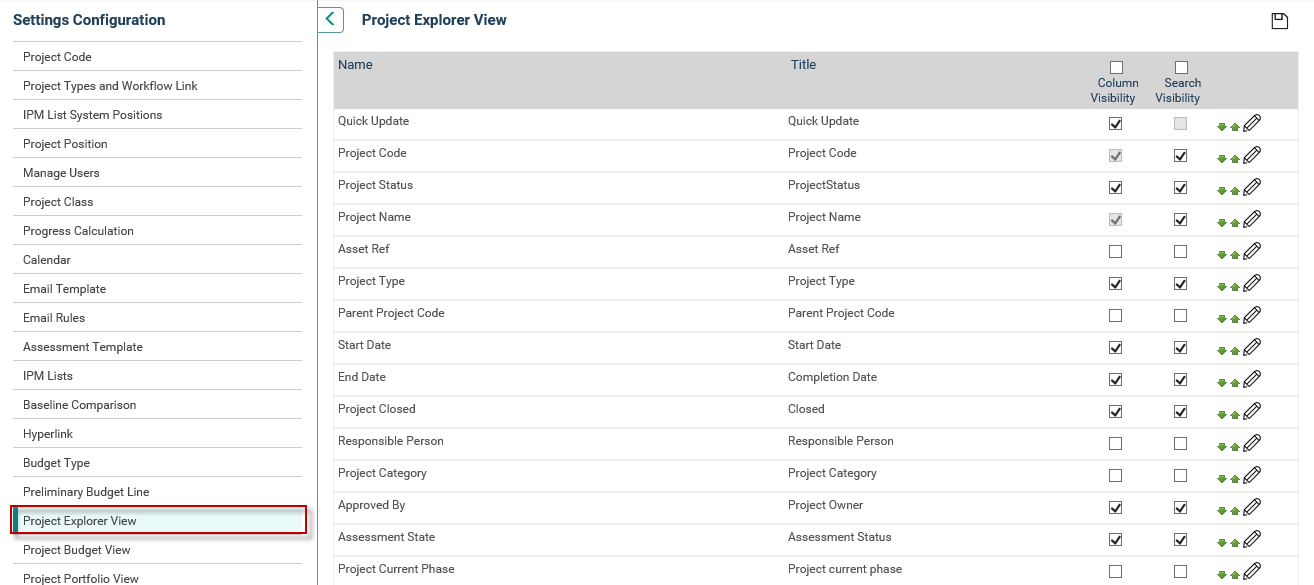
STEP 2: Tick the check boxes against each column name to suit your need (i.e. tick Column Visibility and un-tick Search Visibility if you do not wish to have search option but wish to have the Name appear in Project Register. Use the up/down arrows to move the items up or down that in turn defines the column order from left to right (i.e. the items at the top of the list are positioned from left to right.).
STEP 3: To define custom terminology for the columns, click 'Edit' icon alongside the column name and enter the desired text. Then, click 'Update' to save the change.
STEP 4: After finalising the column positioning, search box positioning and label names, click Save icon to save the settings.
 | The Project Name and Project Code values are mandatory. Modifications to the labels of these two fields can be done but the system does not allow switching off their visibility. |
Project Budget View
The Project Budget View setting provides functionality to view project budget performance within the Executive Explorer menu.
Similar to the Project Register View, the IPM Administrator can use Project Budget View to customise the columns displayed on Project Budget page.
Once configured all users can view the same columns within the Project Budget view.
Follow the steps below to configure Project Budget View.
STEP 1: Go to Framework> Project Settings> Project Budget View.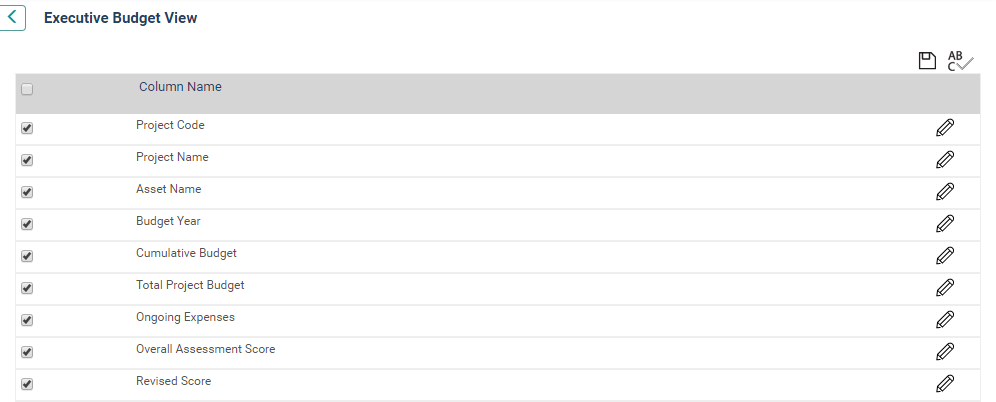
STEP 2: Tick the check boxes to enable the corresponding columns to be displayed within the Project Budget screen.
STEP 3: Click 'Edit' to edit the label of the column.
STEP 4: Change the column name according to the terminology used within the organisation.
STEP 5: Click 'Update' to save the change.
STEP 6: Once, the Project Budget View settings are finalised, click 'Save' to save the configuration.
Executive Search
This area allows you to customise the search filter options in the Overview, Portfolio Project View and Project Budget View pages to match any terminology and visibility changes you may have already carried out.
STEP 1: Go to Framework> Project Settings> Executive Search.
STEP 2: Tick the boxes to enable the corresponding fields to be displayed in search options within Executive Overview, Portfolio Project View and Project Budget.
STEP 3: Click the Save icon.
STEP 4: If you want the fields to display terminology that is more relevant to your organisation click the edit icon and enter your desired text. Click 'Update' to save the change.
Project Portfolio View (Portfolio Project)
You can configure the 'Portfolio Grid' and the 'Search Fields' independently following the below given steps (applicable only for IPM Premium). Through this settings configuration, the IPM administrator will be able to customise the columns visibility, Search visibility and Popup visibility of the columns displayed in the Portfolio Project View page.
Follow the steps below to set up the portfolio project view.
STEP1: Go to Framework> Project Settings > Project Portfolio View (Portfolio Project).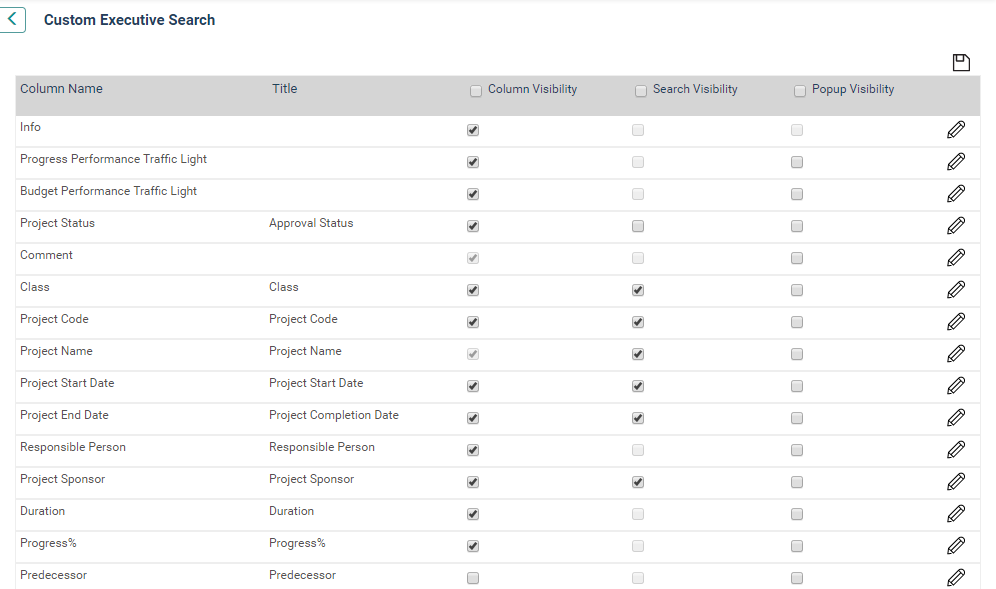
STEP 2: Tick the boxes on the right accordingly to enable the corresponding columns with the option to be displayed on Executive Explorer > Project Portfolio View area, for Column visibility, Search visibility and Popup visibility.
When the Popup visibility is ticked, the information will appear within the popup.
STEP 3: To customise column names, click 'Edit' alongside the column name item. STEP 4: Change the label text to suit the organisational terminology.
STEP 5: Click 'Update' to update the column name label.
STEP 6: Once the Portfolio Project View settings are finalised, click 'Save'.
Organisational Budget
This area allows you to define an organisational budget for a particular reporting year. This yearly figure should ideally be a value which covers all expenditure across the entire organisation for the specified financial year.
STEP 1: Click 'Add New Organisation Budget'. 
STEP 2: Select a reporting year from the dropdown list available and specify the budget amount you want to allocate in dollars.
STEP 3: Click 'Insert'. You can also use the edit/delete icons to modify or remove an existing budget as required.
 | When activated you will also see a second tab titled Financial Target within this area which allows you to define target values for income and expenditure within a financial year. This can then be used for reporting purposes. Please contact CAMMS Support for more details on using this feature. |
Asset Configuration
The Asset Configuration area allows configuring an asset hierarchy and the relevant data entry fields which are displayed to the users at the interface level of the project workflow.
STEP 1: Go to Project Settings > Asset Configuration.

Adding an Asset Hierarchy
STEP 1: Click 'Add New Asset Hierarchy Level' to add a new asset hierarchy level.

STEP 2: Specify a name in the Hierarchy Name field.
STEP 3: Click 'Save' to add the level to the hierarchy.
The system pops up a screen message giving instructions on how to configure the newly created asset level.

STEP 4: Now you can set up the asset level field configuration as follows:
Field | Description/Instructions | Mandatory/Optional |
Apply this field | Enables this Asset level within the Asset Setup | Optional |
Display in project | Makes this field visible at the project level | Optional |
Title Name | Enter a custom label to be displayed when users browse assets at the project level | Optional |
 | Options for some fields are fixed and cannot be modified (e.g. Asset Name is always enabled within Asset Setup and visible within projects) |
STEP 5: Click 'SAVE' to commit your changes. Repeat this as many times as required to build your tree hierarchy.
STEP 6: Click 'DELETE' to remove an existing hierarchy level. Remember that asset hierarchy levels can only be deleted if they do not have any child assets under them.
Asset Setup
The Asset Setup area allows you to define assets as per the hierarchy levels you defined in Asset Configuration.
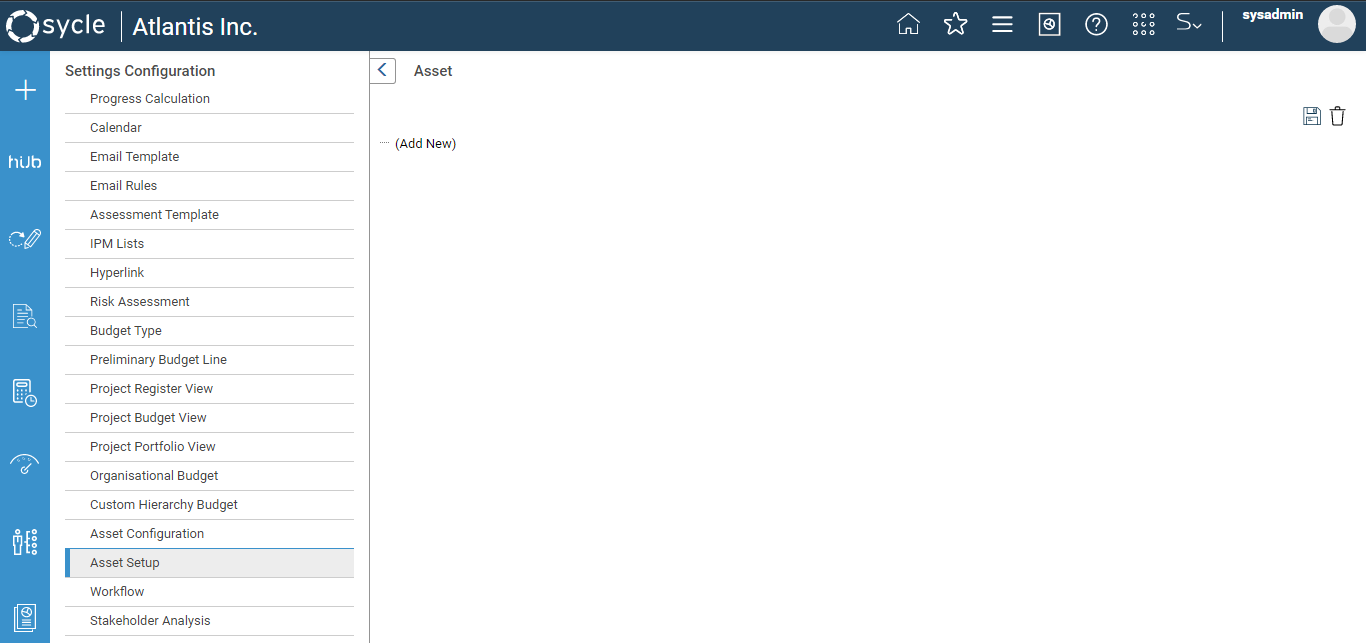
STEP 1: Go to Project Settings > Asset Setup.
STEP 2: Click 'Add New', specify a name for the Asset and enter data as per the fields displayed. Remember these fields will depend on your configuration of them in the Asset Configuration area.

STEP 3: Click the 'Save' icon to add the first asset level.
STEP 4: Click the 'Add New Asset Budget' link if you want to specify a budget for a given year. This will enable you to select a reporting period and associate a budget amount in dollars for the current asset.

STEP 5: Click the 'Insert' button to save the asset budget details.
STEP 6: Once you have created a first level asset, you can proceed to create and enter data for any child assets. Click the '+' sign on the left side of the first level asset name to expand it as shown.
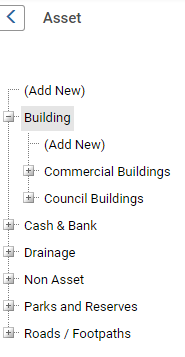
STEP 7: Click the relevant 'Add New' links to continue adding parent and/or child assets as per the hierarchy you configured in Asset Configuration.
| Total child asset budgets must be less than or equal to the parent asset budget. Once the asset is assigned to a project, the Responsible Officer who is at the highest asset hierarchy level will be assigned as the asset owner in project 'Board and Team'. Other Responsible Officers at lower hierarchy levels are added as 'Project Sponsors' in 'Project Board and Team' |

Workflow
Similar to the Project Workflows screen in Framework > Project Workflows, this area allows users to create new workflows or edit existing ones.
Please refer the Project Settings – Project Workflows article for more information.
Stakeholder Analysis
Stakeholder analysis is a process of analysing the attitudes of stakeholders and can be done once or on a regular basis to track changes in stakeholder attitudes over time. It can be configured using dropdown lists and text boxes as outlined below.
STEP 1: Go to 'Project Settings' > 'Stakeholder Analysis'.

Drop Down
Depending on the type of the Stakeholder Analysis required, you can customise the drop down fields available within stakeholder analysis object.
You can add a new dropdown list to the object by clicking on the "Add New Dropdown" icon.
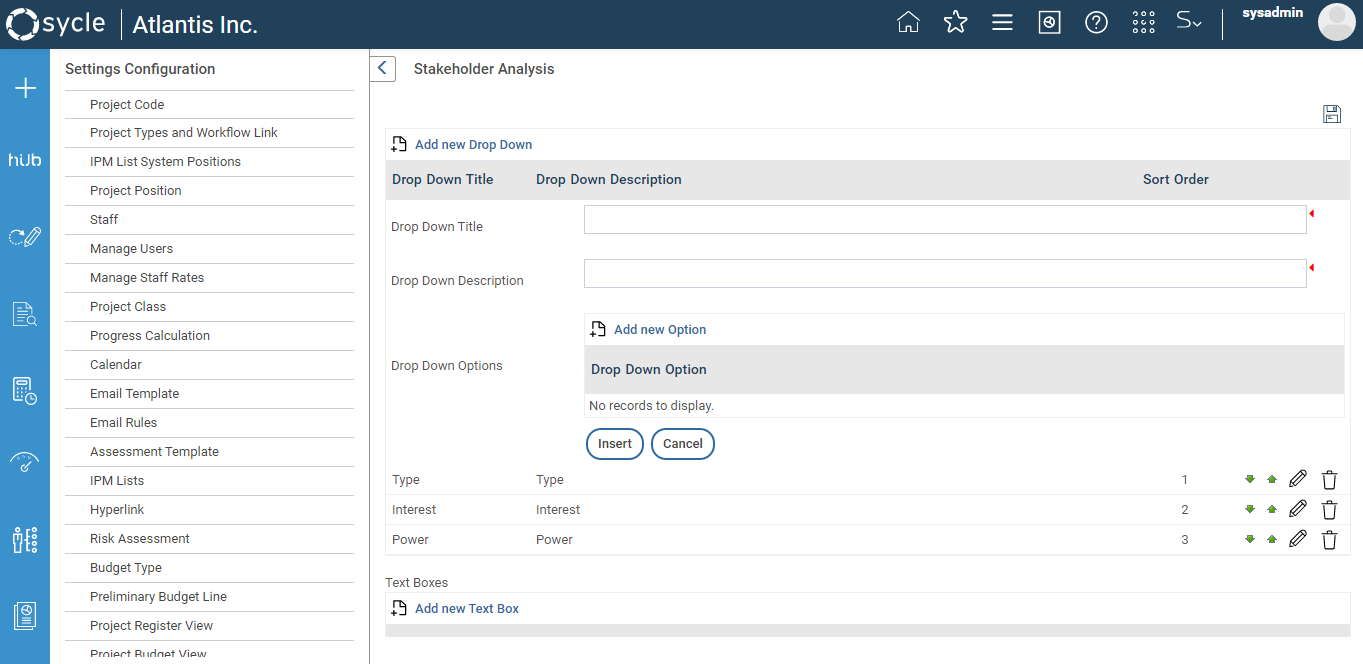
Once you click on it, the following fields will be shown;
Field Name | Description/Instructions | Mandatory / Optional |
Dropdown Title | Title of the dropdown | Mandatory |
Dropdown Description | A brief description of the dropdown field | Mandatory |
Sort Order | Sort index is automatically assigned by the system | N/A |
Click 'Add new Option' to add options to the drop down. Enter the option name in the text box and click on the Insert button to add it as a option.
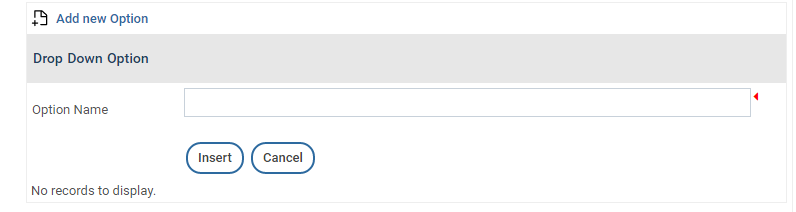
You can edit an existing option in a dropdown list by clicking on the Edit icon adjacent to the dropdown list, and then by clicking on the Edit icon adjacent to the relevant option.
You can delete an existing option in a dropdown list by clicking on the Delete icon adjacent to the dropdown list, and then by clicking on the Delete icon adjacent to the relevant option.
 You can edit an existing dropdown list by clicking on the Edit icon adjacent to it, and you can delete an existing dropdown list by clicking on the Delete icon adjacent to it.
You can change the order of the dropdown lists by using the Arrow icons.
Text Box
Depending on the type of the Stakeholder Analysis required, you can customise the text fields available within stakeholder analysis object.
You can create new text boxes by clicking on the "Add New Text Box" icon. The following fields will be displayed once you click on it;
- Text box Title : Enter a title for the text box
- Text box description : Enter a description for the text box.
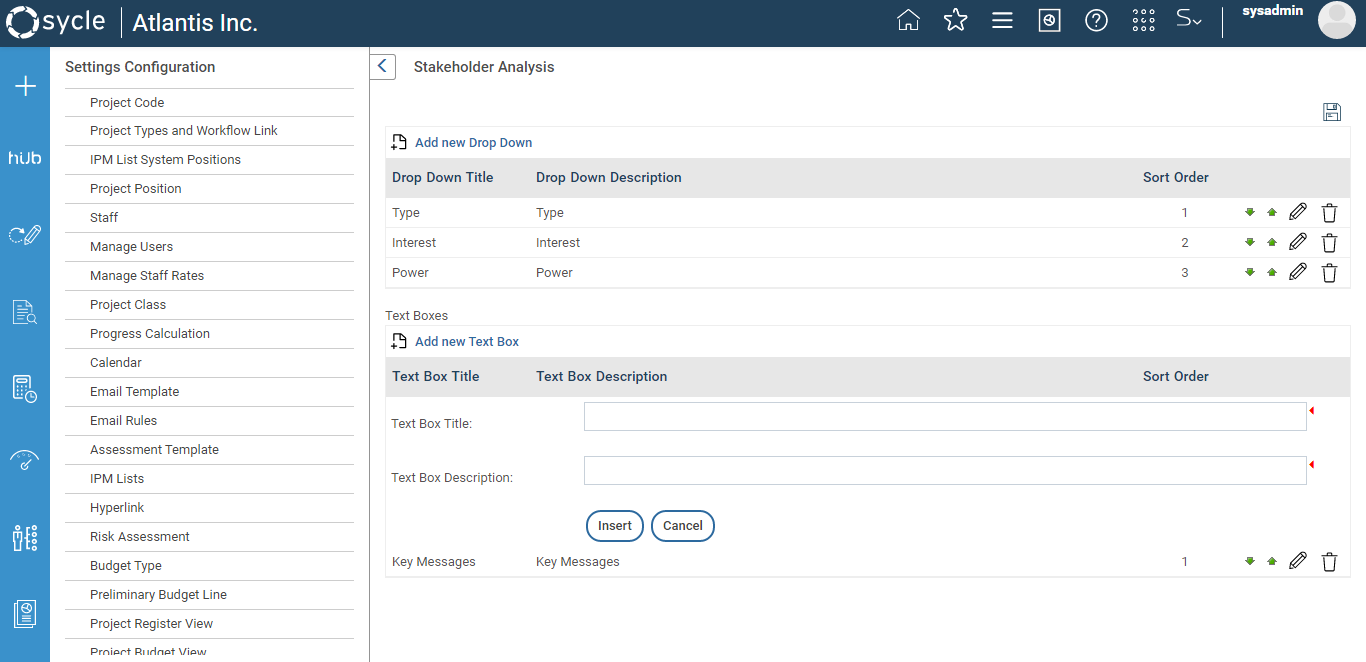
You can edit an existing text box by clicking on the Edit icon adjacent to it, and you can delete an existing text box by clicking on the Delete icon adjacent to it.
System Settings
Please refer the Project Settings – System Settings article for more information.
Discussion Group
Administrators can view, edit and delete administrative groups for the Discussion Forum within this section.
Existing groups in which you are a member of will be listed under ‘Group Name’ section. You can edit or delete existing groups by clicking on the edit/delete buttons.
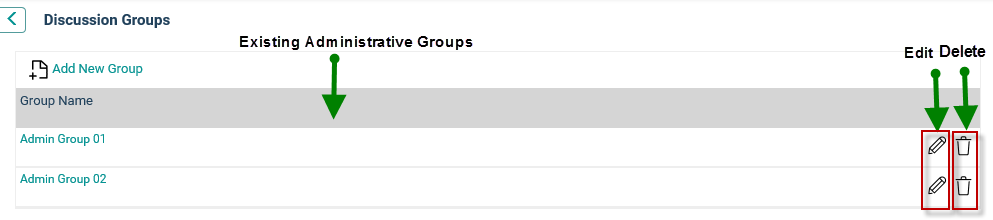
In order to create a new Administrative Group, click on the ‘Add New Group’ icon.

The following fields will appear:

Group Name: Enter a name for the administrative group. This field is mandatory.
Filter by Organisation Link Dropdown: Filter the list of users as per their Organisational Links. Default is set to ‘Show All’.
All active users within the organisation who have a staff member linked to them will be displayed. You can tick the ‘Select All’ check-box to select all displayed members.
Once relevant members are added, they will be displayed in the ‘Member Name’ area. You can delete members by clicking on ‘Delete’ button in front of their names.

· Click ‘Insert’ to add the new group.
Lessons Learned
The Lessons Learned page will allow the administrator to configure the fields that will be displayed in the Lessons Learned object and the Lessons Learned Register.
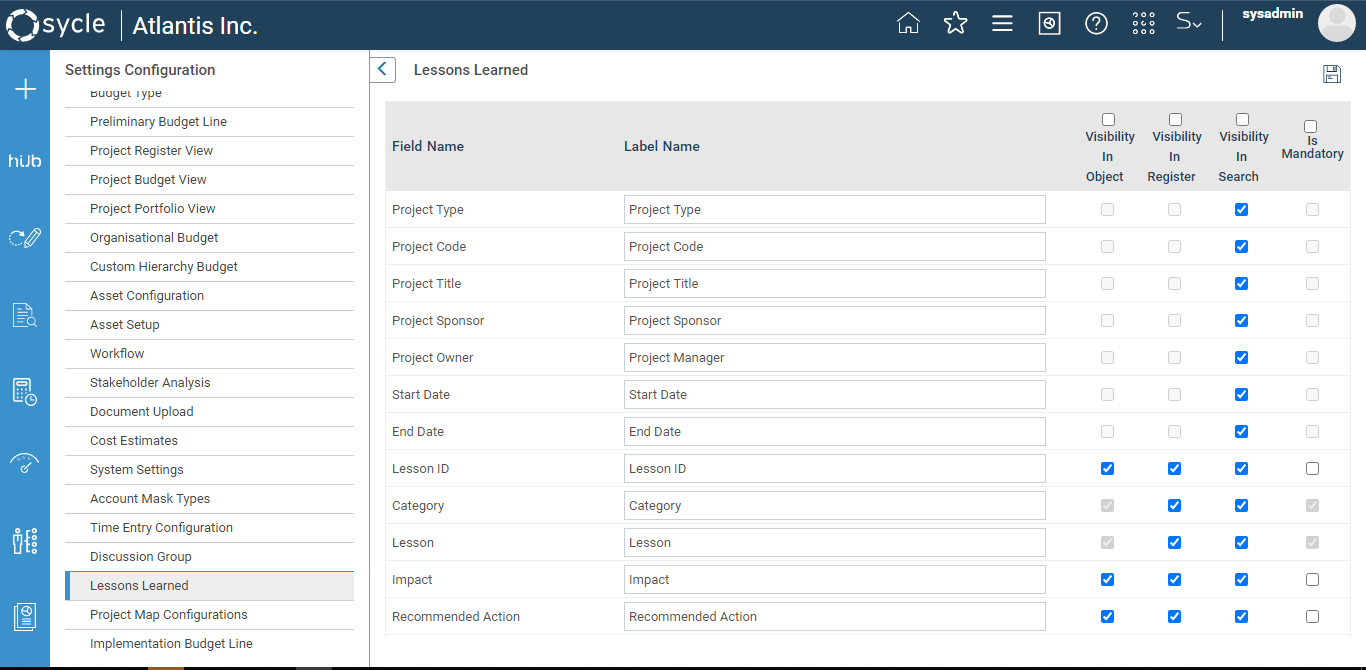
If the "Visibility in Object" tick box is selected against a field, it will be visible in the Lessons Learned object.
The "Is Mandatory" tick box will determine if the relevant field is compulsory or not. i.e.; if the "Is Mandatory" tick box is selected against a certain field, it will be considered as a compulsory field.
If the "Visibility in Register" tick box is selected against a field, it will be visible as a column in the Lessons Learned Register as shown below:

The fields that will be appearing in the Filters area can be configured via the "Visibility in Search" tick box. If the "Visibility in Search" tick box is selected for a certain field, it will be displayed as a filter in the Lessons Learned Register.

Time Entry Configuration
 The Time Entry Configuration area will allow the administrator to configure the Time Entry module. This area consists of 4 sub-sections;
- General Settings
- Non-Projects
- Time and Cost Utilization
- Time Entry
You can navigate to any of the areas mentioned above, via the Configuration Type dropdown list highlighted below;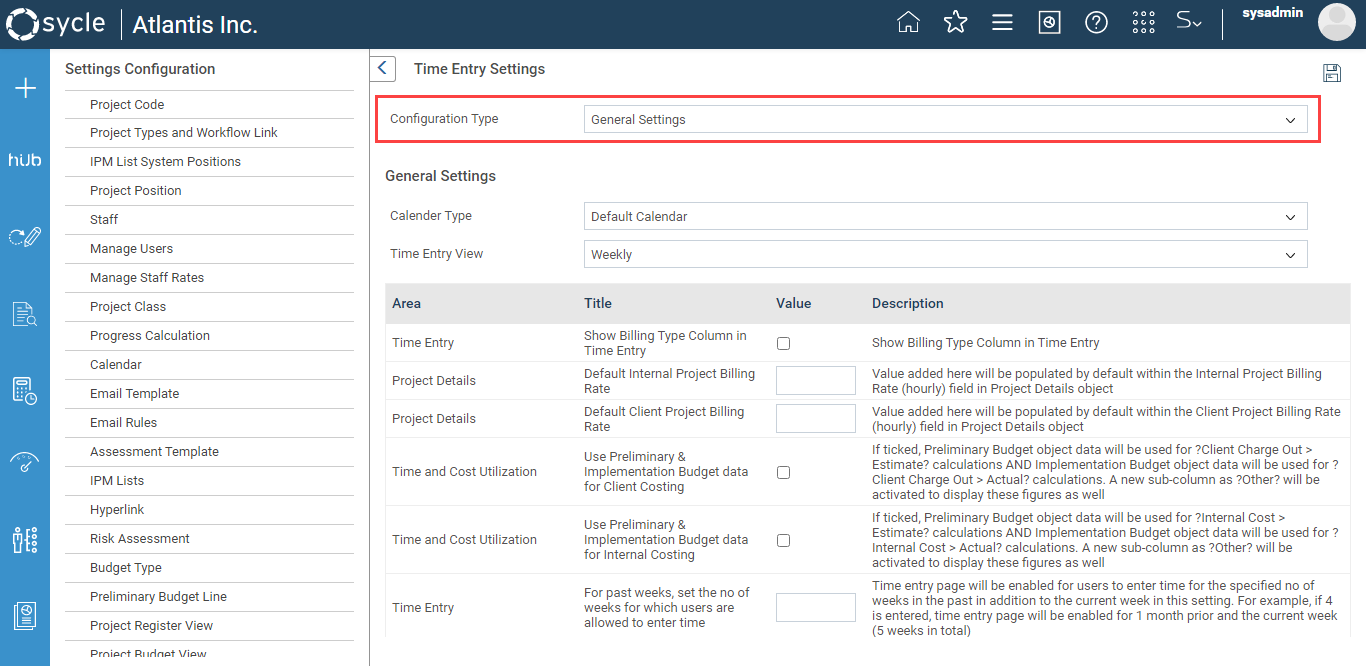
 | The Time Entry Configuration page will only be visible if you have the Time Entry module activated. |
General Settings
The General Settings area consists of a number of settings required to configure the Time Entry Module. They are mentioned below;
| Field | Description |
| Calendar Type | This option will allow you to select the calendar to be used in the Time Entry module |
| Time Entry View | This option will allow you to customize the view of the Time Entry page. i.e.; Whether it should show a weekly view or a monthly view. |
| Show Billing Type Column in Time Entry | Selecting this tick box will display the Billing Type column in Time Entry |
| Default Internal Project Billing Rate | The value entered here will be auto-populated by default within the Internal Project Billing Rate (hourly) field in Project Details object |
| Default Client Project Billing Rate | The value entered here will be auto-populated by default within the Client Project Billing Rate (hourly) field in Project Details object |
| Use Preliminary & Implementation Budget data for Client Costing | If ticked, Preliminary Budget object data will be used for 'Client Charge Out > Estimate' calculations AND Implementation Budget object data will be used for 'Client Charge Out > Actual' calculations. A new sub-column as 'Other' will be activated to display these figures as well. |
| Use Preliminary & Implementation Budget data for Internal Costing | If ticked, Preliminary Budget object data will be used for 'Internal Cost > Estimate' calculations AND Implementation Budget object data will be used for 'Internal Cost > Actual' calculations. A new sub-column as ?Other? will be activated to display these figures as well |
| For past weeks, set the no of weeks for which users are allowed to enter time | Time entry page will be enabled for users to enter time for the specified no of weeks in the past in addition to the current week in this setting. For example, if 4 is entered, time entry page will be enabled for 1 month prior and the current week (5 weeks in total) |
| For future weeks, set the no of weeks for which users are allowed to enter time | Time entry page will be enabled for users to enter time for the specified no of weeks in the future in addition to the current week in this setting. For example, if 4 is entered, time entry page will be enabled for the current week and 1 month forward (5 weeks in total) |
Non-Projects
This area allows administrators to categorize any project as a ‘Non-project’. Non projects can be defined as responsibilities which are not essentially real life projects, but are created in Camms.Project as projects as they are needed for time entry purposes.
You can define the method to categorize projects as non-projects via the Non-Project Classification Method field.
1. Categorising projects belonging to certain project types as non-projects
If all projects belonging to a certain type should be considered as non-projects, then the administrator can select the "Project Type Based" radio button.
Once you select it, a dropdown which shows all available project types will be shown. Select the tick box next to the project type you wish to categorize as a non-project.

2. Categorising individual projects as non-projects
If certain projects should be considered as non-projects, then the administrator should select the "Project Based" radio button.

Then drag and drop the relevant project to the Non-Projects area on the right side.
You can remove a non-project by dragging and dropping it outside of the Non-Projects area.
Time and Cost Utilization
This area will allow administrators to customize which tabs, and columns are visible in the Time and Cost Utilization page in the Time Entry module and customize their display names.

Time Entry
This area will allow administrators to customize which columns are visible in the Time Entry page of the Time Entry module, and also customize their display name.