There are several approaches that can be taken to managing project activities including agile, interactive, incremental, and phased approaches. Such phases can differ from organisation to organisation and from project to project. This area can be used to define customised workflows so that different project types can accommodate its own type of project management workflow.
Custom workflows created here work similarly to templates. Each workflow consists of a series of phases and each phase in turn, consists of a group of objects which are the activities involved in managing a project.
- Create a new workflow
- Create phases and objects for your workflow
- Configure the workflow objects as per requirements
- Designate and configure Sign Off Points
- Designate and configure Email Alert Points
This is applied to the 'Default Project Type' which is provided with the standard configuration. If you apply this to a new project, you will be able to create and observe these phases via the tabs at the top as follows:

 | If a workflow has been applied to any existing projects, the system will allow you to add new objects as well as remove existing objects. However, removing objects will result in any data that was previously entered within that object for a project not being visible unless you add the object at a later date. A warning message will be displayed if you try to remove such object:
|

Create a New Workflow
There are two methods for creating a new workflow. The first is to start with a blank template and build your workflow from the ground up or make a copy of an existing workflow and make modifications as required.
STEP 1: Click Framework > Project Workflows to set up your organisation's project framework workflow.
STEP 2: Click 'Add New Workflow' link and enter the workflow name.
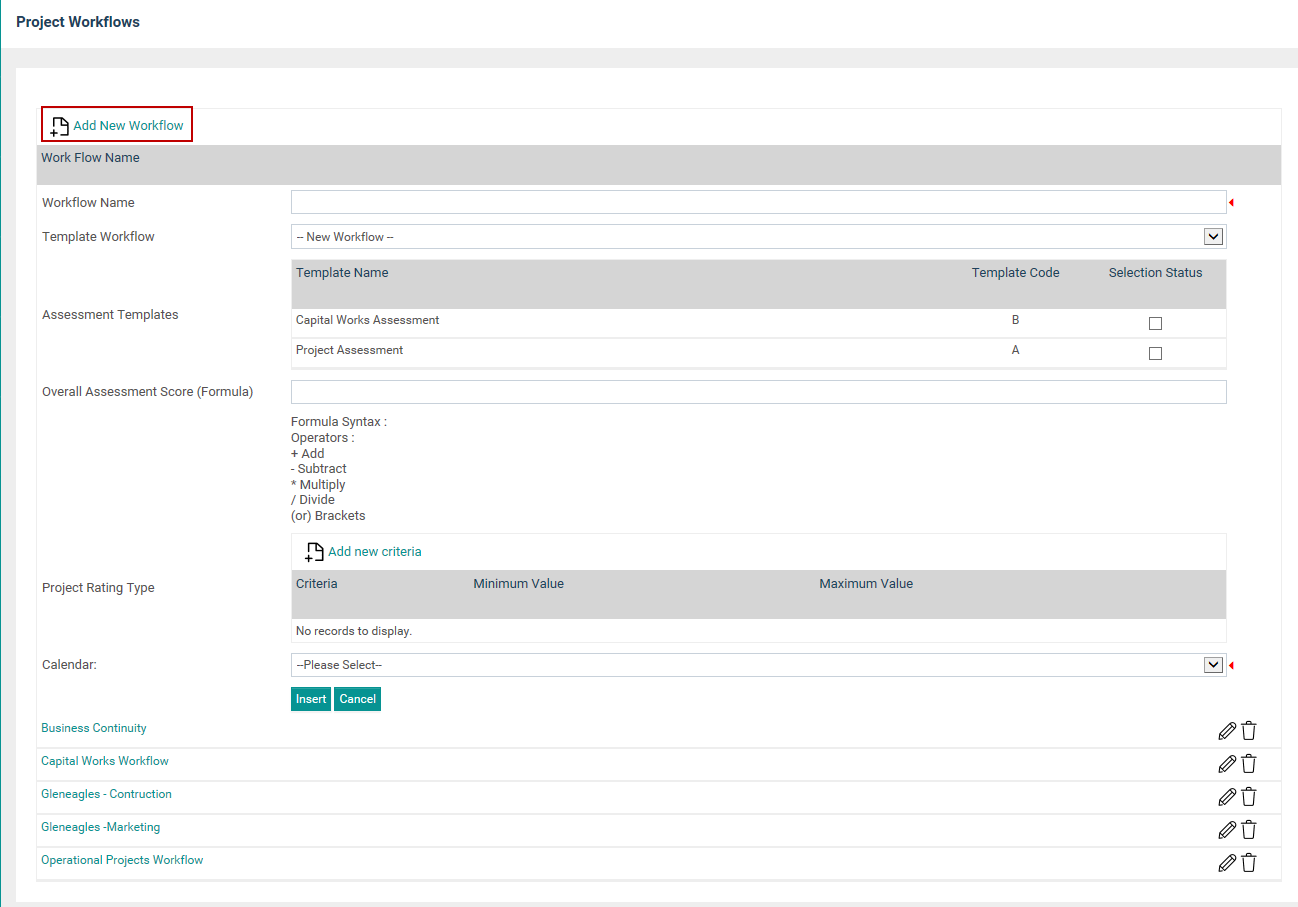
If you want to create a workflow by duplicating an existing workflow, select an existing one from the 'Template Workflow' dropdown. duplicate.

STEP 3: To associate an assessment template with the workflow, select an assessment template from the list. Workflows that have been already created will be displayed for selection.
You must assign an assessment template in order to carry out an Assessment via the Assessment Model object. Only one assessment template can be assigned for a single workflow.

STEP 4: Add overall assessment score and project rating type. You can 'Add New Criteria' for rating type as well.

STEP 5: Associate a customised calendar using the calendar dropdown. Multiple calendar versions can be created through the Framework> Project Settings> Calendar area by the IPM administrator. The schedule of the project would be determined by the selected calendar.
STEP 6: Click 'Insert' to save your entry.
Once the workflow has been created, click the hyperlinked title to start adding Phases and Objects.
Conditional Workflow
You can define visible/enable conditions using different criteria to drive conditional workflows.
IPM Administrator can setup formulas to manage the visibility and enabling of the objects and phases.
Select a phase or an Object and Click Object Properties in the configuration area.
 Using the field code, administrator can configure the visibility condition for the object within the text box provided in the formula screen.
Similar to visibility condition, 'Enable Condition' also can be configured by clicking on the 'Enable Condition’ text-box.
Standard fields are included in the Available Criteria gird. Each field displays the current label and the field code.
 New criteria can be added using the ‘Add New Criteria’ button. Once the 'Add New Criteria. button is clicked, a new pop-up will be displayed listing the standard and custom fields which are activated in the Project Details object and Custom Objects and to select completed objects.
Type: Select whether the condition should be a Value or a Completion.
Object: Select the relevant Object.
Field: Select the relevant field.
Click on the ‘Insert’ button to add the selected field to the Available Criteria grid.
The visibility condition can be entered within the ‘Condition’ textbox, using the available criteria and syntax.
Example: Cashflow Forecast Object to be made visible when the expenditure exceeds 30,000.

You may refer to the ‘Guidance Notes’ below the ‘Condition’ text box if you want any assistance in setting up conditions using the fields of different data types (e.g. text, numeric, single select dropdowns, multi select fields).
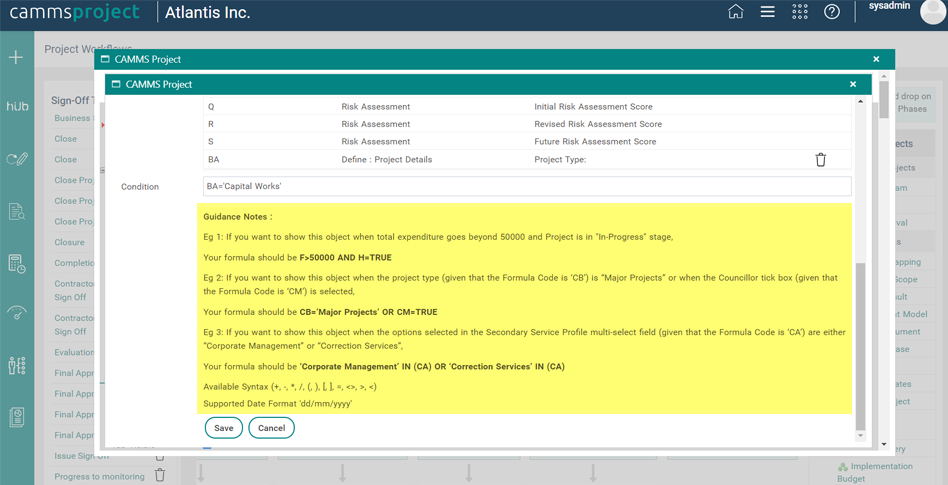
Once the visibility condition is setup, the system will show the respective phase or object when the condition is met.
When enable condition is configured, until the condition is fulfilled, the respective phase or object will be non-editable for all users (Including the IPM administrators).
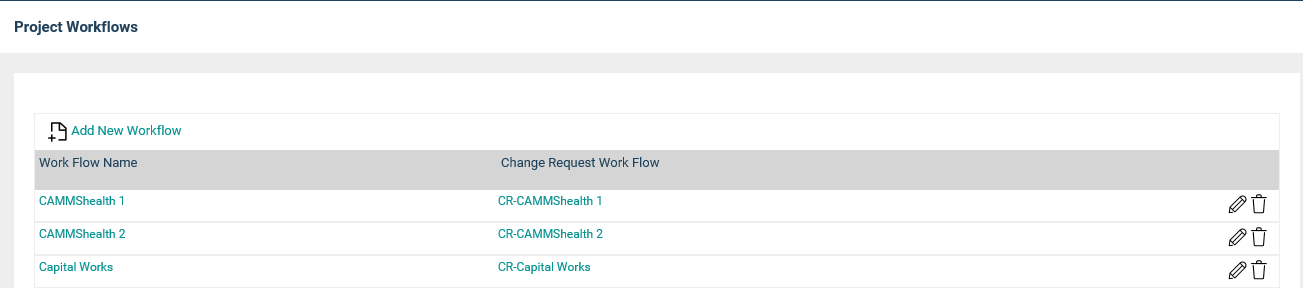
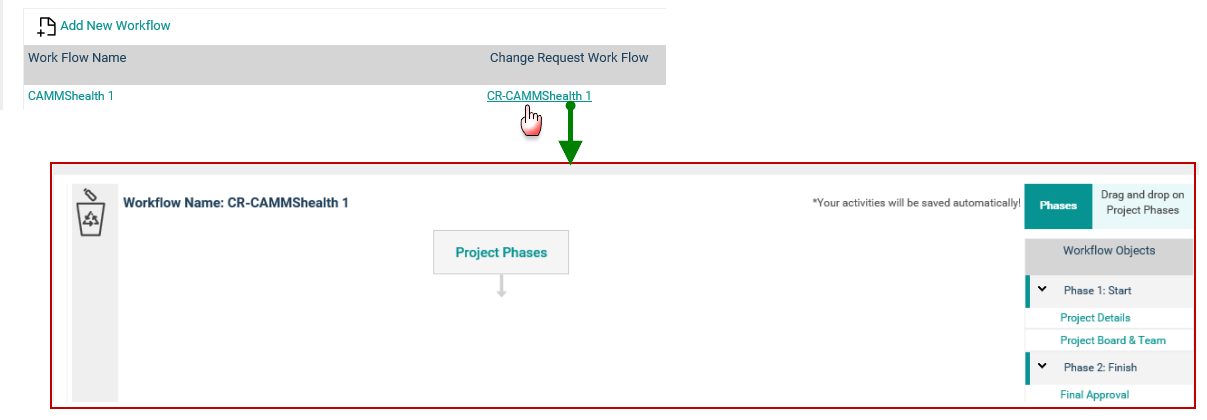
Change Request Workflow
For each project workflow, a customised change request workflow can be created.
When the administrator navigates to a change request workflow, phases and objects will be displayed on the right side of the workflow.
Only following objects can be included in a workflow.
- Project Detail Object
- Preliminary Budget Object
- Project Board and Team object
- Task Planning Object
When above mentioned objects are not included in the project workflow, they will not be displayed in the object area.
Creating Phases and Objects
The left side pane of the project workflow page displays the sign off templates and email templates. The list on the right side displays all available workflow objects. There are two types of objects: Compulsory objects and Optional objects.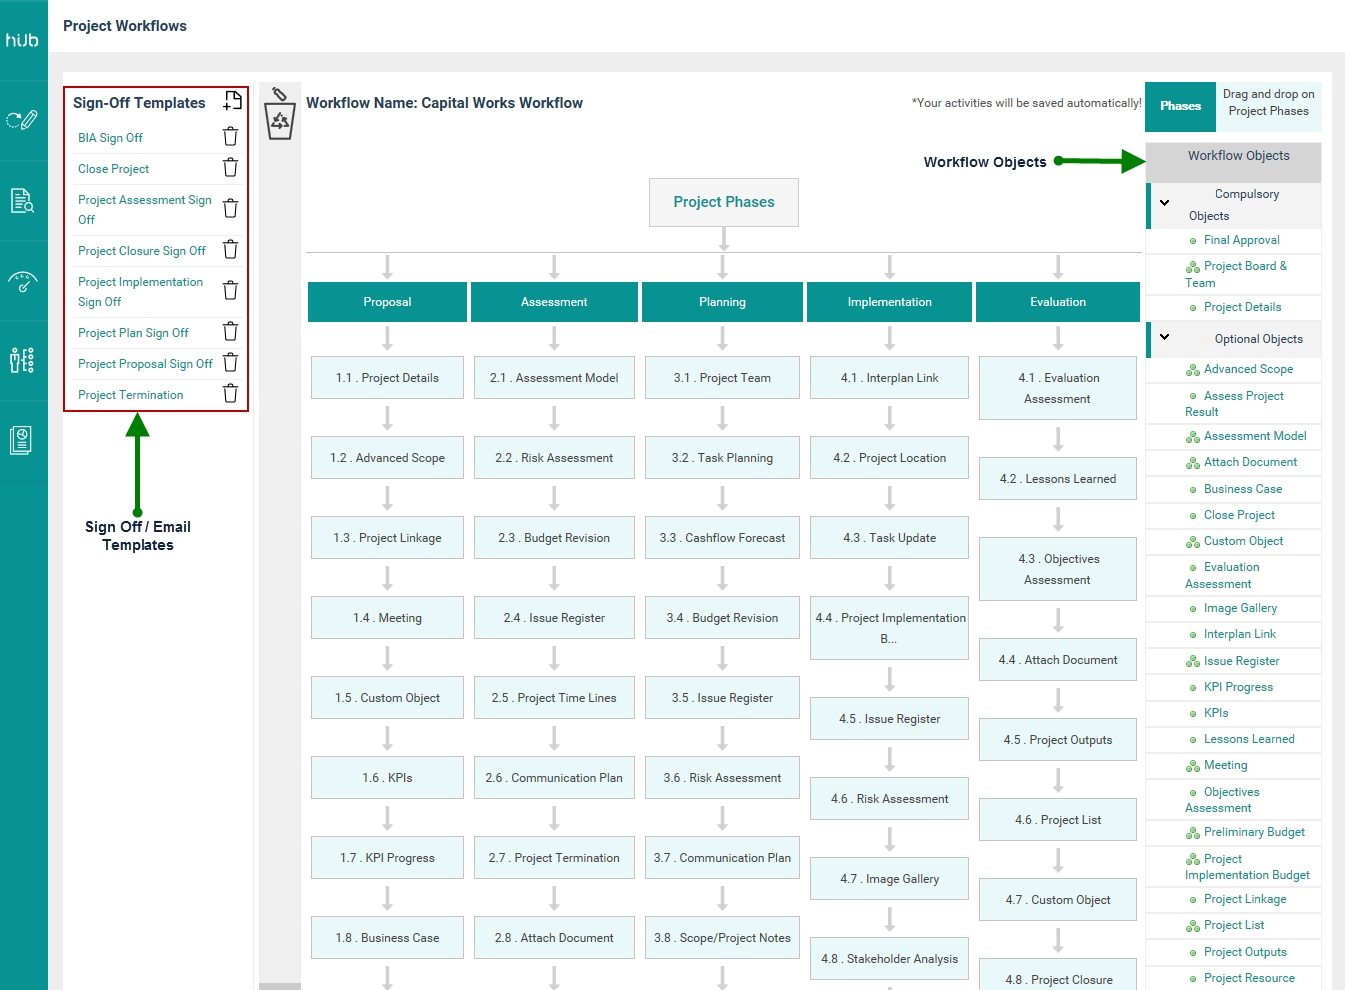
STEP 1: In order to create a new Phase, simply drag a phase from the 'Phases' box and drop onto the 'Project Phases' box in the middle of the screen. Wait for the blue dotted line to appear around 'Project Phases' box. When it appears, release the 'Phases' box to create a new Phase.
 | You cannot add an object without creating a project phase. A warning message will appear if you attempt to add an object without a phase. You cannot delete the initial phase and the project details object. Warning message will appear when trying to delete the initial phase. |
STEP 2: Enter a title for the phase according to your organisation's requirements and click 'Save'. 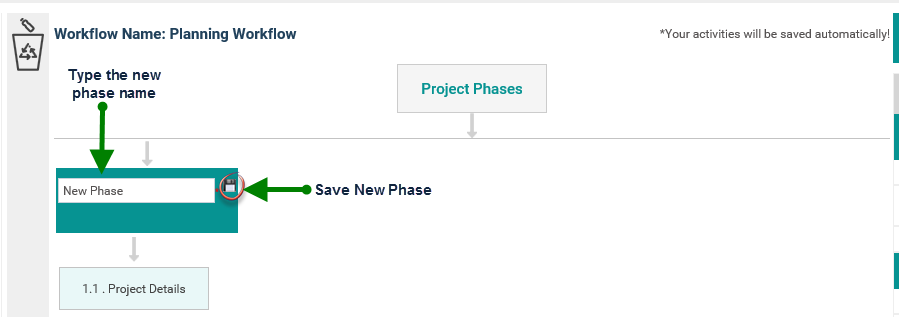
Once the first phase has been added, it will also automatically add the 'Project Details' object as the first object of the workflow.
| You cannot delete the initial phase and the project details object. Warning messages will appear if you try to delete these items. |

Similarly, you can include multiple phases and objects by dragging and dropping them into the relevant locations. Ordering of the phases and objects will depend on your organisational preference.
 | You can change the position of an object at any time by dragging and dropping the object to the required location in the workflow. |
Objects under a particular phase get numbered automatically according to the sequence in which they are placed within the phase.
 | Business Rules
|
STEP 3: To modify a phase title, click on the particular phase and enter a new title. You have the option of altering the terminology and visibility settings of fields within each Object screen as shown below. Remember, the changes that you make will be reflected within the phases and can be seen by all the users.
STEP 4: In order to edit, click on the object. A pop-up window will appear to edit the terminology.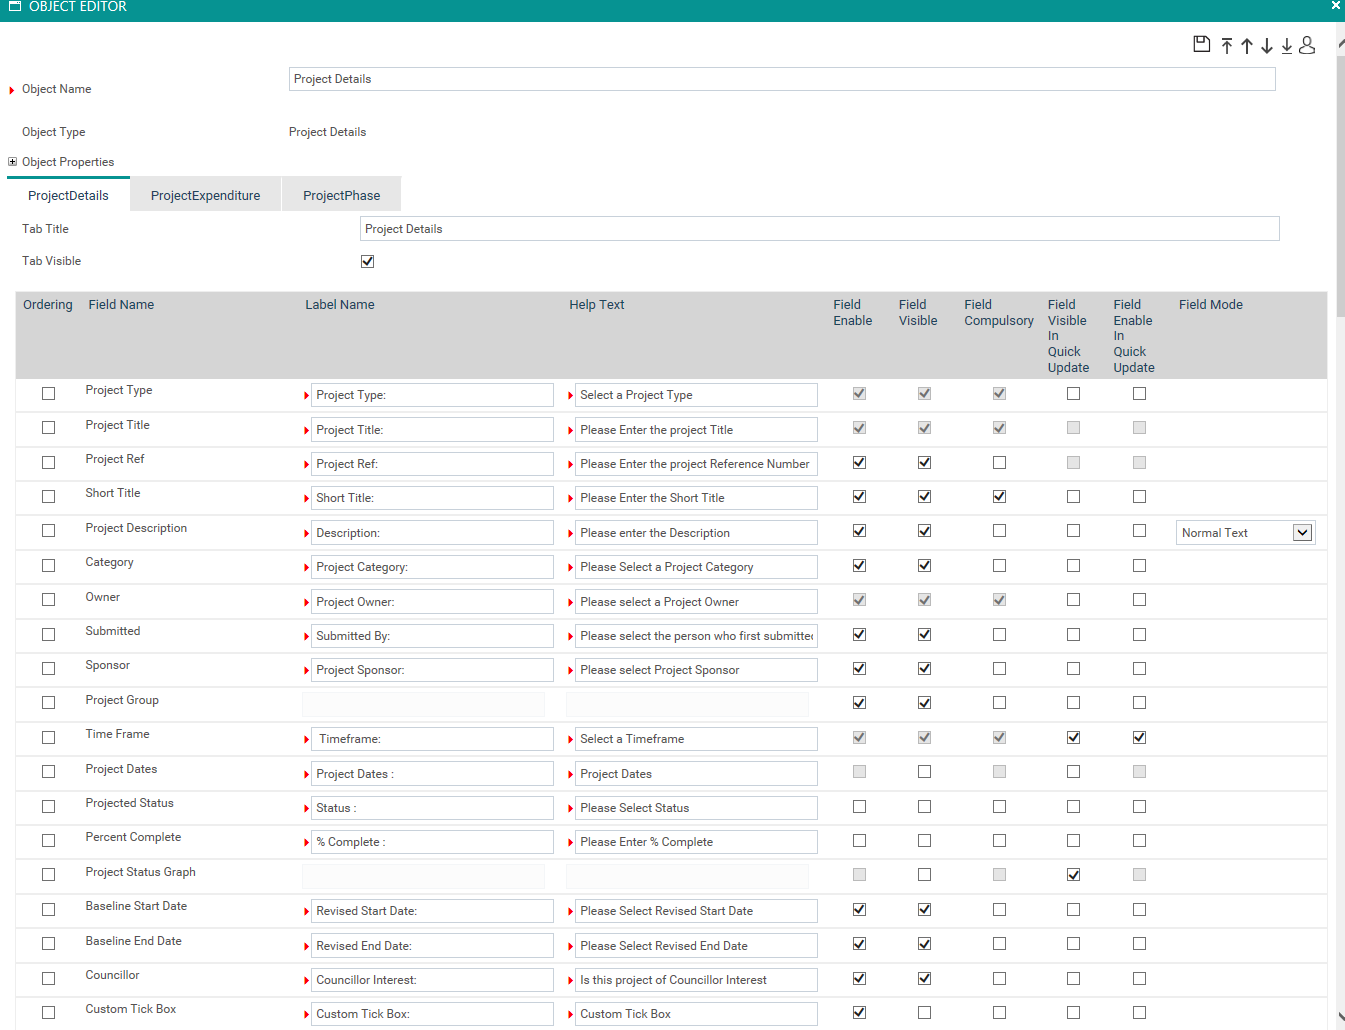
You can alter the terminology and visibility by customising the following.
Field | Descriptions/Instructions | Mandatory/Optional |
Object Name | Shows the default object name which can be edited as required | Mandatory |
Field Name | The default field name | Mandatory |
Label Name | Shows the default field name which can be edited as required | Mandatory |
Help Text | Help text displayed when hovering over help icon for this field Shows the default text which can be edited as required | Mandatory |
Field Enable | If ticked, the selected field will be active but invisible to the user unless 'Field Visible' is also ticked. | Not Applicable |
Field Visible | If ticked, the selected filed will be visible (read only) within the screen. However, if 'Field Enable' is also ticked then you can enter/update data. | Not Applicable |
Field Compulsory | If ticked, the selected field will be a mandatory field within the screen. | Not Applicable |
 | Note that a few key fields have tickboxes greyed out; this is due their behaviour and visibility settings are fixed as system defaults and cannot be modified. Similarly, you can configure other object's terminology and visibility. However, each object is associated with a particular function and contains different sub sections and fields. |
You can reorder the fields by:
- Selecting the ‘Ordering’ tick box adjacent to the field(s) and clicking on ‘Top’, ‘Bottom’, ‘Move Up’ or ‘Move Down’ icons on the toolbar
- Dragging the field and dropping it to the required position in the grid
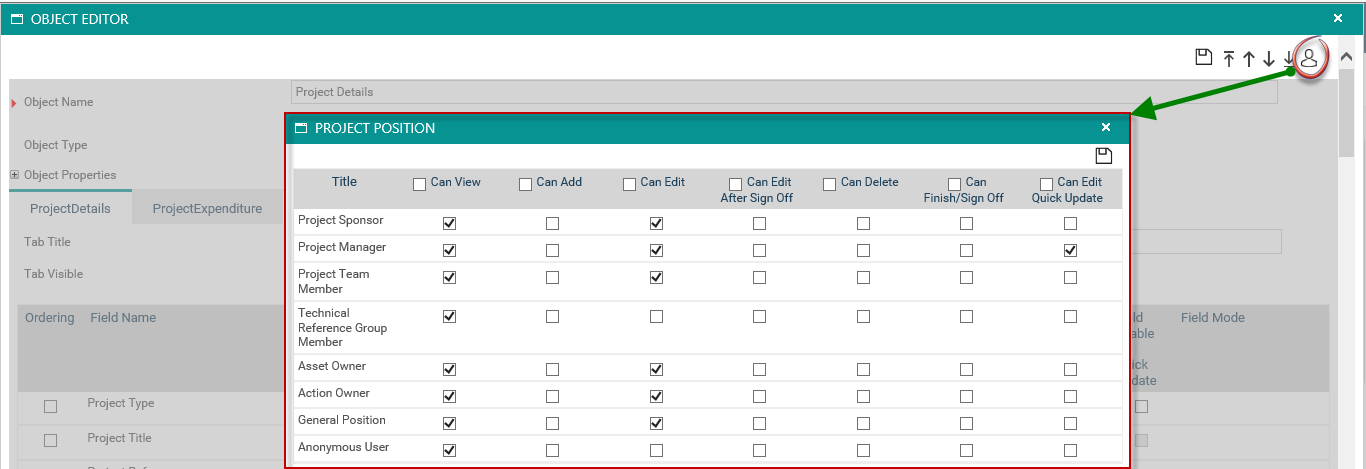
You also have the option to configure the permissions for the object by clicking on the 'Set permission' icon in the object editor. The following permissions can be set for an object for the relevant positions. Permission types are as follows:
- Can view
- Can add
- Can edit
- Can delete
- Can finish/Sign off (when an object sign off is placed, only staff with this permission can give approval)
STEP 5: To remove an object from the workflow, simply drag it to the recycle bin.
Note that if a workflow has been applied to any existing projects the system will not allow you to delete any objects within it.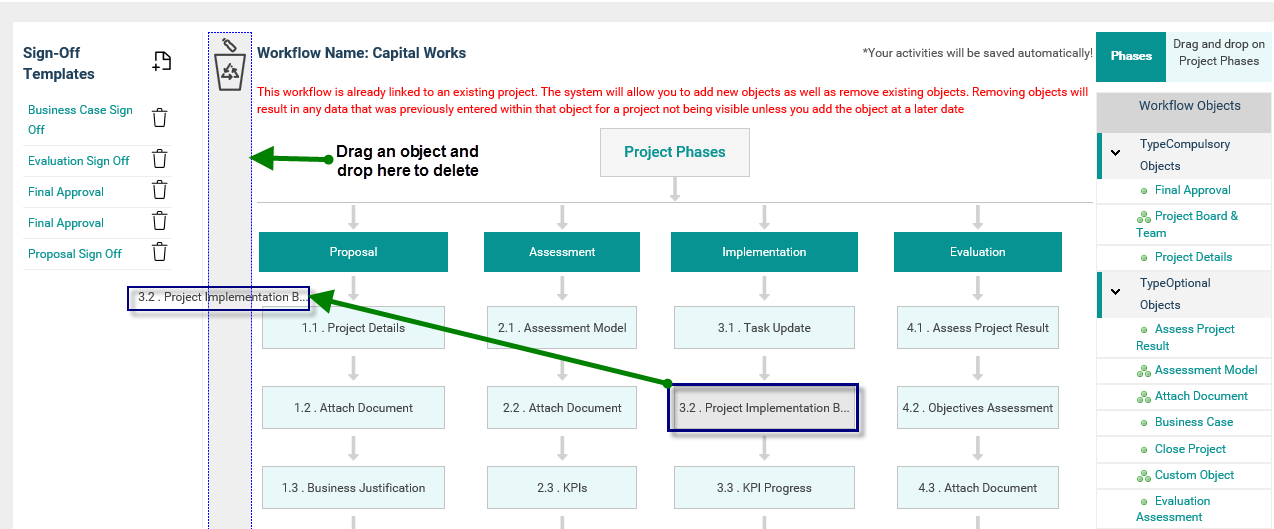
Using Sign off and Generic Email objects in Phases
STEP 1: Place the business case objects and define the phases for the workflow as necessary.
STEP 2: Drag & drop desired Sign off / Generic objects to required positions.
STEP 3: Click on the object to modify the name.
STEP 4: Click 'Save'.
See the section 'Assigning Sign Off Templates' for more information.
Configuring Objects
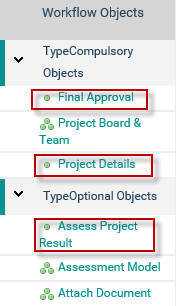
There are two types of objects: Compulsory objects and Optional objects. Each compulsory object must be used within a workflow at least once.
Objects displayed with three dots shows that the particular object can be used multiple times within a workflow.
These objects cannot however be duplicated within the same phase.
Objects with one dot can only exist once within a workflow.
Object | Compulsory within Workflow? | Include Multiple Instances within one Workflow? | Purpose |
Project Details | Yes | No | This object captures key information about a project at its inception. |
Project Linkage | No | No | This object enables you to identify the linkages with organisational and planning hierarchies. A Project can be linked to Strategies, Service Profiles as well as specific Funding Partners (i.e. Agencies). |
Attach Document | No | Yes. Changes are incrementally updated | The object enables you to upload files and store web URLs. This is an independent and incremental object. |
Preliminary Budget | No | Yes. Changes are incrementally updated | The object allows you to undertake an initial budget estimate for a project. You will be able to include predefined budget lines where specific funding is coming from through the linked Funding Partners This object is independent and incremental. You can also identify Ongoing Expenses for a project which can be taken into consideration during the approval process. |
Business Case | No | No | This object allows you to develop business cases for a project based on a predefined form. It enables you to identify desirable objectives of the project and its delivery mechanisms. |
Project Outputs | No | No | Provides you the ability to identify the specific project outputs for the project. These are the key tangible items that will be achieved upon implementation. |
Project Board & Team | Yes | Yes. Changes are incrementally updated. | Enables you to identify the key people involved in the initial and the implementation stages of the project. It allows access to specific areas of the project based on the allocation of roles to staff. This object is independent and incremental. |
Assessment Model | No | Rates the project against a consistent set of criteria determined by the administrator. Based on the answers,the score is calculated to compare projects against each other for final approval. | |
Evaluation Assessment | No | No | Rates the project against a consistent set of criteria determined by the administrator. Based on the answers, a score is calculated to compare projects against each other for final approval. |
Stakeholder Analysis | No | Yes. Changes are incrementally updated. | Referred to the action of analysing the attitudes of stakeholders. This can be done once or on a regular basis to track changes in stakeholder attitudes over time. This object is independent and incremental. |
Risk Assessment | No | Yes. Changes made to one instance reflected in all other instances. | This comprises of a range of steps which can be utilised to define variables and criterias in the risk assessment process. |
KPIs | No | No | Allows you to link KPIs currently within interplan. The KPIs are used to assess the performance of the project and can be rated during project evaluation. |
Planning Link | No | No | Links tasks within a project to tasks in the selected action within planning area. |
Final Approval | Yes | No | Used to record a formal stamp of approval (or rejection) for the continuation of the project from an authorised user. |
Custom Object | No | Yes. Changes made to one instance will NOT be reflected in all other instances. | A generic object with a set of customisable fields
|
Scope / Project Notes | No | Yes. Changes are incrementally updated. | A generic object with a set of 10 customisable text fields. This object is independent and incremental. |
Task Planning | No | Yes. Changes are incrementally updated. | Permits you to add tasks for a given project. All project tasks created within Task Planning area will be linked as sub tasks to the planning section action/task that the project is linked to. This object is independent and incremental. |
Issue Register | No | Yes. Changes are incrementally updated. | Keeps a record of all issues within a project and helps you to monitor the status of issues and track the actions taken to resolve them. This object is independent and incremental. |
Task Update | No | Yes. Changes are incrementally updated. | Functions similarly to ‘Task Planning’. You can create tasks for a project and update tasks as well. |
Project Implementation Budget | Yes | Yes | Allows you to review the current budget information for a project. |
KPI Progress | No | Yes | This enables you to review the performance of KPIs that have been created or linked to a project. |
Assess Project Result | No | No | Allows you to add comments on project implementation progress. |
Objectives Assessment | No | No | Enables you to provide a rating against the objectives that were identified as part of the business case as well as provide textual information to justify the ratings. |
Lessons Learned | No | No | Enables you to specify any improvement that needs to be considered in future projects, highlighting the most positive things from the project. |
Close Project | No | No | Enables authorised users to close the project. Usually placed at the end of the workflow. |
| Incident | No | Yes | Enables you to specify incidents related to your project and monitor them. |
Configuring Project Details
The Project Details Object consists of three tabs:
- Details tab
- Expenditure tab
- Phase tab

This object
- is mandatory for Project Creation and thus a workflow cannot exist without this object.
- can be renamed.
All tabs in this object can also be
Renamed or
Individually switched off if not required for your workflow
IMPORTANT: In project creation, the 'Details' tab is displayed even if it is switched off via the Object Editor so that mandatory information can be entered at a minimum and saved. If you attempt to view the project record at a later time, the details tab will not be visible.
The fields in the details tab can be re-ordered to meet your organisational requirements.
Prerequisites and Dependencies
- Details: Staff records must exist in the system.
- Details: If Service Profiles are to be associated with the project, Service Profile records must exist in the system.
- Details: Project Types (linked to Workflows) must exist in the system.
- Details: If Custom Lists are to be used, they must be defined.
- Details: If Assets are to be linked to the project, they must be configured.
- Project Expenditure: Budget Types must be defined.
Details Tab
Field Name | Field Type | Default Display Name | Default Help Text | Default Settings | ||||
Field Enable | Field Visible | Field Compulsory | Field Visible In Quick Update | Field Enable In Quick Update | ||||
| Project Type | Dropdown -options are configured via Project Type area and linked to workflows via the Workflow Link area. | Project Type: | Select a Project Type | ALWAYS ENABLED | ALWAYS VISIBLE | ALWAYS MANDATORY - | configurable | configurable |
| Project Title | Single Line Text Field | Project Title: | Please enter the project title | ALWAYS ENABLED | ALWAYS VISIBLE | ALWAYS MANDATORY - | configurable | configurable |
| Project Ref | Single Line Text Field - can be set to auto populate as per rules configured via Project Code area | Project Ref: | Please enter the project reference number | configurable | configurable | configurable | configurable | configurable |
| Short Title | Single Line Text Field | Short Title: | Please enter a short title for this project | ALWAYS ENABLED | ALWAYS VISIBLE | ALWAYS MANDATORY - | configurable | configurable |
| Project Description | Multi Line Text Field | Description | Please enter a description | configurable | configurable | configurable | configurable | configurable |
| Category | Dropdown -options are configured via Custom Lists area | Project Category: | Please select a project category | configurable | configurable | configurable | configurable | configurable |
| Owner | Dropdown - options provided are from Staff list | Project Owner: | Please select the project owner | ALWAYS ENABLED | ALWAYS VISIBLE | ALWAYS MANDATORY - | configurable | configurable |
| Submitted | Dropdown - options provided are from Staff list | Submitted By: | Please select the person who first submitted this project | configurable | configurable | configurable | configurable | configurable |
| Sponsor | Dropdown - options provided are from Staff list | Project Sponsor: | Please select the project sponsor | configurable | configurable | configurable | configurable | configurable |
| Project Group | Radio buttons - options allow identification of project as parent, child or independent. If deactivated and/or invisible project defaults to independent. | Project Group: | Please select the project group | configurable | configurable | configurable | configurable | configurable |
| Timeframe | Date selection (To and From) | Project Timeframe: | Select a project timeframe | ALWAYS ENABLED | ALWAYS VISIBLE | ALWAYS MANDATORY - | configurable | configurable |
| Project Dates | Date display (To and From) | Project Dates: | Please select project dates | ALWAYS DISABLED | configurable | ALWAYS DISABLED | configurable | ALWAYS DISABLED |
| Projected Status | Dropdown -options provided are determined during Scoping. Default values are Not Started, In Progress, Completed, Ongoing, Deferred | Status: | Please select status | configurable | configurable | configurable | configurable | configurable |
| Percent Complete | Numeric value between 0-100 both inclusive | % Complete: | Please enter % complete | configurable | configurable | configurable | configurable | configurable |
| Project Status Graph | Displays the current project status in a visual form including icons for progress, budget and RAG status | Project Status Graph: | Project Status Graph | ALWAYS DISABLED | configurable | ALWAYS DISABLED | configurable | ALWAYS DISABLED |
| Baseline Start Date | Date selection | Revised Start Date | Please Select Revised Start Date | configurable | configurable | configurable | configurable | configurable |
Baseline End Date | Date selection | Revised End Date | Please Select Revised End Date | configurable | configurable | configurable | configurable | configurable |
| Councillor | Tickbox | Councillor Interest: | Is this project of Councillor Interest | configurable | configurable | configurable | configurable | configurable |
| Custom Tick Box | Tickbox | Custom Tick Box: | Custom Tick Box | configurable | configurable | configurable | configurable | configurable |
| Custom Text Area | Multi Line Text Field | Custom Text Area | Custom Text Area | configurable | configurable | configurable | configurable | configurable |
| Custom Date Control (1-2 available) | Date selection | Custom Date Control1: | Custom Date Control | configurable | configurable | configurable | configurable | configurable |
| Asset | Dropdown - options are configured via Asset Setup area. | Asset: | Select a Asset | configurable | configurable | configurable | configurable | configurable |
| Dropdown Service Profile | Dropdown - options provided are from Service Profiles list | Service Profile: | Please select Service Profile | configurable | configurable | configurable | configurable | configurable |
| Secondary Service Profile | Dropdown - options provided are from Service Profiles list | Potential Service Profile: | Please select Potential Service Profile | configurable | configurable | configurable | Configurable if Visible in Project Details screen | Configurable if Enabled in Project Details screen |
| Capital Amendment: | Multi Line Text Field | Capital Amendment: | Please enter Capital Amendment | configurable | configurable | configurable | Configurable if Visible in Project Details screen | Configurable if Enabled in Project Details screen |
| Exception: | Text Box | Exceptions: | Please enter exceptions | configurable | configurable | configurable | not configurable | not configurable |
| Programme Summary: | Multi Line Text Field | Programme Summary: | Please enter programme summary | configurable | configurable | configurable | Configurable if Visible in Project Details screen | Configurable if Enabled in Project Details screen |
| Hyperlink URL: | A hyperlink (e.g. to your financial system) - URL is configured via Hyperlink area. | Go to Hyperlink: | Please click the Hyperlink to browse the URL | configurable | configurable | configurable | configurable | configurable |
| Custom List (1-5 available) | Dropdown -options are configured via Custom Lists area | Custom List: | Please select a value from Custom List | configurable | configurable | configurable |
|
|
| Budget Overall | Displays the total value of the Project Cost Estimate | Budget Overall: | Budget Overall | ALWAYS DISABLED | configurable | ALWAYS DISABLED | configurable | ALWAYS DISABLED |
| Custom Numeric Field (1-2 available) | Number Field | Custom Numeric: | Please enter number for Custom Numeric | configurable | configurable | configurable | Configurable if Visible in Project Details screen | Configurable if Enabled in Project Details screen |
| Custom Text Field (1-2 available) | Single Line Text Field | Custom Text Field4: | Please Enter Custom Text Field4 | configurable | configurable | configurable | Configurable if Visible in Project Details screen | Configurable if Enabled in Project Details screen |
| Custom Tickbox (1-2 available) | A tickbox with True/False value | Custom Tickbox: | Please tick the Custom Tickbox | configurable | configurable | configurable | Configurable if Visible in Project Details screen | Configurable if Enabled in Project Details screen |
| Custom Staff List (1-5 available) | Staff Dropdown | Custom Staff List : | Please Select Custom Staff List | configurable | configurable | configurable | Configurable if Visible in Project Details screen | Configurable if Enabled in Project Details screen |
| Custom Text Field (3-10 available) | Single Line Text Field | Custom Text Field4: | Please Enter Custom Text Field4 | configurable | configurable | configurable | Configurable if Visible in Project Details screen | Configurable if Enabled in Project Details screen |
| Custom Area Field (2-10 available) | Multiline Text Field | Custom Area | Please enter text for Custom Area | configurable | configurable | configurable | Configurable if Visible in Project Details screen | Configurable if Enabled in Project Details screen |
| Custom Tickbox (4-10 available) | A tickbox with True/False value | Custom Tickbox: | Please tick the Custom Tickbox | configurable | configurable | configurable | Configurable if Visible in Project Details screen | Configurable if Enabled in Project Details screen |
| Custom Date Control (3- 5 available) | Date selection | Custom Date Control1: | Custom Date Control | configurable | configurable | configurable | configurable | configurable |
| Custom List (6 -10 available) | Dropdown -options areconfigured via Custom Lists area | Custom List: | Please select a value from Custom List | configurable | configurable | configurable | ||
| Custom Numeric Field (3-10 available) | Number Field | Custom Numeric: | Please enter number for Custom Numeric | configurable | configurable | configurable | Configurable if Visible in Project Details screen | Configurable if Enabled in Project Details screen |
| Related Projects | A tickbox and a Multi Line Text Field | Are there Related Projects: | Please Enter Related Projects | configurable | configurable | configurable | configurable | configurable |
| Section Header1 | Displays a textual label which can be used to break up the screen into logical sections | Section Header1 | Section Header1 | ALWAYS DISABLED | configurable | NEVER MANDATORY - | configurable | ALWAYS DISABLED |
| Project Comment | Multi Line Text Field with Append Task Comments button | Overall Project Comment | Please select Overall Project Comment | configurable | configurable | configurable | configurable | configurable |
| Section Header (2-5 available) | Displays a textual label which can be used to break up the screen into logical sections | Section Header2 | Section Header2 | ALWAYS DISABLED | configurable | NEVER MANDATORY - | configurable | ALWAYS DISABLED |
| Justification | Multi Line Text Field | Project Justification | Enter Project Justification | configurable | configurable | configurable | configurable | configurable |
Expenditure Tab
Field Name | Field Type | Default Display Name | Default Help Text | Default Settings | ||
Field Enable | Field Visible | Field Compulsory | ||||
Project Expenditure | Dropdown -options are configured via Budget Types area. | Expenditure Type: | Project Expenditure | ALWAYS ENABLED | ALWAYS VISIBLE | ALWAYS MANDATORY - |
Phase Tab
Field Name | Field Type | Default Display Name | Default Help Text | Default Settings | ||
Field Enable | Field Visible | Field Compulsory | ||||
Phase Code | Single Line Text Field | Phase Code: | Enter a Phase Code | configurable | configurable | configurable |
Phase Name | Single Line Text Field | Phase Name: | Enter a Phase Name | configurable | configurable | configurable |
Phase | Displays a textual label at the top of the screen | Phase: | Phase | configurable | configurable | configurable |
Configuring Project Linkage
The Project Linkage Object consists of three tabs:
- Strategy
- Service Profile
- Funding Partner
 |
Prerequisites and dependencies
|
Project Linkage Strategy
Field Name | Field Type | Default Display Name | Default Help Text | Default Settings | ||
Field Enable | Field Visible | Field Compulsory | ||||
Primary Strategy | Dropdown - options provided are from Strategy list | Primary Strategy: | Please select a primary strategy | ALWAYS ENABLED | ALWAYS VISIBLE | ALWAYS MANDATORY - |
Grid Strategy | Displays a list of potential secondary strategies to choose from in a grid format | Potential Strategies: | Potential Strategies | ALWAYS ENABLED | ALWAYS VISIBLE | ALWAYS MANDATORY - |
Grid Select Strategy | Displays the selected secondary strategies (if any) in a grid format | Secondary Strategies: | Secondary Strategies | ALWAYS ENABLED | ALWAYS VISIBLE | ALWAYS MANDATORY - |
Project Linkage Service Profile
Field Name | Field Type | Default Display Name | Default Help Text | Default Settings | ||
Field Enable | Field Visible | Field Compulsory | ||||
Primary Service Profile | Dropdown - options provided are from Service Profile list | Primary Service Profile: |
Please select a primary service profile
| ALWAYS ENABLED | ALWAYS VISIBLE | ALWAYS MANDATORY - |
Grid Service Profile | Displays a list of potential secondary service profiles to choose from in a grid format | Potential Service Profiles: | Potential Service Profiles | ALWAYS ENABLED | ALWAYS VISIBLE | ALWAYS MANDATORY - |
Grid Select Service Profile | Displays the selected secondary service profiles (if any) in a grid format | Secondary Service Profile: |
Secondary Service Profile
| ALWAYS ENABLED | ALWAYS VISIBLE | ALWAYS MANDATORY - |
Project Linkage Funding Partner
Field Name | Field Type | Default Display Name | Default Help Text | Default Settings | ||
Field Enable | Field Visible | Field Compulsory | ||||
Grid Funding Partner | Dropdown - options provided are from Strategy list | Grid Select Funding Partner | Potential Funding Partner: | ALWAYS ENABLED | ALWAYS VISIBLE | ALWAYS MANDATORY - |
Linked Funding Partner: | Displays a list of potential secondary strategies to choose from in a grid format | Potential Funding Partner | Linked Funding Partner | ALWAYS ENABLED | ALWAYS VISIBLE | ALWAYS MANDATORY - |
Configuring Attach Documents
The Attach Documents Object consists of one mandatory tab titled Attach Documents.
 | This object
Prerequisites and Dependencies
|
Attach Documents
Field Name | Field Type | Default Display Name | Default Help Text | Default Settings | ||
Field Enable | Field Visible | Field Compulsory | ||||
| Object Description : | Rich Text | N/A | N/A | N/A | N/A | N/A |
| Rad Upload Project Attachment | File upload section | Upload Files: | Upload Files | ALWAYS ENABLED | ALWAYS VISIBLE | ALWAYS MANDATORY - |
| URL | Text area with selection for either TRIM link or regular URL | Add URL | Add URL | ALWAYS ENABLED | ALWAYS VISIBLE | ALWAYS MANDATORY - |
Configuring Preliminary Budget
The Preliminary Budget Object consists of four tabs:
- Preliminary Budget
- Ongoing Expenses
- Source of Funds
- Outputs
 |
|
Field Name | Field Type | Default Display Name | Default Help Text | Default Settings | ||
Field Enable | Field Visible | Field Compulsory | ||||
| Document section: | Section for the inclusion of documents which can be viewed by the user through the project record. Instructions: Enter the URL of an existing document or upload a file from your workstation. The URL can be a link to your TRIM document management system if your organisation has activated the TRIM document management functionality. | N/A | N/A | N/A | N/A | N/A |
Preliminary Budget
Field Name | Field Type | Default Display Name | Default Help Text | Default Settings | ||
Field Enable | Field Visible | Field Compulsory | ||||
| Account No | Column heading | Account No | Account No | ALWAYS ENABLED | configurable | NEVER MANDATORY - |
| Description | Column heading | Description | Description | ALWAYS ENABLED | ALWAYS VISIBLE | ALWAYS MANDATORY - |
| Asset | Column heading | Asset | Asset | ALWAYS ENABLED | configurable | NEVER MANDATORY - |
| External Funding | Section heading | Preliminary Budget External Funding | Preliminary Budget External Funding | ALWAYS DISABLED | configurable | NEVER MANDATORY - |
| External Funding Total | Sub total for section | Total | External Funding Total | ALWAYS DISABLED | configurable | NEVER MANDATORY - |
| Income | Section heading | Preliminary Budget Income | Income | ALWAYS DISABLED | configurable | NEVER MANDATORY - |
| Income Total | Sub total for section | Total | Income Total | ALWAYS DISABLED | configurable | NEVER MANDATORY - |
| Expenditure | Section heading | Preliminary Budget Expenditure | Preliminary Budget Expenditure | ALWAYS DISABLED | configurable | NEVER MANDATORY - |
| Expenditure Total | Sub total for section | Total | Expenditure Total | ALWAYS DISABLED | configurable | NEVER MANDATORY - |
| Operational Cost | Section Heading | Operational Cost Estimate (Post Project) | OperationalCost | ALWAYS DISABLED | configurable | NEVER MANDATORY - |
| Operational Cost Total | Sub total for section | Total | Operational Cost Total | ALWAYS DISABLED | configurable | NEVER MANDATORY - |
| Grand Total | Displays overall total both at the top and bottom of the grid | Grand Total | Grand Total | ALWAYS DISABLED | configurable | NEVER MAN |
Ongoing Expenses
Field Name | Field Type | Default Display Name | Default Help Text | Default Settings | ||
Field Enable | Field Visible | Field Compulsory | ||||
| Account No | Column heading | Account No | Account No | ALWAYS ENABLED | configurable | NEVER MANDATORY - |
| Description | Column heading | Description | Description | ALWAYS ENABLED | ALWAYS VISIBLE | ALWAYS MANDATORY - |
| Comment | Column heading | Description | Comment | ALWAYS ENABLED | configurable | NEVER MANDATORY - |
| Annual Ongoing Expenses l | Section Heading | Annual Ongoing Expenses | Annual Ongoing Expenses | ALWAYS ENABLED | configurable | NEVER MANDATORY - |
| Annual Ongoing Expenses Total | Sub total for section | Total | Annual Ongoing Expenses Total | ALWAYS DISABLED | configurable | NEVER MANDATORY - |
| Grand Total | Displays overall total both at the top and bottom of the grid | Grand Total | Grand Total | ALWAYS DISABLED | configurable | NEVER MANDATORY - |
Custom Object
Field Name | Field Type | Default Display Name | Default Help Text | Default Settings | ||
Field Enable | Field Visible | Field Compulsory | ||||
| Custom Text Field (1-5 available) | Single Line Text Field | Custom Text Field: | Please enter text for the Custom Text field | configurable | configurable | configurable |
| Custom Tickbox (1-5 available) | A tickbox with True/False value | Custom Tickbox: | Please tick the Custom Tickbox | configurable | configurable | configurable |
| Custom List (1-5 available) | Dropdown - options are configured via Custom Lists area | Custom List: | Please select a value from Custom List | configurable | configurable | configurable |
| Custom Date (1-5 available) | Date selection | Custom Date: | Please select a value from Custom Date | configurable | configurable | configurable |
| Custom Area Field (1-5 available) | Multiline Text Field | Custom Area | Please enter text for Custom Area | configurable | configurable | configurable |
| Custom Numeric Field (1-5 available) | Number Field | Custom Numeric: | Please enter number for Custom Numeric | configurable | configurable | configurable |
| Section Header (1-10 available) | Displays a textual label which can be used to break up the screen into logical sections | Section Header: | Section Header: | configurable | configurable | configurable |
Source of Funds
Field Name | Field Type | Default Display Name | Default Help Text | Default Settings | ||
Field Enable | Field Visible | Field Compulsory | ||||
| Account No | Column heading | Account No | Account No | ALWAYS ENABLED | configurable | NEVER MANDATORY - |
| Description | Column heading | Description | Description | ALWAYS ENABLED | ALWAYS VISIBLE | ALWAYS MANDATORY - |
| Comment | Column heading | Comment | Comment | ALWAYS ENABLED | configurable | NEVER MANDATORY - |
| Source of Funds | Section Heading | Source of Funds | Source of Funds | ALWAYS ENABLED | configurable | NEVER MANDATORY - |
| Source of Funds Total | Sub total for section | Total | Source of Funds Total | ALWAYS DISABLED | configurable | NEVER MANDATORY - |
| Grand Total | Displays overall total both at the top and bottom of the grid | Grand Total | Grand Total | ALWAYS DISABLED | configurable | NEVER MANDATORY - |
Outputs
Field Name | Field Type | Default Display Name | Default Help Text | Default Settings | ||
Field Enable | Field Visible | Field Compulsory | ||||
| Account No | Column heading | Account No | Account No | ALWAYS ENABLED | configurable | NEVER MANDATORY - |
| Description | Column heading | Description | Description | ALWAYS ENABLED | ALWAYS VISIBLE | ALWAYS MANDATORY - |
| Comment | Column heading | Comment | Comment | ALWAYS ENABLED | configurable | NEVER MANDATORY - |
Outputs | Section Heading | Outputs | Outputs | ALWAYS ENABLED | configurable | NEVER MANDATORY - |
Outputs Total | Sub total for section | Total | Outputs Total | ALWAYS DISABLED | configurable | NEVER MANDATORY - |
| Grand Total | Displays overall total both at the top and bottom of the grid | Grand Total | Grand Total | ALWAYS DISABLED | configurable | NEVER MANDATORY - |
Configuring Business Case
The Business Case Object consists of three tabs:
- Business Case Details
- Business Case Project Objectives
- Business Case Project Delivery Options
 |
Prerequisites and dependencies
|
Business Case Details
Field Name | Field Type | Default Display Name | Default Help Text | Default Settings | ||
Field Enable | Field Visible | Field Compulsory | ||||
ActiveCase | DropDown | Active Case | Select the Active Case | ALWAYS ENABLED | ALWAYS VISIBLE | ALWAYS MANDATORY - |
BCField1 | TextBox | BCField1 | Please enter the BCField1 | configurable | configurable | configurable |
BCField2 | TextBox | BCField2 | Please enter the BCField1 | configurable | configurable | configurable |
BCField3 | TextBox | BCField3 | Please enter the BCField1 | configurable | configurable | configurable |
BCField4 | TextBox | BCField4 | Please enter the BCField1 | configurable | configurable | configurable |
CustomField1 | TextBox | Custom Field1 | Please enter the Major field 1 | configurable | configurable | configurable |
CustomField2 | TextBox | Custom Field2 | Please enter the Major field 2 | configurable | configurable | configurable |
CustomField3 | TextBox | Custom Field3 | Please enter the Major field 3 | configurable | configurable | configurable |
CustomField4 | TextBox | Custom Field4 | Please enter the Major field 4 | configurable | configurable | configurable |
CustomField5 | TextBox | Custom Field5 | Please enter the Major field 5 | configurable | configurable | configurable |
CustomField6 | TextBox | Custom Field6 | Please enter the Major field 6 | configurable | configurable | configurable |
CustomField7 | TextBox | Custom Field7 | Please enter the Major field 7 | configurable | configurable | configurable |
CustomField8 | TextBox | Custom Field8 | Please enter the Major field 8 | configurable | configurable | configurable |
CustomField9 | TextBox | Custom Field9 | Please enter the Major field 9 | configurable | configurable | configurable |
CustomField10 | TextBox | Custom Field10 | Please enter the Major field 10 | configurable | configurable | configurable |
CustomField11 | TextBox | Custom Field11 | Please enter the Major field 11 | configurable | configurable | configurable |
CustomField12 | TextBox | Custom Field12 | Please enter the Major field 12 | configurable | configurable | configurable |
CustomField13 | TextBox | Custom Field13 | Please enter the Major field 13 | configurable | configurable | configurable |
CustomField14 | TextBox | Custom Field14 | Please enter the Major field 14 | configurable | configurable | configurable |
CustomField15 | TextBox | Custom Field15 | Please enter the Major field 15 | configurable | configurable | configurable |
CustomField16 | TextBox | Custom Field16 | Please enter the Major field 16 | configurable | configurable | configurable |
Business Case Project Objectives
Field Name | Field Type | Default Display Name | Default Help Text | Default Settings | ||
Field Enable | Field Visible | Field Compulsory | ||||
Options | DropDown | Options | Select an Option | ALWAYS ENABLED | ALWAYS VISIBLE | ALWAYS MANDATORY - |
ActiveCase | DropDown | CurrentCase | Select the Active Case | ALWAYS ENABLED | ALWAYS VISIBLE | ALWAYS MANDATORY - |
| ObjectiveName | TextBox | Name | Please enter the Objective Name | ALWAYS ENABLED | ALWAYS VISIBLE | ALWAYS MANDATORY - |
| ObjectiveDescription | TextBox | Description | Please enter the Description | configurable | configurable | configurable |
| ObjectiveMetby | TextBox | Objective Metby | Please enter the Objective Met by | configurable | configurable | configurable |
Business Case Project Delivery Options
Field Name | Field Type | Default Display Name | Default Help Text | Default Settings | ||
Field Enable | Field Visible | Field Compulsory | ||||
Options | DropDown | Options | Select an Option | ALWAYS ENABLED | ALWAYS VISIBLE | ALWAYS MANDATORY - |
ActiveCase | DropDown | Active Case | Select the Active Case | ALWAYS ENABLED | ALWAYS VISIBLE | ALWAYS MANDATORY - |
| OptionName | TextBox | Name | Please enter the Name | ALWAYS ENABLED | ALWAYS VISIBLE | ALWAYS MANDATORY - |
| OptionDescription | TextBox | Description | Please enter the Description | configurable | configurable | configurable |
| OptionAdvantages | TextBox | Advantages | Please enter the Advantages | configurable | configurable | configurable |
| OptionDisAdvantages | TextBox | Dis Advantages | Please enter the Dis-advantages | configurable | configurable | configurable |
Project Outputs
The Project Outputs Object consists of one mandatory tab titled Project Outputs (this can be renamed if required.)
Field Name | Field Type | Default Display Name | Default Help Text | Default Settings | ||
Field Enable | Field Visible | Field Compulsory | ||||
GridProjectOutputs | Column header | Project Outputs | Add new Project Output | ALWAYS ENABLED | ALWAYS VISIBLE | ALWAYS MANDATORY - |
TextBoxProjectName | Text | Project Name | Please Enter the Project Name | ALWAYS ENABLED | ALWAYS VISIBLE | ALWAYS MANDATORY - |
TextBoxProjectDescription | Text | Project Description | Please Enter the Project Description | configurable | configurable | configurable |
Configuring Assessment Model
The Assessment Model Object consists of one mandatory tab titled Assessment Model (this can be renamed if required.)
 | Prerequisites and dependencies
|
Assessment Model
Field Name | Field Type | Default Display Name | Default Help Text | Default Settings | ||
Field Enable | Field Visible | Field Compulsory | ||||
| Label Status | Text | Status: | Stakeholder | configurable | configurable | configurable |
| Label Date | Date | Date: | Date | configurable | configurable | configurable |
Configuring Evaluation Assessment
The Assessment Model Object consists of one mandatory tab titled Assessment Model (this can be renamed if required.)
 | Prerequisites and dependencies
|
Evaluation Assessment
Field Name | Field Type | Default Display Name | Default Help Text | Default Settings | ||
Field Enable | Field Visible | Field Compulsory | ||||
| Staff | Dropdown - options provided are from Staff list | Decision Maker: | Please select the Staff member | ALWAYS ENABLED | ALWAYS VISIBLE | ALWAYS MANDATORY - |
| Label Status | Text | Assessment Status: | Please select the Assessment Status | ALWAYS ENABLED | ALWAYS VISIBLE | ALWAYS MANDATORY - |
| Label Date | Date | Sign off Date: | Sign off Date | ALWAYS ENABLED | ALWAYS VISIBLE | ALWAYS MANDATORY - |
| Project Description | Text | Description: | Description | configurable | configurable | configurable |
Configuring Stakeholder Analysis
The Stakeholder Analysis Object consists of one mandatory tab titled Stakeholder Analysis.
 | This object
Prerequisites and dependencies
|
Field Name | Field Type | Default Display Name | Default Help Text | Default Settings | ||
Field Enable | Field Visible | Field Compulsory | ||||
| Label Stakeholder | Text | Stakeholder | Stakeholder | ALWAYS ENABLED | ALWAYS VISIBLE | ALWAYS MANDATORY - |
Configuring Risk Assessment
The Risk Assessment Object consists of one mandatory tab titled Risk Assessment.
 | This object
Prerequisites and Dependencies
|
Field Name | Field Type | Default Display Name | Default Help Text | Default Settings | ||
Field Enable | Field Visible | Field Compulsory | ||||
| Risk Issue | Text | Risk Assessment Name: | Risk Assessment Name | ALWAYS ENABLED | ALWAYS VISIBLE | ALWAYS MANDATORY - |
Responsible Person | Dropdown - options provided are from Staff list | Responsible Person | Responsible Person | ALWAYS ENABLED | ALWAYS VISIBLE | ALWAYS MANDATORY - |
Causes | Text | Causes | Causes | ALWAYS ENABLED | ALWAYS VISIBLE | ALWAYS MANDATORY - |
| Consequences | Text | Consequences | Consequences | ALWAYS ENABLED | ALWAYS VISIBLE | ALWAYS MANDATORY - |
Likelihood | Options are configured via Risk Assessmentarea | Likelihood | Likelihood | ALWAYS ENABLED | ALWAYS VISIBLE | ALWAYS MANDATORY - |
Consequence | Options are configured via Risk Assessment area | Consequence | Consequence | ALWAYS ENABLED | ALWAYS VISIBLE | ALWAYS MANDATORY - |
Image Risk Rating | Image | Risk Rating | Risk Rating | ALWAYS ENABLED | ALWAYS VISIBLE | ALWAYS MANDATORY - |
Risk Rating Context | TextBox | Risk Rating Context | Risk Rating Context | ALWAYS ENABLED | ALWAYS VISIBLE | ALWAYS MANDATORY - |
| Active | CheckBox | Active | Active | configurable | configurable | configurable |
Configuring KPIs
The KPIs Object consists of two main tabs:
- KPI Explorer tab
- KPIs
- Target or Actual
- Graph
- KPI Evaluation
This object and its tabs can be renamed.
 | Prerequisites and dependencies
|
KPI Explorer
No fields available for configuration.
KPI Explorer: KPIs
Field Name | Field Type | Default Display Name | Default Help Text | Default Settings | ||
Field Enable | Field Visible | Field Compulsory | ||||
| Name | Text | Name | KPI Name | ALWAYS ENABLED | ALWAYS VISIBLE | ALWAYS MANDATORY - |
| Description | Text | Notes | KPI Notes | ALWAYS ENABLED | ALWAYS VISIBLE | ALWAYS MANDATORY - |
| Indicator | DropDown | Unit | KPI Measuring Unit | ALWAYS ENABLED | ALWAYS VISIBLE | ALWAYS MANDATORY - |
| Reporting Period | DropDown | Period | KPI Reporting Period | ALWAYS ENABLED | ALWAYS VISIBLE | ALWAYS MANDATORY - |
| Aggregation Method | DropDown | Aggregation | KPI Aggregation Method | ALWAYS ENABLED | ALWAYS VISIBLE | ALWAYS MANDATORY - |
| Calculation Method | DropDown | Calculation Method | KPI Calculation Method | ALWAYS ENABLED | ALWAYS VISIBLE | ALWAYS MANDATORY - |
| Responsible Officer | DropDown | Responsible Officer | Responsible Officer for KPI | ALWAYS ENABLED | ALWAYS VISIBLE | ALWAYS MANDATORY - |
| Data Entry Officer | DropDown | Reporting Officer | Reporting Officer for KPI | ALWAYS ENABLED | ALWAYS VISIBLE | ALWAYS MANDATORY - |
| Custodian | DropDown | Custodian | KPI Custodian | ALWAYS ENABLED | ALWAYS VISIBLE | ALWAYS MANDATORY - |
| Data Source | DropDown | Data Source | KPI Data Source | ALWAYS ENABLED | ALWAYS VISIBLE | ALWAYS MANDATORY - |
| KPICategory | RadioButton | KPI Category | KPI Category | ALWAYS ENABLED | ALWAYS VISIBLE | ALWAYS MANDATORY - |
| Timeframe | RadioButton | Timeframe | Timeframe for KPI | ALWAYS ENABLED | ALWAYS VISIBLE | ALWAYS MANDATORY - |
| Input Type | RadioButton | Input Type | Input Type for KPI | ALWAYS ENABLED | ALWAYS VISIBLE | ALWAYS MANDATORY - |
| Active | CheckBox | Active | Indicates active KPI | ALWAYS ENABLED | ALWAYS VISIBLE | ALWAYS MANDATORY - |
| KPI Type | RadioButton | KPI Type | KPI Type | ALWAYS ENABLED | ALWAYS VISIBLE | ALWAYS MANDATORY - |
KPI Explorer: Target or Actual
Field Name | Field Type | Default Display Name | Default Help Text | Default Settings | ||
Field Enable | Field Visible | Field Compulsory | ||||
| Reporting Year | Dropdown | Reporting Year | KPI Reporting Year | ALWAYS ENABLED | ALWAYS VISIBLE | ALWAYS MANDATORY - |
| Target | Numeric | Target | KPI Target | ALWAYS ENABLED | ALWAYS VISIBLE | ALWAYS MANDATORY - |
| Variance | Numeric | Variance | KPI Variance | ALWAYS ENABLED | ALWAYS VISIBLE | ALWAYS MANDATORY - |
| Notes | Text | Notes | KPI Notes | ALWAYS ENABLED | ALWAYS VISIBLE | ALWAYS MANDATORY - |
KPI Explorer: Graph
No fields available for configuration.
KPI Evaluation
No fields available for configuration.
Configuring interplan Link
The interplan Link Object consists of one main tab:
- interplan Link
- Create New Action
- Existing Action
- Linked Action
This object and its tabs can be renamed.
 | Prerequisites and Dependencies
|
Create New Action
Field Name | Field Type | Default Display Name | Default Help Text | Default Settings | ||
Field Enable | Field Visible | Field Compulsory | ||||
| Business Unit | Dropdown - options provided are from Business Unit list | Custom Business Unit: | Select a Business Unit | ALWAYS ENABLED | ALWAYS VISIBLE | ALWAYS MANDATORY - |
| Service | Dropdown -options provided are from Service Profiles list (restricted to those within BU above) | Custom Service: | Select a Service | ALWAYS ENABLED | ALWAYS VISIBLE | ALWAYS MANDATORY - |
| Action | Text | Action | Please select Action | ALWAYS ENABLED | ALWAYS VISIBLE | ALWAYS MANDATORY - |
Resolution | CheckBox | Resolution | Select Resolution | ALWAYS ENABLED | ALWAYS VISIBLE | ALWAYS MANDATORY - |
Operational Plan Report | CheckBox | Council Plan | Select Council Plan | ALWAYS ENABLED | ALWAYS VISIBLE | ALWAYS MANDATORY - |
Resolution Details | CheckBox | Ref: | Select Ref | ALWAYS ENABLED | ALWAYS VISIBLE | ALWAYS MANDATORY - |
Best Value | CheckBox | Best Value | Select Best Value | ALWAYS ENABLED | ALWAYS VISIBLE | ALWAYS MANDATORY - |
EMTReport | CheckBox | EMT Report | Select EMT Report | ALWAYS ENABLED | ALWAYS VISIBLE | ALWAYS MANDATORY - |
Existing Action
Field Name | Field Type | Default Display Name | Default Help Text | Default Settings | ||
Field Enable | Field Visible | Field Compulsory | ||||
| Strategy | Dropdown - options provided are from Strategy list | Strategy: | Please select a Strategy | ALWAYS ENABLED | ALWAYS VISIBLE | ALWAYS MANDATORY - |
| Action | Dropdown -options provided are from Actions list (restricted to those within Strategy above) | Action: | Please select an Action | ALWAYS ENABLED | ALWAYS VISIBLE | ALWAYS MANDATORY - |
Linked Action
Field Name | Field Type | Default Display Name | Default Help Text | Default Settings | ||
Field Enable | Field Visible | Field Compulsory | ||||
| Business Unit | Dropdown - options provided are from Business Unit list | Custom Business Unit: | Select Linked Business Unit | ALWAYS ENABLED | ALWAYS VISIBLE | ALWAYS MANDATORY - |
| Service | Dropdown -options provided are from Service Profiles list (restricted to those within BU above) | Custom Service: | Select Linked Service | ALWAYS ENABLED | ALWAYS VISIBLE | ALWAYS MANDATORY - |
| Action | Text | Action | Select Linked Action | ALWAYS ENABLED | ALWAYS VISIBLE | ALWAYS MANDATORY - |
Resolution | CheckBox | Resolution | Select Linked Resolution | ALWAYS ENABLED | ALWAYS VISIBLE | ALWAYS MANDATORY - |
Operational Plan Report | CheckBox | Council Plan | Select Linked Council Plan | ALWAYS ENABLED | ALWAYS VISIBLE | ALWAYS MANDATORY - |
Resolution Details | CheckBox | Ref: | Select Linked Ref | ALWAYS ENABLED | ALWAYS VISIBLE | ALWAYS MANDATORY - |
Best Value | CheckBox | Best Value | Select Linked Best Value | ALWAYS ENABLED | ALWAYS VISIBLE | ALWAYS MANDATORY - |
EMTReport | CheckBox | EMT Report | Select Linked EMT Report | ALWAYS ENABLED | ALWAYS VISIBLE | ALWAYS MANDATORY - |
Configuring Final Approval
The Final Approval Object consists of one mandatory tab titled Final Approval (this can be renamed if required.)
Field Name | Field Type | Default Display Name | Default Help Text | Default Settings | ||
Field Enable | Field Visible | Field Compulsory | ||||
| Staff | Dropdown - options provided are from Staff list | Decision Maker : | Please select the Staff member | ALWAYS ENABLED | ALWAYS VISIBLE | ALWAYS MANDATORY - |
| Status | Options are system defaults - please contact CAMMS Support to have this modified. | Proposal Status : | Please select the Proposal Status | ALWAYS ENABLED | ALWAYS VISIBLE | ALWAYS MANDATORY - |
| Label Date | Date selection | Sign off Date: | Please Select Sign off Date | ALWAYS ENABLED | ALWAYS VISIBLE | ALWAYS MANDATORY - |
| Project Description | Multi Line Text Field | Description: | Please enter a project description | configurable | configurable | configurable |
| Project Approval Comment | Multi Line Text Field | Approval Comment: |
Please enter an approval comment
| configurable | configurable | configurable |
Configuring Custom Object
 | This object
|
Field Name | Field Type | Default Display Name | Default Help Text | Default Settings | ||
Field Enable | Field Visible | Field Compulsory | ||||
| Object Description : | Rich Text | N/A | N/A | N/A | N/A | N/A |
| Document section: | Section for the inclusion of documents which can be viewed by the user through the project record. Instructions: Enter the URL of an existing document or upload a file from your workstation. The URL can be a link to your TRIM document management system if your organisation has activated the TRIM document management functionality. | N/A | N/A | N/A | N/A | N/A |
| Custom Text Field (1-20 available) | Single Line Text Field | Custom Text Field: | Please Enter Custom Text Field | configurable | configurable | configurable |
| Custom Tickbox (1-20 available) | A tickbox with True/False value | Custom Tickbox: | Please Select Custom Tickbox | configurable | configurable | configurable |
| Custom List (1-20 available) | Dropdown - options areconfigured via Custom Lists area | Custom List: | Please Select Custom List | configurable | configurable | configurable |
| Custom Date (1-20 available) | Date selection | Custom Date: | Please select a value from Custom Date | configurable | configurable | configurable |
Configuring Scope
The Scope/Project Notes Object consists of one mandatory tab titled Scope/Project Notes.
 | This object
|
Scope/Project Notes
Field Name | Field Type | Default Display Name | Default Help Text | Default Settings | ||
Field Enable | Field Visible | Field Compulsory | ||||
| Custom Text Field (1-20 available) | Single Line Text Field | Custom Text Field: | Please Enter Custom Text Field | configurable | configurable | configurable |
Configuring Task Planning
The Task Planning Object consists of one mandatory tab titled Task Planning.
 | This object
Prerequisites and dependencies
|
Task Planning
In order to configure and activate the Custom Fields:
Go to Framework > Choose a workflow > Click on Task Planning Object
The administrator can configure the settings as shown below: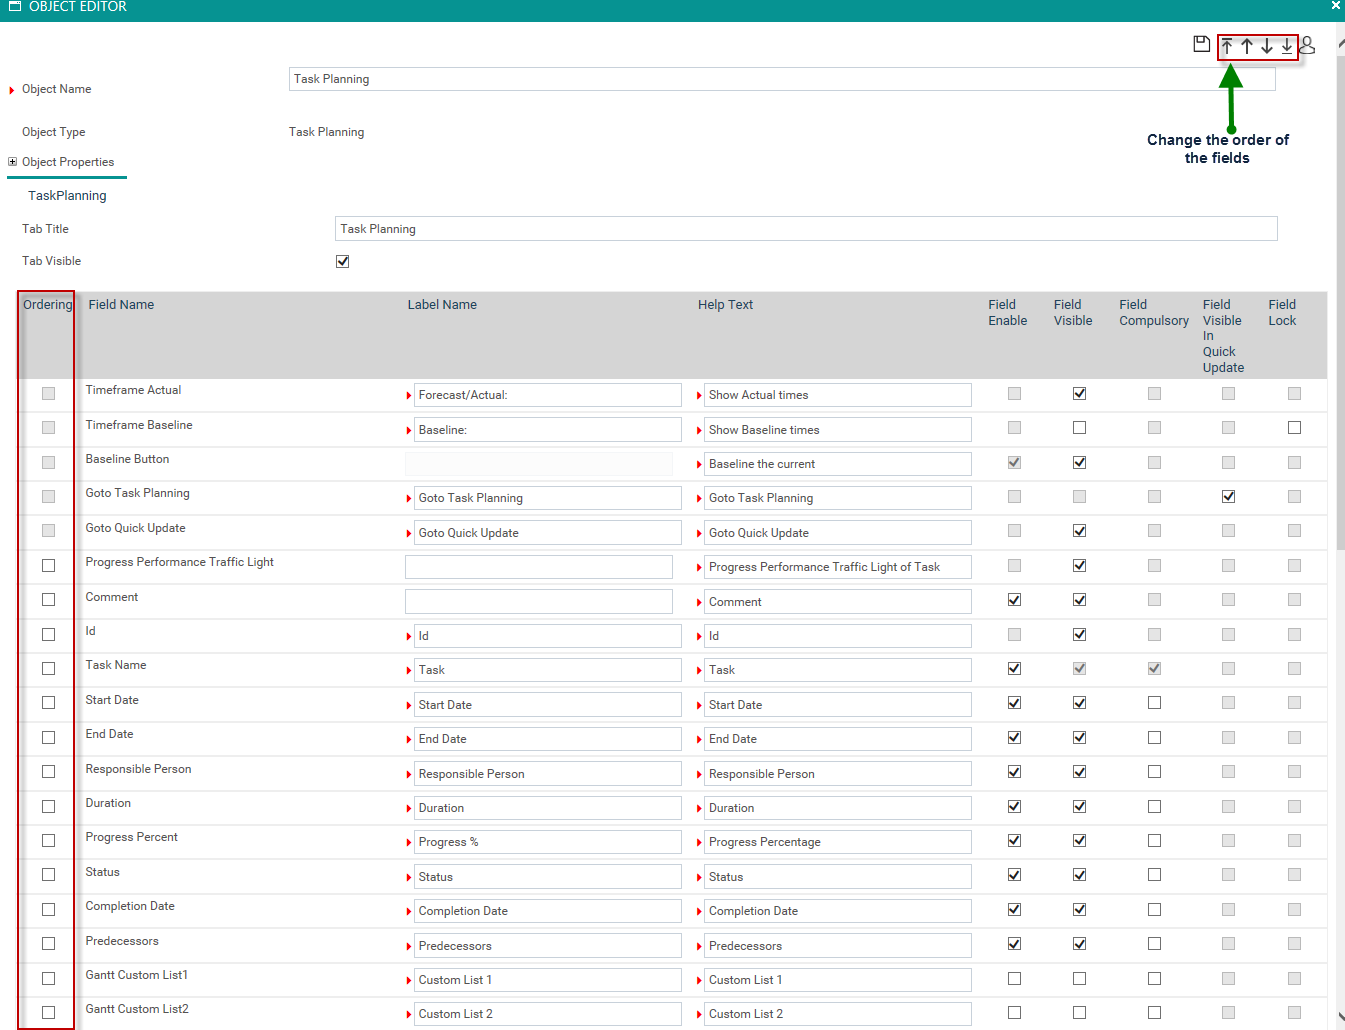
Choose the field by ticking the tickbox against it and use the arrows on top right corner of the object editor in order to change the order of the fields. The fields will appear in this order on the Task Planning object .
 | In order to change the label names for other custom fields (text fields, date fields and numerical fields), navigate to object framework area. |
The below table gives an overview of the fields which can be configured within this section.
Field Name | Default Display Name | Default Help Text | Default Settings | ||||
Field Enable | Field Visible | Field Compulsory | Field Visible in Quick Update | Field Lock | |||
| Timeframe Actual | Forecast/Actual: | Show Actual times | ALWAYS DISABLED | configurable | NEVER MANDATORY - | ALWAYS DISABLED | NEVER MANDATORY - |
| TimeframeBaseline | Baseline: | Show Baseline times | ALWAYS DISABLED | configurable | NEVER MANDATORY - | ALWAYS DISABLED | Configurable When ticked in an instance where a new baseline version is not created during a particular phase, the system will NOT auto create a new version upon phase sign off. |
| BaselineButton | N/A | Baseline the current | configurable | configurable | configurable | ALWAYS DISABLED | NEVER MANDATORY - |
| Goto Task Planning | Goto Task Planning | Goto Task Planning | ALWAYS DISABLED | ALWAYS DISABLED | ALWAYS DISABLED | configurable
| ALWAYS DISABLED |
| Goto Quick Update | Goto Quick Update | Goto Quick Update | ALWAYS DISABLED | configurable | ALWAYS DISABLED | ALWAYS DISABLED | configurable |
Progress Performance Traffic Light | N/A | Progress Performance Traffic Light of Task | ALWAYS DISABLED | configurable | ALWAYS DISABLED | ALWAYS DISABLED | ALWAYS DISABLED |
Task ID | ID | ID | ALWAYS DISABLED | configurable | ALWAYS DISABLED | ALWAYS DISABLED | ALWAYS DISABLED |
Task Name | Task Name | Task Name | configurable | ALWAYS ENABLED | ALWAYS ENABLED | ALWAYS DISABLED | ALWAYS DISABLED |
Comment | Comment | Comment | configurable | configurable | ALWAYS DISABLED | ALWAYS DISABLED | ALWAYS DISABLED |
Completion Date | Completion Date | Completion Date | configurable | configurable | configurable | ALWAYS DISABLED | ALWAYS DISABLED |
Start Date
| Start Date | Start Date | configurable | configurable | configurable | ALWAYS DISABLED | ALWAYS DISABLED |
End Date
| End Date | End Date | configurable | configurable | configurable | ALWAYS DISABLED | ALWAYS DISABLED |
Predecessors
| Predecessors | Predecessors | configurable | configurable | configurable | ALWAYS DISABLED | ALWAYS DISABLED |
Status | Status | Status | configurable | configurable | configurable | ALWAYS DISABLED | ALWAYS DISABLED |
| List Fields (5) | Custom List | Custom List | configurable | configurable | configurable | ALWAYS DISABLED | ALWAYS DISABLED |
| Single Line Text Fields (5) | Custom Text Field | Custom Text Field | configurable | configurable | configurable | ALWAYS DISABLED | ALWAYS DISABLED |
| Numeric Fields (5) | Custom Numeric Field | Custom Numeric Field | configurable | configurable | configurable | ALWAYS DISABLED | ALWAYS DISABLED |
| Data Fields (5) | Custom Tick Box/Date | Custom Tick Box/Date | configurable | configurable | configurable | ALWAYS DISABLED | ALWAYS DISABLED |
Progress Percent | Progress % | Progress Percentage | configurable | configurable | configurable | ALWAYS DISABLED | ALWAYS DISABLED |
Duration | Duration | Duration | configurable | configurable | configurable | ALWAYS DISABLED | ALWAYS DISABLED |
Responsible Person | Responsible Person | Responsible Person | configurable | configurable | configurable | ALWAYS DISABLED | ALWAYS DISABLED |
Configuring Task Update
The Task Update Object consists of one mandatory tab titled Task Update.
 | This object
Prerequisites and Dependencies
|
Task Update
Field Name | Field Type | Default Display Name | Default Help Text | Default Settings | ||
Field Enable | Field Visible | Field Compulsory | ||||
| Timeframe Actual | Date display | Forecast/Actual: | Show Actual times | ALWAYS DISABLED | configurable | NEVER MANDATORY - |
| TimeframeBaseline | Date display | Baseline: | Show Baseline times | ALWAYS DISABLED | configurable | NEVER MANDATORY - |
| BaselineButton | Button | N/A | Baseline the current | configurable | configurable | configurable |
Configuring Issue Register
The Issue Register Object consists of three tabs:
- Issues tab
- Actions tab
- Decisions tab
 | This object
|
Issues tab
Field Name | Field Type | Default Display Name | Default Help Text | Default Settings | ||
Field Enable | Field Visible | Field Compulsory | ||||
| Issue No | Auto generated number | Issue No: | Enter an Issue No | ALWAYS ENABLED | ALWAYS VISIBLE | ALWAYS MANDATORY - |
| Issue Title: | Single Line Text Field | Issue Title: | Enter an Issue Title | ALWAYS ENABLED | ALWAYS VISIBLE | ALWAYS MANDATORY - |
| Date Logged: | Date | Date Logged: | Date Logged | configurable | configurable | configurable |
| Date Resolved: | Date | Date Resolved: | Date Resolved | configurable | configurable | configurable |
| Responsible Person | Dropdown - options provided are from Staff list | Responsibility: | Select a Responsible Person for the issue | configurable | configurable | configurable |
| Project Issue Status: | Dropdown - options provided are determined during Scoping. Default values are Not Started, In Progress, Resolved | Status: | Select a Status | ALWAYS ENABLED | ALWAYS VISIBLE | ALWAYS MANDATORY - |
| Resolution: | Multi Line Text Field | Resolution: | Enter a Resolution | configurable | configurable | configurable |
Actions tab
Identical to the Issues tab above
Decisions tab
Identical to the Issues tab above
Configuring Project Implementation Budget
The Project Implementation Budget Object consists of one mandatory tab titled Project Implementation Budget.
 | This object
|
Configuring KPI Progress
The KPI Progress Object consists of one mandatory tab titled KPI Progress.
 | This object
Prerequisites and Dependencies
|
KPI Progress
No fields available for configuration.
Configuring Assess Project Result
The Assess Project Result Object consists of one mandatory tab titled Assess Project Result (this can be renamed if required.)
Field Name | Field Type | Default Display Name | Default Help Text | Default Settings | ||
Field Enable | Field Visible | Field Compulsory | ||||
| Project Comments | Text | Project Comments | Please Enter Comments to assess project Results | ALWAYS ENABLED | ALWAYS VISIBLE | ALWAYS MANDATORY - |
Configuring Objectives Assessment
The Objectives Assessment Object consists of two mandatory tabs:
Project Objectives
Project Budget
 | This object
Prerequisites and Dependencies
|
Project Objectives
Field Name | Field Type | Default Display Name | Default Help Text | Default Settings | ||
Field Enable | Field Visible | Field Compulsory | ||||
| Project Comments | Text | Project Comments | Please Enter Comments to assess project Results | ALWAYS ENABLED | ALWAYS VISIBLE | ALWAYS MANDATORY - |
Project Budget
No fields available for configuration.
Configuring Lessons Learned
The Lessons Learned object can be added to multiple phases of the workflow. However, the object can be added only once within a particular phase.
The object behaviour is unique and incremental. Hence, details entered in previous phases will flow to next available phases. However, this procedure will not occur vice versa.
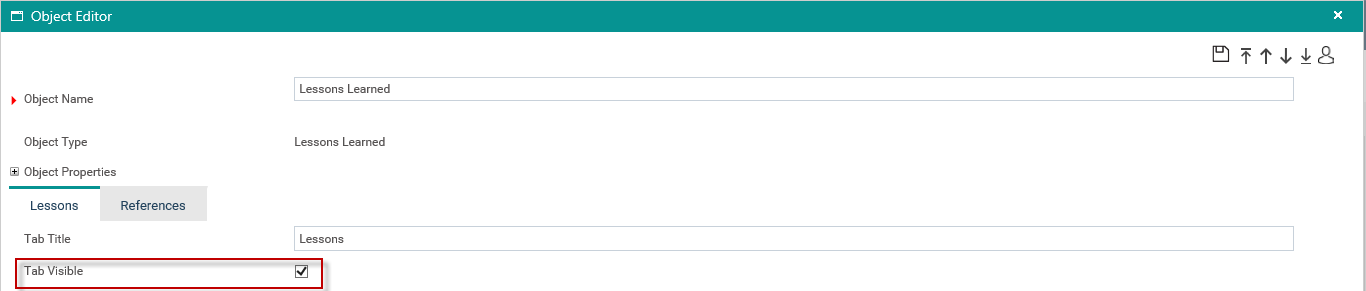
There are two sections (tabs) within the configuration area: References and Lessons. The administrator can edit the tab titles.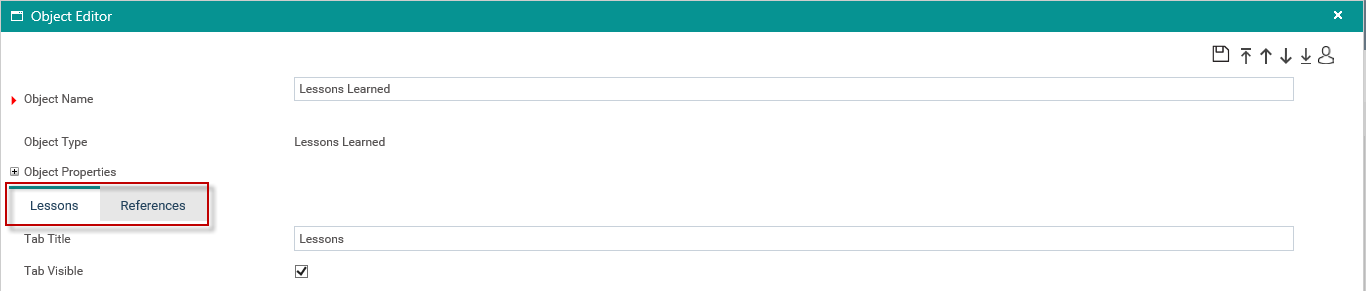
The administrator can show/hide tabs by selecting/unselecting the ‘Tab Visible’ select-box.
Object level permissions can be configured within this section as well (by the administrator).
Furthermore, ‘Project Position Permissions’ for the object can be configured via Project Settings > Project Position section.
 | Please note that ‘Object Level Permission’ will always supersede the ‘Project Position Permissions.’ |
Configuring Advance Scope
This object provides you the ability to enter and map the data from one phase to other phases. Only one advance scope can be set up for each phase.
In order to set up an Advance Scope Object,
Go to Framework > Choose the workflow > Drag and drop the 'Advance Scope' object to the relevant phases>Click on the 'Object Editor'
You can add up to 20 Custom Fields configuring Label Name, Help Text, Field Code and Mapping Filed in order for the information to appear on the desired Phase.

Mandatory fields which you need to fill are marked with red arrows. Using the 'Advance Scope Document Links' check box, you can decide if you want this section to appear on the Advance Scope object.
In order to display the fields from the previous phase, you can click on the Mapping Field dropdown. When you click on the Mapping Field drop down, a new window will appear giving you a list of fields from the previous phase advance scope object. You can choose the field and click on the 'Select' button to map.
Configuring Project Lists
The object can be included in multiple stages of the project workflow allowing you to select items as the project progress.
5 multi select lists are included where the administrator can configure the label, visibility, based on the stage the object is included.
Configuring Close Project
The Close Project Object consists of one mandatory tab titled Close Project (this can be renamed if required.)
Field Name | Field Type | Default Display Name | Default Help Text | Default Settings | ||
Field Enable | Field Visible | Field Compulsory | ||||
| Staff | Dropdown - options provided are from Staff list | Staff | Please select the Staff member | ALWAYS ENABLED | ALWAYS VISIBLE | ALWAYS MANDATORY - |
| Close | Tickbox | Close | Please select to Close the Project | ALWAYS ENABLED | ALWAYS VISIBLE | ALWAYS MANDATORY - |
| Label Date | Displays date | Date | Close Date | ALWAYS ENABLED | ALWAYS VISIBLE | ALWAYS MANDATORY - |
| Label Officer | Displays staff name | Officer | Officer who Closed the Project | ALWAYS ENABLED | ALWAYS VISIBLE | ALWAYS MANDATORY - |
Configuring Incident object
The Incident object is one of the optional objects that can be added to the workflow. It can be added multiple times within a single workflow and multiple times within a phase of the workflow. The behavior of the object can be common or unique or unique incremental, which can be configured by Camms.
The title of the Incident object is configurable, and the Incident tab can be hidden if required to do so.

Incident object will include below fields. Administrator will be able to make the fields visible in the object, and change Label Name and Help Text.
Field Name | Label Name | Help Text | Field Enable | Field Visible | Field Compulsory |
Code | Code | Code | Unticked and Disabled | Ticked and enabled | Unticked and disabled |
Title | Title | Title | Unticked and Disabled | Ticked and disabled | Unticked and disabled |
Description | Description | Description | Unticked and Disabled | Ticked and enabled | Unticked and disabled |
Type | Type | Type | Unticked and Disabled | Ticked and enabled | Unticked and disabled |
Reported Date and Time | Reported Date and Time | Reported Date and Time | Unticked and Disabled | Ticked and enabled | Unticked and disabled |
Reported By | Reported By | Reported By | Unticked and Disabled | Ticked and enabled | Unticked and disabled |
Responsible Officer | Responsible Officer | Responsible Officer | Unticked and Disabled | Ticked and enabled | Unticked and disabled |
Status | Status | Status | Unticked and Disabled | Ticked and enabled | Unticked and disabled |
Category Name | Category Name | Category Name | Unticked and Disabled | Ticked and enabled | Unticked and disabled |
Administrators can re-order the fields in the Incident object using the field drag and drop functionality or re-order icons on the top toolbar of the object editor.
Administrators can pre-define the types of incidents that can be created or linked within each Incident object if he/she wants to restrict users to create/link only incidents of the specified Incident Types. This can be done by following the steps below;
STEP 1: Navigate to the object editor area of the Incident object.
STEP 2: You will be able to view a multi-select dropdown list called 'Incident types to be used in the object’. You can select a certain incident type by selecting the tick box next to the relevant incident(s). You can select multiple incident types if required.

Note: The Incident object will be available within the workflow configuration area in Camms.Project only for the clients who have the incident module (Incident Capabilities in Camms.Risk) activated.
Credit Risk Assessment
In the object editor area following options are included:
| Field Name | Referring Object |
| Project Duration | Number of days taken from the timeframe field in project detail object |
| Project progress | % completed field from the project detail object |
| Income | Total income taken from preliminary budget object |
| Expenditure | Total expenditure taken from preliminary budget object |
| Net budget | Difference between the budget and income from the preliminary budget object |
| Project Note Started | Status field in project details |
| Project is In-progress | Status field in project details |
| Project is ongoing | Status field in project details |
| Project is deferred | Status field in project details |
| Project is completed | Status field in project details |
| Project is terminated | Sign off status |
| Assessment Score | Total assessment score |
| Initial Risk Assessment Score | From the assessment object |
| Revised Risk Assessment Score | From the assessment object |
| Future Risk Assessment Score | From the assessment object |
In addition to the above standard fields, administrator can add below criteria to configure the formula if needed. Using the ‘Add Criteria’ button.
All fields in the custom objects>custom tab (list fields, text field, etc.). fields will display as follows;
Using the field code, administrator can configure the visibility condition for the object within the provided text-box in the formula screen.
When you click on the ‘Add Criteria’ button, a new pop-up will be displayed listing custom object fields and to select completed objects.
You can select one or multiple criteria using the check-boxes placed next to each row. Clicking on the ‘Insert’ will add the selected criteria to the formula screen.
Configured formula will be added to the first screen of the object editor upon save.
Similar to visibility condition configuration, 'Enable Condition' also can be configured by clicking on the ‘Enable Condition’ box. For example: Credit Risk Assessment object edibility will be based on full proposal and costing object completion.
When enable condition is configured, until the condition is fulfilled, the object will be non-editable for all users including IPM administrators. Same is applied for visibility condition.
In order to enable and view a phase, the conditions for the object should be configured properly.
Configuring Terminate a Project Object
Administrators can include 'Terminate Project' object when defining a workflow.
Terminate Object can be included only ONCE in a workflow.
This is another sign off. Hence, all features included for other sign off objects are included in this object as well.
It is recommended to include terminate project sign off in a separate phase “Terminate" phase since there could be other activities that needs to be carried out once the termination is approved.
Terminate sign off object will be included in the project position permission configuration area for the administrator to configure which position can submit (can edit) for approval and who has the permission to authorise (can finish/sign off). All the permissions applied in other standard sign offs will be applied here as well.
Configure Position Permission for Each Object within a Workflow
In the object editor area, click on 'Set Permission' icon. Administrators can edit permissions within this section for a particular object.
By default, positions and permissions configured in Project Settings area will be applied.
Permissions changed within this section will be applicable for the select object Only.
When the same object is placed in multiple phases or multiple times within a phase, permissions can be configured per object
For Example: Stakeholder object is placed in planning phase and implementation phase for ABC workflow. Administrator can configure different permissions for each phase for this object. Likewise, custom object can be placed in multiple times within a phase and in multiple phases. Administrator can configure different permission rights object wise.
Object permission screen will be applied to all the objects in cammsproject including the sign off objects.
For each object, Administrator can configure following permissions;
- Can view
- Can add
- Can edit
- Can delete
- Can finish/Sign off (when an object sign off is placed, only staff with this permission can give approval)
For Project Detail object, additional column will be placed in the position screen to configure ‘Can edit’ permission for the quick update.
When ‘can view’ permission is un-ticked, then rest of the permissions (can add, can edit, can delete) will be un-ticked and disabled. Meaning when the project position does not have permission to view an object, then rest of the permissions becomes obsolete.
Mark an Object as Completed
The Completed Icon will be placed in the toolbar for each project object.
Users with 'Add' and 'Edit' permissions to the selected object can confirm the activities within the object is completed by clicking the icon. However, you can still go back and mark it as 'Incomplete' if required.
  This option can be activated by your administrator from the 'Project Settings' area. Once activated this will be applied to all the objects in the application.
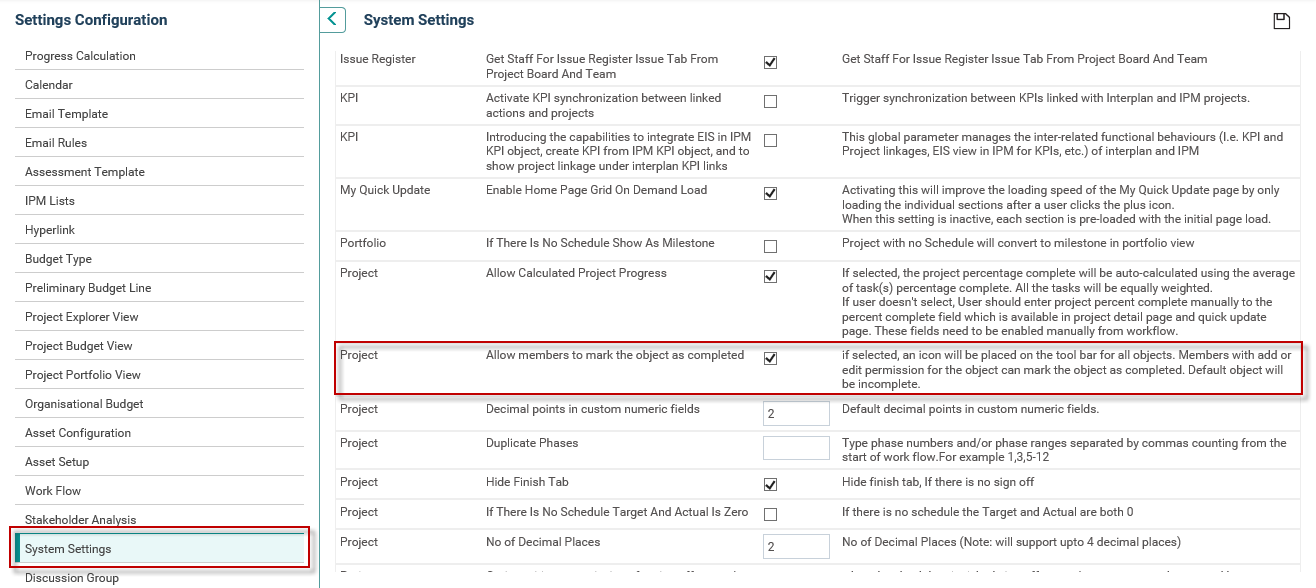
Configure from which Previous Object (Activity) the Project should Get Opened
This allows the sign off authoriser to either make the decision as ‘Approve’, ‘Reject’ or ‘Re-open’.
If decision is ‘re-open’, then the project will be open from the activity (object) the administrator has configured in the template area.
This property is included in all Sign Off objects: Final Approval, Close Project, Terminate Sign Off and Custom Sign Off. Also, the same applies in Change Request Sign Off Process.
Administrator can change the label name and visibility. By default, it will be inactivated.
Below the 'Re-Open', 'Re-open from' property is displayed. Click on this to open the workflow.
IPM administrator can decide from which activity (object) the project should get re-opened.
Only the previous phase activities (objects) will be able to re-open from. Forward phase activities will be shown in disabled. mode.
Example: If workflow has 4 stages (Proposal, Initiation, Planning and Close). IPM is configuring the ‘re-open’ in the a sign off at the planning phase. Then object that will be able to select to re-open from would be Proposal to Planning. Objects within the ‘Close’ phase will be displayed in disabled mode.
Assigning Sign Off Templates
Within this section, the 'Sign Off' objects are created and applied to workflows. It enables any project to use the "Sign Off" object to freeze the remaining activities (phases and objects) until the sign off section is completed.
STEP 1: Click on the "New'' icon from the 'Sign-Off Templates' section.

STEP 2: Enter the following requisite data.
 | Your administrator can edit the visibility, access, settings and the appearance of the fields in the sign-off object. |
You can re-order the sections (e.g. Sign-Off Status, Sign Off Action button panel, Sign-Off General Comments, Sign-Off History Comments) in the Sign-Off objects. The fields within a section (Sign Off Property) will not be able to be re-ordered.
To reorder a section, you can:
- Select the ‘Ordering’ tick box adjacent to the ‘Sign Off Property’ and click on ‘Top’, ‘Bottom’, ‘Move Up’ or ‘Move Down’ icons on the toolbar
- Drag the section (Sign Off Property) and drop it to the required position in the grid.

STEP 3: Click 'Save'.
 | The Sign Off Request emails are sent by staff members who have 'can edit' permissions and Sign Off Completion can only be done by staff members who hold 'can finish' permissions; given by system administrator. Emails are sent only when the corresponding operations are completed and those Sign Off emails needs to be configured within 'Setting Configuration'. Generic type emails are triggered when you configure the template and click the relevant phase/object 'Save' icon. |
Field | Descriptions / Instructions | Mandatory / Optional |
Title | Specify a name for the sign off object | Mandatory |
Description | Add a brief description | Optional |
Select Request Template | Allows you to assign a sign off request Email template to the sign off object. Provides a list of Sign Off Request Email templates in the system to choose. Refer article Administration Framework – Project Settings under section 'Email Templates' for further details. | Mandatory |
Select Complete Template | Allows you to assign a sign off complete Email template to the sign off object. Dropdown provides a list of Sign Off Complete Email templates in the system to choose. Refer article Administration Framework – Project Settings under section 'Email Templates' for further details. | Mandatory |
Field Settings | Similar to the standard Object Editor; allows you to alter the terminology/visibility settings of each field. Some field settings are fixed (greyed out) and cannot be modified. | Optional |
Can Proceed Without Sign off | Ticking 'Can Proceed without Sign Off' tick box allows you to progress without signing off. You can proceed to next phases without anyone having to sign off from the current phase. | Optional |
Sign Off Process | Allows Administrators to configure the sign off process. Refer Sign Off Process Details for more information. | Optional |
IPM Administrator manage authorises and steps | Tick this select-box if you require administrator to manage and authorise project phases | Optional |
Sign Off Authority | Defaults to Project Owner. Can change this to Project Sponsor or allow users to select from a dropdown list of all existing staff. | Optional |
| Select a copy of the completion email to | Select others to send an email reminder on sign off completion. | Optional |
Please refer Configure from which previous object (activity) the project should get open for more information on Re-open sign off property.
 | A Sign Off Object can be attached to a project phase or to an object. If it is attached to the phase, you will find the sign off at the end of the phase and without the sign off completion you cannot proceed to the next phase. For example, if you have a 'Business Case' object which needs a sign off, then you must drag and drop the 'Business Case Sign Off' object onto the 'Business Case' object within the workflow (so that it attaches to the object and not the phase). Similarly you can attach the sign off object to a phase by dragging and dropping the object at the end of a phase. After assigning a sign off object you can rename it to any desired name regardless of the original sign off object name. See below example "drag and dropping sign offs' for more information. Refer Creating Phases and Objects for more information. |
Templates for Sign Off Request and Sign Off Complete emails have to be set up under Settings Configuration > Email Template in order to receive an email. If the email templates are not configured properly, the email will not be sent (See article Administration Framework – Project Settings under section 'Email Templates' ).
See below for additional business rules.
Assign Sign Off Objects Business Rules
If Project Owner is selected as Sign Off Authority, the Sign Off Request email will be sent to the email address of the user designated as Project Owner. Similarly, if Project Sponsor is selected as Sign Off Authority, the Sign Off Request Email will be sent to the email address of the user designated as Project Sponsor. If 'Dropdown selection' is selected as Sign Off Authority, it will allow users to select only the staff members who are in the 'Project Board & Team' as the Sign Off Authority at the point where the sign off is required (depends on workflow). The selected user will then receive the Project Sign Off Request.
When the Sign Off Authority approves, defers or rejects the project, the Sign Off Complete email is generated to the Project Owner.
These notifications will only be sent if the users in question have valid email addresses and if the corresponding email templates (Sign Off Request and Sign Off Complete) exist. Refer article Administration Framework – Project Settings under section 'Email Templates' .
STEP 4: To edit a sign off template, simply click on an existing sign off template.
Drag and Drop Sign Offs
There are two different ways to add a sign off to a phase of the workflow.
1) For a Phase sign off excluding 'Final Approval', drag the email sign off object to the Phase Header
Note: If the sign off is the 'Phase' sign off, it must be added at the end of the phase as the next object number (not linked to a different object).
If you need to add other different sign offs throughout the phase, you drag and drop the sign offs at that object. However it will not be considered as a 'Phase sign off'. This is important when setting your workflows as the 'Project Current Phase' of the project will be driven by these 'Phase sign offs'.

2) For the Final Approval Sign off:
Drag the email sign off object and hover over the final approval object at the bottom of the phase.
Note: this is for the final approval of the project and will impact the 'Project Approval Status'.
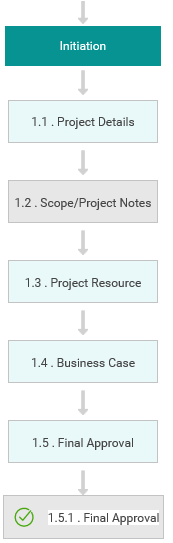
Sign Off Process Details
When concurrent sign off process (workflow base) option is selected, follow two options (radio buttons) will be displayed to configure the number of approvals needed.
- At least one approval needed
- All approvals needed
When sequential sign off process (workflow base) is selected (which is the default process) , there will not be able sub options to select from.
When sign off process configured project base is selected, there will not be sub options select from in the object editor area since configuration will be done in project side.
When a sign off process is changed (workflow/project base & sequential/concurrent), it will impact only to the projects where the sign off is not initiated.
If the sign off has already initiated, and those will reflect the selected sign off process at the time of submitting for approval.
This is common for both workflow and project base sign off process.
View Signed off Time in the History Section
You can view both the Signed Off Date and Time in the History section of the Sign Off object.
Configuring the sign off process for document approvals
You can configure the sign off process for document approvals by following the steps below;
1. Navigate to the object which you wish to configure the sign off process for documents. There, you will see a field titled as "Document Sign Off". You can activate the document approval functionality for the object by selecting the Field Visible tick box next to the "Document Sign Off" field.

2. Once you click on the 'Setup Sign Off' button, another pop-up window will be displayed. This pop-up window will consist of a sign off template.
Enter the pre-requisite data and click on Save.
Note: Currently, the document approval functionality is available in Attach Document, Advanced Scope and Custom Attachment tab in Custom Objects.