Allocation Overview
This section will give you an overview of the resource allocation.
When you click on the 'Filter' icon located on top right corner of the screen, a popup (shown below) will appear enabling you to define the resources under criteria such as data period and allocation type (under allocated and over allocated).

The list of resources which would appear on the left side of the screen will be as per the refined criteria.
Tick the positions which you would like to check the allocation on and click the green colour 'Draw' icon on the right top corner. A detailed pie chart will appear as shown below providing the allocation of resources with number of hours.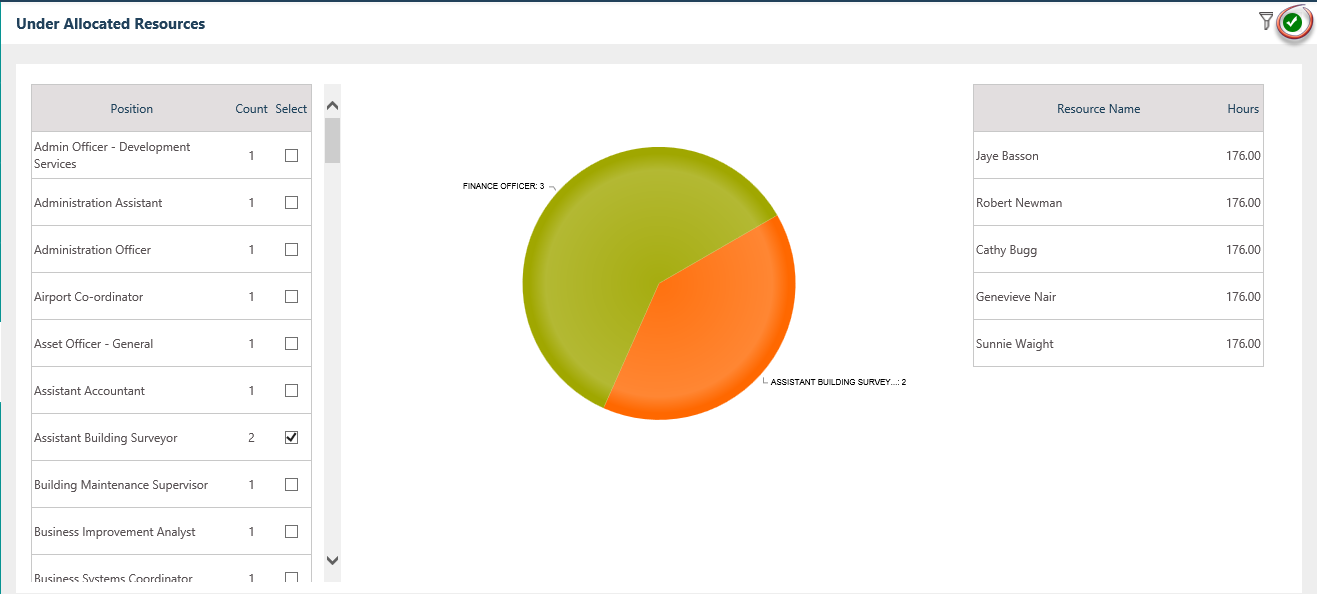
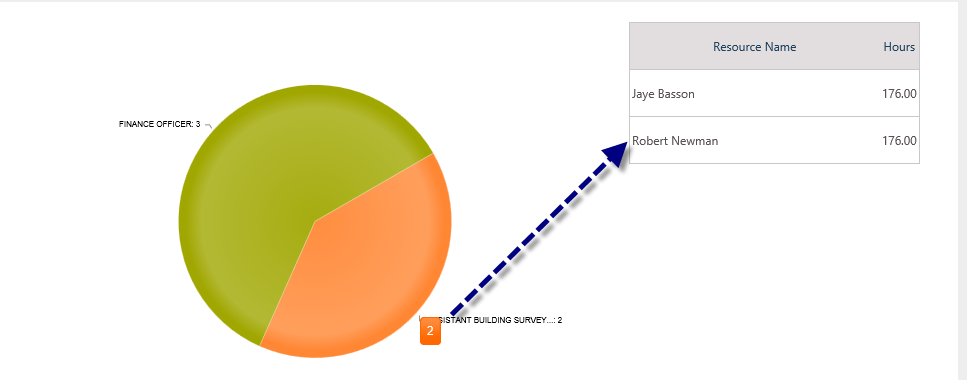
Hover above any section of the pie chart and click on the segment to view more details. The names of the staff members will be displayed. (Project Managers shown in the below screenshot).
Resource Utilisation
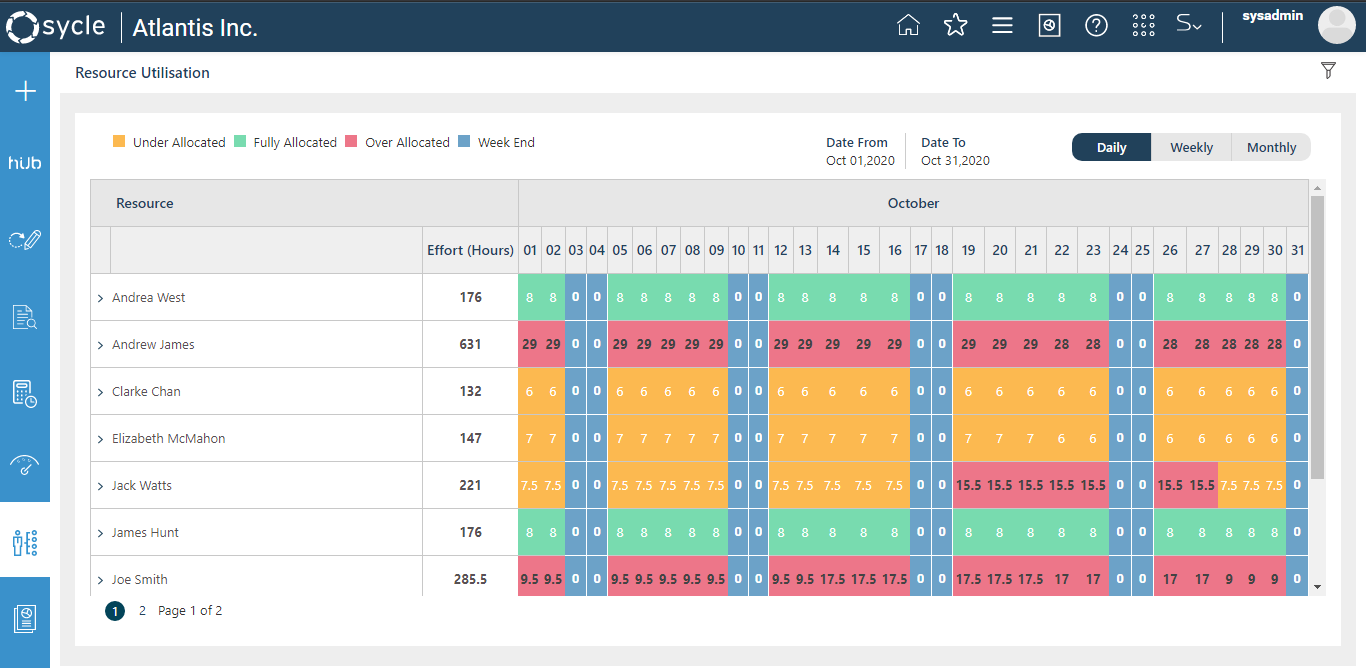
This section provides an overview of the resource utilisation under certain criteria such as over allocation, under allocation, weekends, holidays, etc. using different colour combinations. The resources will appear on the left side as per filtered options. The time allocation completed through Task Planning will be displayed where you can change if required. When you change the time allocation from Resource Utilisation, those time changes will be reflected on the Task Planning area.
The total effort will be displayed as a summary against each resource under the effort column.
You cannot edit/update any details which prior to the current date. However, the task allocation details for dates which falls after the current date can be changed from the chart by clicking on the no. of hours.
Filter Criteria
 You can filter resources via the Filter area of the Resource Utilisation page, which can be accessed by clicking on the Filter icon on the top toolbar.
The filtering criteria available in the Resource Utilisation page are mentioned in the grid below:
Criteria | Description |
| Select Search Template | Allows users to select an existing search template for filtering |
From Date | The start date for the time period |
To Date | The end date for the time period |
Organisational Link | Directorate to which the resource is under |
Staff Position | Staff position of the Resource |
Project Manager | Project Manager of the Resource |
Resource | Keyword of the Resource (Autofill will provide options) |
Allocation Type | If the resource is over allocated or under allocated |
| Reporting Officer | Reporting Officer of the Resource |
| Project Status | Status of the project (Open, Upcoming and Closed). By default, only open and upcoming projects will be shown |
| Project Position | Project position of the Resource |
Note: The reporting officer filter is only available if the Reporting Officer functionality is activated by Camms. Please contact Camms Support if you wish to activate the Reporting Officer functionality.
Saving filters as templates
You can save search criteria as a template for later use by following the steps below:
STEP 1: Select the filters you would like to save as a template, and select the 'Save Search Template' tick box.
STEP 2: Once you select the 'Save Search Template' tick box, you will see a text box below it. Enter the name for your search template, and click on 'Filter' button to save it.

Searching by selecting an already existing template
You can select an existing template when filtering resources via the Select Search Template dropdown list in the Filters area.
Viewing, editing and deleting existing templates
You can view already created templates by clicking on the Pencil icon next to the Select Search Template dropdown list.
A pop-up window which contains all created templates will be displayed when you click on the Pencil icon.

You can delete any existing template by clicking on the Delete icon next to it.
Setting a search template as default
You can set a search template as default in two ways:
1. Via the Filters area
In order to set a certain search template as default via the Filters area, you can follow the steps below;
STEP 1: Select the template which you want to set as default from the 'Select Search Template' dropdown list.
STEP 2: Select the 'Set as default' tick box and click on the 'Filter' icon to save your changes.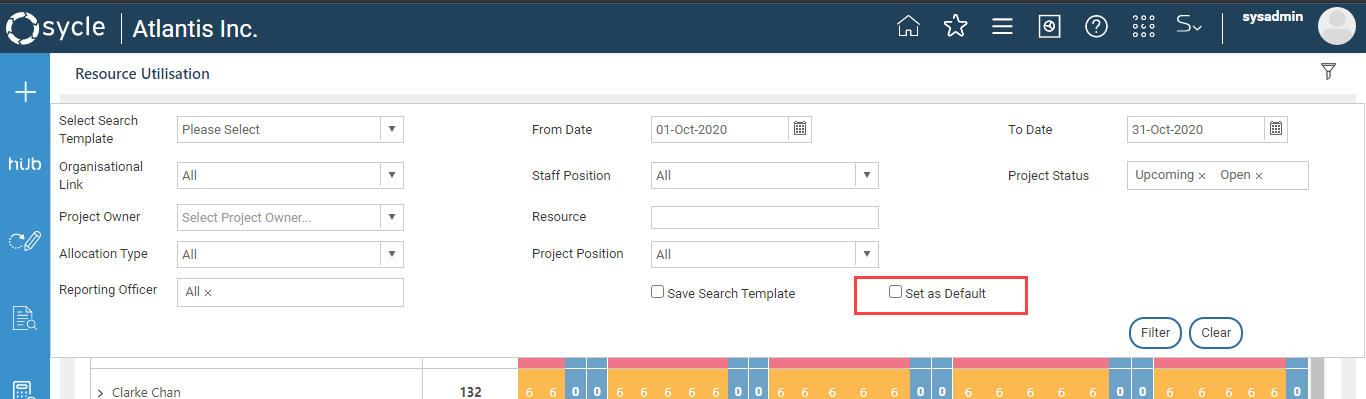
2. Via the templates area
In order to set a certain search template as default via the Templates area, you can follow the steps below:
STEP 1: Click on the Pencil icon next to the 'Select Search Template' dropdown list.
STEP 2: Click on the 'Default' icon adjacent to the template which you wish to set as default, and click on 'Save'.
Daily, weekly and monthly views
You can view allocations of resources for projects in projects using daily, weekly and monthly views.
1. Daily View (Default View)
2. Weekly View
You can switch the view of the Resource Utilisation page to weekly view by clicking on the 'Weekly' option in the toggle on the top right corner.

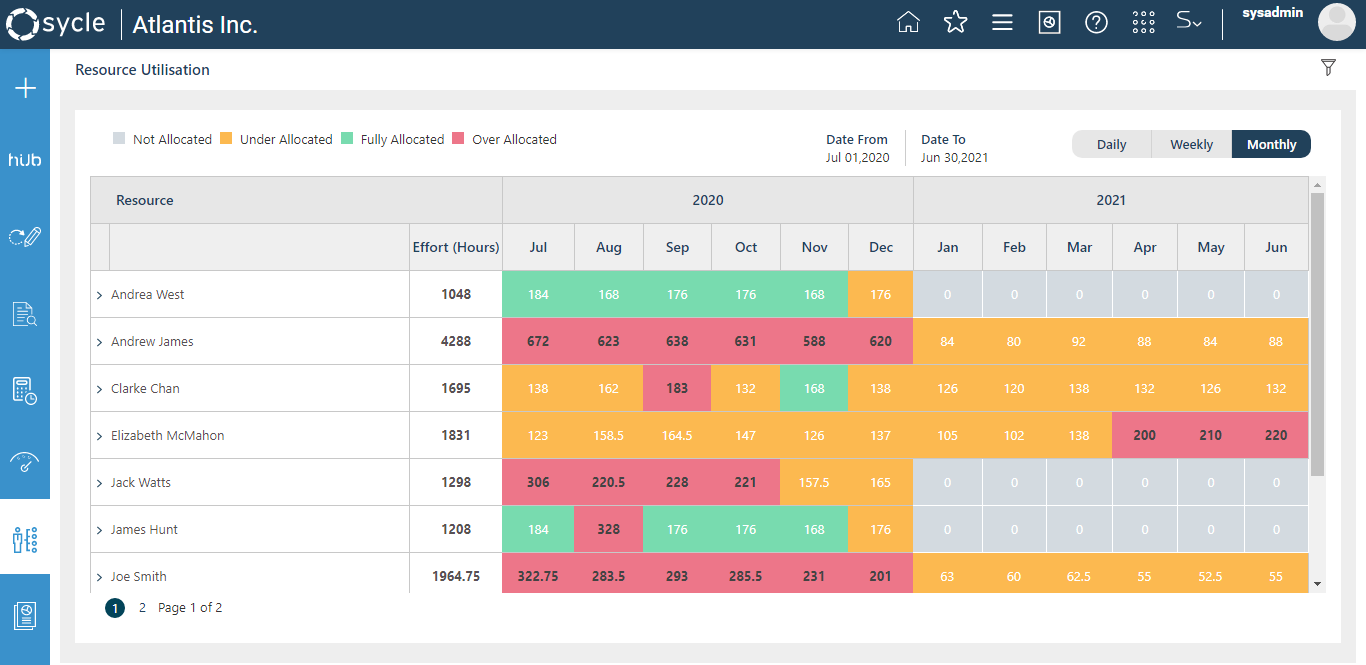
3. Monthly view
You can switch the view of the Resource Utilisation page to monthly view by clicking on the 'Monthly' option in the toggle on the top right corner.
Viewing allocations of resources
You can expand the resource to view more details on his or her allocations. You can further expand the project by clicking the 'plus' sign against it to view the Tasks related to the project as shown below:
You cannot add any hours/tasks to the dates on which the staff is on leave. When you click on a resource (shown in below screenshot), you will be taken to a screen which will enable you to edit/update the leave status and settings for the resource (next screenshot).


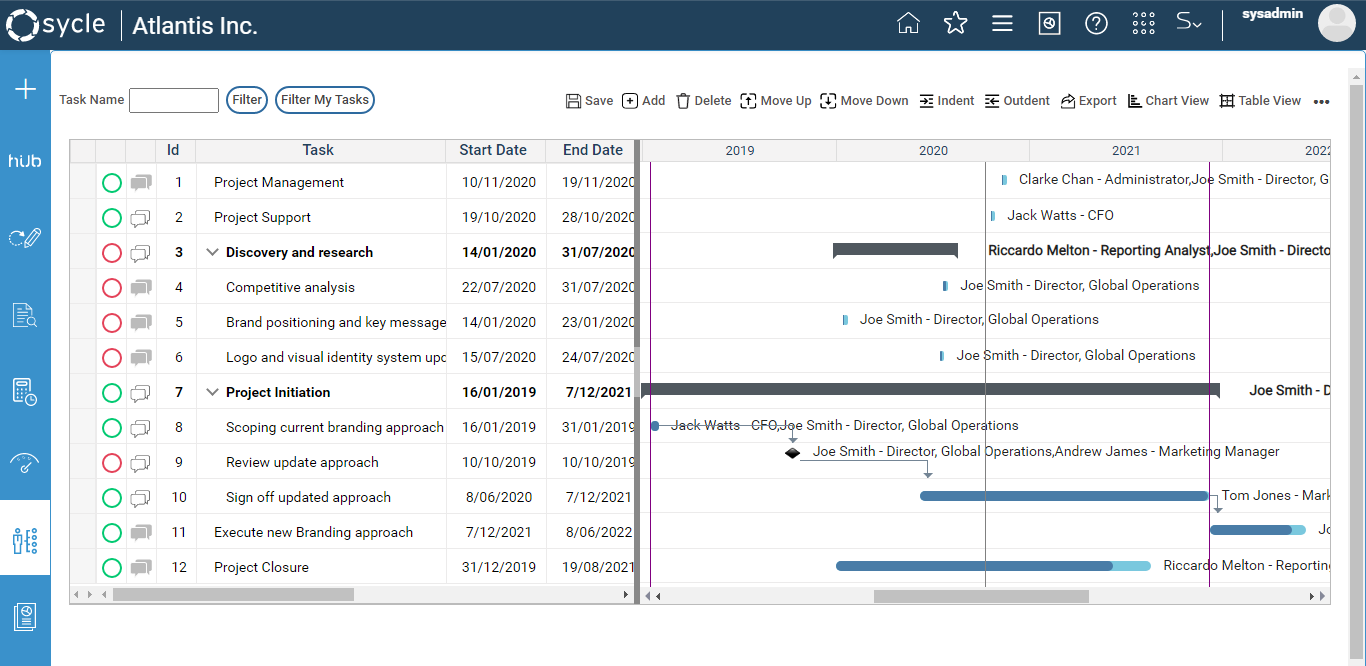
When you click on a project, 
It will direct you to a screen which will show the tasks of the project under the list fields along with a Gantt chart (Task Planning).

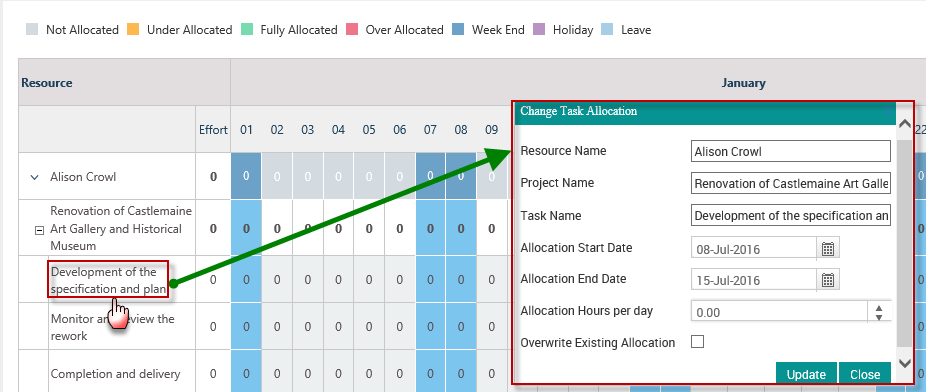
When you click on a task, a pop up as shown below will appear to allow you to change the Task Allocation for a given date range. Please tick the 'Overwrite Existing allocation' option if you wish to overwrite the current allocated time.
When you update the number of allocated hours of a staff member for a day from Resource Utilisation, the system will calculate the Hours Per Day in the Resource Allocation pop-up in the Gantt as follows.
Hours Per Day = Total effort for the task/Task duration
E.g.
The duration of the task ‘Project Management’ is 2 days (Start date: 11th August and End Date: 13th August)
The number of hours per day in the Resource Allocation pop-up in the Gantt against the staff ‘Clarke’ is 8.
In the Resource Utilization, when you update the no. of hours against Clarke for 11th Aug as 10, the system will calculate the Hours Per Day in the Gantt as given below and update the Hours Per day for 11th and 12th Aug against Clarke with 9.
Hours Per Day = (10+8) / 2 = 9
Project Utilisation
Similar to the Resource Utilisation, this section provides an overview of the Project utilisation under certain criteria such as over allocation, under allocation, weekends, holidays etc. using different colour combinations. The projects will appear on the left side as per the filter options.
The time allocation completed through Task Planning will initially appear where you can change if required. When you change the time allocation from Project Utilisation, those time changes will be reflected on the Task Planning area.

Filtering Criteria
When you click on the 'Filter' icon located on top right corner of the screen, the below screen will appear.

Please see below grid for the descriptions on the filter criteria.
Criteria | Description |
| Select Search Template | Allows users to select an existing search template for filtering |
From Date | The start date for the time period |
To Date | The end date for the time period |
Project Status | Status of the project (Open, Upcoming and Closed). By default, only open and upcoming projects will be shown |
Task Status | The current status of the task |
Project Manager | Project Manager of the Project |
Project Name | Keyword of the Project (Autofill will provide options) |
| Reporting Officer | Reporting Officer of the Resource |
Note: The reporting officer filter is only available if the Reporting Officer functionality is activated by Camms. Please contact Camms Support if you wish to activate the Reporting Officer functionality.
Similar to the Resource Utilisation page, you can save search templates for later use.
Viewing resources allocated to projects
Simply click on the arrow against the Project in order to expand it to get further elaboration through sub tasks. You can view project allocations using daily, weekly and monthly views.

When you click on a project, It will direct you to a screen which will provide the tasks of the project under the list fields along with a Gantt chart (Task Planning).
When you update the number of allocated hours of a staff member for a day from Project Utilisation screen, the system will calculate and update the Hours Per Day in the Resource Allocation pop-up in the Task Planning object (Gantt) as follows.
Hours Per Day = Total effort for the task/Task duration
The Legend (Colour codes)
 The grid below elaborates on each of the colour codes used in the Resource Utilisation and Project Utilisation pages.
| Legend | Description |
| Over Allocated | This colour code shows resources who are over-allocated. Daily View: Resources who are allocated for more than the number of working hours per day. Weekly View: Resources who are allocated for more than the number of working hours per week. The number of working hours per week= number of working hours per day * Number of working days per week. Monthly View: Resources who are allocated for more than the number of working hours per month. The number of working hours per week= number of working hours per day * Number of working days per month. |
| Not Allocated | This colour code shows the resources who are not allocated for any tasks for a particular date |
| Under Allocated | This colour code shows resources who are under-allocated. Daily View: Under Allocation slots define resources who are allocated for less than the number of working hours per day. Weekly View: Under Allocation slots define resources who are allocated for less than the number of working hours per week. The number of working hours per week= number of working hours per day * Number of working days per week. Monthly View: Under Allocation slots define resources who are allocated for less than the number of working hours per month. The number of working hours per week= number of working hours per day * Number of working days per month. |
| Fully Allocated | This colour code shows resources who are fully allocated. Daily View: Fully Allocated slots define resources who are allocated for exactly the number of working hours per day. Weekly View: Under Allocation slots define resources who are allocated for exactly the the number of working hours per week. The number of working hours per week= number of working hours per day * Number of working days per week. Monthly View: Under Allocation slots define resources who are allocated for exactly the Number of working hours per month. The number of working hours per week = number of working hours per day * Number of working days per month. |
| Weekends | This colour code indicates the resources who are allocated on weekends. Weekly View:
|
| Leave | This colour code indicates the resources who are allocated on leave days. Weekly View:
|
| Holidays | This colour code indicates the resources who are allocated on holidays.. The holidays are defined by your administrator. Weekly View:
|
Note: The number of working hours per day is defined by your administrator.