Overview
My Quick Update can be used to quickly update (edit only) the most frequently changed details.

The default quick update page set through My Settings will be loaded once navigated to Overall Quick Update. You can load other quick update pages by selecting the respective quick update item from the dropdown available at the left hand side of the page.
My Quick Update will allow you to update information on below given items:
- My Projects
- My Project Tasks
- My Project Risks
- My Risk Actions
- My Risk Controls
- My Approvals
- My Issues
- My Issue Actions
- My Issue Decisions
You can view one of the items above by selecting it from the dropdown list on the top left corner of the page. Once you select an item from the dropdown list, it will be loaded. For example, if you wish to view the projects you are allocated to, you can select the 'My Projects' option from the dropdown list.

My Projects
By default, this section displays all open projects where you are in the project board AND have been granted the permission to edit the Project Details.
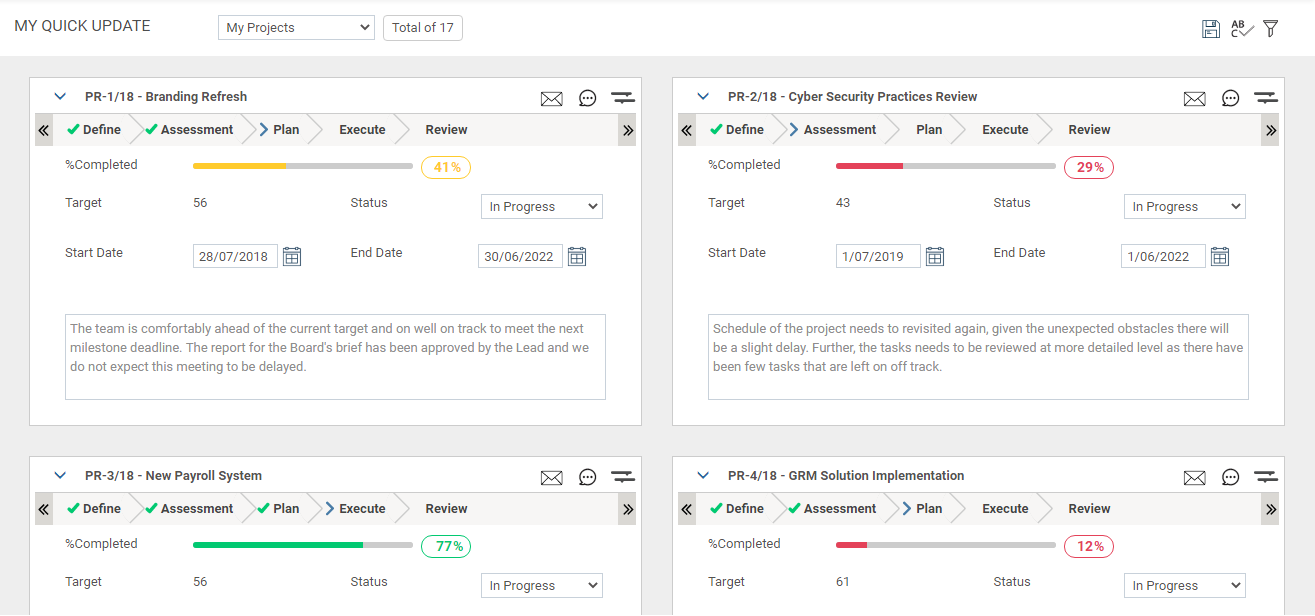
My Quick Update> My Projects will show all projects corresponding to you.
The total number of projects will be shown at the top, next to the quick update dropdown.
Inline Quick Update will display below information for projects. You can edit the in-line fields and click the ‘Save All’ icon.
1. Project Name - Displays the project title. The title will be hyperlinked. Clicking on the title will navigate you to the current phase of the project
2. % Complete
This displays the % complete slider bar and the %complete numeric figure.
The colour of the slider bar represents the colour of the project performance traffic light.
You will be able to adjust the project percent complete using the slider and the %complete figure will change accordingly. You will be shown the %value when dragging the slider indicating the appropriate %complete value for the project. Further, you can enter the %complete value and the slider bar will automatically change to represent that numeric value.
Note: This is only applicable if manual scheduling is enabled.
When the ‘%Complete’ is editable, the ‘Status’ dropdown will automatically change as given below.
- If “% Complete” is ‘0’, then “Status” is ‘Not Started’
- If “% Complete” is ‘100’, then “Status” is ‘Completed’
- If the “0 <% Complete <100”, then “Status” is ‘In Progress’
3. Target
This displays the target for the project.
This is non-editable and the value will be derived based on the following logics:
- If the project progress is ‘Action Based Progress’ and the project is linked to an action, the target will be based on the action target
- If the project progress is ‘Action Based Progress’ and the project is NOT linked to an action, the target will be based on the calculation method defined
- If the project progress is ‘Project Based Progress’, the target will be based on the progress calculation method defined.
4. Status
When the “Status” dropdown is editable, “% Complete” (slider bar and numeric figure) will automatically change based on the "Status" as given below;
- If “Status” is ‘Not Started’, then “% Complete” is ‘0’
- If “Status” is ‘Completed’, then “% Complete” is ‘100’
- If the “Status” is ‘Ongoing’, then “% Complete” is blank
- If the “Status” is ‘In Progress’, then “%Complete” will be editable and the value should be “0 <value <100”.
- If the status is ‘Deferred’, then “% Complete” will be editable
5. Start Date
Project Start date will be editable/non-editable based on the external setting “Is Project Duration Based On Gantt”.
If “Is Project Duration Based On Gantt” setting is turned on,
- Start date will be non-editable.
- Project start date will automatically adjust based on the earliest start of the Gantt.
If “Is Project Duration Based On Gantt” is turned off, you will be allowed to edit the project start date.
6. End Date
Project End date will be editable/non-editable based on the external setting “Is Project Duration Based On Gantt”.
If “Is Project Duration Based On Gantt” setting is turned on,
- End date will be non-editable.
- Project end date will automatically adjust based on the earliest start of the Gantt.
If “Is Project Duration Based On Gantt” is turned off, you will be allowed to edit the project end date.
7. Baseline Start Date
Displays the project Baseline Start Date
8. Baseline End Date
Displays the project Baseline End Date
9. Schedule icon
Displays the current Gantt chart for the project in a pop-up.
The same functionalities provided in Task Planning object will be available based on user permissions.
10. Chat icon
Clicking on the chat icon will open the chat messaging panel for the project in a pop-up.
11. Email icon
Clicking on the email icon will enable you to send an email based on the project update. A popup window(as shown below) will be displayed upon clicking this icon.

You can send an email to a staff member within the organisation or to a separate email address.
12. Project Comment
Displays the overall project comment. This will be editable.
13. Append Task Comment button
You can add task comments to the overall project comment by clicking on this button.
14. Child Projects icon
If the project has associated child projects, ‘Child Projects’ icon will be shown on top.
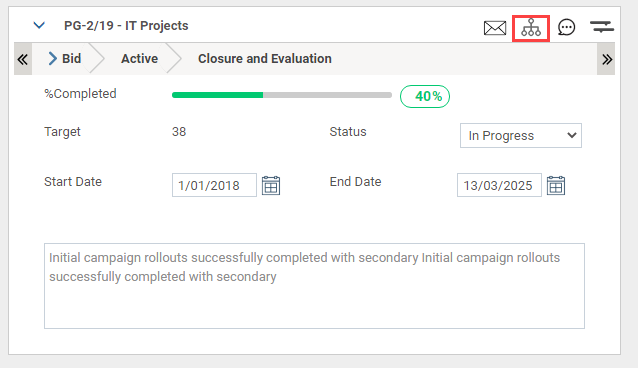
This child project icon will be visible if the respective project is a ‘Parent Project’ AND if the ‘Project Reference’ Object is available in the Project Workflow only.
Click on the icon and a pop-up window will be displayed with child project details. Information in the grid will be displayed in read-only mode.

Click on ‘Expand All’ button to expand all records in the grid.
However, if there are no child projects linked to the respective project, ‘No Records to Display’ message will be shown within the popup window.
Filters area
Click on the ‘Filter’ icon to filter projects displayed.

The following filters are available for you to filter projects.
| Filter | Filter Description |
| Search | A textbox which allows you to perform a search on the projects you are responsible for. This is a key word search and therefore, by entering a part of the project title, you will be able to filter out all projects that contain the typed words anywhere in the title. |
| Project Type | A dropdown list of all project Types configured within the system. Selecting a project type(s) will display only projects that are of the selected type. Defaults to “Show all”. |
| Project Position | A dropdown list of all project positions configured within the system. Selecting a position will display all projects that are assigned to you. Defaults to “Show all”. |
| Performance Status | A dropdown list of performance statuses available for a Project (i.e. On Track, Monitor, Off Track). Selecting a performance status will display all projects with the selected project performance status. Defaults to “Show all”. |
| Project Status | Drop-down listing allowing you to select ‘Open’, ‘Close’ ‘Upcoming’ or ‘Show All’. |
| Hide Deferred | Ticking this would exclude all deferred projects from the list. |
| Save as default | Ticking this will save the current search and set it as default |
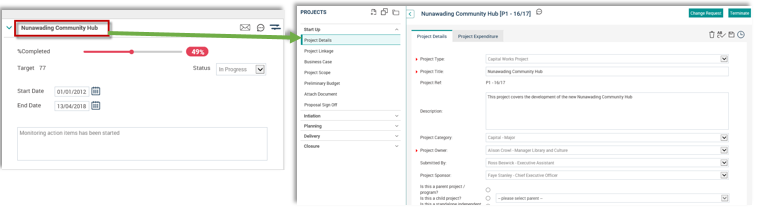
Expanded view
You can expand the project by clicking on the arrow adjacent to the project name.
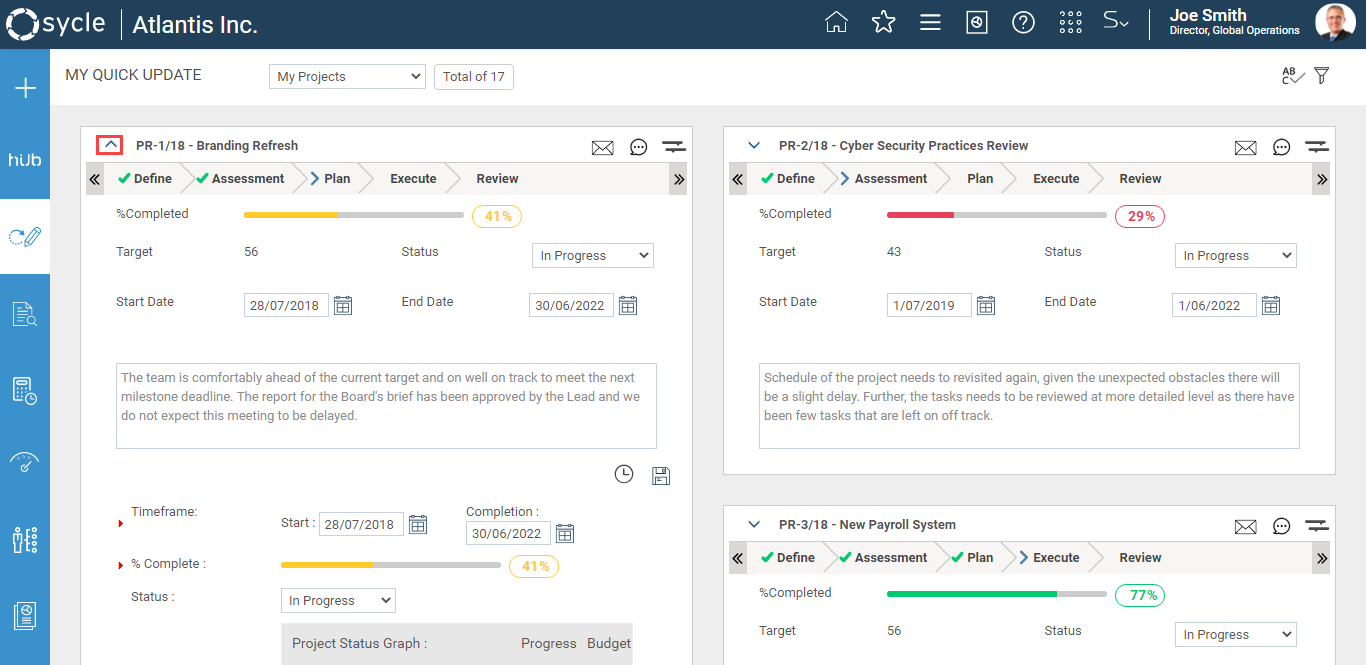
The fields displayed in the expanded view will be based on the configurations done in the object editor area of the Project Details object by your administrator.
This can be configured from the object editor area for a particular workflow.
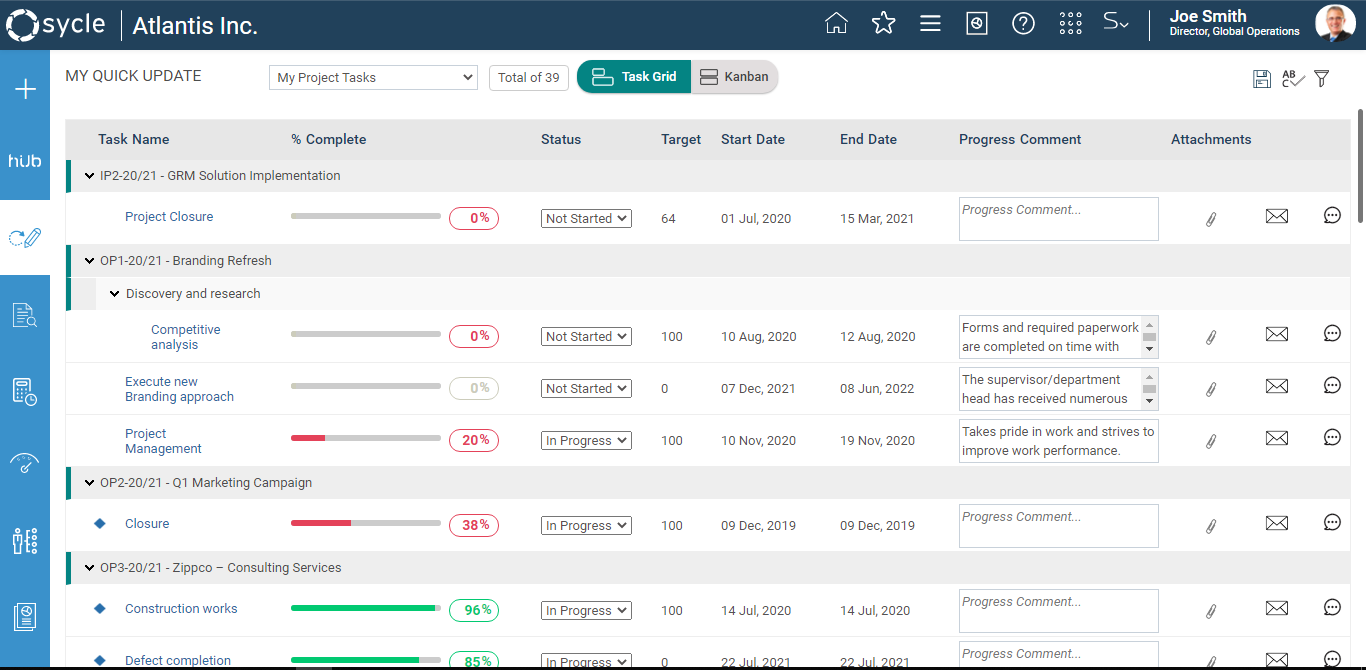
My Project Tasks
Select ‘My Project Tasks’ from my quick update drop down menu in order to view tasks you are responsible for.
By default, this section will display tasks:
Which are linked to open projects
For which you are the primary or secondary responsible officer
For which you have view permission to Task Planning object of the respective project
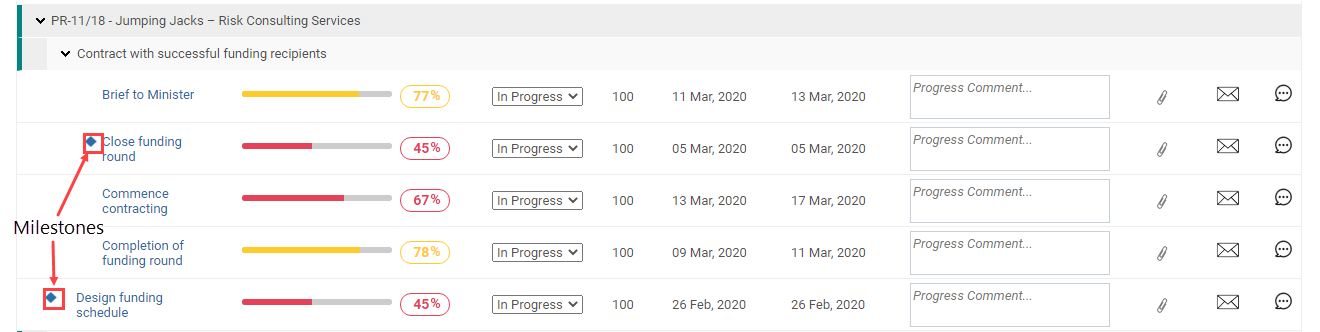
The tasks will be first grouped by the project which they are linked to and then by their parent task (if applicable) and ordered by the project code.
If the task is a 'milestone', the milestone icon “ “ will be shown before the task name.
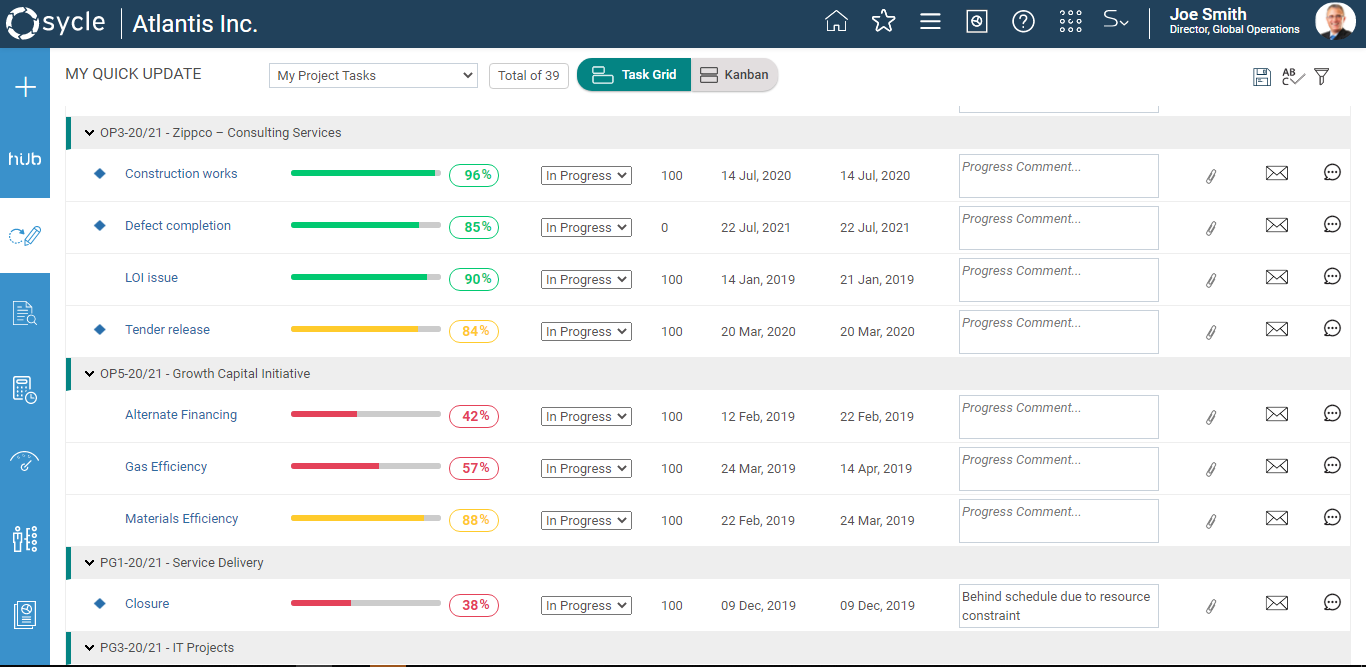
The following fields are shown in the grid of the My Tasks page.
1. Project Tasks
Displays the task title. Title is hyperlinked by default. Clicking on the title will navigate you to the current schedule screen for the project in a new window.
2. % Complete
Displays the % complete slider bar and the %complete numeric figure.
You can adjust the project percent complete using the slider and the %complete figure will change accordingly. You will be shown the %value when dragging the slider.
Further, you can enter the %complete value and the slider bar will automatically change to represent that numeric value.
‘Status’ dropdown will change according to the % Complete value as given below.
- If “% Complete” is ‘0’, then “Status” is ‘Not Started’
- If “% Complete” is ‘100’, then “Status” is ‘Completed’
- If the “0 <% Complete <100”, then “Status” is ‘In Progress’
3. Status
A dropdown with a list of task statuses.
Based on the status value, “% Complete” will automatically change as given below.
- If “Status” is ‘Not Started’, then “% Complete” is ‘0’
- If “Status” is ‘Completed’, then “% Complete” is ‘100’
- If the “Status” is ‘Ongoing’, then “% Complete” is blank
- If the “Status” is ‘In Progress’, then “%Complete” will be editable and the value should be “0 <value <100”
- If the status is ‘Deferred’, then “% Complete” will be editable
4. Target – Displays the target set for the task. Non-editable
5. Start Date – Displays the start date set for the task. Non-editable
6. End Date – Displays the end date set for the task. Non-editable
7. Progress Comment – Progress comment for the task. Editable.
8. Schedule
Displays the schedule icon.
Clicking on Schedule icon will open the current Gantt chart of the project which the task is linked to, in a pop-up. The same functionalities provided in Task Planning object will be available based on your user permissions.
9. Chat icon – Clicking on the chat icon will open the chat messaging panel for the task in a pop-up.
10. Email icon
Clicking on the email icon enable you to send an email based on the task update. A popup window will be displayed to send the email to a staff member within the organisation or to a separate email address.


My Project Tasks Filters
The following filters are available for My Project Tasks.
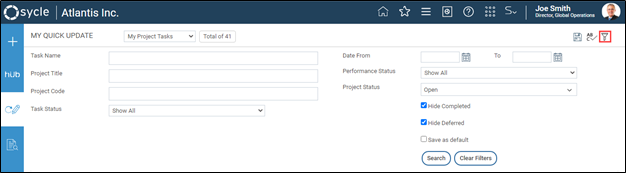
Task Name – Allows you to perform a search on tasks which are of your responsibility.
Project Title - Perform a search on all projects in the system and display any tasks that you are responsible for which belong to those projects.
Project Code - Perform a search on all project codes in the system and it will display any tasks that you are responsible for which belong to those projects.
Task Status – A dropdown list of all possible statuses for a task (i.e. not started, in progress, etc.). Selecting a status will display all tasks in the selected task status. Defaults to “Show all”.
Performance Status – A dropdown list of performance statuses available for a task (i.e. On Track, Monitor, Off Track). Selecting a performance status will display all tasks with the selected performance status. Defaults to “Show all”.
Start and End date – A date picker to filter tasks by the task start and end dates.
Hide Completed - Ticking this would exclude all completed tasks from the list.
Hide Deferred - Ticking this would exclude all deferred tasks from the list.
Project Status – A drop-down listing ‘Open’, ‘Close’ ‘Upcoming’ and ‘Show All’. This defaults to Open, thus showing only tasks from ‘Open’ projects.
Save as default – Ticking this will save the current search.
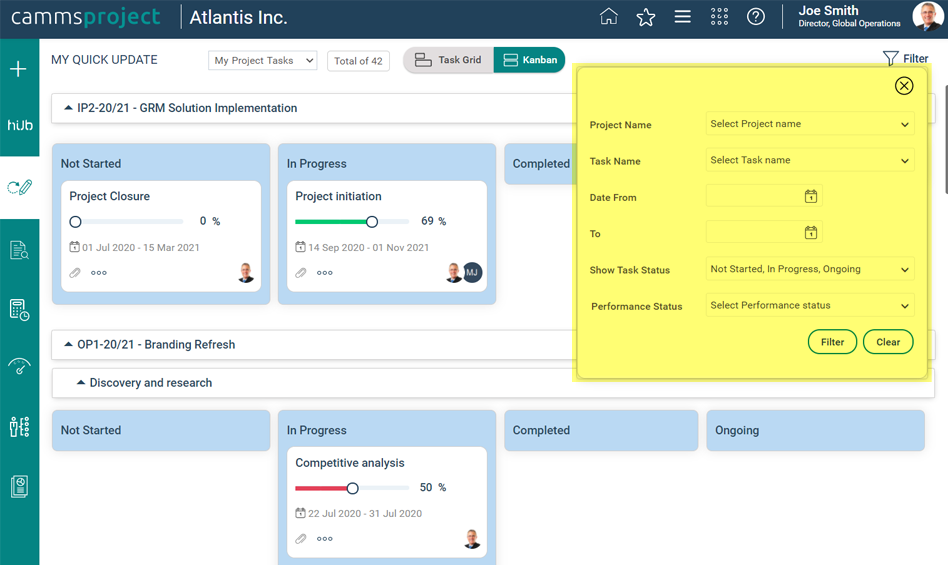
Kanban view in My Project Tasks
- Select the ‘Kanban’ option in the toggle button in My Tasks to navigate to the Kanban Board.

- Lists/Columns in the Kanban board represent the status of a task (i.e. Not Started, In Progress, Completed, Deferred, and Ongoing).
- Cards represent the tasks in the Gantt.
Note: Only child tasks/milestones and standalone tasks/milestones in the Gantt will have a card in the Kanban board.
- Tasks are first grouped by the project and then by the parent/summary tasks which they are linked to.
- Each card displays the following information on the task:
- Title
- Progress bar – Will display % complete of the task, and the colour of the slider bar will represent the performance of the task
- Timeframe (start and end dates)
- Responsible person
- No. of attachments
- Updating the progress of tasks:
- You can update task progress by dragging the progress bar on the card. The system will automatically save your progress updates.
- You can further update the status of the task by moving the card across the columns. This can easily be done by clicking a card, dragging and dropping it on to the required column in the Kanban board.
- Deleting tasks:
- Tasks can be deleted by clicking on the Delete icon on the card.
- Show More Details:
- Click on the ‘Show Details’ icon on the card to view/update more details of the task.
- The Show Details pop-up will show all fields activated in the Task Planning object except for:
- ID
- Predecessors
- History
- Attachments
- Responsible person
- Reference tasks
- Custom calculated fields
- You will be able to update the timeframe (Start and End Dates) and duration of tasks which have no dependencies (i.e. standalone/independent tasks) from the Show Details pop-up. The Timeframe and Duration fields will be non-editable for predecessors and successors.
- Once the updates are made, click on the 'Save' button in the Show Details pop-up to save the updates. Upon saving, the updates will reflect on the Gantt.
- Filters in the Kanban Board:
The following filters are available in your Kanban Board for filtering tasks:
- Project Name
- Task Name
- Task Start Date and End Date
- Task Status – By default, the Kanban Board in Quick Update will not show tasks which are in ‘Completed’ and ‘Deferred’ stages. If you wish to see completed and deferred tasks in your Kanban Board, select Completed and Deferred options within the ‘Show Task Status’ dropdown in the search panel and click on ‘Filter’ button.
- Task Performance Status (On Track, Off Track and Monitor)
My Project Risks
Select ‘My Project Risks’ from the My Quick Update drop down menu.
By default, this section will display risks:
Which are linked to open projects
For which you are the primary or secondary responsible officer
For which you have view permission to Risk Assessment object
Risks will be grouped by the project to which they are linked. Projects will be order by their project code. Risks under a particular project will be ordered by the risk code.
In order to edit risk information, the relevant project should be opened.
Inline Quick update displays below given information for each risk.
1. Risk Code – Displays the risk code for the risk
2. Title – Displays the title for the risk. Clicking the link will navigate you to the Risk Details screen.
3. Initial Rating – Displays the rating image corresponding to the initial assessment rating of the risk.
4. Revised Rating – Displays the rating image corresponding to the revised assessment rating of the risk.
5. Next Review Date – Displays the next review date for the risk. Overdue indicator will be displayed next to the date if the risk is overdue.
6. Email icon - Clicking on the email icon enables you to send an email based on the risk update. A popup window will be displayed to send the email to a staff member within the organization or to a separate email address
Email popup:

To carry out a risk assessment via Quick Update, expand the risk by clicking on the arrow placed before the risk code.

The expanded view will display the below information for the risk:
1. Current Risk Assessment - Current Risk assessment is displayed with criteria and rating. You can select the ratings from the rating dropdowns. The rating will be updated upon save.
2. Next Review Date - Next review date is auto populated based on the last review date and review frequency. When the review frequency is not selected in the risk review screen then the date field will be blank. You can select another date by using the date control.
If “Enable next review date field within risk area only to the administrators and risk managers” is turned on: Only administrator or/and risk manager permissions can edit the next review date field.
If “Enable next review date field within risk area only to the administrators and risk managers” is turned off: Next review date field is editable for all users who can edit the risk (including administrator and risk manager permissions).
3. Risk comments – Displays risk comments activated within the system.
4. Actions – All risk actions linked to the expanded risk will be displayed in a table. The columns of the table will be similar to that of in EIS> Risk tab> Action grid. These records:Title, Responsible Person Comment, Status, %Completed, Progress are non-editable.
5. KPIs – All KPIs linked to the expanded risk will be displayed in a table. The columns of the table will be similar to that of in EIS> Risk tab> KPIs grid. These records: Title, Unit, Reporting Period, Actual, Target, Performance and Trend are non-editable.
◊ Please note that KPI Grid will not be available if your organization has not purchased Camms.Strategy product.
6. Risk Controls – All risk controls linked to the expanded risk will be displayed in a table. Risk control grid configured within the risk area is displayed here with the information.
NOTE: Risk Control Grid will be available only if Risk Control feature is activated.
My Project Risks Filters
Following filters are available for project risks.

Risk Code – Allows you to type in the risk code and search for the risk.
Search –Allows you to type in the risk title and search for the risk.
Risk Rating – A dropdown list of all risk rating types defined in the system. Selecting a rating type will display only the risks that have the selected rating as its latest rating. Defaults to “Show all”
Risk Status – A dropdown lists of all risk statuses defined in the system. Selecting a status would display only the risks of selected status. Defaults to “Active risks only".
Hide Deferred - Ticking this would exclude all deferred projects from the list.
Project status - A drop-down listing ‘Open’, ‘Close’ ‘Upcoming’ and ‘Show All’.
Save as default – Save the current search.
My Risk Actions
Select ‘My Project Actions’ from the My Quick Update drop down menu.
By default, this section will display risk actions:
Which are linked to open projects
For which you are assigned primary or secondary responsible officer positions.
For which you have view permission to the corresponding Risk Assessment object.
Risk actions which are NOT completed
Risk actions which are NOT deferred
Risk actions which are NOT ongoing.
In order to edit risk action information, the relevant project should be opened.
Risk Actions will be first grouped by the ‘project’, then by the ‘risk’ to which the risk actions are linked. Projects will be ordered by their project code. Risks under a particular project will be ordered by the risk code. Risk actions under a particular risk will be ordered by the Risk Action title.
Inline Quick Update will display the below given information for each risk action:
1. Title: Displays the title of the risk action. The risk action title is hyperlinked. Clicking on the title will navigate you to the risk action details page.

2. Progress Comment – A text box to enter the progress comment for the action. The latest progress comment will be displayed. Editable.
3. Status – A dropdown list of action statues in the system (i.e. Not Started, In Progress, completed etc.). Allows you to select the status for the risk action.
- Based on the %Complete value entered in “%Complete” field, “Status” will change automatically as follows.
If the “%Completed” is ‘0’, then “Status” dropdown value will be ‘Not Started’.
If the “%Completed” value is ‘0 <value <100’, then “Status” dropdown value will be ‘In Progress’.
If the “%Completed” value is ‘100’, then “Status” dropdown value will be ‘Completed’.
4. % Complete – Displays the % complete slider bar and the %complete numeric figure.
You will be able to adjust the risk action percent complete using the slider and the %complete figure will change accordingly. You will be shown the %value when dragging the slider indicating the appropriate %complete value for the project.
You also can enter the %complete value and the slider bar will automatically change to represent that numeric value.
Based on the risk action status selected within “Status” dropdown, %complete slider bar and the %complete numeric value will change automatically as follows.
If “Status” is ‘Not Started’, then “% Complete” will be ‘0’ and non-editable.
If “Status” is ‘Completed’, then “% Complete” will be ‘100’ and non-editable.
If the “Status” is ‘Ongoing’, then “% Complete” will be blank and non-editable.
If the “Status” is ‘In Progress’, then “%Complete” will be editable and the value will be “0 <value <100”.
If the “Status” is ‘Deferred’, then “% Complete” will be editable and the value will be “0 <value <100”.
The colour of the slider bar represents the risk action performance.
Performance of Risk Actions
When the action's status is ‘Completed’, the performance would always be set to ‘On Track’.
When the action's status is either ‘Deferred’ or ‘Ongoing’, the performance would always be set to ‘N/A’.
When an action has the status ‘Not Started’ or ‘In Progress’, the performance will be calculated as below:
Performance = (Actual Percent Complete / Target Percent Complete) * 100
The ‘target’ for the risk action is the expected %complete to the system date (will be calculated based on the risk action start and end date as mentioned below).
- Target Percent Complete = Target will be calculated considering the start and end dates with linear progression, whereby, performance would be 0% on the start day, and 100% on the end day.
Target = [(Current System Date - Action Start Date) / (Action End Date - Action Start Date)] * 100%
Example: If the duration of the action is two months, at the end of the first month, the performance target will be calculated to be 50%.
The ‘actual’ for the risk action is the %Complete entered by the user.
Performance Thresholds
The performance thresholds will have the following default values.
On Track: >= 90
Off Track: < 70
Monitor: Less than 90 and greater than or equal to 70
You can change the threshold values under the Progress Calculation page, accessed under, Framework > Project Settings > Progress Calculation.
Notes: If the ‘Current System Date’ is equal to the ‘Start Date’, then the calculated Target will be 0. In this event, the performance indicator will be shown as ‘On Track’. The performance calculation will be disregarded.
If the action has a ‘Start Date’ which is a future date, irrespective of status or % Complete, the performance indicator will be shown as ‘On Track’.
5. Email icon – Click on the email icon to send an email based on the risk action update. A popup window will be displayed to send the email to a staff member within the organisation or to a separate email address.

You can expand the risk action by clicking the arrow placed before the risk action title. The exiting risk action detail screen will be displayed in the expanded view.
 My Risk Actions Filters
The following filters are available for My Risk Actions.
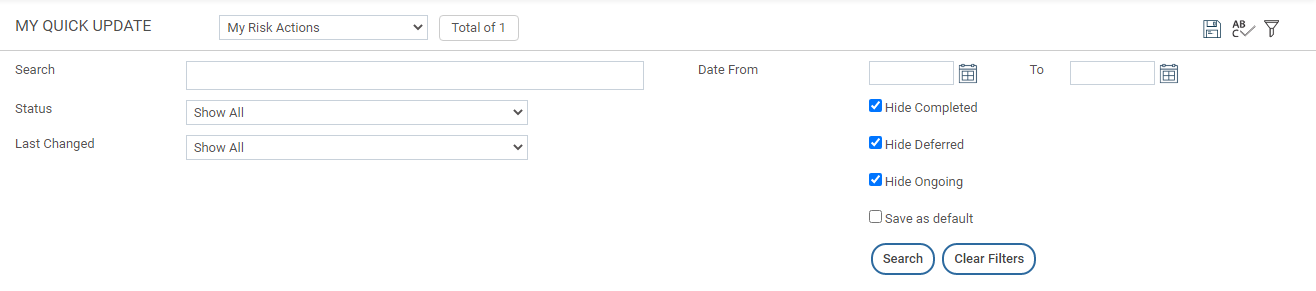
- Title – A text box which allows you to type in the risk action title and search for the risk action.
- Start Date and End Date – Date pickers to filter the risk actions by the risk action start and end dates.
- Status – A dropdown lists of all risk action statuses defined in the system. Selecting a status will display only the risk actions of selected status. Defaults to “Show All".
- Last Changed – A dropdown list of all predefined time frames (e.g. over a week ago, over a month ago, over 3 months ago)Selecting a time frame will display all risk actions that have been updated within the time frame specified. Defaults to “Show All”
- Hide Completed – Ticking this will exclude all completed risk actions from the list.
- Hide Deferred – Ticking this will exclude all deferred risk actions from the list.
- Hide Ongoing – Ticking this will exclude all ongoing risk actions from the list.
- Save as default – Ticking this will save the current search.
My Risk Controls
By default, this section will display risk controls:
Which are linked to open projects
For which you are the ‘control owner’ or ‘control authorizer’ for the risk control
For which you have view permission for the corresponding Risk Assessment object
In order to edit risk action information, the relevant project should be opened.

Inline Quick Update will display all the fields in the control grid within risk assessment screen which are configured through risk field configuration area. (I.e. Fields for which the visibility is set to ‘true’ through the control field configuration screen> “Visibility in Risk Grid”).
Control Title in Inline Quick Update is not editable. It will be hyperlinked and clicking on the Control Title will navigate you to the risk control details screen.
Clicking on the email icon enables you to send an email based on the risk control update. A popup window will be displayed to send the email to a staff member within the organization or to a separate email address.

Risk controls are first grouped by the ‘Project’ to which they are linked and then by the ‘Risk’.
You will be able to expand the risk control by clicking the arrow placed before the risk control title.

My Risk Controls Filters
All the fields which the visibility is set to true in control field configuration screen in the risk field configuration area> “Visibility in Search” will appear as filters in the My Risk Controls search panel.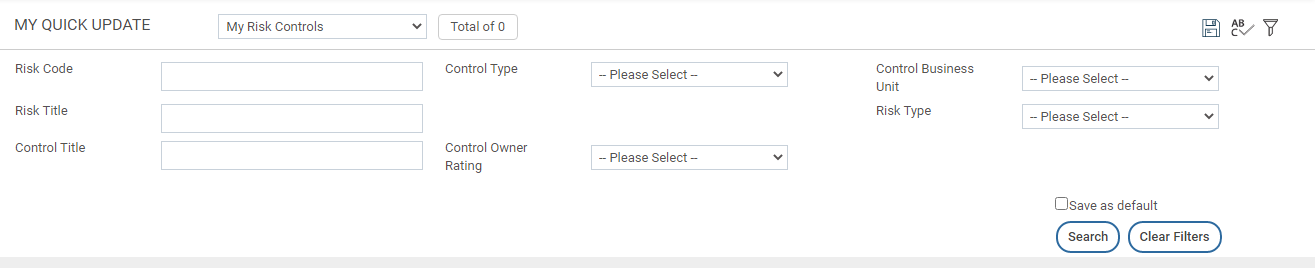
My Issues
By default, this section will display issues:
Which are linked to open projects.
For which you are the responsible officer.
For which you have view permission to respective Issue Register object which have not been resolved.

Inline Quick update will display below given information for each issue:
Issue No. – Displays the Issue No for the issue. Non-editable.
Issue Title – Displays the Issue Title for the issue. Non-editable.
Date Logged – Displays the Log Date for the issue. Non-editable.
Date Resolved – Displays the Resolved Date for the issue. Date Resolved will be enabled when the ‘Project Issue Status’ is “Resolved”. Otherwise, it will be blank.
Status – Displays the Project Issue Status for the issue.
Comment – Displays the Resolution /Recommendation for the issue.
Issue Register Object
- The Issue Register Object can be added multiple times within one workflow. Further, the Issue Register Object will be either common to the workflow OR unique for the phase OR unique or incremental based on the organisation’s configurations.
- If the Issue Register Object is common to the project workflow:
My Quick Update will display all issues which the user is responsible for in the current editable Issue Register object in the project workflow
- If the Issue Register Object is unique for the phase:
My Quick Update will display all issues which the user is responsible for in the current editable Issue Register object. Further, if there are any issues which the user is responsible for in any other Issue Register Object which is editable in the project workflow, those will also be displayed.
- Issues will be first grouped by the ‘project’ they are linked to [Projects will be ordered by the project code] and then by the ‘phase’ [Phases will be ordered according to the order in the project workflow].
- Issues under a particular phase will be ordered by the ‘Issue No’
- If the Issue Register Object is unique and incremental:
My Quick Update will display all issues which the user is responsible for in the current editable Issue Register Object. Further, if there are any issues which the user is responsible for in any other Issue Register object which is editable in the project workflow, those will also be displayed.
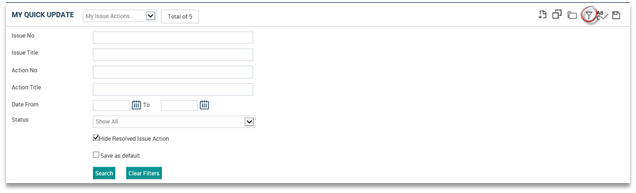
My Issues Filters The following filters will be available for My Issues:
Issue No. – A text box which allows to type in the issue no and search for the issue. This is a key word search and therefore by entering a part of the issue no. you will be able to filter out all issues that contain the typed characters anywhere in the issue no.
Issue Title – A text box which allows you to type in the issue title and search for the issue. This is a key word search and therefore, by entering a part of the title, you will be able to filter out all issues that contain the typed characters anywhere in the title.
Date Logged – A date picker which allows you to specify a From and To date and filter out all issues which appear outside the given date range.
Status – A dropdown lists of all issue statuses defined in the system. Selecting a status would display only the issues of the selected status. Defaults to “Show All".
Hide Resolved Issues – Ticking this would exclude all resolved issues from the list. Ticked by default.
My Issue Actions
By default, this section will display issue actions:
Which are linked to open projects
From which you are the responsible officer
From which you have view permission for the respective Issue Register object
Which have not been resolved
In order to edit issue actions, the relevant project should be opened.
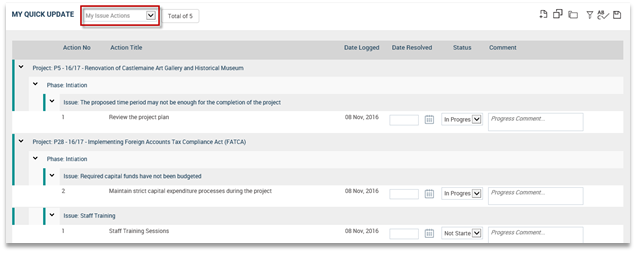
Inline Quick Update will display below given information for each issue action.
Action No. – Displays the Action No. for the issue action. Not editable.
Action Title – Displays the Action Title for the issue action. Not editable.
Date Logged – Displays the Log Date for the issue action. Non-editable.
Date Resolved – Displays the Resolved Date for the issue action. Date Resolved will be enabled when the ‘Action Status’ is “Resolved”. Otherwise, it will be blank.
Status – Displays the Action Status for the issue action.
Comment – Displays the comment for the issue action. Editable.
Issue Register Object
Issue Register object can be added multiple times within one workflow. Further, Issue Register object will be either common to the workflow OR unique for the phase OR unique or incremental based on the organisation’s configurations.
1. If the Issue Register object is common to the project workflow:
- My Quick Update will display all issue actions which you are responsible for in the current editable Issue Register object in the project workflow
- Issue actions are grouped by :
- The ‘project’ which the issue actions are linked to [Projects will be ordered by the Project Code]
- The ‘issue’ which the issue action is linked to [Issues will be ordered by the Issue No].
Note: If an issue action is not linked to an issue, then that issue action should be shown under the group “Issue: Not linked”. The “Issue: Not Linked” group should be shown after all issue actions linked to any issue are displayed under the project.
- Issue actions are ordered by the ‘Action No’.
2. If the Issue Register Object is unique for the phase:
- My Quick Update will display all issue actions which you are responsible for in the current editable Issue Register object. Further, if there are any issue actions which you are responsible for in any other Issue Register object which is editable in the project workflow, those will also be displayed.
- Issue actions should be grouped by:
- The ‘project’ which the issue actions are linked to [Projects will be ordered by the project code]
- The ‘phase’ which the corresponding issue register object is available in the workflow [Phases will be ordered according to the order in the project workflow]
3. The ‘issue’ which the issue action is linked to [Issues will be ordered by the Issue No].
Note: If an issue action is not linked to an issue, then that issue action should be shown under the group “Issue: Not linked”. The “Issue: Not Linked” group should be shown after all issue actions linked to any issue are displayed under the phase.
- Issue actions are ordered by the ‘Action No’.
My Issue Actions Filters
The following filters are available for My Issue Actions:
Issue No. – A text box which allows you to type in the issue no and search for the issue actions linked to the issues with the issue no entered.
Issue Title – A text box which allows you to type in the issue title and search for the issue actions linked to the issues with the issue title entered.
Action No – A text box which allows you to type in the issue action no and search for the issue action.
Action Title – A text box which allows you to type in the action title and search for the issue action.
Date Logged – A date picker which allows you to specify a From and To date and filter out all issue actions which fall outside the given date range.
Status – A dropdown lists of all issue action statuses defined in the system. Selecting a status will display only the issue actions of selected status. Defaults to “Show All".
Hide Resolved Issue Actions – Ticking this will exclude all resolved issue actions from the list.
My Issue Decisions
By default, this section will display issue decisions:
Which are linked to open projects
For which you are the responsible officer for
For which you have view permission for the respective Issue Register object
Which have not been resolved

In order to edit issue decisions, the relevant project should be opened.
Inline Quick Update will display the below given information for each issue decision:
Decision No. – Displays the Decision No for the issue decision. Non-editable.
Decision Title – Displays the Decision Title for the issue decision. Non-editable.
Date Logged – Displays the Log Date for the issue decision. Non-editable.
Date Resolved – Displays the Resolved Date for the issue decision. Date Resolved will be enabled when the ‘Decision Status’ is “Resolved”. Otherwise, it will be blank.
Status – Displays the Decision Status for the issue decision.
Comment – Displays the comment for the issue decision.
Issue Register Object and Groupings
The Issue Register Object can be added multiple times within one workflow. Further, the Issue Register Object will be either common to the workflow OR unique for the phase OR unique or incremental based on the organisation’s configurations.
i. If the Issue Register object is common to the project workflow:
- My Quick Update will display all issue decisions which you are responsible for in the current editable Issue Register object in the project workflow.
- Issue decisions should be grouped by:
1. The ‘project’ which the issue decisions are linked to [Projects will be ordered by the Project Code]
2. The ‘issue’ which the issue decision is linked to [Issues will be ordered by the Issue No].
Notes:
- If an issue decision is not linked to an issue, then that issue decision should be shown under the group “Issue: Not linked”. The “Issue: Not Linked” group should be shown after all issue decisions linked to any issue are displayed under the project.
- Under the ‘Issue: Not Linked’ grouping, there can be issue decisions which are linked to an issue action OR issue decisions which are not linked to any issue action.
3. The ‘issue action’ which the issue decision is linked to [Issue actions will be ordered by the Action No].
Notes:
If an issue decision is not linked to an issue action, then that issue decision should be shown under the group “Action: Not linked”. The “Action: Not Linked” group should be shown after issue decisions linked to any issue action are displayed under the project.
Example for groupings:
- If the issue decision is linked to the issue “Issue 1” and to the issue action “Action 1”, then the corresponding issue decision will be grouped under “Issue: Issue 1”, “Action: Action 1”.
- If the issue decision is linked to the issue “Issue 1”, but not linked to an issue action, then the corresponding issue decision will be grouped under “Issue: Issue 1”, “Action: Not Linked”.
- If the issue decision is linked to the issue action “Action 1”, but not linked to an issue, then the corresponding issue decision will be grouped under “Issue: Not Linked”, “Action: Action 1”.
- If the issue decision is not linked to an issue or an issue action, then the corresponding issue decision will be grouped under “Issue: Not Linked”, “Action: Not Linked”.
- Issue decisions should be ordered by the ‘Decision No’.
ii. If the Issue Register Object is unique for the phase:
- My Quick Update will display all issue decisions which the user is responsible for in the current editable Issue Register object. Further, if there are any issue decisions which you are responsible for in any other Issue Register object which is editable in the project workflow, those will also be displayed.
- Issue decisions should be grouped by:
1. The ‘project’ which the issue decisions are linked to [Projects will be ordered by the project code]
2. The ‘phase’ which the corresponding issue register object is available in the workflow [Phases will be ordered according to the order in the project workflow]
3. The ‘issue’ which the issue decision is linked to [Issues will be ordered by the Issue No].
Notes:
- If an issue decision is not linked to an issue, then that issue decision should be shown under the group “Issue: Not linked”. The “Issue: Not Linked” group should be shown after all issue decisions linked to any issue are displayed under the project.
- Under the ‘Issue: Not Linked’ grouping, there can be issue decisions which are linked to an issue action OR issue decisions which are not linked to any issue action.
4. The ‘issue action’ which the issue decision is linked to [Issue actions will be ordered by the Action No.]
Note:
If an issue decision is not linked to an issue action, then that issue decision should be shown under the group “Action: Not linked”. The “Action: Not Linked” group should be shown after issue decisions linked to any issue action are displayed under the project.
Example for groupings:
- If the issue decision is linked to the issue “Issue 1” and to the issue action “Action 1”, then the corresponding issue decision will be grouped under “Issue: Issue 1”, “Action: Action 1”.
- If the issue decision is linked to the issue “Issue 1”, but not linked to an issue action, then the corresponding issue decision will be grouped under “Issue: Issue 1”, “Action: Not Linked”.
- If the issue decision is linked to the issue action “Action 1”, but not linked to an issue, then the corresponding issue decision will be grouped under “Issue: Not Linked”, “Action: Action 1”.
- If the issue decision is not linked to an issue or an issue action, then the corresponding issue decision will be grouped under “Issue: Not Linked”, “Action: Not Linked”.
- Issue decisions should be ordered by the ‘Decision No.’
iii. If the Issue Register object is unique and incremental:
- My Quick Update will display all issue decisions which you are responsible for in the current editable Issue Register object. Further, if there are any issue decisions which the user is responsible for in any other Issue Register object which is editable in the project workflow, those will also be displayed.
- Issue decisions should be grouped by:
1. The ‘project’ which the issue decisions are linked to [Projects will be ordered by the project code]
2. The ‘phase’ which the corresponding issue register object is available in the workflow [Phases will be ordered according to the order in the project workflow]
3. The ‘issue’ which the issue decision is linked to [Issues will be ordered by the Issue No].
Notes:
- If an issue decision is not linked to an issue, then that issue decision should be shown under the group “Issue: Not linked”. The “Issue: Not Linked” group should be shown after all issue decisions linked to any issue are displayed under the project.
- Under the ‘Issue: Not Linked’ grouping, there can be issue decisions which are linked to an issue action OR issue decisions which are not linked to any issue action.
4. The ‘issue action’ which the issue decision is linked to [Issue actions will be ordered by the Action No.]
Note:
- If an issue decision is not linked to an issue action, then that issue decision should be shown under the group “Action: Not linked”. The “Action: Not Linked” group should be shown after issue decisions linked to any issue action are displayed under the project.
Example for groupings:
- If the issue decision is linked to the issue “Issue 1” and to the issue action “Action 1”, then the corresponding issue decision will be grouped under “Issue: Issue 1”, “Action: Action 1”.
- If the issue decision is linked to the issue “Issue 1”, but not linked to an issue action, then the corresponding issue decision will be grouped under “Issue: Issue 1”, “Action: Not Linked”.
- If the issue decision is linked to the issue action “Action 1”, but not linked to an issue, then the corresponding issue decision will be grouped under “Issue: Not Linked”, “Action: Action 1”.
- If the issue decision is not linked to an issue or an issue action, then the corresponding issue decision will be grouped under “Issue: Not Linked”, “Action: Not Linked”.
- Issue decisions should be ordered by the ‘Decision No.’
My Approvals
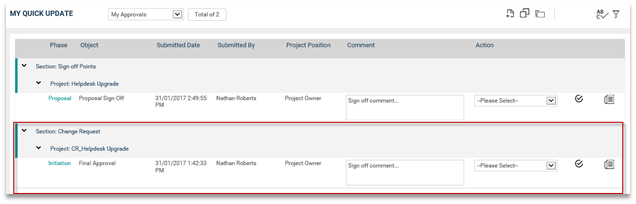
My Approvals are divided into two sections namely “Sign Off Points” and “Change Request”.
The “Sign Off Points” section will display all the ‘pending approval’ phase/object sign offs where you are the decision making authority.
The “Change Request” section will display all ‘pending approval’ change request sign offs where you are the decision making authority.
The Sign Off Points section will be grouped by the project. Under each project there could be multiple sign offs at different phases/objects (default all sign off should be in expand mode with an option to collapse by the project)
All the sign offs from Open and upcoming will also be displayed here (all pending approvals only). Any pending approvals from ‘Closed’ project are not displayed here.
See Sign Offs and Change Requests sections to view more details.
Sign Offs
The “Sign Off Points” section will display phases and objects which you are required to sign off.
Inline Quick Update will display below given information for each sign off point:
1. Phase – Phase name will be hyperlinked. Clicking this will navigate you to the relevant sign off (open in a new window).
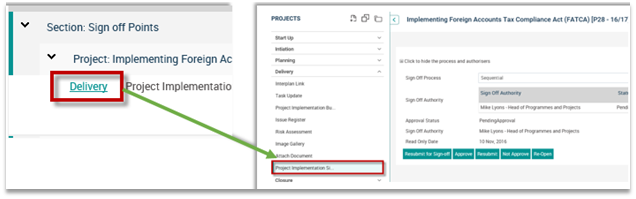
- If it is a Phase Sign off – Displays the name of the phase which the sign off is required for
- If it is an Object sign off – Displays the phase in which the object is in the workflow
2. Objects – The object name will be non-editable.
- If it is a Phase Sign off – Displays the corresponding phase sign off object name
- If it is an Object sign off – Displays the object name which the sign off is required for
3. Submitted Date – Requested date and time. Non-editable.
4. Submitted by – The name of the staff who submitted the phase/object for sign-off. Non-editable.
5. Project Position – The project position of the staff who submitted the phase/object for sign-off. Non-editable.
6. Comment – Multi line text box provided for the approver to enter a comment
7. Action – A dropdown list with options: “Approve”, “Not Approve” and “Re-open”
8. Confirm icon – Clicking on this will confirm the action selected within “Action” dropdown. For example, if you select “Approve” from the “action” dropdown and clicks on the Confirm icon, then the respective phase/object will get approved.
Sign Offs Report
Clicking on this icon will load the Project Master Report for the respective project in the SSRS previewer.
However, if it is a phase sign-off: Project Master Report will include only the phase which the sign-off is required.
If it is an object sign-off: Project Master Report will include only the object which the sign-off is required.

Change Requests
Inline Quick Update will display below given information for each change request:
Phase – Displays the phase in which the sign off object is in the change request workflow. Phase name will be hyperlinked. Clicking this will navigate you to the relevant sign off (open in a new window).
Objects – Displays the sign off object name. Non editable
Submitted Date – Requested date and time. Non-editable.
Submitted by – The name of the staff who submitted the change request for sign-off. Non-editable.
Project Position – The project position of the staff who submitted the change request for sign-off. Non-editable
Comment – Multi line text box provided for the approver to enter a comment.
Action – A dropdown list with options: “Approve”, “Not Approve” and “Re-open”.
Confirm icon – Clicking on this will confirm the action selected from “Action” dropdown. For example, if you select “Approve” from the “action” dropdown and clicks on the Confirm icon, then the respective change request will get approved.
Change Request Report

Clicking on the report icon will load the Project Master Report for the respective change request in the SSRS previewer.
