This section will give an overview of getting started with Camms.Meeting and the overall features of the navigation, login process, user profile, and home screen.
System Navigation
Top navigation menu
The top navigation can be accessed by clicking on the navigation hamburger icon at the top right-hand side of the screen. The menu options will vary based on the user roles. Given below in figure 01 is the complete accessible menu, only to the system administrator. This depicts all menu options.
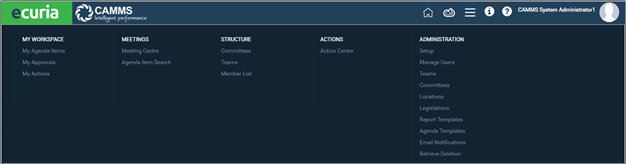
My Workspace
- My Agenda Items – allows creation, submission, Copy/move and delete
- My Approvals – allows approval of agenda items, meeting minutes assigned to self for review
- My Actions – allows update of own Actions
Meetings
- Meeting Centre – allows search, view, edit of all meetings
- Agenda item search – allows search, creation, submission, Copy/move and delete of agenda item
Committees
- Committees – allows search and view for committee records
- Teams – allows search and view for teams
- Member List – allows search and view for any elected member records
Action
- Action Centre: allows search, view, edit of all actions
- Meeting Type (i.e. Formal Public, Formal Internal and Informal)
- Report Title
- Action Title
- Meeting Title
- Start
- End
- Action Owner
- Secondary Action Owner
- Status
- % Complete
- General Manager
- Corporate Manager
Administration – only accessible by Administrators
- Set up
- Manage Users
- Teams
- Committees
- Locations
- Legislations
- Report Templates
- Agenda Templates
- Email Notification
- Retrieve Deletion
Quick Links
Quick Links Panel placed on left hand side of the screen would provide you quick access to each phase within the meeting process workflow.
Quick Link Icon | Description | |
 | Create new meeting – Used to create a new meeting | |
 |
| |
 | Join Meeting – Conduct meetings that you have organized or join a meeting that you are requested to participate | |
 | Meeting Minutes – Edit meeting minutes prior to finalizing and distributing the minutes among participants | |
 | Follow-up Actions – Monitor/ update actions that was derived from meetings |
Header
Following common icons would be available in the page header:

Sign In
Many areas of the meeting portal are available for public (unregistered) access. However, it is recommended that staff assigned with user accounts remain logged into the system to ensure that all relevant functionality is available.
The following steps to be followed to sign in to the system:
- STEP 1: Open a web browser, type the URL in the address bar and hit enter. Save the URL link in favorites for faster access.
- STEP 2: Click the “Sign In” button in the top right-hand corner. A pop-up window will appear as shown in the figure below.

- STEP 3: Enter the Username and password provided by the system admin and click ‘Sign in’. If the wrong username or password is entered an error message will display as “The Username and password is incorrect”.
- STEP 4: Click the ‘remember me’ tick box. This will save the username for future logins.
Forgot Password
If the password is forgotten, the user can click on ‘Forgot password’. This will redirect the user to enter the email address to receive a link to reset the password.
The Administrator can also reset a user password upon request. Refer topic “Manage users” (Section 4.2) for more information.
User Profile
Each user will have his/her personal profile. The user can edit the user profile information by following the steps given below.
- STEP 1: Click on the ‘Profile pic’ icon in the header as shown in the figure below.
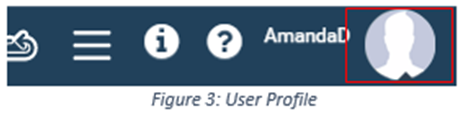
- STEP 2: Click on the ‘Profile’ Button in the profile window. Then the User profile page will load.

- STEP 3: The user profile page has three sections (User profile, My setting, Change Passwords). Click on the ‘User profile’ tab as shown in the figure below, to update personal information. Click ‘Save’.

- STEP 4: Click on ‘My setting’ tab to update settings such as Time zone, Out of office etc. Click ‘Save’.

- STEP 5: Click on ‘Change password’ Tab to update password. Click ‘Save’. Password has to be minimum of six characters.

Note: For detailed functionality refer Manage Users section in the 'System Functionalities – Administrator' article. |
Action Icons
The commonly used are listed below:

Home Screen
The homepage displays a list view and a calendar view of all upcoming meetings as shown in the figure below. Each user will have a different view of the meetings.

The homepage comprises the following components:
- Upcoming meetings list – Formal public meetings are viewable by all. The Formal internal and informal meetings will show only to the participants who are eligible to join those meetings. Users can join the meeting, if the ‘join meeting’ button is made visible.
 – Join Meeting
- Meeting Schedule – This view is available in day, week, month and list view.
- Meeting Summary – The meeting summary will be displayed in the left side panel, Click on the meeting title from the calendar and the summary will show. The following actions can be performed.
Action Icon | Description |
 | Add this meeting to your calendar. This will get added to your default email client. |
 | Downloads –Can download the Agenda draft or finalized, Minutes Draft of finalized excluding confidential items. IF the user is a global confidential user or has been assigned confidential rights, the reports will include the confidential items. |
 | Preview Outputs - Can preview the Agenda draft or finalized, Minutes Draft of finalized excluding confidential items. IF the user is a global confidential user or has been assigned confidential rights, the reports will include the confidential items. |
- “Print” Quick link
Exit System
To exit the system, the following steps, have to be followed.
- STEP 1: Click the user profile on the header.
- STEP 2: Click on the ‘Sign out’ button.
Note: Inactive users will be logged out of the system automatically. Additionally, closing the browser window will automatically log out the user. |
