Advanced scope object will provide you a rich text editor area which to further define your project scope.
The documents link will only appear depending on the configurations made in the 'Object Editor'.
Advanced Scope Section
STEP 1: Click on 'Add New' icon of each field to enter data.
STEP 2: The rich text editor will appear when you click the 'Add New' icon. Add details and click on the 'Insert' button to save data.

Add Document Links
STEP 1: In order to add Documents and Links, navigate to Documents/Links tab which is located next to Advanced Scope tab.
STEP 2: To add a new document, click on the 'Add' icon.
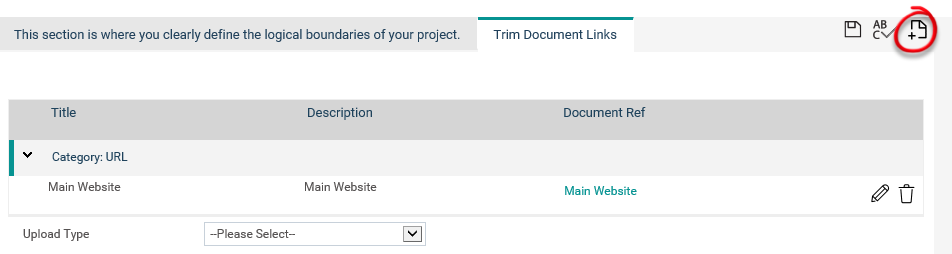
STEP 3: Then select the required upload type from the 'Upload Type' dropdown. Fields will appear according to the selection. Fill the fields and click on the 'Upload' button to add the document or URL.

STEP 4: To insert a URL, add the relevant title, URL and description in the relevant section. Then click on 'Add' button to update the information.
STEP 5: Similarly, you can add upload 'Trim Links' and 'Share Point Links'.
Sending a document/URL for sign off
STEP 1: When document sign off functionality is activated through the object editor area, a new icon ‘Sign Off’ will be available against each document/URL uploaded in the TRIM Document Links tab in the Advanced Scope object.
Clicking ‘Sign Off’ button adjacent to a document/URL will display a pop-up as shown below;

STEP 2: The pop-up window will also show the details of the attachment such as its title and reference. You can select the relevant sign off authorities, and click on ‘Submit for Sign Off’ button to submit the document/URL for approval. An email will be generated to the respective sign off authority.
STEP 3: Once applied for approval, the document/URL will be read only. Hence, you will not be able to edit or delete the document/URL until the sign off is completed.
STEP 4: Upon receiving the sign-off request email, the ‘Sign Off’ Authority can then review the document/URL and choose to Approve or Reject it. Depending on the sign off settings determined by the admin, the Sign Off Authority may be allowed to provide a justification for the decision.
STEP 5: This can be done by either clicking the relevant link in the sign-off email, or by navigating to the respective object and clicking on the relevant button.
STEP 6: After the approval, a ‘Sign Off’ Complete email will be generated.
STEP 7: When a document/URL is approved, it will be ‘read-only’ and will not be editable for any users, except for users who have the ‘Can Edit After Sign Off’ permission to the object and super permissions (IPM admin, Project Manager, etc.).
STEP 8: When a document/URL is rejected, it will be made editable so that users can make the amendments and re-submit for sign off, if required.
STEP 9: Sign Off status will be displayed in the ‘Status’ column.