 Camms is pleased to announce the July Feature Release for Camms.Incident.
This was released on 17th July 2020 and includes the following new features and enhancements to improve your user experience within the system.
1. Fields to be mapped across multiple objects
Administrators now have the option of mapping fields between different tabs in a workflow, so that data entered in one tab can automatically pre-populate into a designated field (of the same type) in another tab.
- For custom fields of any type except for special fields (such as risk analysis pop up, linkage, action and standard fields like category/type etc), there will be an option to map fields across multiple objects in the same workflow and have the data automatically synchronised both ways.
- This will be a two-way synchronisation, meaning data entered/modified from one field will immediately update on the mapped field as well.
- For this to function, fields intended to work this way should be configured to be of the same field type from object configurations area, which can be accessed via cammsrisk > Framework > Incident Settings area.
How to configure:
- A new configuration ‘Auto synchronize with fields’ will be available in the field configuration area, which can be accessed via Object Configurations for applicable field types where multiple fields to synchronise with a parent field can be selected.
- The configuration field will display a tree structure of the workflow, showing all objects and fields available for the workflow and the administrator/user can pick the fields to sync with. Multiple selections can also be selected from here. Note that only fields of the same type will be shown here.
- After a field is selected, the field will be shown as below, where the field name, the object name and the workflow name will be shown in that order, against the selected field from top to bottom.
- In the example below, the user has selected the ‘Review comment’ field from the ‘Incident’ object of the ‘NearMiss’ workflow to synchronise with the ‘TestField’.
- Once the fields are selected and saved, the data mapping will initiate between the fields configured from here.
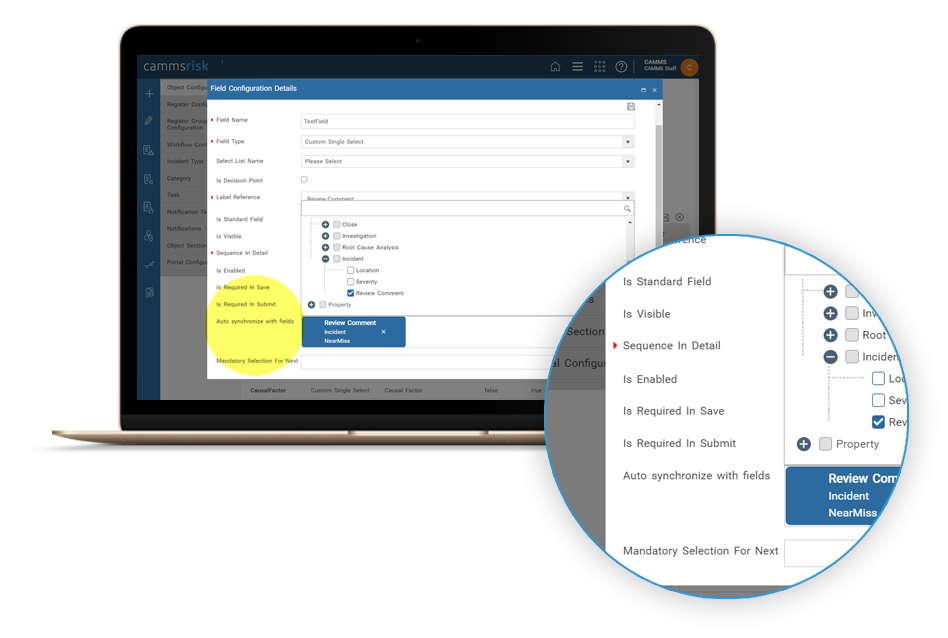
Image 1: New configuration is available
Important Notes and What's Next:
- Only fields within the same workflows can be picked from here. In future, we hope to look at extending this to have the ability to map fields between different workflows as well.
- Please also note that the above feature will only be applicable to custom fields. In future, this will be extended to more commonly used standard fields as well. However, please note that standard fields like Incident Responsible Officer, Priority and Severity already have other means of having the same field repeated in multiple tabs.
2. Approvals for incident action creation
There is now an approval process available for the incident action creation process, where they can be sent for sequential/ concurrent approval by authorised users, before being formally established as an action.
How to configure:
- In the standard ‘ActionObject’ accessed via cammsrisk > Framework > Incident Settings > Object configurations, a new object configuration titled ‘Enable approval’ is available, which can be ticked to enable the action approval process.

Image 2: New configuration available
- Two new permissions have been introduced to the standard permission area, which can be accessed via cammsrisk > Framework > Incident settings > User roles as outlined below:
- Standard Incident Action Draft Submission Permission - This will give the user permission to create an incident action and submit for approval. This user role should be tied in with an appropriate user role providing 'add' permission for the action object, following the current standard system behaviour.
- Standard Incident Approver Permission – This will give the user permission to approve an incident action created and submitted for approval
- Standard Incident Action Draft Submission Permission - This will give the user permission to create an incident action and submit for approval. This user role should be tied in with an appropriate user role providing 'add' permission for the action object, following the current standard system behaviour.
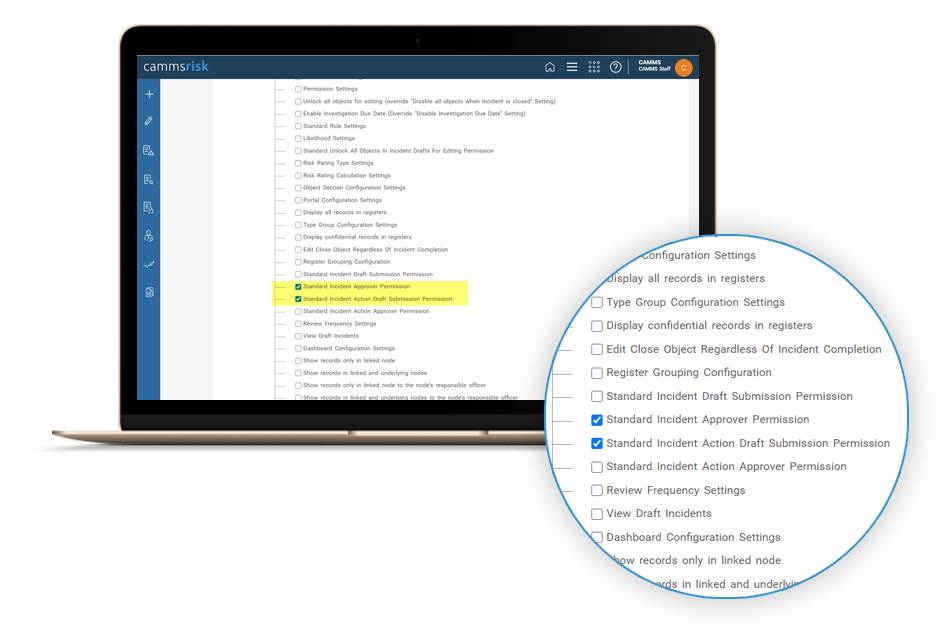
Image 3: New permissions are available
- Once approvals are enabled for the action object, an approval submission section will appear in the action creation page for the users with the ‘Standard Incident Action Draft Submission Permission’.
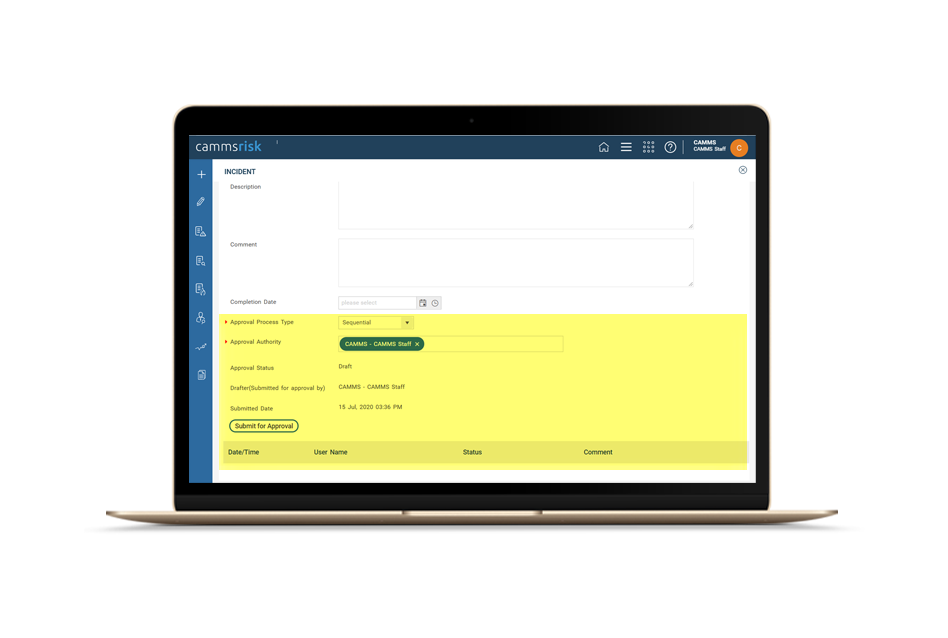
Image 4: New configuration is available
- Users submitting an action will be able to enter the below details and submit an action for approval:
- Approval process type: This will list two options for approval processes:
- Sequential – The approval process goes from one approval authority to the other in a sequential manner in the order they are selected from the drop down ‘Approval Authority’. All selected individuals will be prompted to approve the action one after the other, once it has been approved by all, only then will the overall action be considered approved.
- Concurrent – The approval process goes to all selected approval authorities simultaneously. Any of them can approve the action, when at least one person has given approval, the action will be considered approved.
- Sequential – The approval process goes from one approval authority to the other in a sequential manner in the order they are selected from the drop down ‘Approval Authority’. All selected individuals will be prompted to approve the action one after the other, once it has been approved by all, only then will the overall action be considered approved.
- Approval Authority: A multi-select staff drop down listing all staff with the user role with ‘Standard Incident Approver Permission’ assigned. Staff picked from here will receive records submitted for their approval in their 'My Quick Update’ area under 'My Approvals', from where they can either choose to approve/reject the records. They can also navigate to the details view by clicking on the hyperlink to approve/reject from the details page as well.
- Approval Status: Shows the current approval status the record is at. The statuses are;
- Draft - This means the record is still in the draft state (saved as draft) and hasn't been submitted for approval yet.
- Submitted - This means the record is submitted for approval and is now pending approval
- Rejected - This means the record was rejected/not approved by an approver
- Resubmitted - This means the record which once was rejected was corrected and resubmitted for approval.
- Approved - This means the record is approved. Only the actions which are approved will be displayed in the action register, dashboards and reports.
- Drafter (Submitted for approval by): Maintains a record of the incident action draft submitter
- Submission Date: Maintains a record of when the record was submitted for approvals
- Submit for Approval: You can submit your actions for approvals via this button
- The history grid: A table showing the history of approvals for the record from data/time, username, status and any approve/reject commentary added.
- Approval process type: This will list two options for approval processes:
Email configurations:
- You can also set up incident action related emails from the system to support the approval process. These emails will trigger notifications when actions are submitted for approvals, approved and/or rejected
- From the ‘Notifications’ area, which can be accessed via cammsrisk > Framework > Incident settings, when the Notification type is selected as Actions, three new triggers will be available with the functionality outlined as shown below;

Image 5: New triggers are available
- Action submitted – This will be triggered when a submitter user submits actions for approval.
- Action rejected – This will trigger when actions submitted for approval are rejected by a user. If the approval process type is set up as ‘Concurrent’ this will only be triggered if the last standing approver also rejects the record and there are no more pending approvals.
- Action approved– This will be triggered when actions submitted for approvals are approved by a user. If the approval process type is set up as ‘Sequential’ this will only be triggered if/when all approval authorities selected approve the record.
- We have also introduced two new recipients to the standard list of recipients, which can be accessed via cammsrisk > Framework > Incident settings > Notifications area as shown below, to be used appropriately.
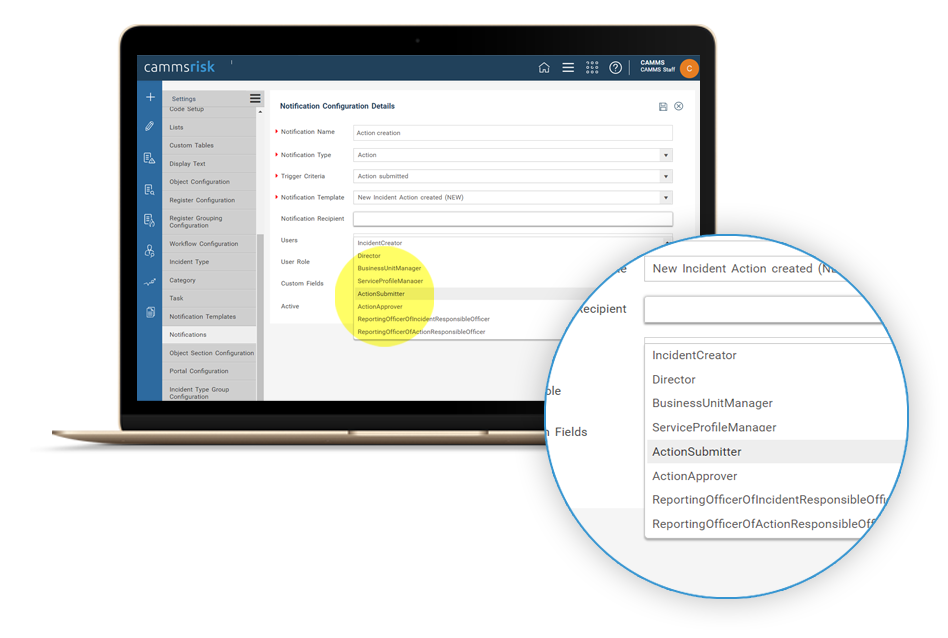
Image 6: New recipient types are available
Important Notes and What's Next:
The Incident Action Details page should be saved and the action should be created for the approvals section to appear.
We will be improving this further through our upcoming releases, to provide you with the option of submitting actions for approval at the same time you create them.
3. Improvements to the feature of limiting staff records populated in staff drop downs
As an extension to the feature for the staff list fields released via the April 2020 sprint, administrative users in Camms.Incident can now set up the staff lists in staff drop down fields, to be limited based on the hierarchy linkages.
- You can already limit the population of staff records in staff drop downs by choosing from the options below, which will help end-users further narrow down the list they search through, when recording incidents and assigning to staff.
- All Staff
- Staff linked to the incidents' linked organisation unit
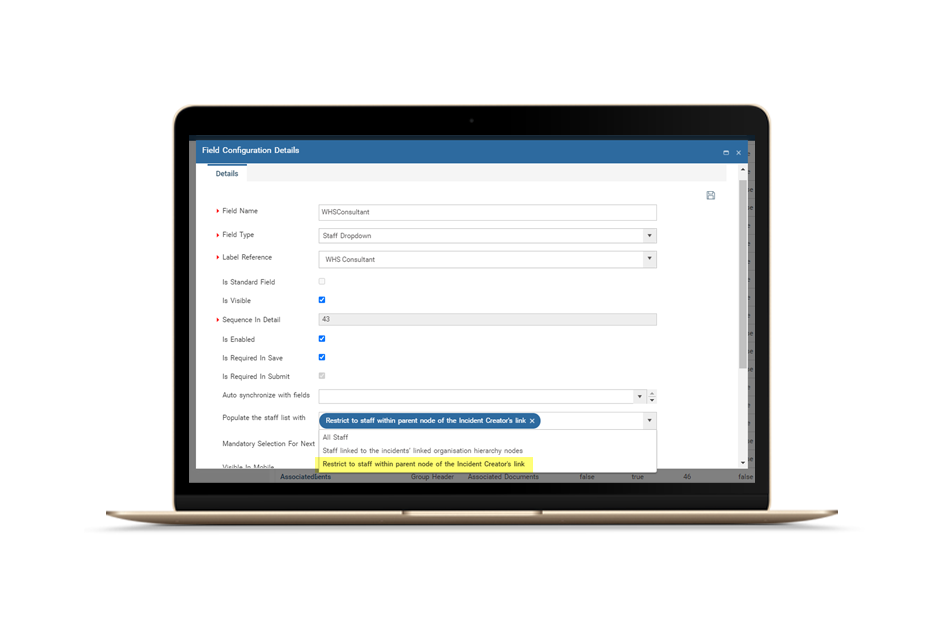
Image 7: Field configurations
- The existing configuration ‘Populate the staff list with’ which is available for all incident administrator users for all staff fields within field configurations, which can be accessed via cammsrisk > Framework > Incident Settings > Object configurations, will now have an added feature as shown below:
- Restrict to staff within parent node of the Incident Creator's link:By selecting this option, the staff list will be populated with all staff linked from the topmost hierarchy node with which the incident creator is linked to. For example:
 If the Incident Creator is linked to department 'H', the staff list will show all staff who are linked to it's parent node 'B' at level 2 and all of its child nodes (i.e. E, F, H and I).
4. Updates to standard Incident Reports
1. Visual and Layout Improvements
The Incident Master Report, Incident Action Summary Report and Incident Investigation Report has been updated to include the visual and layout improvements detailed below.
- Incident Master Report: Spaces between each of the sub-sections within the reports are increased to allow users to read content more easily and focus faster on important areas.
- Incident Master Report: Spaces between each of the sub-sections within the reports are increased to allow users to read content more easily and focus faster on important areas.
- Incident Action Summary Report: The appearance of the ‘Incident Actions by Schedule’ and ‘Incident Actions by Status’ widgets is improved to allow clear visualization of information.
- Incident Action Summary Report: The appearance of the ‘Incident Actions by Schedule’ and ‘Incident Actions by Status’ widgets is improved to allow clear visualization of information.

Image 8: Incident Master Report > Increase in spacing between sub-sections of the report
- Incident Action Summary Report: The comment section is hidden in instances where no comments are available within the application to better utilize spacing within the report.
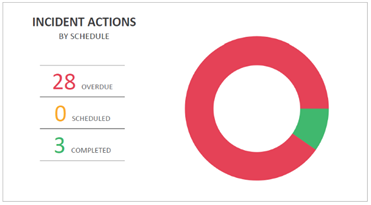

Image 9: Incident Action Summary Report > Improvement in appearance of widget- Incident Investigation Report: The appearance of the ‘Incident Investigation’ donut chart is improved to allow clear visualization of information.
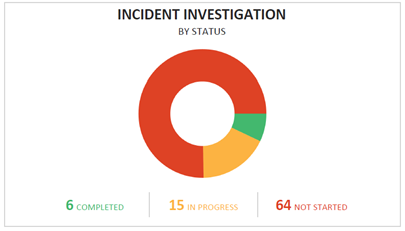
Image 10: Incident Investigation Report > Improvement in appearance of widget
- Incident Investigation Report: The appearance of the ‘Incident Investigation’ donut chart is improved to allow clear visualization of information.
- Incident Action Summary Report: The comment section is hidden in instances where no comments are available within the application to better utilize spacing within the report.
- Incident Investigation Report: The appearance of information displayed within the ‘Incident Investigation Summary’ section is enhanced to improve comprehension of information displayed.
- All Reports: Inessential white spaces within the reports have been minimized. Also fields which are active within the application but contain no data, will now be displayed as ‘N/A’.
2. Generalization of report titles
To help better cater to the wide variety of uses in case the system is utilised for (cases, forms, incidents, hazards, etc.), the naming convention of the report titles are now modified as below.- Naming convention of each report downloaded is changed to follow the format: reportnameddmmyyyy
- In an instance that the report is run for a single incident, the cover page of the report now displays the incident code and the report name.
- Incident Code | Report Name
E.g. INJ – 330 | Incident Action Summary Report
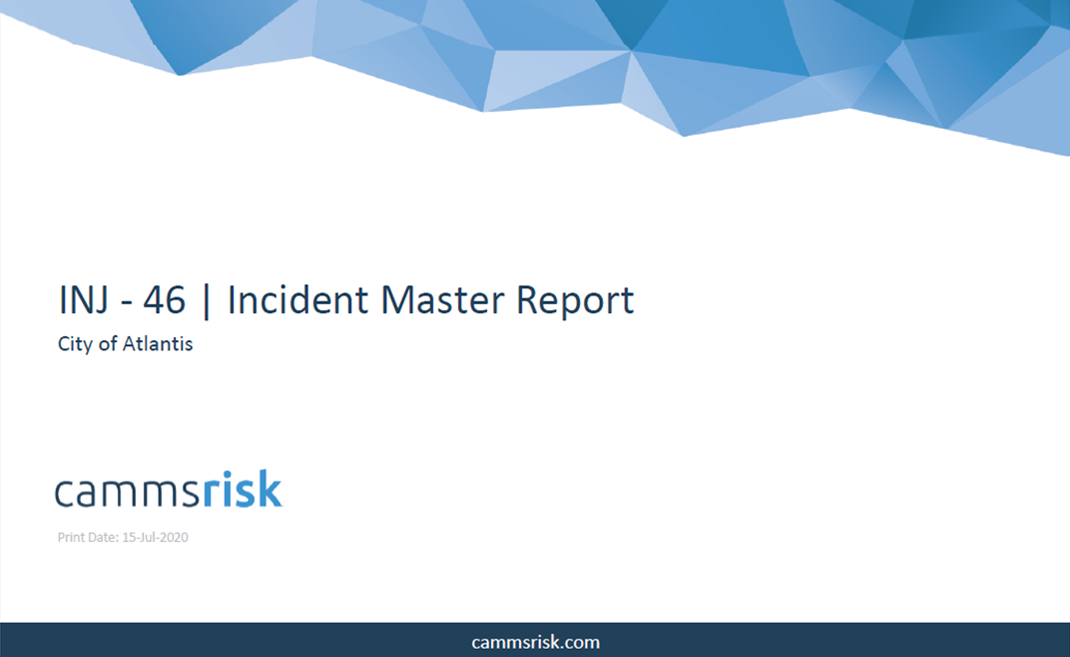
Image 11: Incident Master Report > Display of content when report is run for a single incident
