
Camms is pleased to announce the September Feature Release for Camms.Risk Incident Management.
This was released on 19th September and includes the following new features and enhancements to improve your user experience within the system.
1. Introducing auto-save for your data
You now have an auto-save feature, where incident data will be saved in a pre-defined frequency to prevent data loss due to interruptions. This prevents the end-user from the need to manually save information, in the expectation of an event of an application crash or due to human errors such as accidentally closing the browser window.
How to do the configurations?
- A new ‘Auto Save Frequency setting has been introduced within ‘Miscellaneous Settings’ (accessed via Camms.Incident > Mega Menu > Incident Settings > Miscellaneous Settings)
- To activate the auto-save feature a numeric value needs to be inserted within the numeric box which will determine the frequency in minutes.
- The minimum auto-save frequency is 5 minutes. Keeping it blank would turn off the auto save feature.
- Decimals, alphabets and characters cannot be entered.
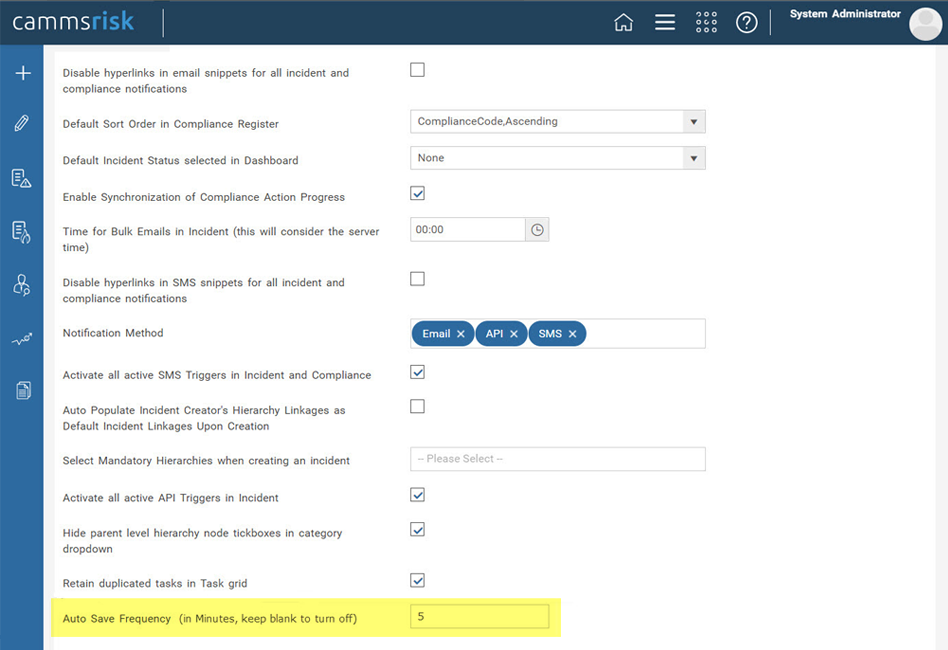
Image 1: Auto Save Frequency setting
How will it work?
- The auto-save will run in the background for the object the user is currently in, and will display a message as ‘Saving’ when it happens. The user can continue to work on the application without any disruption to on-going work. The data will be saved up to the point the auto-save happened.

Image 2: Auto-save message
- The mandatory validations will not be validated at the time of auto-save.
- The user will not be able to do a manual save at the time the auto-save is happening, but could do so at any other given time.
- At the time of an incident creation, if the auto-save happens the incident will get saved as a ‘Draft’ and will appear in the register as a ‘Draft’ for the incident creator only.
Note: The incident will be created and saved as a ‘Draft’ irrespective of the miscellaneous setting ‘Disable draft functionality in Incident Details’ being ticked.
- At the time of an incident action creation, the action will get saved as a ‘Draft’ and will appear in the action register for the action creator only.
Note: The incident will be created and saved as a ‘Draft’ irrespective of the ‘Enable Approval’ setting being ticked.
- The auto-save will run and save information only if the user has done any changes to the record between the frequency cycles.
- The auto-saved information will be updated in incident history.
Where will it not work?
- The feature will not work in the below mentioned objects
- Linkage object
- Document object
- My Quick Update
- Incident Portal
Will emails get triggered on auto-save?
- Emails can be configured to trigger on auto-save when the trigger criteria is fulfilled. A new dropdown named as ‘Trigger Type’ has been introduced in the Notification configuration screen for most notification types and its trigger criteria
- This will include the options of ‘On Save’ and ‘On Auto-Save’ as the trigger types
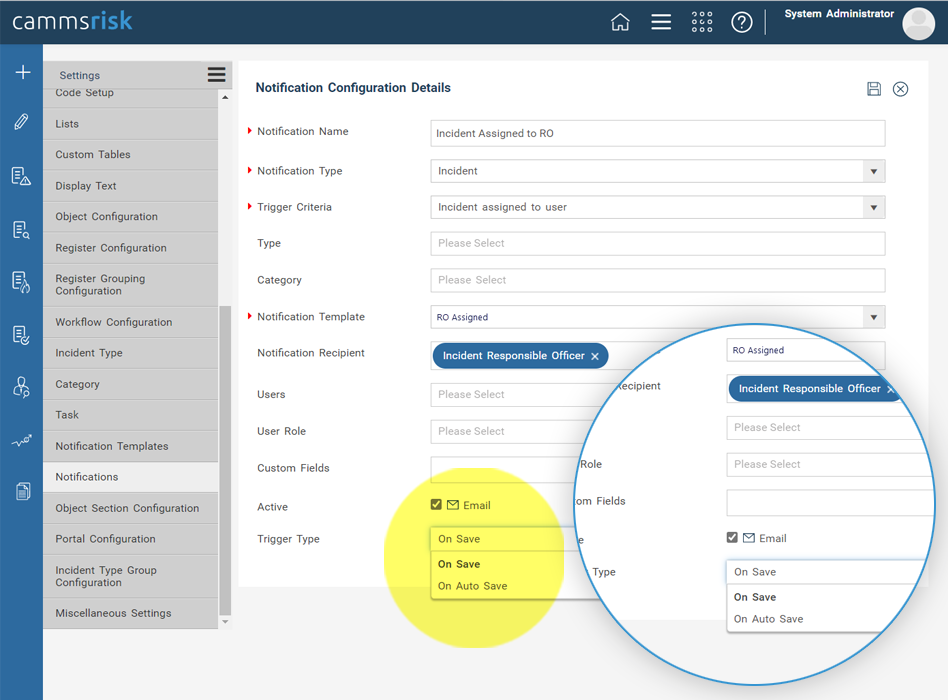
Image 3 - Email trigger type
- The ‘On Save’ option will be the default, and will trigger emails only on the manual save of incident details. The ‘On Auto-Save’ option will trigger emails when changes are saved on Auto-Save
The ‘On Auto-Save’ option is not applicable for the following triggers
Incident
- New incident creation
- Password reset
- Web account created
- Incident Deleted
- Incident Submitted
- Incident Approved
- Incident Rejected
Action
- Action submitted
- Action Approved
- Action Rejected
Sign off
- Phase submitted for sign off
- Phase approved
- Phase rejected
Submission
- Notifications will not trigger if the incident is in ‘Draft’ state. This is also applicable for actions which are in ‘Draft’ state
2. Filter staff lists based on user role
- As an extension to the feature for staff list fields released in our April 2020 sprint, administrator users in Camms.Incident now have the ability to set up staff lists in staff dropdown fields to be limited, based on the assigned user roles.
- You can already limit the population of staff records in staff drop downs by choosing from the options below, which will help end-users further narrow down the list they search through, when recording incidents and assigning to staff.
All Internal Staff
Staff linked to the incidents' linked organisation hierarchy nodes
Restrict to internal staff within parent node of the Incident Creator’s link
Portal Staff
- The existing configuration ‘Populate the staff list with’, available for all incident administrator users on all staff fields within field configurations, which can be accessed via Camms.Service>Framework>Incident Settings>Object Configurations, will now have an added feature as below.
User Roles: When selected another drop down will appear beneath the field listing all user roles available in Camms.Risk>Framework>Incident Settings>User Roles area.
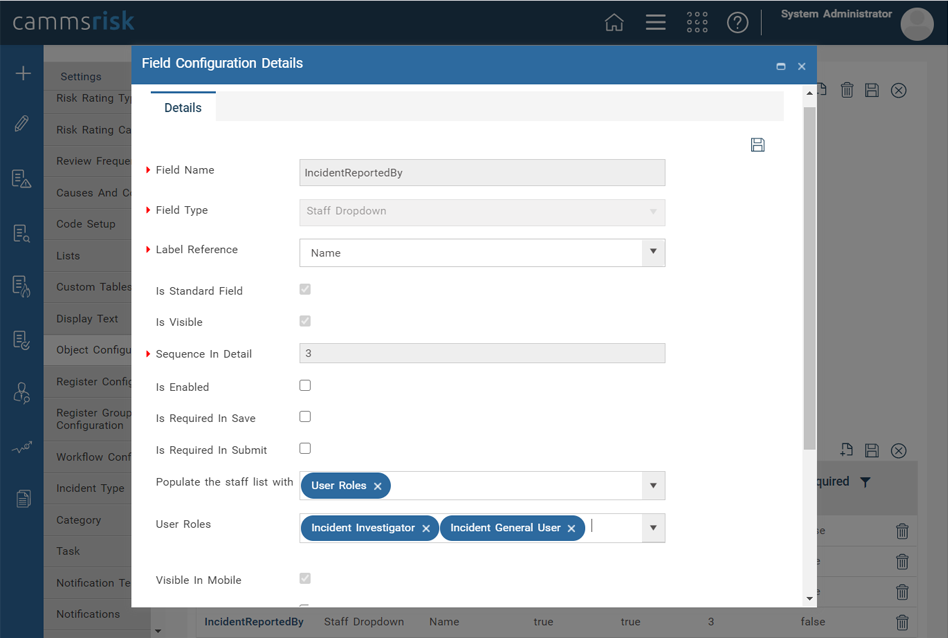
Image 4 : New configuration is available
- The user will be able to select one/many user roles from the list and any staff who is directly or indirectly assigned with one or all of these user roles will be listed in the staff drop downs within the incident form.
- This new configuration can be used in combination with other options available above for the staff list population feature as well and a union of all combinations will filter out the staff to be shown in the staff lists.
- Rest of the feature behaviour is as it is at the moment.
Important Note:
- When this feature is used for the Standard Incident Responsible Officer field and if the below settings are used in the database for the client from under Camms.Risk>Framework>Incident Settings>Miscellaneous Settings, the below behaviours can be observed. Hence it is important to have consistent configurations for the staff fields.

Image 5: Impacted Setting
- If the above setting is enabled and used along with the feature above, the selections made from the new feature ‘Populate the staff list with’ configuration will be taken in to consideration.

Image 6: Impacted Setting
- If the above setting is enabled and used along with the feature above, the selections made from the new feature ‘Populate the staff list with’ configuration will be NOT taken in to consideration and the final staff list will be picked from the setting above.
3. Ability to send out email notifications based on hierarchy linkages
- The email notifications are improved this sprint to give you ability to send out email notifications based on the hierarchy linkages the incidents has to help the records get the attention from it requires immediately based on the impact it may have.
- Two new triggers are introduced as below with the mentioned functionality for the Notification type: ‘Incident’ accessed via Camms.Risk>Framework>Incident Settings>Notifications
i) Linking to Hierarchy nodes
When this trigger is selected, notifications can be configured to be triggered based on the linkage’s incident records have with different hierarchy nodes.

Image 7: New trigger introduced
- The specific nodes for which the linkage should be considered and matched with to trigger the emails, can be selected and saved for the notification using the hierarchy search and type areas below;

Image 8: Hierarchy node selection
- The hierarchy search will give an option to carry out a text-based search for a particular hierarchy node, similar to the hierarchy search filter in your incident registers at the moment. If you wish to have a more hierarchical view for the node selection process, you can do so by selecting the hierarchy type and the linkages from the respective options above. Once the selections are made, you can save by selecting the recipients and other attributes to the notification following the existing behavior.
How does the trigger work?
- Once your set up is done, the trigger will be satisfied, when an incident record linked to a hierarchy matching the exact hierarchy nodes you selected for the notification are found. The linkages can be made to the incident by the end user via the linkage tab or pop up or using the standard drop down options as well. The linkages selected for the notification should be the same selected for the incident as well here as the direct linkage to the linked node itself is considered here for the trigger.
What recipients can you use with this?
- All snippets available at the notification set up area can be used as applicable for this trigger as well.
What snippets can you use with this?
- All snippets available at ‘Notification Template’ area accessed via Camms.Service>Framework>Incident Settings>Notification Templates for the Notification type: Incident, can be used for this trigger.
- Additionally, a new snippet [LinkedHierarchyNodes] available under the same area can be used together with this trigger, which when used will list all linkages the incident has with hierarchy nodes - grouped by the hierarchy type
ii) Linking to a hierarchy node considering rolled up linkages
- When this trigger is selected, notifications can be configured to be triggered based on the linkage’s incident records has with different hierarchy nodes, but with the added feature of considering the rolled-up linkages.

Image 9: New trigger introduced
- The specific nodes for which the linkage should be considered and matched with to trigger the emails, can be selected and saved for the notification using the hierarchy search and type areas below:
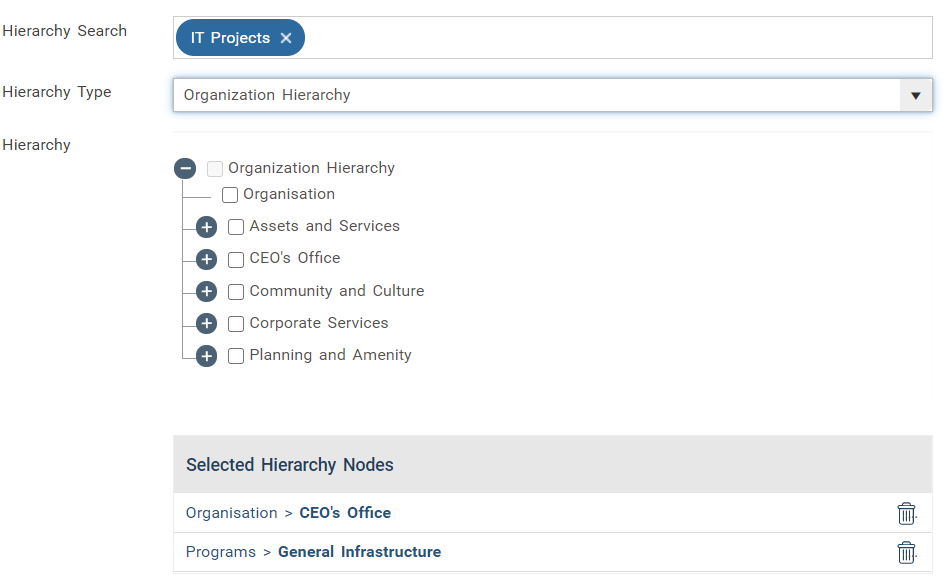
Image 10: Hierarchy node selection
- The hierarchy search will provide an option to carry out a text-based search for a particular hierarchy node similar to the hierarchy search filter in your incident registers at the moment. If you wish to have a more hierarchical view for the node selection process, you can do so by selecting the hierarchy type and the linkages from the respective options above. Once the selections are made, you can save by selecting the recipients and other attributes to the notification following the existing behavior.
How does the trigger work?
- Once your set up is done, the trigger will be satisfied when an incident record linked to a hierarchy matching the exact hierarchy nodes you selected or rolling up to that level for the notification are found. The linkages can be made to the incident by the end user via the linkage tab or pop up or using the standard dropdown options as well. The linkages selected for the notification should be either same selected for the incident or rolling up to the level selected for the notification as both the direct linkage and rolled up to the linked node area considered here for the trigger.
For Example: Consider a hierarchy path (top to bottom as below):

Image 11: Example hierarchy
- Let’s assume Incident A is linked to the level 3 node in the hierarchy which is ‘Libraries’ and Incident B is linked to the level 2 node ‘Community Facilities’
- If for the notification, from the hierarchy field, a level 1 node (Community and Culture) is selected, this trigger will consider both Incident A and B for the notification because both those incidents roll up to the level 1 which was selected for the trigger.
Note: This will consider an upward breadcrumb from the actual Incident linked node along the hierarchy path till the node level selected for the notification.
Therefore, If an Incident C was linked to the node ‘Chapel Off Chapel’ it will also be considered but an Incident D linked to ‘EAT Economic Development…’ will NOT be considered
What recipients can you use with this?
- All snippets available at the notification set up area can be used as applicable for this trigger as well.
- Additionally, a new recipient ‘Unit Manager of the linked hierarchy node of the notification and below’ is also introduced for this trigger which when used will send out emails to all unit managers for the hierarchy node the notification is linked with and below.

Image 12: New recipient
To explain more using the above example,
- In a scenario where the notification was linked to level 1 node ‘Community and Culture’ with a new incident created linked to level 3 node ‘Libraries’, if there are responsible officers/unit managers assigned to the respective hierarchy nodes, the notifications will be sent out to the managers of units ‘Level 1 node – Community and culture’, ‘Level 2 node -Community Facilities’ and ‘Level 3 node – Libraries’. If there are mode child nodes below ‘Libraries’, they will be sent out for them as well.
Note: The above recipient will only be applicable to the above trigger only at the moment hence please refrain from using this recipient for any other triggers.
What snippets can you use with this?
- All snippets available at ‘Notification Template’ area accessed via Camms.Service>Framework>Incident Settings>Notification Templates for the Notification type: Incident can be used for this trigger.
- Additionally, a new snippet [LinkedHierarchyNodes] available under the same area can be used together with this trigger which when used will list all linkages the incident has with hierarchy nodes - grouped by the hierarchy type
4. Review process for incidents
- A new review process is now introduced which can be used to carry out scheduled reviews for incidents
How to do the configurations?
- A new standard object ‘Review’ is introduced to the ‘Object Configurations’ area accessed via Camms.Service>Framework>incident Settings area which can be enabled for this purpose.
- There will be the below standard fields available with the mentioned functionality but rest of the behavior would follow the standard object behavior providing similar capabilities such as adding/editing and deleting custom and standard fields, determining the field labels/positions and whether/not they are mandatory etc.
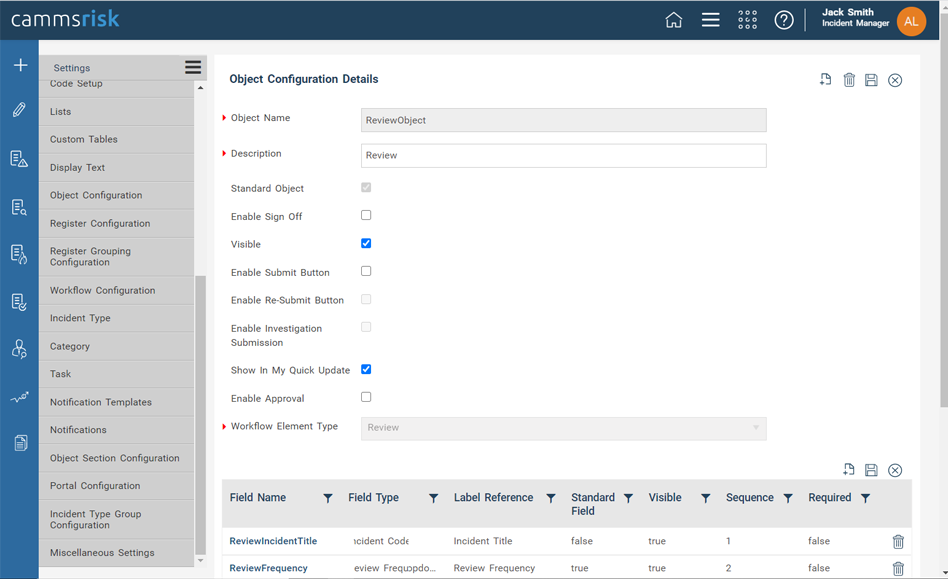
Image 13: New Standard Object
- Review Frequency: will show all frequency options created under ‘Frequency’ area accessed via Camms.Service>Framework>Incident Settings in the order. This will determine the next review date for the incident based on the below logics. More details below.
- Last Reviewed By: The name and the position of the staff who completed a review last.
- Last reviewed Date: The data on which the above staff completed a review.
- Next Review Date: The next review date for the incident. This would be set up based on a calculation [Last Review Date + Period of days defined by the Frequency].
Note: Although it is calculated using the logic above, individual date setting option selected for the frequency value selected would determine the final date shown here. More details below
- Review Comment: Any comments added while doing and completing the review
- Review Status: The status of the review. This will be shown as Overdue or Upcoming based on the below logics.
- Overdue – If the next review date has passed the current system date and the review is not still ‘Complete’ this will be shown as Overdue
- Upcoming – If the next review date is either falling before or on the same date as the current system date, this will be shown as ‘Upcoming’
- Complete Review: The review details above can be updated many times as required and saved using the save icon for the page, but a review is considered as completed only when the ‘Complete Review’ button is clicked. Only doing so will update the Last review date/Last reviewed By and Next review date fields as per the above logics and the incident will be considered as reviewed, changing the status to ‘Upcoming’
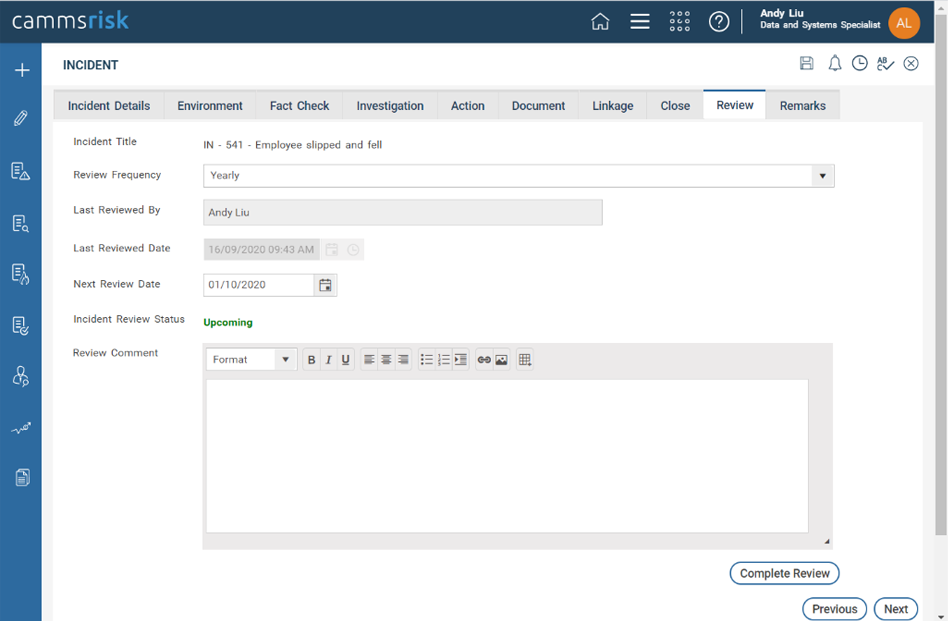
Image 14: Incident Review
How to set up the frequency values?
- For a user with the necessary permissions given for a user role from User Roles are accessed via Camms.Service>Framework>Incident Settings>User Roles>Standard, an extra configuration ‘Review Frequency’ will be available on the left menu under Incident Settings.

Image 15: New standard permission

Image 16 : Review Frequency area
- This area will show all the frequency options you have configured so far. A new option can be added using the add new icon, or an existing one can be updated by clicking on the name and navigating into the record as well.
- When adding a new one, the below options with mentioned functionality will be available.

Image 17 : Add a new option
- Review Frequency Name: The name of the frequency option you are setting up, ex: Monthly
- Description: A description for the option.
- Image: An image for the option if required (currently will not be shown anywhere in the application)
- Color: A color for the option if required (currently will not be shown anywhere in the application)
- Position: The sequence in which the option should appear in the ‘Frequency’ selection dropdown in the end user view
Frequency Type –
- Type: The type of the frequency option which needs to be counted as. Options available here are Days/Months and Years
- Type Count: The count of the above selected type applicable to your frequency.
For ex: If you want to set up a frequency option to be as quarterly, you can select Type = Month from the Type count = 3 which will make up the frequency to be considered as in every three months (which is quarterly)
Set Next Review Date –
Set next review date for the period to be;
- Below three options are available for you to select from on how the next review date calculated as above [Last Review Date + Period of days defined by the Frequency], will be shown:
- Select the day for the period: A exact date from the period as per the next review date calculation logic. For example, if its yearly and the review was done today, the next review date will be set to be calculated as;
Today + Year and will be set to the next review date
21/09/2020 + year = Next review date = 21/09/2021
- End of period: The end date of the considered period will be shown here. For example, if its yearly and the review was done today, the next review date will be set to be calculated as;
Today + Year and will be set to the end date of the ‘Yearly’ period
21/09/2020 + year = Next review date = 31/12/2021
- Day: A specific date as you select from here from the period considered for the next review date. For example, if its yearly and the review was done today and the setup is done to consider the 300th day, the next review date will be set to be calculated as;
Today + Year and will be set to the exact date you picked of the ‘Yearly’ period
21/09/2020 + year = Next review date = 27/10/2021 (in the next year, which is 2021, the 300th day is October 27th)
Can review related emails be sent?
Yes, you can have emails set up to be sent based on the next review date as below.
- A new notification type ‘Review’ is introduced in the ‘Notification’ area accessed via Camms.Service>Framework>Incident Settings area.
- A new trigger ‘Next Review Date’ will be available for the trigger with below configuration options.

Image 18: New Notification and trigger introduced
- A reminder email to be sent based on a frequency set depending on the condition that it is before/after a certain set amount of days of the next review date can be set from here.
- The rest of the functionality will follow the standard behavior.
What snippets can you use with this?
- A new notification type ‘Review’ is available under the Notification Template area accessed via Camms.Service>Framework>Incident Settings.
- The new type will provide all the existing snippets which can be currently used together with the below new snippets.
- [LastReviewedBy]: Last reviewed by for the record
- [LastReviewedDate]: Last review date for the record
- [NextReviewDate]: Review due date for the record
- [ReviewFrequency]: Frequency selected for the record
- [ReviewComment]: Comment

Image 19 : New snippets
5. Improvements to the Document and Linkage objects
Document Object
- Document uploads within the Document Object have been improved to provide ease of use to the end-user. When uploading a document it will now automatically upload the document and save it without having the need to manually save
- However on Edit, document details such as 'document title' and 'document description' will not be automatically saved if a document is not uploaded, and therefore will require to be manually saved.
Linkage Object
- Adding linkages within the Linkage Object will automatically get saved upon selection of the linkage
- This improvement is applied for all Linkage types except the ‘Hierarchy’ linkage type. If the user selects the linkage type as ‘Hierarchy’, the selected hierarchy nodes will require to be manually saved.
