Camms is pleased to announce the November Feature Release for Camms.Project.
This was released on 14th November 2020 and includes the following new features and enhancements to improve your user experience within the system.
1. Ability to input data from an Excel sheet into Custom Tables
Introducing a Data Upload Wizard to Custom Tables, allowing you to easily input data from an Excel sheet into Custom Tables in the project.
How to access the Data Upload Wizard?
- The Data Upload Wizard is available under Custom Object > Custom Table tab in the project workflow.
- Click on the ‘Data Upload’ icon on the toolbar in the Custom Table to navigate to the data upload wizard.
Note: Data Upload functionality will be available only when the rows are added to the Custom Table by the end user (i.e. when ‘Allow users to add rows’ tick box is selected in the object configuration area of the Custom Table). Hence, this functionality will not be available when the rows in Custom Tables are pre-defined by the administrator.
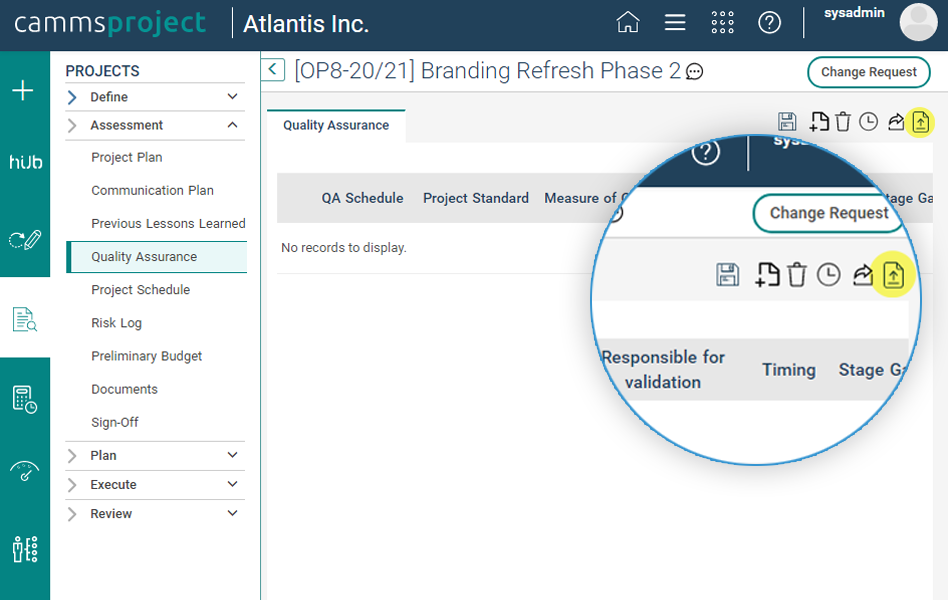
Image 1: 'Data Upload' icon in the Custom Table
How can I upload data into a Custom Table via the Data Upload Wizard?
Step 1 – File Upload
- You can either upload an Excel file to the wizard by using a pre-defined template or by using an Excel file you have already entered data in.

Image 2: File upload setup
- To download the predefined template, click on the ‘Download Template’ button. The template will be automatically downloaded to your device.
- Once you fill the data in the Excel sheet and the file is ready to upload, click on the ‘Select File’ button on the wizard.

Image 3: 'Select File' button on the wizard
- Select the file which you want to upload the data from the file browser.
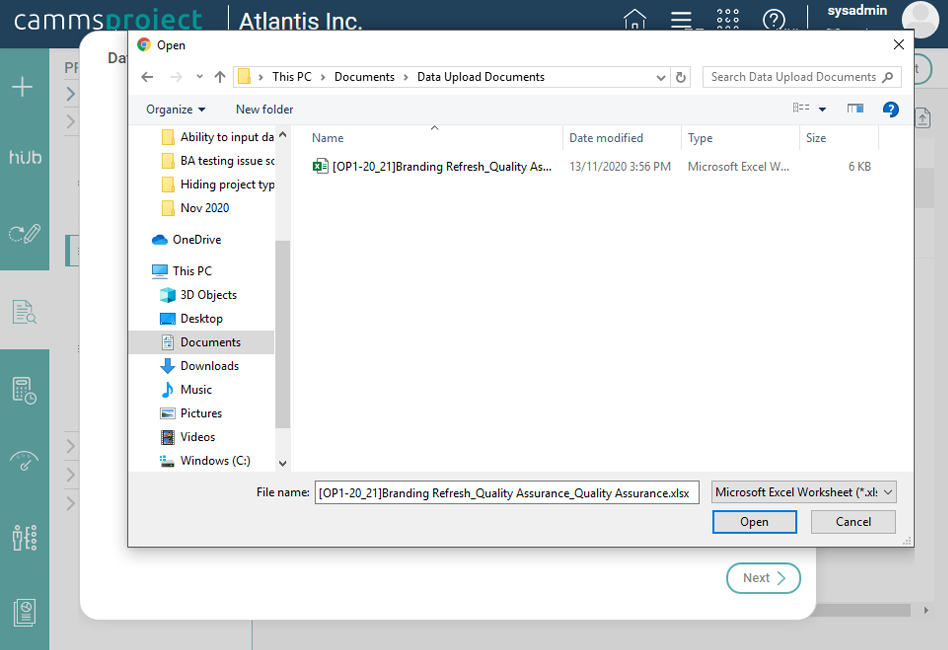
Image 4: File browser
- To upload the file to the system, click on the 'Upload' button which is located next to the ‘Select File’ button. Once the file is successfully uploaded to the wizard, you will be able to navigate to the next step.
Notes:
- The format of the file which you upload to the wizard should be either xls or xlsx.
- Make sure that the column headers are added to the file which you upload since the first row of the data source will be considered as column headers.
Step 2 – Select Worksheet
- Select the worksheet from which the data should be imported.

Image 5: Select Worksheet step
- Select the worksheet (in the file which you uploaded in step 1) which contains the data that you wish to upload from the dropdown list. Once you select the worksheet, you will be able to navigate to the next step.
Step 3 – Select Custom Table
- You can select the Custom Table in the project to which you wish the data to be uploaded via this step.

Image 6: Select Custom Table step
- Expand the dropdown list and select the Custom Table which you will be uploading the data to.
- This dropdown list will display all the Custom Tables in the current project which you have edit permissions to, allowing you to upload data to a Custom Table in any phase of the project without navigating to the respective Custom Table.
Step 4 – Data Mapping
- Map data between the Custom Table and the selected worksheet.

Image 7: Data Mapping step
- The Data Mapping table will display the following columns:
- Column Name: Will display all the column names in the selected Custom Table.
Notes:
- Only columns that are set to visible and editable (from the object configuration area) will be shown here.
- Cumulative columns (i.e. the columns that have the 'Is Cumulative' tick box selected in the object configuration area) and ‘Formula’ columns will not be shown here.
- Column Type: Will display the data type of each column.
- Map to Excel Column: Will display all the columns in the selected worksheet in a dropdown.
- You can select a column header from the ‘Map to Excel Column’ dropdown for each column in the Custom Table.
- Once you map the columns and finish the data upload process (Step 5), the system will automatically populate the data within the respective columns in the Excel to the mapped columns in the Custom Table.
Step 5 – Finish
- The final step will allow you to see a preview of the final output of the Custom Table after the data is uploaded.
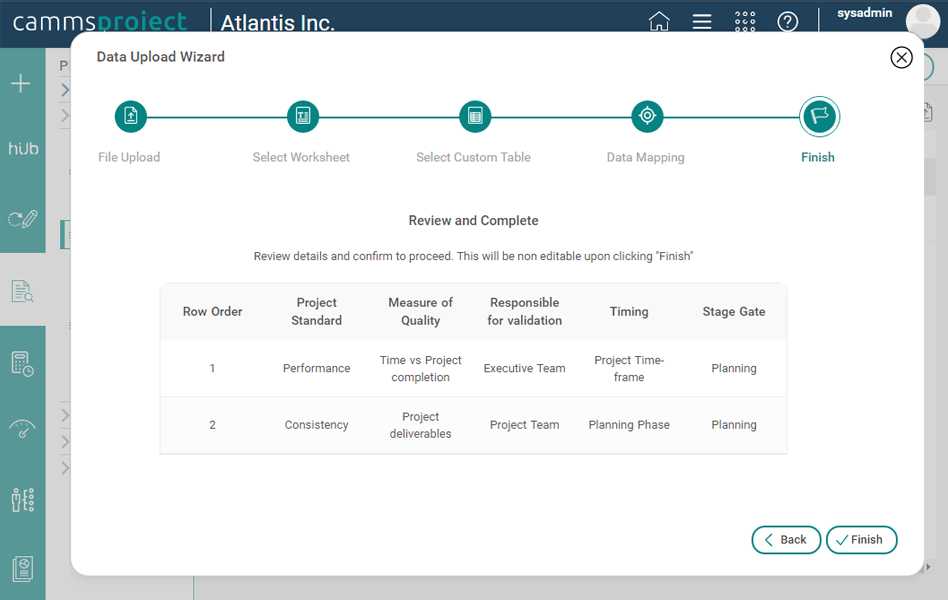
Image 8: Preview of final output
- If there are any data upload errors, you will be able to view them in the error log which is displayed below the preview grid.

Image 9: Error Log
- If you are satisfied with the preview output, you can proceed with the data upload by clicking on the ‘Finish’ button.
Note:
- If the data was already present in the Custom Table at the time of the data upload, they will be automatically overwritten and replaced with the data in the selected worksheet.
- If the data has errors, the system will auto change/correct them as given below, when the data is uploaded to the Custom Table;
- If the column type is Numeric/Currency, they will be replaced with ‘0’.
- If the column type is Text or Dropdown, they will be replaced with empty/null.
- If the column type is Date, they will be replaced with empty/null.
- If the column type is Period, they will be replaced with the next available month.
Who can access the Data Upload Wizard in the Custom Table?
- Users with ‘Can Add’ or ‘Can Edit’ permissions to the Custom Object will be able to upload data.
- Users with ‘Can Edit After Sign Off’ permission to the Custom Object will be able to upload data after the Custom Object is signed off.
- Users with ‘Can Edit After Terminate’ permission to the Custom Object will be able to upload data after the project is terminated.
- Users with Super roles (e.g. IPM Administrator and Project Manager) will be able to upload data to the Custom Tables at any given time.
What’s coming up?
Camms will be continuously working towards improving and extending the Data Upload Wizard functionality in the Custom Table to support the scenario where the rows in Custom Tables are defined by the administrator, as a part of the roadmap. Stay tuned for the updates through our product communications.
2. Filters in Task Kanban Board in Quick Update
Introducing filters to the Kanban Board in My Quick Update > My Tasks, allowing you to filter your Kanban Board using the following filters:
- Project Name
- Task Name
- Task Start Date and End Date
- Task Status – By default, the Kanban Board in Quick Update will not show tasks which are in ‘Completed’ and ‘Deferred’ stages. If you wish to see completed and deferred tasks in your Kanban Board, select Completed and Deferred options within the ‘Show Task Status’ dropdown in the search panel and click on ‘Filter’ button.
- Task Performance Status (On Track, Off Track and Monitor)

Image 10: Filters in Kanban Board in Quick Update
3. Improved Search functionality in Project Register and Project Hub
- The Simple Search and Advanced Search in the Project Register and Project Hub, used to function independently.
To further improve the search functionality in the Project Register and Project Hub, this behaviour has now been changed, so that the Simple Search would now automatically use the filters applied in the detailed search of the Register and Hub.
- A new button called ‘Clear’ was introduced in the Advanced Search to allow you to clear filters that have been applied and reset to default.

Image 11: The new 'Clear' button in the Advanced Search in Project Register
4. Improvements to the Responsible Person column in the Gantt
- The Responsible Person column in the Gantt now shows the primary responsible person first, followed by the secondary responsible persons in alphabetical order.

Image 12: Display primary responsible person first in Responsible Person column in Gantt