Users eligible to join the meeting, can do so after the meeting agenda has been finalised. This functionality can be accessed in two ways.
- Option 1: Click on the 'Join Meeting' tab in the left side quick links panel. A list of all meetings with finalised agendas would be displayed for selection. Then click on 'meeting title', to select the meeting to join. This will direct the user to the Meeting workspace.
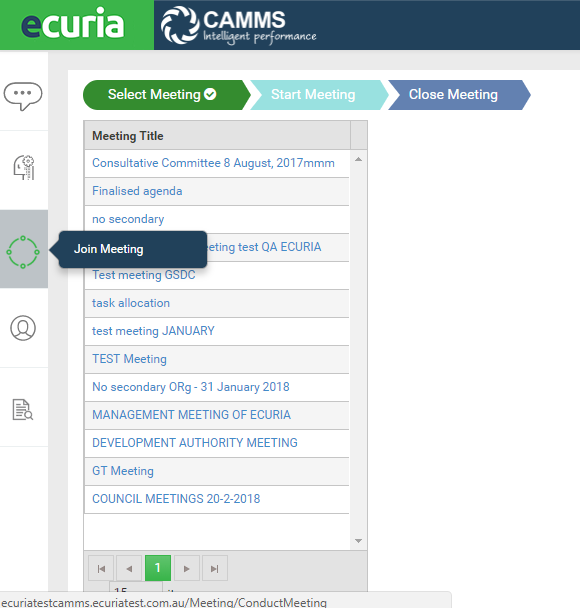
- Option 2: Click on the 'home page' icon. This page will have the upcoming meetings bar on the left side and a calendar view of all meetings. Meetings with finalised agendas will show a 'Join the meeting' icon. Click on the 'Join the meeting' icon and the user will be directed to the meeting workspace.
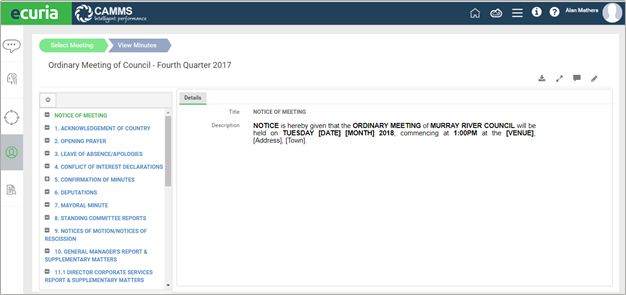
Meeting Workspace – Participant / Member view
When a meeting agenda is finalised, workspace (participant view) would be available for all meeting participant and members.
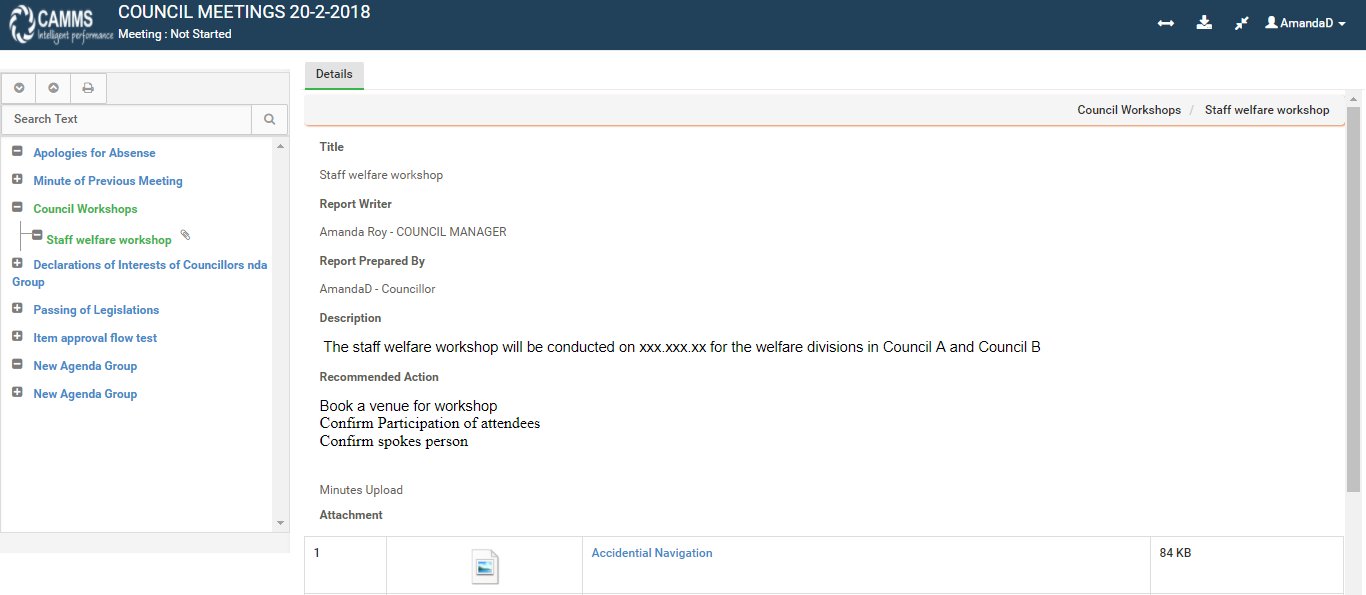
Meeting Workspace would provide a complete view of the agenda to the participants. The user can use the TOC on the left hand side to navigate between groups and items. Any items which have attachments are indicated with the paper clip icon next to the item. Refer to the below figure for a snapshot of the meeting workspace for a participant or member.
Functionality
participants and members are given a few basic functionalities donated in the action icons listed below:
Action Icon | Description | |
 | Expand Screen | |
 | Download Agenda | |
 | Highlight text to comment | |
 | Sketch (Pen) | |
 | Undo sketch | |
 | Redo Sketch | |
 |
|
Highlight Text to Comment
The member/participant can highlight areas and user comment.
To highlight the text and to add a note, the following steps need to be followed.
- STEP 1: Click on the 'Highlight to comment' icon at the top.
- STEP 2: Select the text you want to highlight and add a note.
- STEP 3: Click save. Then the comment icon will show over the highlighted text.
- STEP 4: On mouse over the comment will show.
- STEP 5: To edit the comment, click on the pencil icon.
Sketch (Pen)
To add a scribble or to underline on the agenda, the sketch pen can be used.
To use the sketch pen, the following steps need to be followed.
- STEP 1: Click on the 'Sketch' icon. Then the cursor would change to a pen.
- STEP 2: Sketch on the screen.
- STEP 3: Click 'Save Sketch' icon. Then a screenshot of the page will be captured and auto downloaded to the local hard drive.
- STEP 4: To undo the sketch mark, click the 'undo' icon.
- STEP 5: To redo the sketch mark, click 'redo' icons.
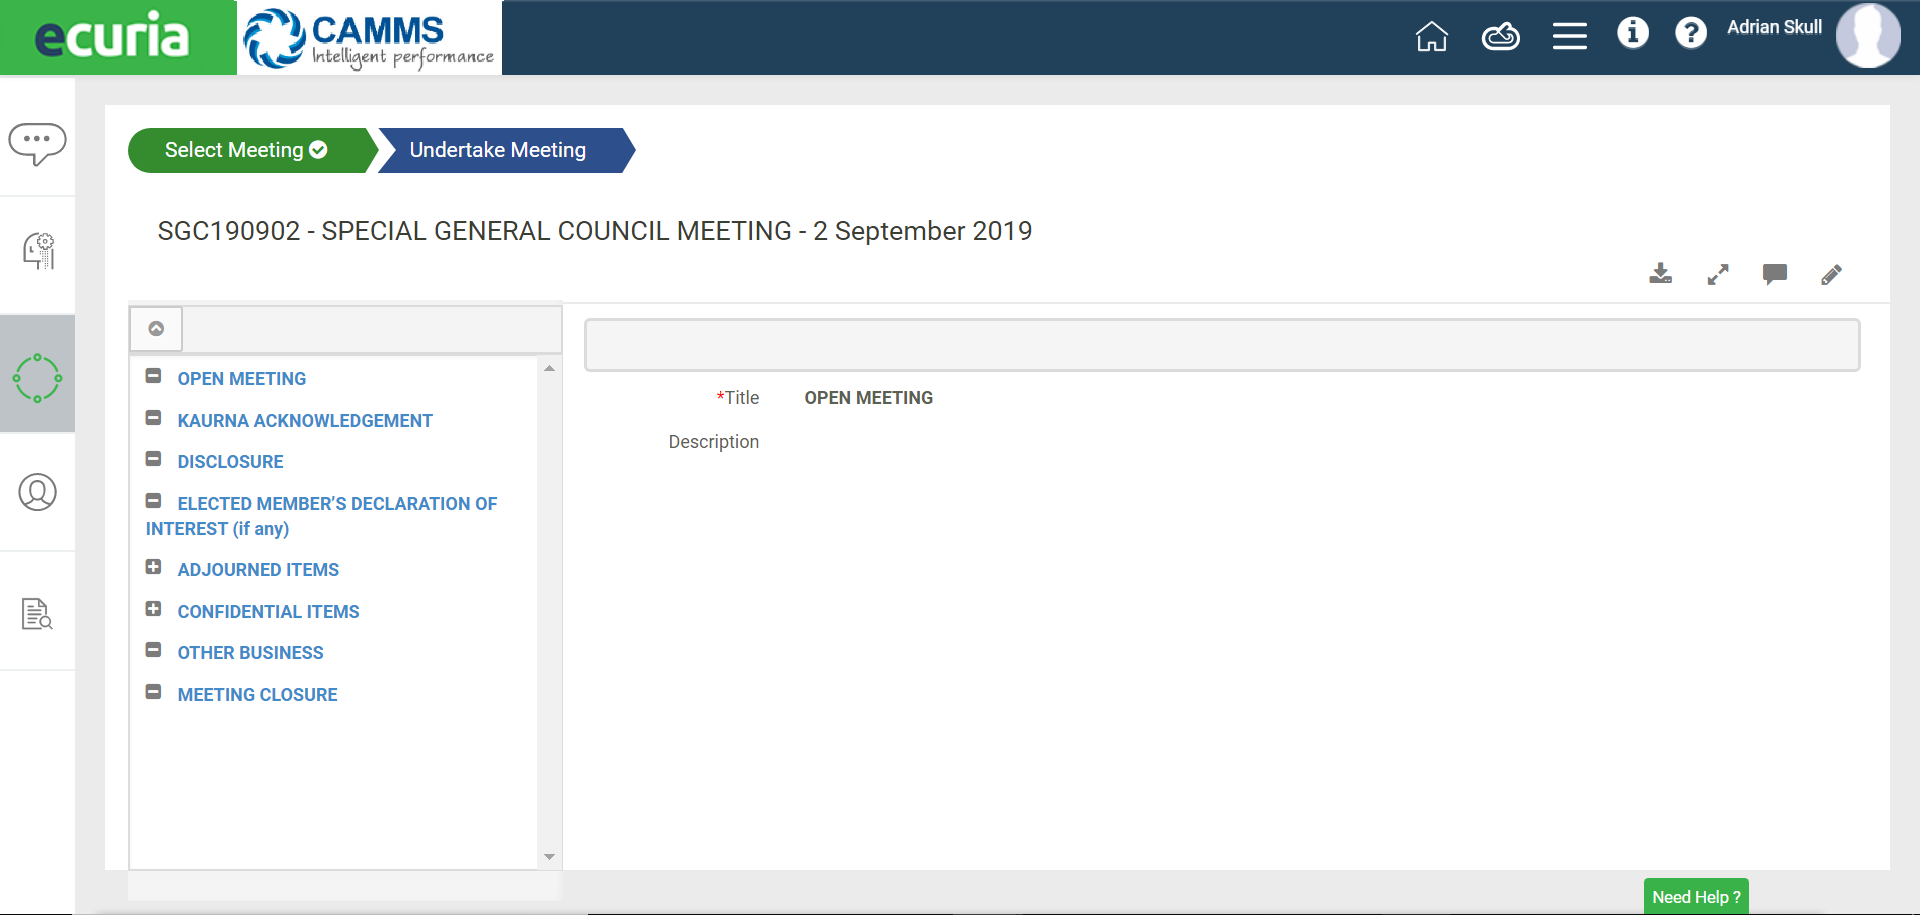
Meeting Workspace – Organiser View
When a meeting agenda is finalised, a different workspace would be available for the meeting organiser. This view has some key functionalities that are available only for the organiser. Shown below is a snapshot of the meeting workspace for an organiser.

Functionality
An organiser is given a few key functionalities in addition to the participant or members. These features are denoted in the action icons listed.
Action Icon | Description |
 | Motion/Resolution/Notes |
 | Vote |
 | Division Vote |
 | In/Out |
 | Attachments |
 | Email |
 | Add/Actions |
 | Revert to Non-Confidential |
 | Mark attendance |
 | Start Meeting |
 | Pause Meeting |
 | End Meeting |
 | View Full Agenda |
 | Preview Minute Output |
 | Auto Generate Actions |
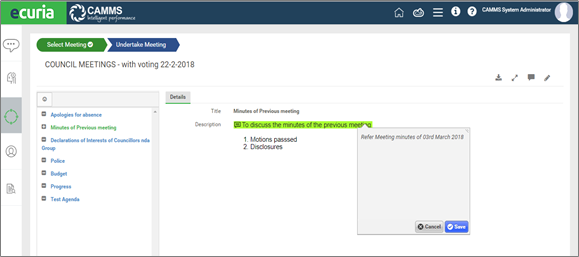
Motion/Resolution/Notes
Add Notes
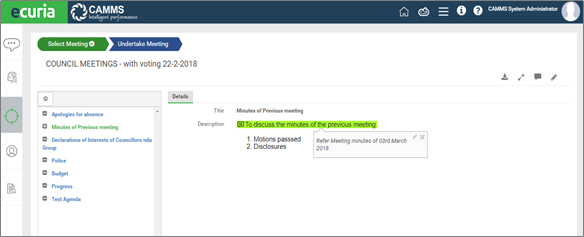
The organiser is able to add notes to a Meeting Agenda group or Agenda item. The notes will be added to the final meeting minutes. This can be done prior to meeting commencement.
Note: The notes RTF will not have a toolbar. Only text can be entered. Formatting can be done in the meeting minutes stage, after the meeting is concluded.
The following steps need to be followed to add a ‘Note’.
STEP 1: Click on the ‘Notes’ icon.
STEP 2: A RTF box will appear. For ease of use, the user has the option to draft the notes by selecting auto populated content by using the following three drop downs. The auto text can also be inserted into the RTF using short cut keys.
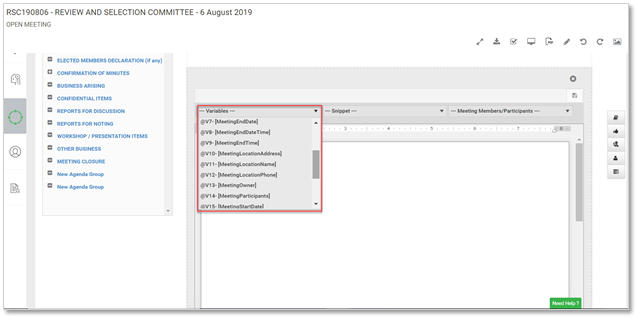
- Variables – These are pre defined fields that will auto fill, based on the data entered at the ’Create meeting’ stage. The user can select one more variable and the notes will auto populate.
Example: Meeting Title, Meeting Description, Current date time
To insert a variable via a short cut key, the user needs to follow the syntax of ‘@variablenumber’. Variables are numbered as V1, V2, etc. in chronological order. For example, to insert the first variable, type ‘@V1’ and ‘Space key’ But in the instance, the variable doesn’t have a value, then the variable doesn’t get saved.
- Absent
- Apologies
- Current Date
- Current Time
- Leave of absence
- Meeting description
- Meeting end date
- Meeting end time
- Meeting location address
- Meeting location name
- Meeting location phone
- Meeting members
- Meeting owner
- Meeting participants
- Meeting start date
- Meeting start time
- Meeting title
- Organisation
The new variables can be used in the Note RTF in the Join meeting & Meeting Minutes’ phase. It also can be used for Snippet creation and Agenda template cover design in the administrative section.
- Snippet – This will list all the snippets configured by the administrator at Setup (refer section4.1) The user can select one or more snippets. To insert a snippet via a shortcut key, the user needs to follow the syntax of ‘@snippetnumber’. Snippets are numbered as S1, S2, etc. in chronological order. For example to insert the fourth snippet, type ‘@S4’ and ‘Space key’.
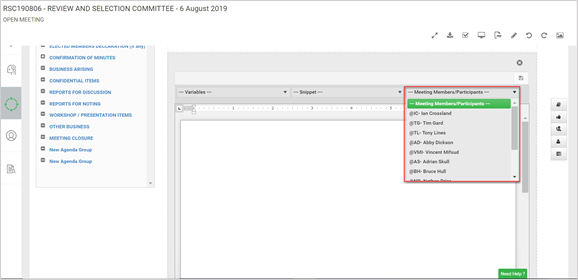
- Members/Participants – this will list all the names of the elected members and participants of the meeting. The user can select one more names to be included in the notes. To insert a member name via short cut key, the user needs to follow the syntax of ‘@personnumber’. Members are numbered with reference to a person’s number as P1, P2 etc. in chronological order. For example to insert the first member, type ‘@P1’ and ‘Space key’
STEP 3: Click ‘Save’ This will save all the information in the Notes
Delete
To delete any notes, click on the ‘x’ icon on the top corner of the note.
Edit
To edit a comment, click on the ‘pencil’ icon in the top corner of the note. The RTF box will appear.
Vote
This functionality allows users to take a vote on meeting agendas items. The user can create a list of items to take votes prior to meeting commencement.
Note: The notes RTF will not have a toolbar. Only text can be entered. Formatting can be done in the meeting minutes stage, after the meeting is concluded.
To create items to vote the following steps have to be followed.
- STEP 1: Click on the ‘Votes’ icon
- STEP 2: Then a RTF box will appear.
Further, For ease of use, the user has the option to draft voting items by selecting auto populated content from the following two drop downs. The auto text can be inserted into the RTF using Shortcut keys as well.
- Variables – These are pre defined fields That will auto fill, based on the data entered at the’Create meeting’ stage. The user can select one more variable and the notes will auto populate. For example, Meeting Title, Meeting Description, Current date time, etc.
To insert a variable via a short cut key, the user needs to follow the syntax of ‘@variablenumber’. Variables are numbered as V1, V2 etc. in chronological order. For example, to insert the first variable, type ‘@V1’ and ‘Space key’ But in the instance, the variable doesn’t have a value then the variable doesn’t get saved. - Snippet – This will list all the snippets configured by the administrator at Set up (refer section4.1) The user can select one or more snippets. To insert a snippet via a shortcut key, the user needs to follow the syntax of ‘@snippetnumber’. Snippets are numbered as S1, S2 etc. in chronological order. For example to insert the fourth snippet, type ‘@S4’ and ‘Space key’.
- Members/Participants – this will list all the names of the elected members and participants of the meeting. The user can select one more names to be included in the voting text. To insert a member name via short cut key, the user needs to follow the syntax of ‘@personnumber’. Members are numbered with reference to a person’s number as P1, P2, etc. in chronological order. For example to insert the first member, type ‘@P1’ and ‘Space key’.
- STEP 3: Select a member to Move the vote, click on the ‘Moved’ drop down
- STEP 4: Select a member to Second the vote, click on the ‘Seconded’ drop down
- STEP 5: The organiser can create more than one vote item by clicking the Vote icon repeatedly
Auto Populate Voting Content
If the agenda item report has been configured to select an RTF box to include in voting, the content of that RTF box (Entered in agenda creation at the meeting preparation stage) will auto populate.
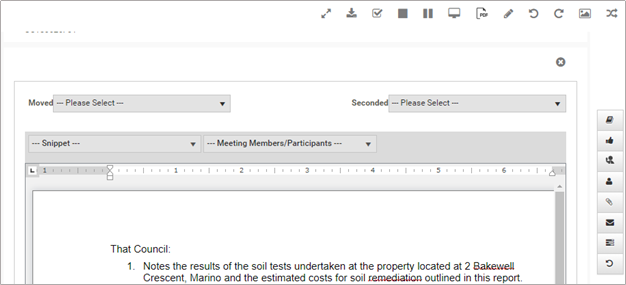
Taking a Vote
A vote can be taken only after the meeting has commenced. The organiser has to select members for ‘Moved’ and ‘Seconded prior’ to taking a vote as shown in the below figure.
To take a vote the following steps have to be followed.
- STEP 1: Click on 'take vote' button below the RTF box. The voting options will load as per the below figure.
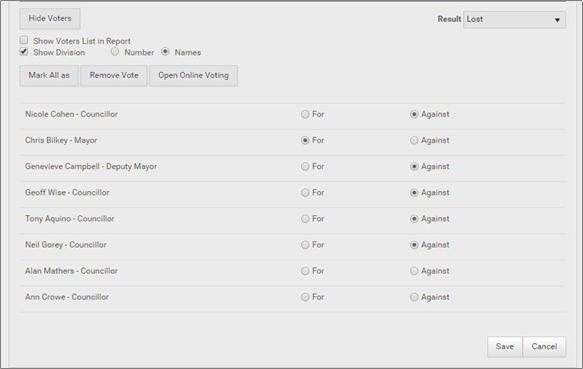
- STEP 2: The list of members will be shown . One of the two options can be selected:
- For
- Against
- STEP 3: Tick 'Division'. Then a radio button option will appear for 'Number' and 'Names'. If ‘number’ is selected it will show the voting result as a number. If 'Name' is selected it will show the names of the members for each result.
- STEP 4: If the Voters' Lists needs to be included in the Minutes report, tick 'Show voters list in report' tick box
- STEP 5: 'Mark All As' button will mark all votes as 'For'.
- STEP 6: 'Remove Vote' button will clear all votes
- STEP 7: Open Voting online
- This feature will allow all meeting members to cast their vote using the system. A notification will be sent to them via email. Votes have to be done before the meeting ends.
- To enable Online voting, click on this button. A prompt message will appear. Click 'OK' to continue.

After manual voting has been completed, the 'result' drop down will automatically show the result.
a. Carried Unanimously – If more than 50% has voted 'For'.
b. Carried – if 50% has voted 'For' and 50% has voted 'Against'.
c. Lost – If more than 50% has voted 'Against'.
d. Lapsed – If voting has not been completed before meeting terminated.
e. More options can be added via setup.
- STEP 8: Click 'Save' to save all voting results.
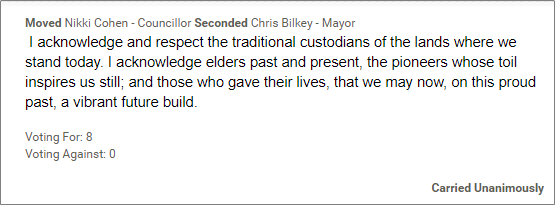
Once the voting has been completed, the note will show a summary of the vote as depicted in the below figure.
Note: Confidential Vote
A vote taken for a confidential agenda item is a confidential vote. A confidential vote can be taken only by confidential members, which is handled by a setting ‘____’. If the setting is ON the following steps needs to be noted:
1.Select a mover and a seconder – this will only list the members who are marked as confidential users. (Note: Confidential users can be marked for an agenda item or for a meeting). In the event a member/s is not marked as a confidential user, the drop down will not have a value.
2.Click on the ‘Take Vote’ button – this will list the names of the members who are marked as confidential users. In the event a member/s is not marked as a confidential user, the name will not appear to cast a vote.
3.Follow steps 3 to 7 listed above to complete taking a vote.
If the setting is OFF the following needs to be noted:
1.Select a move or seconder – This drop down will list all the confidential users (Note: All confidential users of the meeting and the agenda item) irrespective if they are members or participants of the meeting.
2.Click on the ‘Take Vote’ Button – This will list all the names of all confidential users irrespective if they are members or participants of the meeting.
NOTE : Lapsed Vote
A lapsed vote is a vote which is moved but not seconded. To record a lapsed vote, select a mover from the ‘moved’ drop down and save the vote. A pop up will appear asking if the vote is to be recorded as a lapsed vote. Click ‘Yes’. The vote will be saved as a lapsed vote.
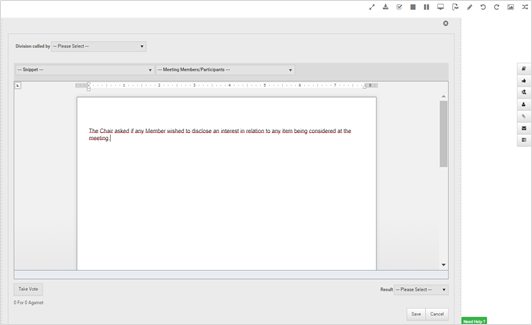
Division Vote
To take a division vote click on the ‘Division vote’ icon from the right side toolbar. A division vote can be taken only for a vote that has already been taken and has a motion. The division vote RTF will load upon validating if there is an existing vote. The organiser has to select a member for ‘Division called by’ prior to taking a vote as shown in the figure.
To take a vote, the following steps have to be followed.
- STEP 1: Click on the 'Take Vote' button below the RTF box. The voting options will load. The vote can be done by the same list of members of the existing vote.

- STEP 2: Follow Steps 2 to 8 explained under the ‘Take Vote’ functionality described above, to complete a division vote.
Attachments
This feature allows the organiser to add attachments to each agenda item or agenda group. This can be done by clicking on the 'Attachment' icon. The user controlled attachment tool will appear as a note in the agenda as shown in the below figure.

Attachments will not show in the preview and will appear only in the draft meeting minutes and the final minutes.
Add Action
This functionality is used to create action items discussed in the meeting for each agenda item or agenda group. To add action items the following steps need to be followed:
- STEP 1: Click the 'Add actions' button
- STEP 2: Enter an action item in the text area.

- STEP 3: Spell check can be done
- STEP 4: Click on the 'Save' icon to save all action items
- STEP 5: To add more than one action item, the user must add one after the other.
The saved action items will appear in the action centre, and it can be assigned to specific users. This is discussed under Action Centre.
Mark In/Out
The meeting organiser can use this functionality to mark meeting attendees who step out of the meeting and return.
The following steps need to follow to mark in/out;
- STEP 1: Click 'In/Out' icon.

- STEP 2: Select Member/Participant name from the drop down. if the name is not available, click 'Other' to enter the name.
- STEP 3: Mark in or out status.
- STEP 4: Default system time will appear. To edit time, click on the text box or click on the ‘clock’ icon to select time from the drop down.
- STEP 5: Click ‘Submit’.
Revert to Confidential
This is a new feature in the Join meeting stage. The meeting organiser/minute taker can revert a confidential item into a non-confidential item, by clicking the ‘Revert to Non-confidential’ action button on the right side of the screen.
When an item is reverted to non-confidential, the following functionalities occur:
- The item will no longer be confidential. Data fields – Reasons, Grounds, Custom Field 1, custom Field 2 will be removed and not appear in the outputs and preview.
- The agenda item will get added to the non-confidential agenda report and non-confidential minute report.
- Actions will also revert to non-confidential.
Email Agenda Item
The agenda item can be emailed by Clicking the 'Email' icon.
Mark Attendance
This feature is to mark the attendance of all participants and members before the meeting starts. Once all attendance is marked, the meeting will automatically commence.
To mark attendance the following steps need to be followed
- STEP 1: Click on 'Mark Attendance' icon.
This will open a popup with all meeting members’ and participants’ names.

- STEP 2: The default status will be set as a present. Click on ‘Present’ and a drop down will appear with the following options:
- Present
- Apology – Not present
- In Attendance
Start Meeting
This functionality is possible only once the meeting attendance has been completed. Then the 'start' meeting will appear. Once the icon is clicked, the user will be prompted to confirm if he/she wishes to commence the meeting. Upon clicking ‘Ok’ the meeting has commenced.
Pause Meeting
The meeting can be paused by clicking the ‘Pause' icon. To resume the meeting, click on the 'Reconvene Meeting' Icon.
End Meeting
Once the meeting has concluded the organiser can end the meeting by clicking on the 'End meeting' icon. The user will be prompted if to end the meeting. Click 'Ok' to continue.
After the meeting has been concluded, online voting cannot be done.
Auto Generate Actions
Action items can be generated, after the meeting has commenced, and 'after' the vote is taken, based on the motion terminology configured at 'Set up'. Click the 'Generate action item' button to Auto Generate.
For example, if the admin has set up the motion to generate action items for carried and carried unanimously, then at the join meeting stage, the organiser can generate actions, only if the vote motion matches to Carried or Carried unanimously.
At the join meeting stage, if the vote has a division vote, then the ‘auto generate actions’ will check the motion of the division vote and generate actions.
A pop up will appear notifying the user, that the actions have been generated. The Auto generated actions will automatically update in 'Action Centre' but will update in ‘Follow up Actions’ only after the meeting minutes are finalised.
The action officer for the actions generated against an agenda item will be the Report Owner, and for the actions generated against an agenda group, the action officer will be the Meeting organiser. However, this can be changed in Follow Up actions after the meeting is concluded.
Note: The user must apply a numbering list to the items that they enter in the voting area in order to generate them as action items, if a user enters the items without any numbering they will not be generated as action items. Alternatively, the user can generate actions for items inserted in a table. The items have to be inserted only in the second column of a table.
View Full Agenda
This functionality is used when the agenda needs to be viewed on Fullscreen during the meeting. Click the ‘View full screen’ Icon and the agenda will open in a new window with an expanded view.
The following functionalities are available on agenda full screen:
Action Icon | Description |
 | Collapse Agenda Pane |
 | Download agenda |
 | Exit Full screen |
Preview Minute Output
This functionality enables the organiser to preview the draft minutes of all Notes, Votes, Action items and other meeting details.
Delete/Hide/Public
All meeting action items such as notes, Vote, Action items, In/out, Pause/resume and attachments get saved as a meeting minute. The following functionalities are available at each meeting minute.
- Delete – A meeting minute can be deleted by clicking the ‘x’ icon. An alert message will popup to confirm to delete
- Hide – The organiser can hide any action item by ticking the ‘Hide’ tick box
- Public – A meeting minute of a confidential agenda item can be made public by ticking the ‘Public’ tick box
