Camms is pleased to bring you the Quarterly Product Release Note for Camms.Risk.
This quarter we've got a number of exciting new features and enhancements to improve your user experience within the system, which was deployed to your Test environment on 20th March 2021 and will be deployed to your Live instance on 3rd April 2021.
1. Create an audit recommendation from a risk action
This enhancement will let you create a corresponding audit recommendation (in the audit module) from a risk treatment action; automatically creating a link between these two.
How do you configure this?
- Users with the ‘Editor’ permissions for all Risk types, 'Show Audit' permission, and 'GOV/OHS Audit Administrator' permissions in the standard permission framework (accessed via Camms.Risk > Administration > Manage Users) or ‘Risk Solution’ permissions for all Risk types, 'View' permissions for Audit and Finding, and 'Edit' permissions for Recommendation in the new flexible hierarchy framework [currently in beta] (accessed via Camms.Risk > Administration > Role Management > Permission), will be able to create an Audit Recommendation when creating linkages.
How does this work?
- There are two ways in which a linkage between a Risk Action and an Audit Recommendation can be created.
- Using an existing audit recommendation
- Creating a new audit recommendation
Linkage using an existing audit recommendation
- To create a linkage using an existing audit recommendation, go to the Links tab, and select 'Audit Recommendation' in the 'Create a new linkage' dropdown. The following multi-select dropdown filters will be displayed, where you can filter from existing audit recommendations in the grid below and create a linkage:
- Audit Title – Select from the list of audit titles to filter from.
- Audit Finding – Based on the selected audit titles, audit findings will be filtered and listed to be selected from.
- Organisational Links – An independent filter to select business units (for standard permission clients) / organisational links (for flexible permission clients) within the organisation hierarchy to filter existing audit recommendations in the organisation. This filter will apply to all audits that have a direct linkage to the business unit / organisational link.Note: The filtered Organisational Links are not applicable to the new recommendation that will be created, but is used only to filter existing recommendations.

Figure 1.1 – Filter details to select from existing audit recommendations
- Once filtered, the existing audit recommendations will be listed in the grid below, with the following details:
- Audit Title – This column will display the titles of all audits selected in the filter. Details will be further filtered to list only those that have a direct linkage to the filtered business unit/organisation.
- Audit Finding – This column will display only audit findings that are linked to the selected audit title.
- Audit Recommendation Number – This column will display the audit recommendation number of the existing audit recommendation listed.
- Audit Recommendation – This column will display the recommendation title based on the selected Audit Title and Finding.
- To make a linkage, select the 'Link' checkbox next to the listed audit recommendation, and click the save button at the top of the page.
Note: If any of the listed audit recommendations has the 'Link' checkbox ticked, it will denote that it is already linked, and you will not be able to link it again, since only one Audit Recommendation can be created for one Risk Action for all Risk types.
 Figure 1.2 – Existing audit recommendations filtered to be linked
Linkage creating a new audit recommendation
- To create a linkage using a new audit recommendation, go to the Links tab, and select 'Audit Recommendation' in the 'Create a new linkage' dropdown.
- You can filter Audit Titles and Finding Titles in the filters section if needed. If not, from the grid itself select from the following column dropdowns:
- Audit Title column – This column dropdown will display the titles of all audits in the organisation. If an audit title has been selected from the filter area, the dropdown will be auto populated to the filtered title, but can be changed by selecting another option from the dropdown.
- Audit Finding column – This column dropdown will display the titles of all audit findings in the organisation. If an audit finding has been selected from the filter area, the dropdown will be auto populated to the filtered title, but can be changed by selecting another option from the dropdown. The dropdown will display only audit findings that are linked to the selected audit title.Note: A 'View Details' link will be displayed below the audit title and finding title dropdowns, and will let you view the details page of the audit or finding. This will be disabled and in grey colour till an audit/finding title is selected.
- Audit Recommendation Number column – This column will be automatically populated with the new audit recommendation number upon saving the page.
- Audit Recommendation Title column – This column will auto populate the risk action titles here. You can edit this detail up to 500 characters.
- To make a linkage, select the 'Link' checkbox next to the listed audit recommendation, and click the save button at the top of the page.Note: If any of the listed audit recommendations has the 'Link' checkbox ticked, it will denote that it is already linked, and you will not be able to link it again, since only one Audit Recommendation can be created for one Risk Action for all Risk types.
 Figure 1.3 – Create a new recommendation via the grid
- The following mandatory fields will be auto populated in the Audit Recommendation page from for Risk Action Details page.
- Audit Recommendation Title
- Audit Recommendation Owner
- Audit Recommendation Original Due Date
- Audit Recommendation Review Frequency
- Audit Recommendation % Complete
- Audit Recommendation Status
- Audit Recommendation Comments
- Organisation Linkages
- Once saved, the audit recommendation is created and a linkage is created between the audit recommendation and the risk action. The new audit recommendation will be listed in the Audit Recommendation Register too.
- Once a link is created between an Audit Recommendation and a Risk Action, the following fields can be made to synchronise respectively:
- Audit Recommendation field: Percentage Complete = Risk Action field: Percentage Complete
- Audit Recommendation field: Status Report Summary = Risk Action field: Comment
- Audit Recommendation field: Action Status = Risk Action field: Action Status
- Audit Recommendation field: Responsible Officer = Risk Action: Responsible Officer Notes:
- The above synchronisation will only be made possible, via an internal setting ‘Enable synchronisation of Risk Action and Audit Action’ enabled on request, made to Camms Support.
- Once ‘Enable synchronisation of Risk Action and Audit Action’ is enabled the ‘Link to Risk Action’ column will appear in Camms.Risk > Menu > Audit Settings > Audit Action Status, letting you map the Audit Recommendation Status against Risk Action status. The Status field will get synchronised only if the status is mapped. If the mapping is not done, then the Risk Action Status will not synchronise and will be empty within the Audit Recommendation.

- The Risk Action linkage will display within the ‘Links’ tab of the newly created Audit Recommendation.
- If you ‘Delete’ the link, this will only delete the linkage between the Risk Action and the Audit Recommendation and not the Audit Recommendation.
2. Customising the layout of the project risk register
This enhancement will enable you to customise the layout of the Project Risk register as per your individual preference and save the setting to apply in your profile in the future as well.
How do you configure this?
- Users with the ‘Project Risk Viewer’ permission in the standard permission framework (accessed via Camms.Risk > Administration > Manage Users) or ‘Register’ permission in the new flexible hierarchy framework [currently in beta] (accessed via Camms.Risk > Administration > Role Management > Permission > Project Risk), will be able to view the Project Risk Register and customise the layout.
- A new 'settings' icon will be available at the top-right hand corner of the 'Project Risk Register' window. Click this 'settings' icon to open the 'Quick Settings' popup, where you can customise the layout of the Project Risk Register according to your preference and save the layout.
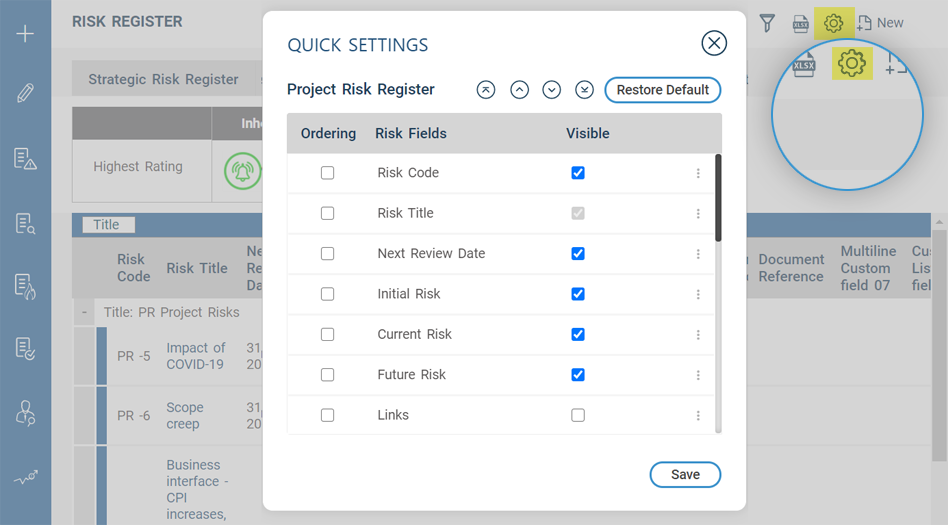
Figure 2.1 – Click on the settings icon to open the quick settings popup window
How does this work?
- Go to the Project Risk Register and click on the 'settings' icon to open the ‘Quick Settings’ popup window. You can customise the order and visibility (show / hide) of fields in the grid. Click on 'Save' to save the layout.
- Fields listed in the 'Quick Settings' popup window will be based on the following criteria:
- Project risk fields configured as 'visible' under Risk Settings > Register Configuration > Project Risk Register.Note: Project risk fields configured as 'visible' and mandatory (un-editable) under Risk Settings > Register Configuration > Project Risk Register, will be 'visible' by default. You will not be able to hide these fields.
- Project risk fields configured as NOT 'visible' but ONLY 'searchable' under Risk Settings > Register Configuration > Project Risk Register, will be listed in this popup to be selected and made visible.
- Project risk fields configured as 'visible' under Risk Settings > Register Configuration > Project Risk Register.
- To change the order of fields,
- Click on the checkbox(es) under the 'Ordering' column and click on the 'top', 'up', 'down', 'bottom' buttons to move the field(s) right to the top, one field up, one field down and right to the bottom respectively OR
- Drag and drop the field to the position you wish using the three dots on the right hand side of the field.

- To change the visibility of fields use the checkboxes under the 'Visible' column next to the fields. This will show / hide fields in the register.

Figure 2.3 – Changing the visibility of fields
- Click on the 'Restore Default' button to restore the default layout of the Project Risk Register that has been configured via the Risk Settings > Register Configuration > Project Risk Register page. Once the default layout is restored, all layout changes done on Risk Settings > Register Configuration > Project Risk Register will apply thereon.Notes:
- To know if the saved register layout is default, check if the 'Restore Default' button is inactive (in grey). If the the saved register layout is one that has been customised, the 'Restore Default' button will be active (in blue).
- If you customise the layout, at some point, back to the default layout, the 'Restore Default' button will be inactive (in grey) and the system will consider the default layout restored. Hence, when an administrator updates the layout via the Register Configuration page, it will reflect here too.
- Once you are happy with the layout, click on 'Save'. The saved layout will remain thereon - even after page refreshes and future log-in's too.
3. Selecting multiple secondary risk categories and its related sub-categories for a risk
This feature is to provide the ability to select multiple secondary risk categories and its related sub categories for a risk.
How do you configure this?
- Users with the ‘Editor’ permissions for all Risk types in the standard permission framework (accessed via Camms.Risk > Administration > Manage Users) or ‘Add’ permissions for all Risk types in the new flexible hierarchy framework [currently in beta] (accessed via Camms.Risk > Administration > Role Management > Permission), will be able to configure this field as a multi-select dropdown.
- 'Sub Categories' and its 'Secondary Categories' requires to be added in the Categories page (accessed via Camms.Risk > Framework > Risk Settings) to be able to select multiple sub categories and secondary categories.
- For Strategic and Project Risk types, the ‘Sub Categories and Secondary Categories’ field requires to be set as 'Visible' in the Field Configuration page (accessed via Camms.Risk > Framework > Risk Settings > Field Configuration), to be able to select this field as a multi-select dropdown.
- The ‘Sub Categories and Secondary Categories’ field will be a hyperlinked field which you can click and select to 'Show Risk Secondary Category', which will display only secondary categories in the dropdown (as Figure 3.2), or select 'Show Risk Sub Category', which will display only the sub categories of the primary risk category in the dropdown (as Figure 3.2), or select both options to display all sub categories of the primary risk category and secondary risk categories and its sub risk categories (as in Figure 3.2).
Notes:
- The field ‘Risk Subcategories’ has now been removed.
- The field ‘Secondary Risk Category’ is now renamed as ‘Sub Categories and Secondary Categories’.
- If you have used either one of these fields prior to this feature enhancement, you will now need to use the new renamed field.

Figure 3.1 – Showing sub categories and secondary categories
- For Operational and Corporate Risk types, if the external settings ‘Hide Risk Sub Categories in Initial Risk Assessment Screens’ and ‘Hide Secondary Risk Category’ has been unticked, in the Configurations page (accessed via Camms.Risk > Administration > Configurations > Settings), you will be able to select risk sub categories and secondary risk categories via one field.
Notes:
- If ONLY the external setting ‘Hide Risk Sub Categories in Initial Risk Assessment screens' is unticked, it will show only the sub categories for the selected primary category.
- If ONLY the external setting ‘Hide Secondary Risk Category’ is unticked, it will show only the secondary risk categories.
- If both fields are ticked and/or both external settings are unticked, it will show the sub categories for the primary category and the secondary risk categories and its sub risk categories.
How does this work?
- Once the 'Sub Categories and Secondary Categories' field is configured and/or the external setting, ‘Hide Risk Sub Categories in Initial Risk Assessment Screens’ and ‘Hide Secondary Risk Category’ is not ticked, based on the risk type, a multi-select dropdown field will appear in the Initial risk assessment page, where you can select one or more risk sub categories for a primary category and/or secondary categories.
 Figure 3.2 – Sub categories and secondary categories multi-select dropdown in initial risk assessment
Notes:
- If you have activated the setting to limit the selection of risk sub categories to just one, then only one Risk Sub Category can be selected. However, multiple Secondary Categories can be selected.
- For existing risks where Risk Sub Categories and/or Secondary Categories have been selected via the two separate fields, these will display as ticked within this multi-select dropdown.
- The primary risk category will be unticked and disabled.
- For Strategic and Project risks, if the field is made visible for the Revised/Current and Future assessment tabs, the categories will display as an un-editable label.

Note: This will not be applicable to Operation and Corporate risks, since the field configuration flexibility has not been implemented for these two risk types. |
- Risk register filters in the following pages will display the multi-select dropdown to filter risk records:
- Quick Risk Action Search
- Executive Intelligence
- Risk Analysis
- Dashboards
How is this reflected within Risk Reports?
- The 'Risk Register Report' has been updated to include this modification where two new options 'Risk Sub-Categories' and 'Secondary Risk Category' appears within the 'Show Fields' report controller.
- These two options will only appear in the instance when the risk setting has been configured as visible (as mentioned above) within at least one risk type.
- If the setting has not been configured within at least one risk type, the options will not be available within the 'Show Fields' report controller.

Figure 3.4 – Secondary and sub risk category options when configured as visible within the application
- Once ticked, the fields will be visible within the report separately as 'Secondary Risk Category' and 'Risk Sub-Categories'.

Figure 3.5 – Secondary and sub risk category columns within the Report when configured as visible within the application
4. Introducing a new email recipient named secondary responsible officer
A new email recipient called 'Secondary Risk Owner' is introduced in order to send email notifications to. An administrator will be able to configure the Secondary Risk Owner as an email recipient for email rules. Once configured, email notifications will be sent out to the Secondary Risk Owners based on the configured trigger criteria.
How do you configure this?
- Users with the ‘Administrator’ permission in the standard permission framework (accessed via Camms.Risk > Administration > Manage Users) or ‘Add’ and/or ‘Edit’ permissions in the new flexible hierarchy framework [currently in beta] (accessed via Camms.Risk > Administration > Role Management > Permission > Risk Administration), will be able to configure this new email recipient type.
- Enable multiple risk owners to view the 'Secondary Risk Owner' as an email recipient and to view the relevant code snippets, by enabling the 'Multiple Risk Owners' setting (accessed via Camms.Risk > Framework > Risk Settings > Initial Settings).

Figure 4.1 – Configuring Multiple Risk Owner
- You can configure the ‘Secondary Risk Owner’ to be displayed in Strategic and Project risk types via Camms.Risk > Framework > Risk Settings > Field Configuration > Strategic Risk / Project Risk > Secondary Risk Owner.
- You can configure a secondary risk owner as an email recipient via Camms.Risk > Administration > Risk Administration > Email > [select Secondary Risk Owner].
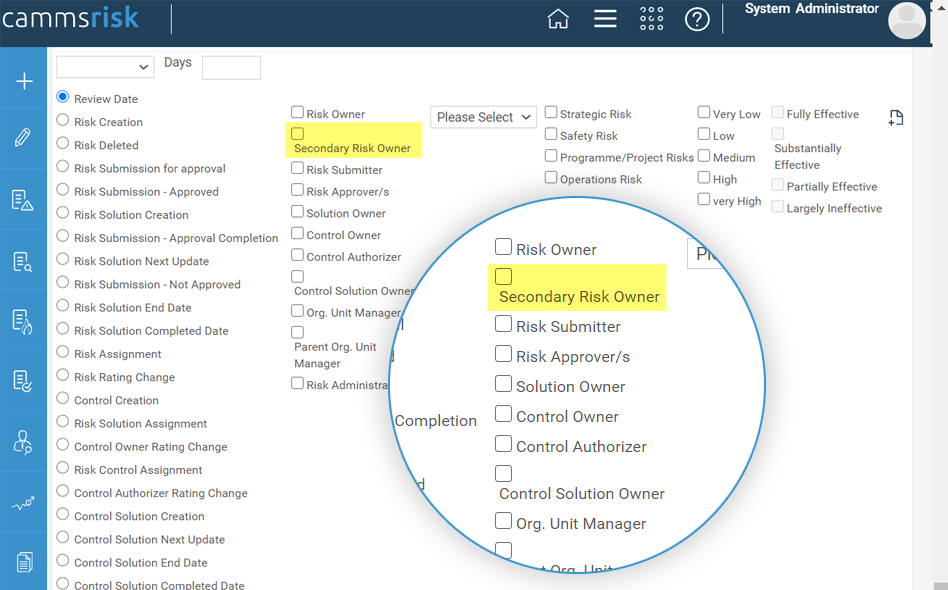
Figure 4.2 – Secondary Risk Owner email recipient
- You can configure an email template by incorporating the ‘Secondary Responsible Officer’ code snippet via Camms.Risk > Administration > Risk Administration > Email Templates > [select Secondary Responsible Person]. Once this code snippet is added, it will display the name of the Secondary Responsible Person when an email is triggered.

Figure 4.3 – Secondary Responsible Person code snippet
How does this work?
- The ‘Secondary Risk Owner’ recipient type will be available for all email trigger criteria except for ‘Solution Assignment’ and ‘Control Assignment’ email trigger types.
- Emails can be configured to be sent to 'Secondary Risk Owners' of Strategic, Operational, Project and Corporate risks.
- If the ‘Secondary Risk Owner’ is configured as a non-mandatory field, emails will be sent out only if the risk has associated 'Secondary Risk Owners'.
- If multiple 'Secondary Risk Owners' have been configured, all Secondary Risk Owners will be notified based on the configured trigger.
Note: The ‘Risk Name List’ code snippet in Camms.Risk > Administration > Risk Administration > Email Templates will be modified to display the ‘Secondary Risk Owner’ of a given risk. This field will appear only if the ‘Multiple Risk Owners’ option in Camms.Risk > Framework > Risk Settings > Initial Settings is enabled. |
5. Introducing new filters to show/ hide risk review related and risk action commentary in the Risk Heatmap Risk Overdue Summary and Risk Register Reports
This feature will ensure that reports are compatible with the 'Hide Risk Review' feature introduced in the Camms.Risk application, and further permitting risk review and risk action related commentary to be depicted within the reports.
- Once the toggle button for the 'Risk Review' tab has been turned off, the 'Last Review Date', 'Next Review Date' and the 'Commentary' sections within the Risk Heatmap report will be hidden.

Figure 5.1 – Risk Heatmap report with risk review tab hidden
- The newly introduced commentary filters within the 'Risk Heatmap' report, will further permit you to show/hide risk review related comments.

Figure 5.2 – Risk commentary filters introduced within the risk heatmap report
- Click on the 'Show Review Comments' tick box to permit all comments within the Risk Review tab to be displayed, and click the 'Show Risk Solution Comments' tick box for comments related to risk actions to be shown within the report.
- All comments will be displayed between the 'Causes/Consequences' and 'Existing Risk Control' sections of the report.
- Comments related to Risk Actions will be displayed under each respective Action.
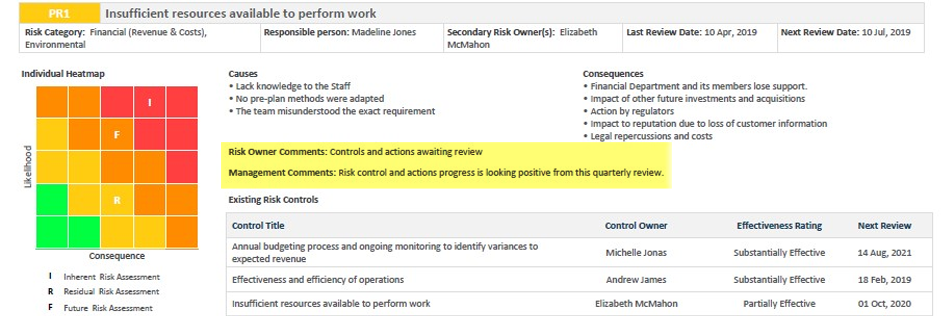
Figure 5.3 – Risk commentary displayed within the Risk Heatmap Report
- Once the toggle button for the 'Risk Review' tab has been turned off, the 'Last Review Date' and 'Next Review Date' fields within the Risk Overdue Summary report will be hidden.

Figure 5.4 – Risk overdue summary report with risk review tab hidden
- This enhancement will permit you to extract all standard fields available within the 'Risk Review' tab into the 'Risk Register' report.
- A new filter grouping depicting the fields within the 'Risk Review' tab will be enabled within the 'Show fields' filter control, right beneath 'Risk Treatment Actions’.
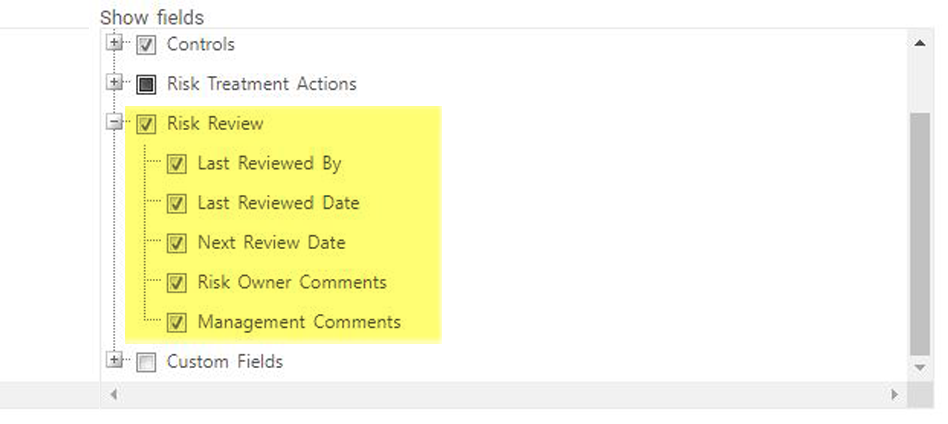
Figure 5.5 – Risk review tab fields within the risk register filter control
- These fields will be ticked-off by default, but once enabled, these will appear within the report after the ‘Completed Date’ column.
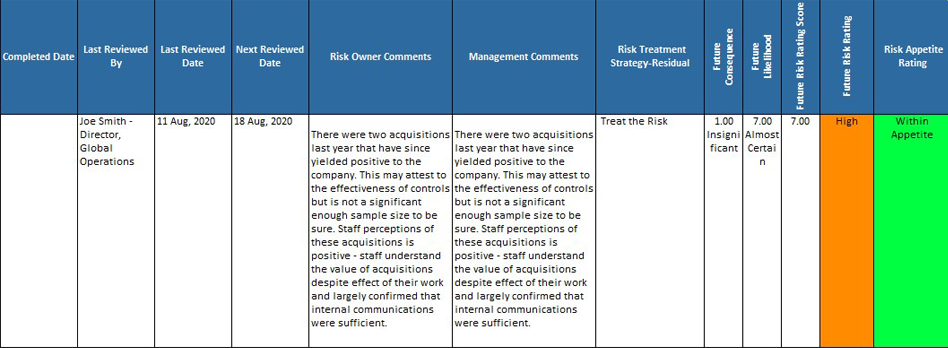
Figure 5.6 – Risk review tab fields enabled within the risk register filter control