 Camms is pleased to bring you the Quarterly Product Release Notification for Camms.Project.
This quarter we've got a number of exciting new features and enhancements to improve your user experience within the system, which will be available in your Test environment on 19th June 2021 and will be available in your Live instance on 3rd July 2021.
1. Microsoft Teams and Planner Integration
Camms.Project has now integrated with Tasks by Planner (accessed via Microsoft Teams) to provide project managers with the ability to synchronise tasks in a project plan. With this integration, Task Owners can simply make their updates via Microsoft Teams, which will automatically flow back into the task plan in Camms.Project.
Prerequisites
- The e-mail addresses of staff members under the Framework > Project Settings > Staff page should match the e-mail addresses used by staff members in Microsoft Teams.
How do you configure this?
You can follow these steps to configure and set up the synchronisation process.
Step 1: Setting up the connection between Microsoft Teams and Camms.Project.
- A new section titled ‘API Configurations’ is now available in the mega menu in Camms.Project.
Note: This section will only be visible for users with Administrator privileges. - Click on the ‘Microsoft Teams Configuration’ menu option underneath the section ‘API Configurations’ to set up the connection between Microsoft Teams and Camms.Project.

Figure 1.1: 'Microsoft Teams Configuration’ option available in the main menu
- Once you navigate to the Microsoft Teams Configuration page, you will be able to view the ‘Teams Configuration’ tab, where you can configure and test the connection between Camms.Project and Microsoft Teams with the assistance of your Microsoft Teams administrator.
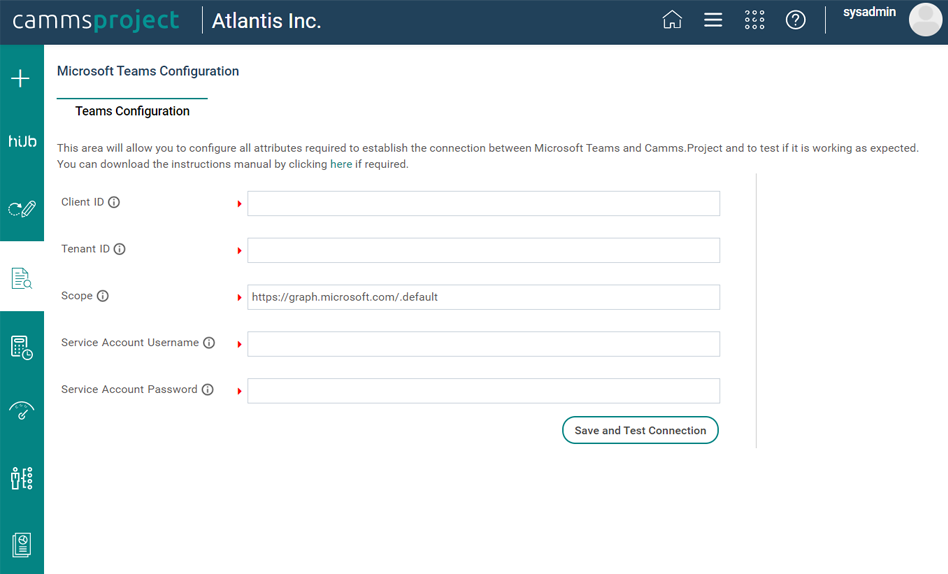
Figure 1.2: Microsoft Teams Configuration page
- If you require assistance in configuring the fields, you can easily refer to the instruction manual that can be downloaded by clicking on the text highlighted in the image below.

Figure 1.3: Downloading the instructions manual
- Enter the relevant data in each field as per the instructions mentioned in the document and then click on the ‘Save and Test Connection’ button.
- The system will now initiate the connection between Camms.Project and Microsoft Teams, and you will be able to view the screen below when the connection establishment is in progress.

Figure 1.4: ‘Connection Establishment in progress’ screen
- Once the connection establishment is completed successfully, you will be able to view the screen below.

Figure 1.5: 'Connection Establishment successful’ screen
- If the connection establishment fails, then you will be able to review the error that caused the failure and retry the connection establishment process by clicking on the ‘Save and Test Connection’ button.
 Figure 1.6: 'Connection Establishment Failed’ screen: The connection establishment has been failed due to an invalid Client ID entered
Step 2: Set the mapping of statuses of tasks between Camms.Project and Microsoft Teams.
- Once the connection between Camms.Project and Microsoft Teams is successfully set up (as described in Step 1), you can click on the ‘Task Status Mapping’ tab if you wish to customise the mapping of task statuses between Camms.Project and Microsoft Teams.
- Since Microsoft Teams has only ‘Not Started’, ‘In Progress’, and ‘Completed’ statuses, the ‘Task Status Mapping’ tab will let you map the task statuses in Camms.Project to those three tasks statuses in Microsoft Teams to ensure a smooth task synchronisation process.

Figure 1.7: Task Status Mapping tab
- All standard and custom task statuses are already mapped for you by default. However, you can update the status mapping, if required.
Note: The mappings that are set for ‘Not Started’, ‘In Progress’ and ‘Completed’ task statuses will not be able to be updated. - Once you have set up the mapping, you can save the updates that you made by clicking on the 'Save' button in the top toolbar.
Step 3: Setting up your preferences for the synchronisation process.
- In this step, you can set up your preferences for the synchronisation process by navigating to the current Task Planning object (Schedule) of the project that you manage.
- Click on the ‘Sync to Teams’ button available on the top toolbar next to the ‘Kanban’ button.
Note: The ‘Sync to Teams’ button will only be visible for users who have the ‘Can View’ permission to the object or a super role permission (e.g. IPM Administrator, Project Manager).
 Figure 1.8: ‘Sync to Teams’ button in the Task Planning object
- A pop-up with the fields mentioned below will be displayed when you click on the ‘Sync to Teams’ button.
- Synchronize tasks that are: The tasks that will be synchronised to Microsoft Teams are determined by the statuses which you select here.
For example, if you wish to synchronise only ‘Not Started’, ‘In Progress’, and ‘Completed’ tasks in Camms.Project to Microsoft Teams, you can select the tick boxes next to ‘Not Started’, ‘In Progress’, and ‘Completed’ status options. - Synchronize comments in the task plan: You can select this tick box if you wish to synchronise task comments with Microsoft Teams. The options mentioned below will be displayed when you select this tick box.
- Append latest comment in Teams to the current comment in Camms.Project: Selecting this option will append the latest comment entered in Teams to the current comment in the Gantt in Camms.Project, when syncing from Teams to Camms.Project. The latest comment entered in Camms.Project will be added as a new comment, when syncing from Camms.Project to Teams.
- Replace the current comment in Camms.Project with the latest comment in Teams: Selecting this option will replace the current comment in the Gantt with the latest comment entered in Teams, when syncing comments from Teams to Camms.Project. The latest comment entered in the Gantt will be added as a new comment, when syncing from Camms.Project to Teams.
- Synchronize tasks that are: The tasks that will be synchronised to Microsoft Teams are determined by the statuses which you select here.
If you do not wish to synchronise comments with Microsoft Teams, you can untick the ‘Synchronize comments in the task plan’ tick box.

Figure 1.9: The pop-up window that is displayed when the ‘Sync to Teams' button is clicked
- Once you set up your preferences, you can move on to the next step by clicking on the 'Next' button in the popup.
Step 4: Configuring names for your new plan and team.
- In this step, you can define names for the team and plan that the system will be creating for your task plan once it is synchronised with Microsoft Teams.
- The following two fields will be available in a pop-up.
- Plan Name: You can define a name for your plan. The name defined here will be the name of the plan created in the Tasks by Planner in Microsoft Teams.
- Team Name: You can define a name for your team. The name defined here will be the name of the team created in the Tasks by Planner in Microsoft Teams.
- Once you have defined a team name and a plan name, you can click on the ‘Sync to Teams’ button in the pop-up to initiate the synchronisation process.

Figure 1.10: The pop-up window where Plan Name and Team Name are entered
- The following will occur when the synchronisation process is initiated:
- A new team will be created in the Tasks by Planner application within Microsoft Teams. This team will include the staff members in the current Board and Team object.
- A new plan will be created in Tasks by Planner.
- The standalone and child tasks in the Gantt which are of the statuses selected in Step 3 will be added to the plan in Teams.
Note: Parent tasks in the Gantt will not be synced to Microsoft Teams. - Once the team and the plan are successfully created, you will be able to view the screen below. If you wish to navigate to the Teams web application, you can click on ‘Navigate to Teams’ button and it will open the web application in a new browser tab.

Figure 1.11: Synchronisation of the task plan completed successfully
- The responsible officers of tasks will receive notifications within Microsoft Teams and email notifications when they are assigned to the team depending on the configurations done by the group owner in the Plan Settings area in the Planner.
Step 5: Setting up the plan which was created by the synchronisation in Microsoft Team.
- To view the plan which was created by the synchronisation, follow the steps mentioned below:
- Navigate to Microsoft Teams desktop application or web application and click on the Teams option in the left navigation bar.
- On the left side of the Teams screen, you will be able to see the team that you created. Click on its name once, and the below screen will be displayed.
Figure 1.12: Team which was created via Camms.Project
- Click on the Tasks by Planner tab. Then click on the ‘Set up tab’ button (highlighted below) to set up the tab.

Figure 1.13: ‘Set up tab’ button in the Tasks by Planner tab
- Once you click on the ‘Set up tab’ button, a pop-up window (as in Figure 1.14) will be displayed. Select the ‘Use an existing plan from this plan’ option and select the plan that was newly created from the dropdown list. Click on the 'Save' button to save your selections.

Figure 1.14: Pop-up window which is displayed when the ‘Set up tab’ button is clicked
- Microsoft Teams will now load the plan that was created via Camms.Project for you to do your updates.
Figure 1.15: Task plan in Tasks by Planner
- Repeat Steps 3, 4, and 5 for each project that you wish to sync to Microsoft Teams.
How does the task synchronisation work?
- Once the initial synchronisation process is completed, users can easily perform updates (create new tasks, update existing tasks, or delete tasks) via Camms.Project or Tasks by Planner in Microsoft Teams.
- The field mapping between the applications is mentioned in the grid below:
Field in Camms.Project | Field in Planner |
Task Name | Task Title |
Start Date | Start Date |
End Date | Due Date |
Progress Percent | Percent Complete |
Progress | Status |
Responsible Officer | Assigned To |
Completion Date | Completion Date |
Comment | Comments |
Note: Attachments added to tasks will not be synced with Microsoft Teams. |
- All task updates that you make in the Gantt will be synced to Microsoft Teams when you click on the 'Save' button or when the auto-save functionality is triggered.
Note: The Gantt will be automatically saved based on the frequency set in the ‘Auto Save frequency (in minutes) in Task Planning object’ setting. - You can do any further updates on the Gantt whilst the synchronisation process is in progress, if required. Those updates will be automatically synced to Microsoft Teams when the next auto-save is triggered after the ongoing sync is completed. Additionally, these updates can be synced to Microsoft Teams when the user clicks on the 'Save' button once the ongoing synch is completed.
- All task updates that you make in Microsoft Teams will be synced back to Camms.Project automatically via a background service which runs every hour.
Note: Please contact Camms if you wish to customise the frequency which the service runs. - The ‘Sync to Teams’ icon will indicate if there is an update from Microsoft Teams, so that users will know when the task plan is not up to date.
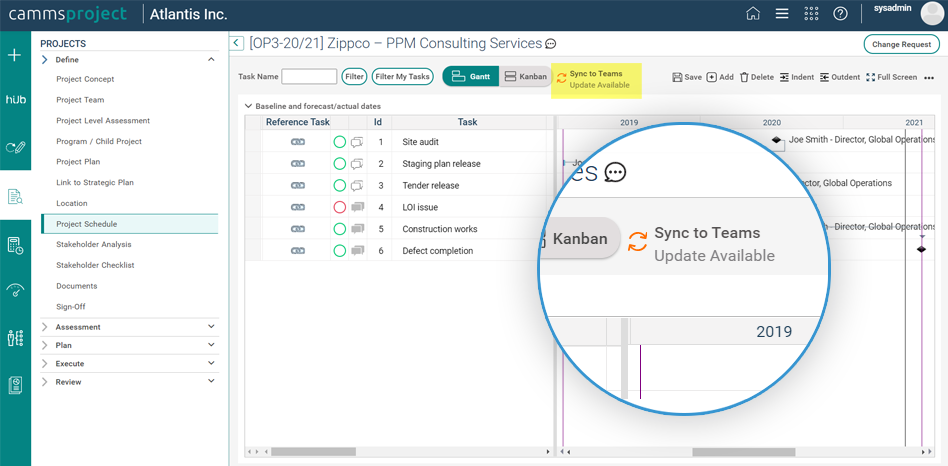
Figure 1.16: ‘Sync to Teams’ button indicating that an update is available
- If you wish to synchronise task updates to Camms.Project on demand, you can click on the ‘Sync to Teams’ button, and then click on the ‘Sync Latest from Teams’ button, highlighted in the image below.
Note: The ‘Sync Latest from Teams’ button will only be enabled if you have ‘Can View’ permission to the Task Planning object or super role permission.

Figure 1.17: ‘Sync Latest from Teams’ button in ‘Sync to Teams’ pop-up window
- If you accidentally close the ‘Sync to Teams’ pop-up while the synchronisation is in progress, the synchronisation process will continue to run in the background. You can easily view the status of the process via the indicator text and the ‘Sync to Teams’ icon.
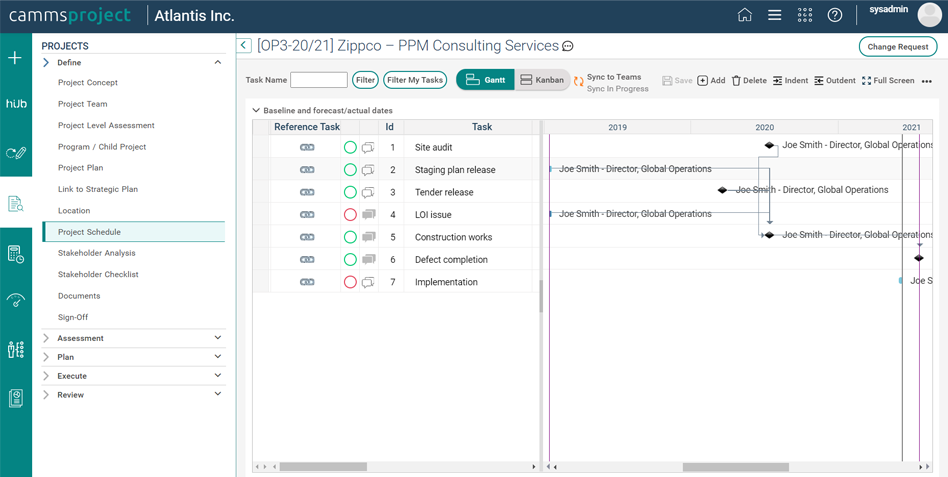
Figure 1.18: Indicator that displays the synchronisation status after the pop-up is closed when the sync is in progress
- The ‘Sync to Teams’ icon will indicate if there was a failure in the synchronisation process.
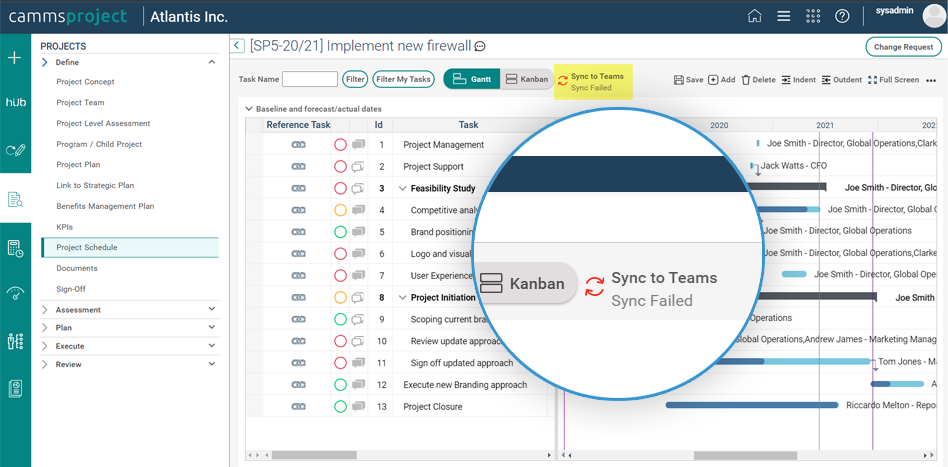
Figure 1.19: ‘Sync Failed’ indicator
- If you wish to check the reason for the synchronisation process that failed, you can refer to the error log, which can be downloaded by clicking on the ‘Download Error Log’ button.

Figure 1.20: ‘Download Error Log’ button in the Sync to Teams pop-up window
- You can click on the ‘Try Again’ button on the ‘Sync to Teams’ pop-up window to restart the synchronisation process in case it fails.
- If you wish to change the preferences for the synchronisation process that you set up when you initially synced your task plan to Microsoft Teams, you can follow these steps:
- Click on the ‘Sync to Teams’ button to access the pop-up window. Then, click on ‘Change Preferences’.
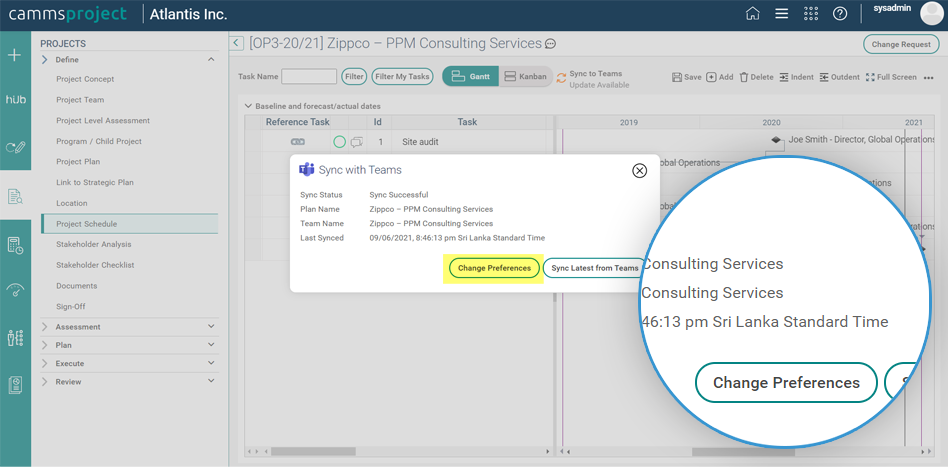
Figure 1.21: ‘Change Preferences’ button in the Sync to Teams pop-up window
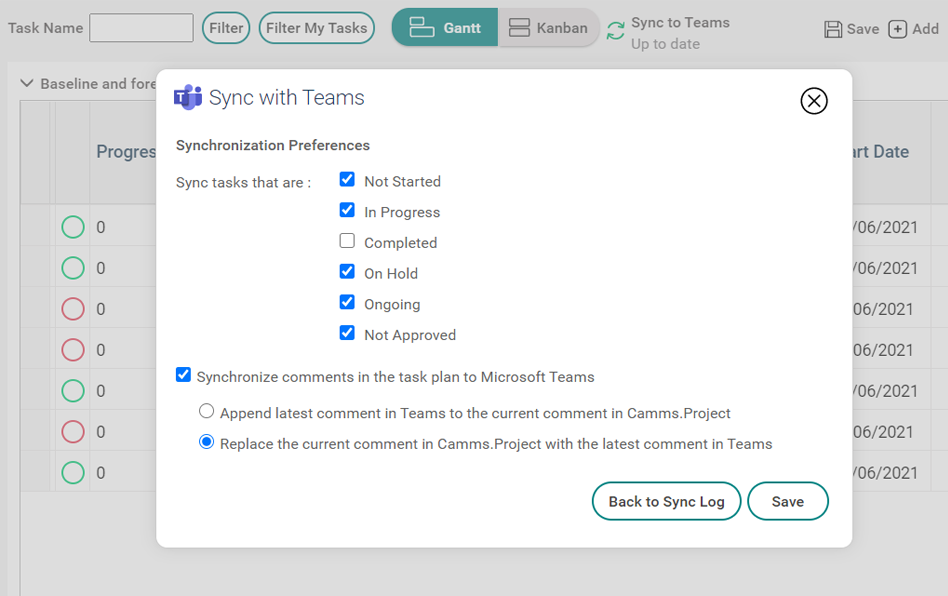
Figure 1.22: ‘Change Preferences’ pop-up window
- Make the updates you wish and save by clicking on the 'Save' button.
What’s coming up? Camms will be continuously working towards improving the Microsoft Teams integration to provide you with the ability to activate the task synchronisation process only for selected projects, as a part of the roadmap. Stay tuned for the updates through our published roadmap and product communications. |
2. Column auto-mapping functionality in Data Upload Wizard in Custom Table
The ‘Data Mapping’ step in the Data Upload Wizard in the Custom table has been enhanced to automatically map data between the Custom Table and Excel to be uploaded. This in turn will not require you to map the columns manually each time you upload data into the Custom Table.
- The auto mapping will be done if the column name in the Custom Table exactly matches any of the column headers in the Excel.
Example:
Column names in Custom Table | Dropdown options of ‘Map to Excel Column’ dropdown (i.e. column headers in Excel) | Outcome of column auto-mapping |
Budget Line | Budget Line Allocated Budget Approved Budget | ‘Budget Line’ option will be pre-selected |
Allocated Budget | Budget Line Allocated Budget Approved Budget | ‘Allocated Budget’ option will be pre-selected |
Current Budget | Budget Line Allocated Budget Approved Budget | No match, therefore dropdown selection will be kept empty |
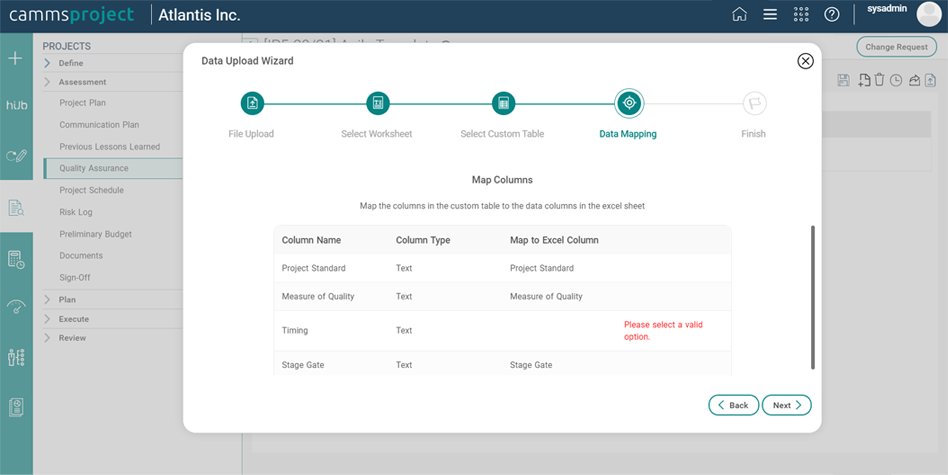
Figure 2.1: Column auto-mapping in the Custom Table
- You will be able update the column mappings which were done automatically by the system, if required.
3. Enhanced Project Master Report to showcase the activated new fields within custom objects
The Project Master Report is now capable of displaying these new field types activated within custom objects of the system. The report will showcase new fields based on visibility and order within the configuration page. These fields within the report will display an empty space if data is not added within the system.
- Single-Line Text fields
- Numeric fields
- Multi-Select Dropdown fields
- Staff list fields

Figure 3.1: Enabled new fields within Custom Objects
