Introduction
This tool provides access to the Report Uploader area which allows you to create customised Crystal and SSRS reports and upload them to the system as well as modify any standard reports currently available.
The Reporting Tool consists of 2 areas; Report Uploader Setup and Report Uploader
Please contact Camms Support if you are interested to activate this solution, as it does not come standard with the suite.
IMPORTANT NOTES
The Report Uploader feature must be activated by Camms before it can be used.
Report uploader does not allow to ‘Edit’ (does not allow to add new Parameters) or ‘Remove’ Camms Standard Reports OR any client specific reports developed and deployed by Camms for the client. This will only allow the client to Add/Edit/Remove custom reports designed and uploaded by the clients themselves.
Report Uploader Setup
The report uploader setup screen allows the user to view and edit the current report parameters available within the system.

This will only be visible if you have purchased the 'Report Uploader' module.
The following columns are displayed in this page;
Field | Description |
Name | Displays the parameter ‘Name’ from the existing list of parameters within the system. |
Parameters | Displays the relevant ‘Parameters’ value for those existing list of parameters within the system. |
Visible in Report Uploader | A tick box to display the parameter within the report uploader parameter ‘Name’ dropdown list, when ticked. |
You can click on the ‘Edit’ button to edit the report parameters, and save the updates made by clicking on the Update button.

You can use the 'Visible in Report Uploader' tick box in order to configure the visibility of the parameter in the Report Uploader.
You can discard the updates you made by clicking on the Cancel button.
Note: The users will only be allowed to edit the visibility of the parameter using this screen by ticking/unticking the ‘Visible in Report Uploader’ tick box.
Only the ticked ones will be loaded into report uploader screen (These parameters will be loaded within the selection dropdown of ‘Name’ parameter of the ‘Add New Parameter’ grid).
Report Uploader
The Report Uploader page will allow you to create customised Crystal and SSRS reports and upload them to the system as well as modify any standard reports currently available.

Uploading a new Crystal report
This can only be done by a user with Administrator privileges.
STEP 1: To navigate to the Report Uploader page, click on the Main Menu and click on the Report Uploader menu option.
STEP 2: Select the area of reporting that you wish to upload to ' i.e.; the Report Category group'. Any reports you have already uploaded are displayed along the left.
Note: Camms.Project will only have one category group titled as 'IPM'.
STEP 3: To upload a new report, click on the 'Add' icon to the right on the Reports title.

Once you click on the 'Add' icon, the right side of the screen will display a set of fields which you can fill out.
If the report you wish to upload is a Crystal report, select the 'Crystal Report' option from the Report Type field.
Once you select the 'Crystal Report' option, the following fields will be displayed on the right side of the screen.
Field | Selection | Mandatory/Optional |
Report Type | Select type as ‘Crystal Report’. | Mandatory |
Title | Define a name for the report (This will be displayed in the Report Explorer area). | Mandatory |
Sequence | Input a number to define the order of the new report among the existing report list in Report Explorer area. | Mandatory |
Visible | Tick the box to make the new report visible in Report Explorer area. Note: This is ticked by default. If unticked, report will not be visible. | Optional |
Report Version | Define a report version for the report. For example, if it is a second version to an existing report, the user can enter either 1.1 or 2 as the version number. | Optional |
Report File | Browse and select the new report file to be uploaded Note:
| Mandatory |
Location | This will display the server location where the report is saved. Note: The location value will only be displayed in the screen once the user clicks on ‘Save’ | Optional |
STEP 5: Once you enter the required data in all mandatory fields, you can click "Save" to upload the report.
Uploading a Microsoft SRS Report
This can only be done by a user with Administrator privileges.
STEP 1: To navigate to the Report Uploader page, click on the Main Menu and click on the Report Uploader menu option.
STEP 2: Select the area of reporting that you wish to upload to ' i.e.; the Report Category group'. Any reports you have already uploaded are displayed along the left.
Note: Camms.Project will only have one category group titled as 'IPM'.
STEP 3: To upload a new report, click on the 'Add' icon to the right on the Reports title.
Once you click on the 'Add' icon, the right side of the screen will display a set of fields which you can fill out.
STEP 4: If the report you wish to upload is a Microsoft SRS report, select the "Microsoft SRS' option from the Report Type field.

Once you select the "Microsoft SRS' option, the following fields will be displayed on the right side of the screen.
Field | Selection | Mandatory/Optional |
Report Type | Select type as ‘Microsoft SRS’. | Mandatory |
Title | Define a name for the report (This will be displayed in the Report Explorer area). | Mandatory |
Sequence | Input a number to define the order of the new report among the existing report list in Report Explorer area. | Mandatory |
Visible | Tick the box to make the new report visible in Report Explorer area. Note: This is ticked by default. If unticked, report will not be visible. | Optional |
Report Version | Define a report version for the report. For example, if it is a second version to an existing report, the user can enter either 1.1 or 2 as the version number.
| Optional |
Report File | Browse and select the new report file to be uploaded Note:
| Mandatory |
Location | This will display the server location where the report is saved. Note: The location value will only be displayed in the screen once the user clicks on ‘Save’ | Optional |
Note: When the user clicks on ‘Save’ and if it is an SSRS report with multiple reports, the user will be prompted with another screen listing all the .rdl files of your new SSRS report.

User must select the specific .rdl file which should be used as the Master report for the new report. If the SSRS report only contains one report file, this prompt will not appear.
Adding parameters to the uploaded report
Once you have uploaded your new report, the 'Add New Parameter' button will appear below the details of the report.
Preconditions:
A report file (Crystal/SSRS) should already be uploaded.
The report file must NOT be a standard report in Camms.Project.
You can follow the steps below to add parameters to the report which you uploaded.
STEP 1: Click the 'Add New Parameter' button and add new parameters to the report. These new parameters are the filters which would be displayed within the report filter section.
Once you click on 'Add New Parameter' button, a new record will be added to the footer of the grid, as shown below.

The following fields will be available for the user to enter data;
Field | Selection | Mandatory/Optional |
Name | Select the parameter name from the existing list of parameters within the system (made visible from the Report Uploader Setup page). For example, if your reports needs a ‘Business Unit’ filter you can select the name ‘Business Unit’ from the dropdown. Note: This dropdown only lists the existing list of parameters which are being used in the system. If the user requires a completely new parameter, it should be notified to Camms. | Mandatory |
Parameters | Enter the same parameter name used within the ‘Parameter Fields’ of your Crystal/SSRS report, for the selected parameter. Note: Multiple parameters can be added as comma separated values. i.e. Date From, Date To. | Mandatory |
Parameter Name | Enter the parameter name which needs to be displayed within the report filter page (report preview area of the application). The report parameter field names should be entered into the parameters field with no spaces. A space is added automatically when the parameter is added, however ensure you remove this. Note: If this field is left blank, the ‘Name’ value of the parameter would be used by default within the report filter page. | Optional |
Default Values | Select a default value to be loaded for the parameter, when being displayed within the report filter page. Note:
| Optional |
Hide | If ticked, the parameter will be hidden within the report filter page. If unticked, the parameter will be displayed within the report filter page. Note: This will only be applicable if a ‘Default Value’ has been set for the parameter. Else the user will be requested to set a ‘Default Value’ prior to hiding the parameter. | Optional |
Sort Order | Enter the order of the display of parameters within the report filter page. | Mandatory |
Show All | Tick the box, if the parameter is a dropdown and if you require the ‘Show All’ option to be available. | Optional |
STEP 2: Enter the required data in all mandatory fields within the parameter table.
For SSRS report only, make sure you 'Save' once you are done updating. If you are uploading SSRS report, do not click 'Save'.
STEP 3: Add the Sort order number and check the 'Show all' tick box if you need the 'show all' option to be available for the parameter.
STEP 4: Once you have entered all information click 'Add'.
Editing existing parameters
You can edit existing parameters by clicking on the Pencil icon next to the relevant parameter.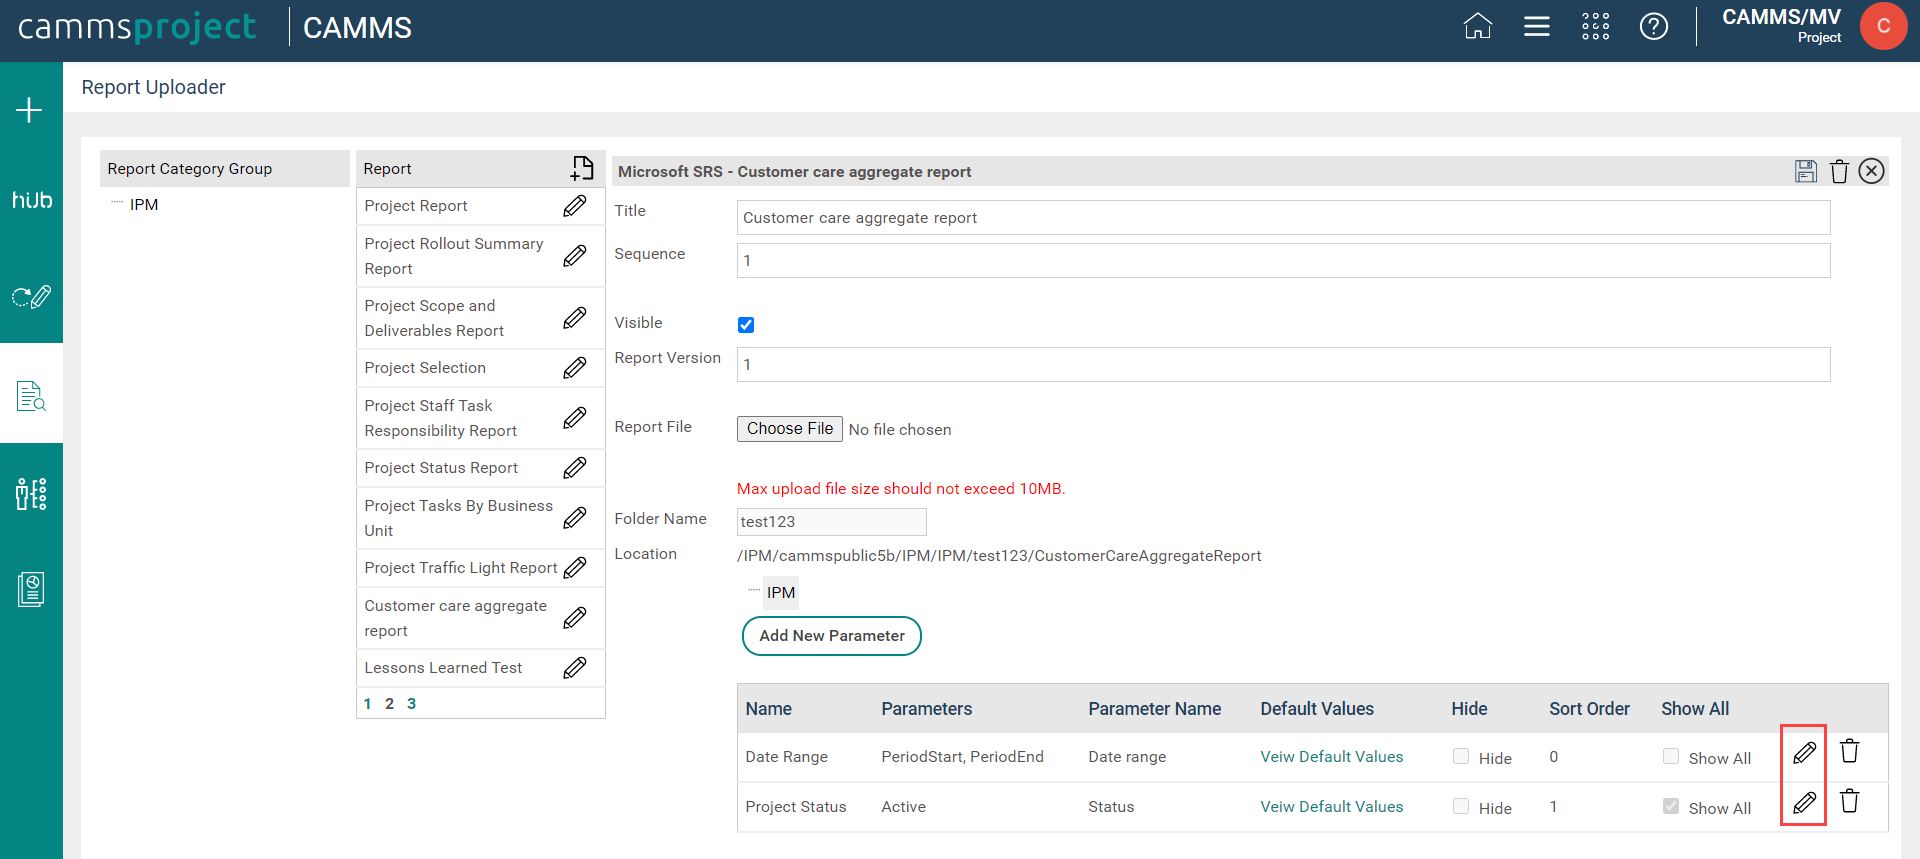
Once you make the changes, you can save them by clicking on the Update button. You can discard any changes made by clicking on the Cancel button.
Deleting existing parameters
You can delete existing parameters by clicking on the Delete icon next to the relevant parameter.

Editing an existing standard/custom report
You can edit the properties such as the Report Name by clicking on the Edit icon next to the relevant report.

For Standard Report or a Custom report developed and deployed by Camms, the user will only be allowed to edit the following fields within the Parameter table.
- Default Values
- Hide
- Sort Order
- Show All
For a custom Report (developed & uploaded by the client through the report uploader), the user will be allowed to edit all fields within the Parameter table.
Note: For a custom report as such, the ‘Add New Parameter’ button will be also displayed for a user allowing them to add a new parameter to the report as required. This button is not available when trying to edit a Standard report.
You can make the changes that you wish and save them by clicking on the Save icon on the top toolbar.
Deleting a custom report from the Report Uploader
You can delete a report by clicking on the Delete icon available on the top toolbar.
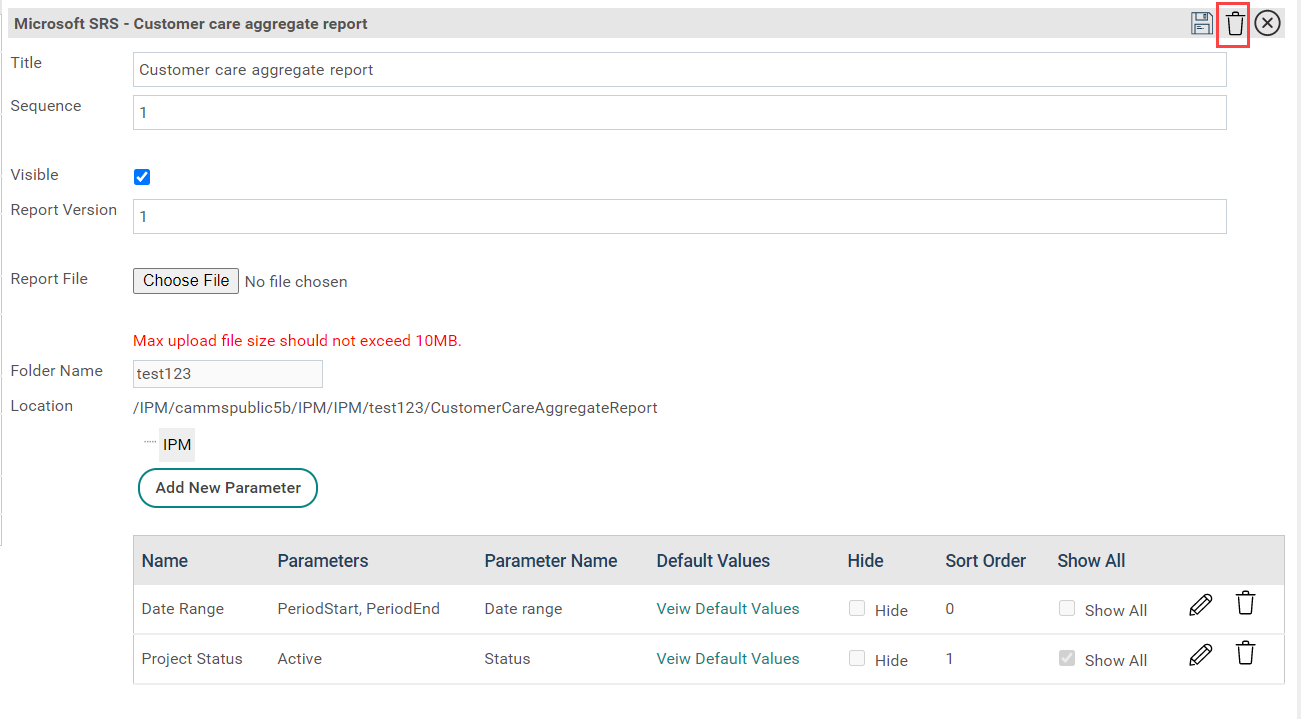
Note: You will not be able to view the Delete icon for standard reports.
Previewing the report
STEP 1: Navigate to the Report Explorer in Camms.Project.
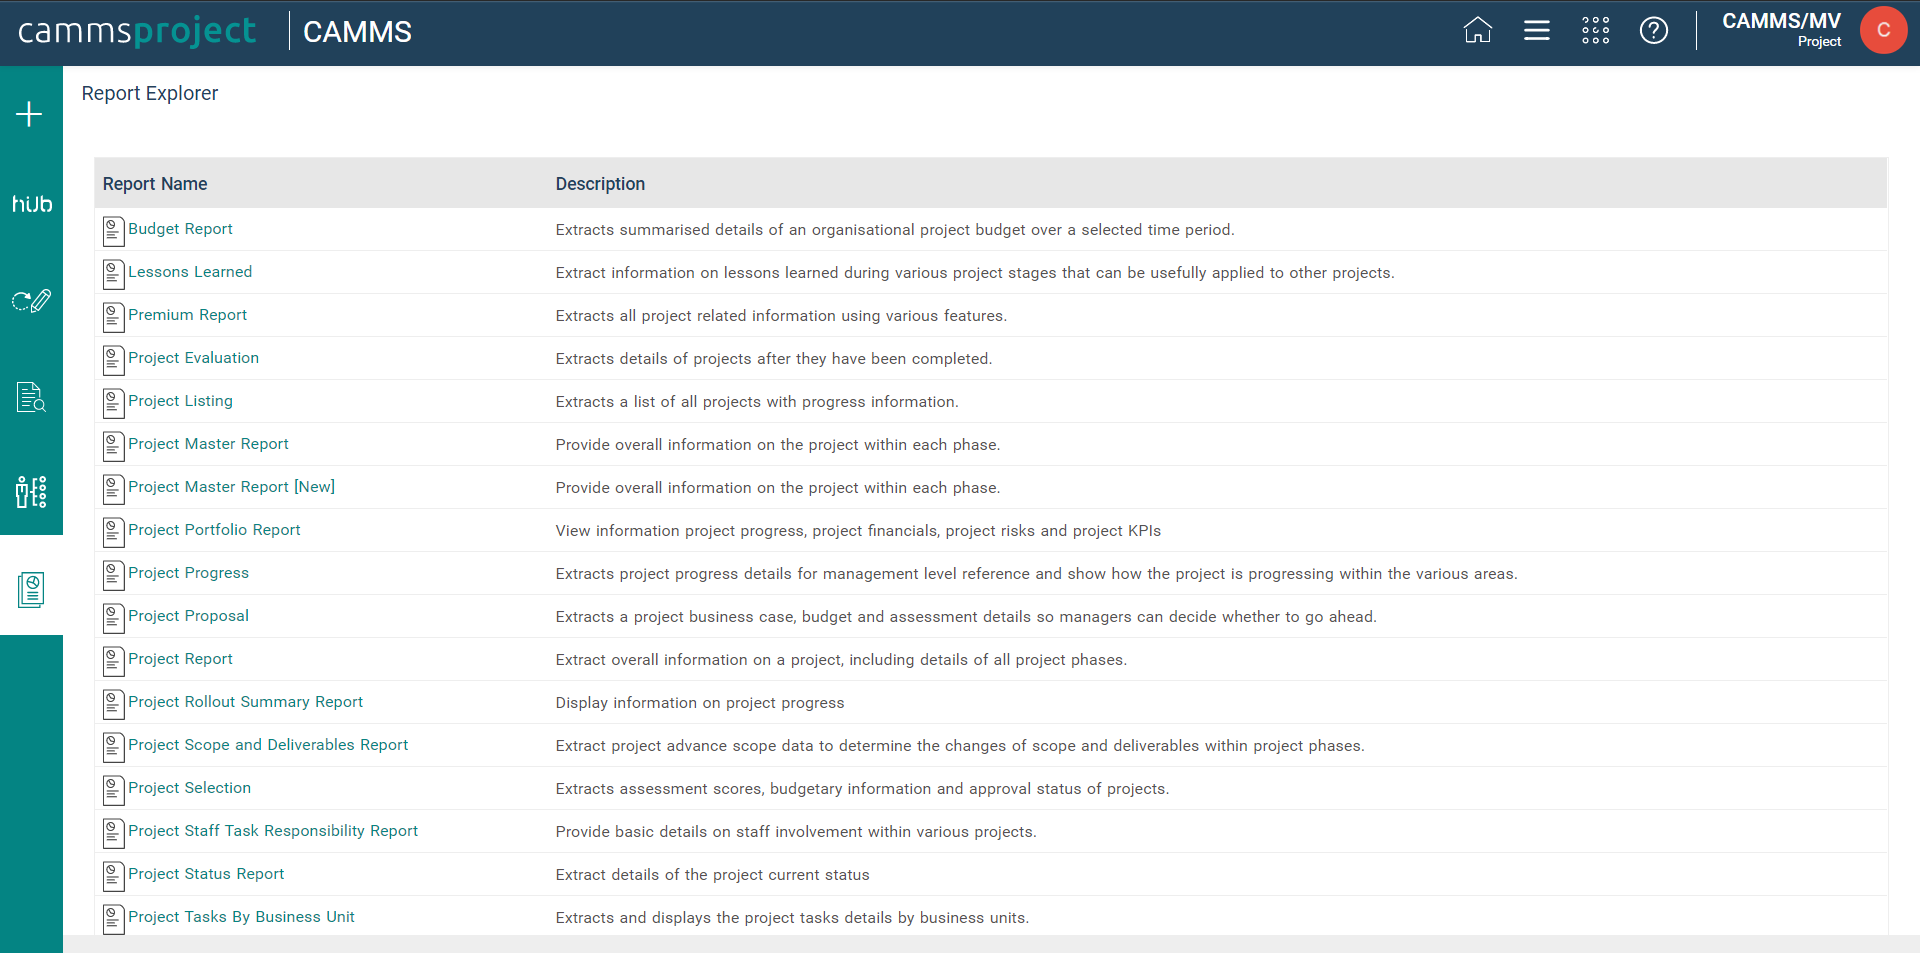
STEP 2: Check whether the new report is appearing within the page and then click on it.
STEP 3: Select the respective parameter values to filter the report content (from the respective list of parameters), and click on ‘Preview’ to generate the report.
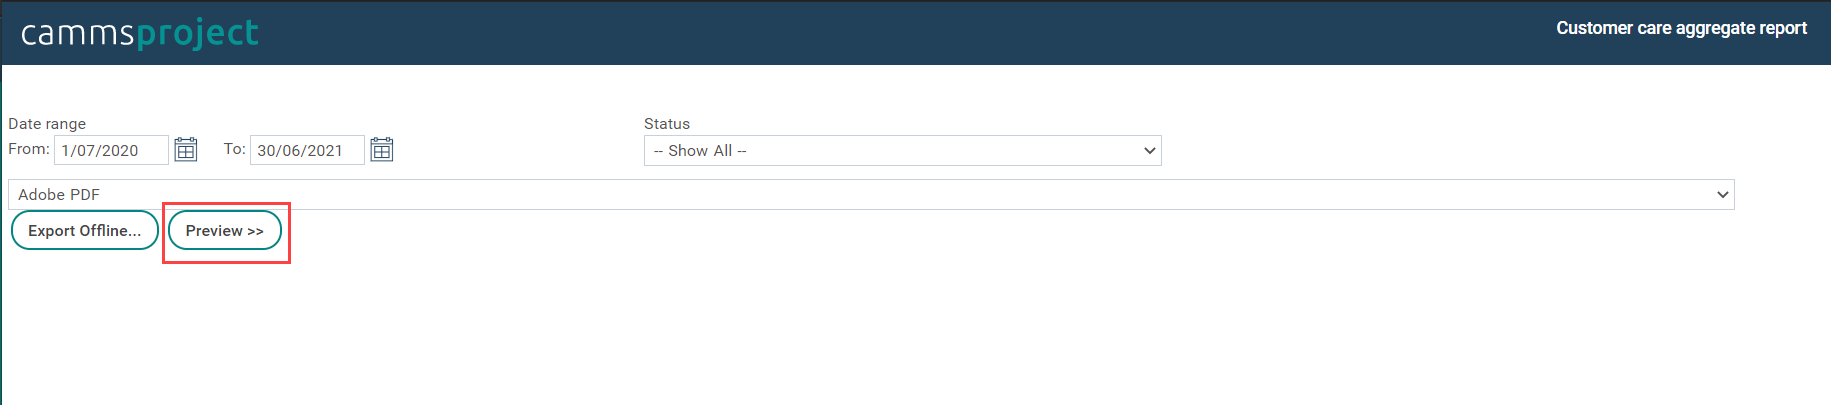
Note: Check whether all the parameters added to the report through the report uploader parameter grid are being displayed here.