Camms is pleased to bring you the Quarterly Product Release Notification for Camms.Risk Incident Management.
This quarter we've got a number of exciting new features and enhancements to improve your user experience within the system, which will be available in your Test environment on 11th September 2021 and will be available in your Live instance on 25th September 2021.
1. Ability to trigger notifications based on custom date fields |
This feature provides the ability to trigger notifications based on custom date fields and the ability to combine date fields with other fields to setup a more advanced logic as the trigger criteria (e.g. triggering a notification 5 days before a certain date, if the incident is still open).
Two new operators (BEFORE and AFTER) have been introduced, that can be used when incorporating custom date fields to custom trigger criteria.
How do you configure this?
- Navigate to 'Menu > Framework > Incident Settings > Notifications' and click on 'New' to configure a new notification.
- To incorporate custom date fields within the custom trigger criteria of your notification, you will need the ‘Custom Trigger Criteria Configurations’ editor. To do this, select any of the below notification types along with the ‘Trigger Criteria’ as 'Custom Trigger Criteria':
- Incident
- Investigation
- Resolution
- Close
- Risk
- Submission
- Custom
- Build your custom date related trigger criteria in the ‘Custom Trigger Criteria Configuration’ editor using the following format. You can use the 'Variables' and 'Operators' dropdowns in the ‘Custom Trigger Criteria Configuration’ editor.
({[Operator]([Date field],[Timeframe],[Timeframe unit])})Example:
({BEFORE(IncidentObject.DateTimeofIncident,5,DAY)})
- Operator – Allowed operators for Date and Time fields are 'BEFORE' and 'AFTER' only. You can use the 'Operators' dropdown in the ‘Custom Trigger Criteria Configuration’ editor.
- BEFORE: This operator can be used when a trigger is required before a selected date-time field.
Example:
Trigger notification 5 days before the incident close due date.
({BEFORE(CloseObject.CloseIncidentDueDate,5,DAY)})
- AFTER: This operator can be used when a trigger is required after a selected date-time field.
Example:
Trigger notification after 5 days from the incident close due date.
({AFTER(CloseObject.CloseIncidentDueDate,5,DAY)})
- BEFORE: This operator can be used when a trigger is required before a selected date-time field.
- Date field – You can use the 'Variables' dropdown in the ‘Custom Trigger Criteria Configuration’ editor to select the required date field.
- Timeframe – This is the interval within which the notification will be triggered. The timeframe value must be 0 or a positive integer.
- Timeframe unit – Will specify the unit of measure of the given timeframe. Permitted values are: HOUR, DAY, MONTH, YEAR.
Note: Have the timeframe value as ‘0’ when you require the trigger on the same day of the selected date-time field. In essence, when the timeframe is '0', the use of any valid date-time Operator and compatible Timeframe Unit, will provide the same result.
Example:To trigger the notification on the incident close due date you can use any of the below:
- ({BEFORE(CloseObject.CloseIncidentDueDate,0,HOUR)}) or
- ({BEFORE(CloseObject.CloseIncidentDueDate,0,DAY)}) or
- ({AFTER(CloseObject.CloseIncidentDueDate,0,DAY)})
Note: You can combine your custom date-based trigger criteria with other criteria by using operators like AND, OR, etc. Refer the User Guide for more details. |
How will this work?
- Once the notification is configured based on the date-time field and saved, the notification will be triggered and sent to the configured recipients on the resulting date(s) based on the trigger criteria.
- If you save a notification criteria with an invalid syntax, a warning prompt appears “The trigger condition entered in Custom Trigger Criteria is incorrect. Please check the User Guide for further guidance”.
 Figure 1.1: Warning message for incorrect syntax
You can click on the 'User Guide' hyperlink within this prompt to open the related User Guide article [link].
- You can alternatively click on the 'User Guide' hyperlink in the tooltip to get navigated to the same page.

Figure 1.2: Tooltip in Custom Trigger Criteria Configurations editor
2. Support for custom trigger notifications during incident submission and resubmissions |
This feature will let you trigger notifications based on user defined custom trigger criteria for Submissions and Resubmissions.
How do you configure this?
- Navigate to 'Menu > Framework > Incident Settings > Notifications' and click on 'New' to configure a new notification.
- ‘Submitted’ and ‘Resubmitted’ will appear as an option in the ‘Trigger Criteria’ dropdown when you select any of the following as ‘Notification Type’:
- Investigation
- Close
- Risk
- Resolution
- Custom
- Review

Figure 2.1: Submitted and resubmitted as trigger criteria
Note: The ‘Submission’ Notification type will no longer be available and this will be replaced by the above mentioned behaviour. |
- Once ‘Submitted’ or ‘Resubmitted’ is selected for any of the above ‘Notification Types’, the ‘Custom Trigger Criteria Configuration’ editor will appear in the Notification Configuration area, allowing you to combine Submit/Resubmit with a Custom Trigger Criteria.

Figure 2.2: Custom trigger criteria configurations editor
- Once ‘Submitted’ or ‘Resubmitted’ is selected as the ‘Trigger Criteria’, the below additional fields will appear in the notification configuration area only for the ‘Custom’ Notification Type.
- ‘Type’ dropdown – This will list all the Incident Types configured under Incident Settings > Type
- 'Object’ dropdown – Upon selection of the 'Type', all the objects in the relevant workflow will be displayed

Figure 2.3: Notification configuration for custom notification type
- If you have not configured a logic using the ‘Custom Trigger Criteria Configurations’, then the notification will get triggered once you click on the Submit/ Resubmit button.
- If you have configured an additional logic using the ‘Custom Trigger Criteria Configurations’, then the System will consider the defined logic upon clicking the Submit/Resubmit button, and then the notification will be triggered.
Notes: The functionality of previously created notifications will have no impact from this modification.
|
3. View additional details on API errors via the error notification |
This feature will enable you to view additional API error related information via the error notification, providing a better understanding on the encountered API error.
You will be able to view the following additional details of an exception occurred for an API by having the 'Error Log' snippet in the email body when configuring the email notification:
- Request Body
- Response Body
- Method – only API
- API End Point – only API
- Headers
- Parameters
- Authorisation
- Time To Deliver
- Time Stamp
- Response Source – only API
- Retry Attempts
- Error Log
- API Notification
How do you configure this?
- A Notification Template needs to be created for an API Notification Delivery Failure via 'Menu > Framework > Incident Settings > Notification Template'.
- Select the ‘Error Log’ snippet from the 'Variables' dropdown for the 'Email Body' which will be available once 'NotificationDeliveryFailure' is selected as the ‘Notification Type’.
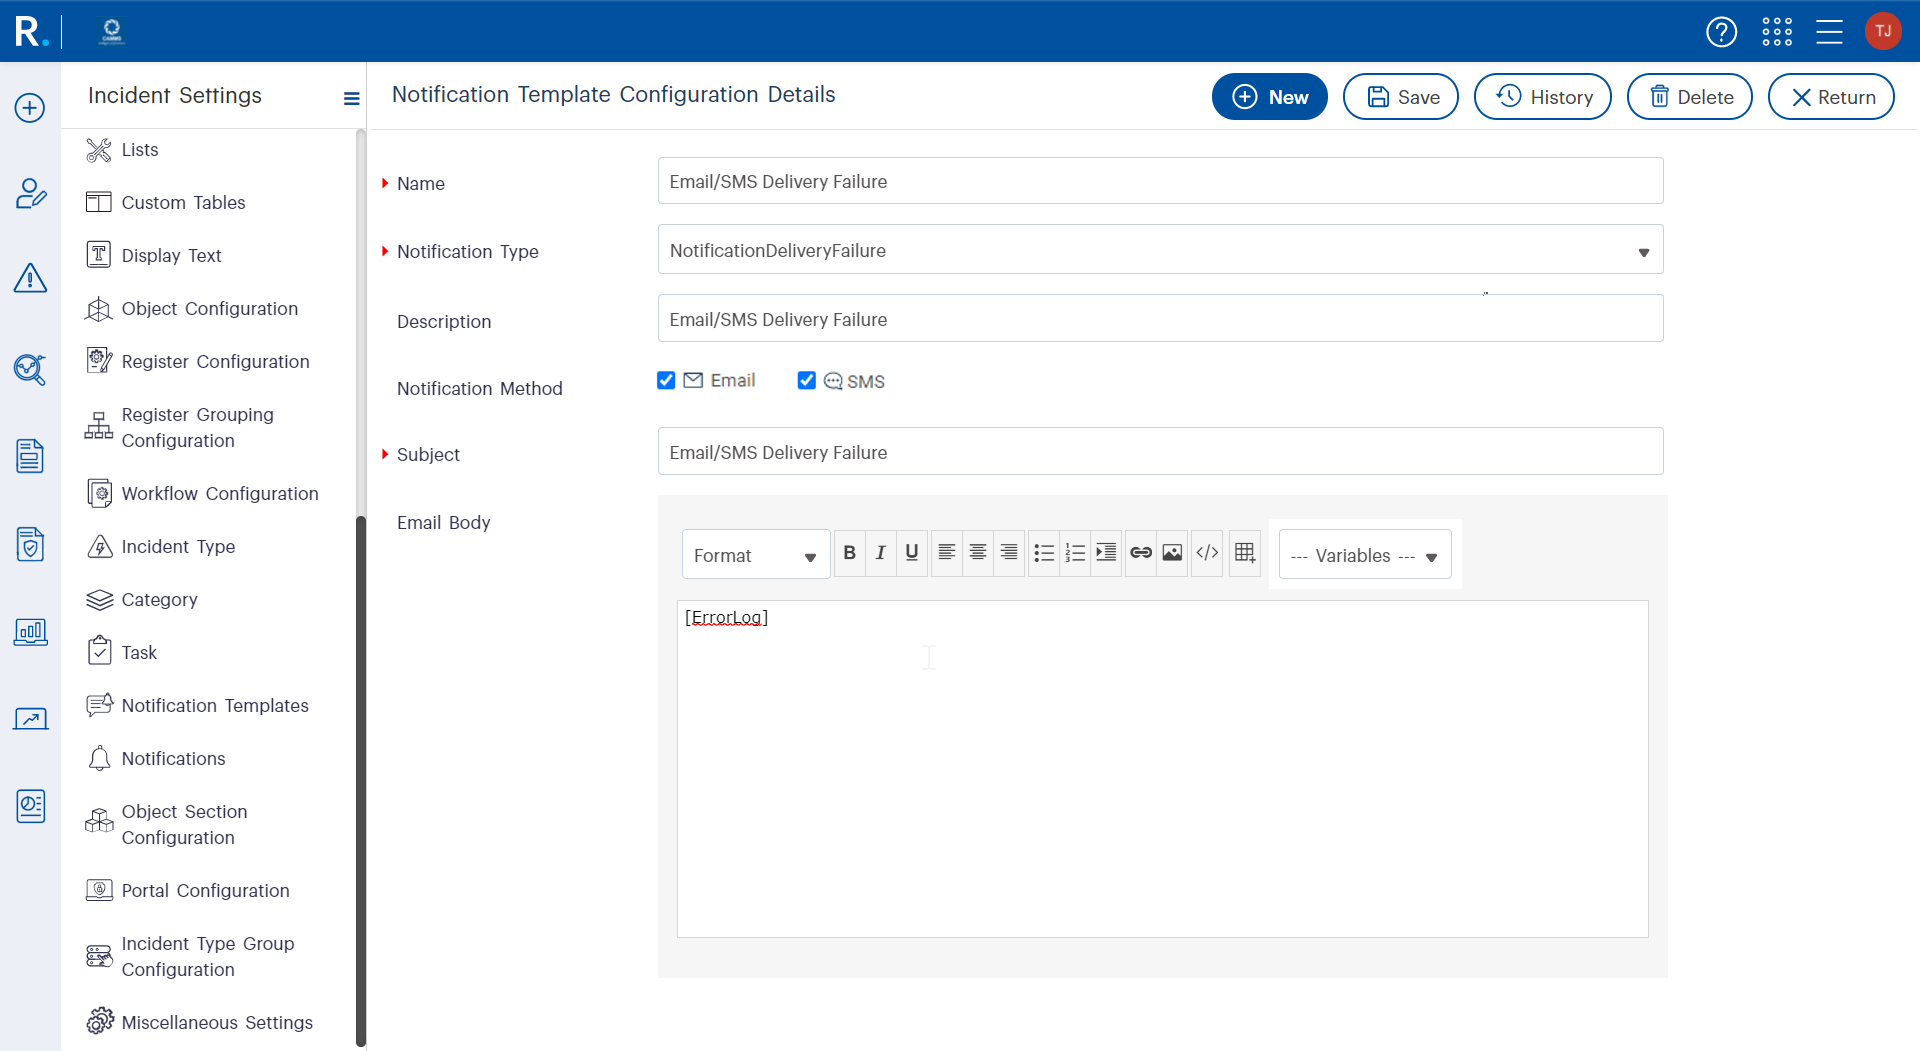
Figure 3.1: Failure notification template creation
- The email body will display the below grid when the 'Error Log’ snippet is used.

Figure 3.2: Email error log
- An SMS will show only the error log when the ‘Error Log’ snippet is used for the SMS body.
API_Failure test
StatusCode: 404, ReasonPhrase: 'Not Found', Version: 1.1, Content: System.Net.Http.StreamContent, Headers:
{
  Pragma: no-cache
  CAMMSCulture: en-AU
  Cache-Control: no-cache
  Date: Fri, 20 Aug 2021 06:11:36 GMT
  Server:
  X-AspNet-Version: 4.0.30319
  Content-Length: 264
  Content-Type: application/json; charset=utf-8
  Expires: -1
}
Figure 3.3: SMS error notification
4. Extending permissions to link incidents with any hierarchy node |
With this feature, you will now be able to link incident records to any hierarchy node within any hierarchy, irrespective of the given view permissions in the Incident Register.
Note: This feature is currently applicable only to customers who have enabled the new Flexible Hierarchy permission structure, which is currently in beta. |
How do you configure this?
- A new permission called ‘Show Hierarchies in Links tab’ will appear under ‘Incident’ in the ‘Role Management’ area. All hierarchies created within the product will be shown under the ‘Show Hierarchies in Links tab’. Users who have access to the Role Management area can configure permissions via 'Menu > Administration > Role Management > [New icon / Edit icon of an existing role] > Product [Select Incident] > Incident > Show Hierarchies in Links Tab > [Select the hierarchies that user should see in Links tab].
 Figure 4.1: Show hierarchies in links tab with all the hierarchies in the system
How does this work?
- If you have a hierarchy/hierarchies ticked under ‘Show Hierarchies in Links tab’ permission, within the roles you are assigned with, you will be able to see that hierarchy/hierarchies in full, within the Linkage object of an Incident record.
Note: Although all the hierarchies are shown in the dropdown, you can only link incidents to the hierarchies you have permissions for. |
 Figure 4.2: Full organisational hierarchy tree in linkage tab of an incident
5. Revamped Documents and Actions tabs (objects) |
A placeholder that says “No content have been added here yet. Click “Add New” to get started” will be displayed where there are no documents or actions added under the Documents and Actions tabs respectively.

Figure 5.1: Placeholder in documents tab

Figure 5.2: Documents tab after adding documents

Figure 5.3: Placeholder in actions tab
- An additional column named 'Field Name' has been introduced to the Document Grid to capture the field names where the ‘Enable Attaching Documents’ setting is enabled.
Note: The columns 'Object Name' and 'Field Name' were previously grouped together as the first column of the grid, named 'Object Name'. - Default sorting of records in the Document tab will be based on the 'Date Uploaded' field–beginning with newest to oldest.
6. Modifications to standard Incident Register Report |
6.1 Report content enhancements
The Incident Register report has been enhanced to include the functionalities detailed below to improve the usability of the report.
- Eight (8) new filtration options have been added along with the ability to filter the report based on hierarchy levels/nodes and further, providing the ability to control the visibility of certain fields within the report.
 Figure 6.1.1: Incident register report filter page
 - Sixteen (16) new fields have been added to the report to allow you to have a comprehensive data visualisation.
 Figure 6.1.2: Incident register report report content
 - To help better cater for the wide variety of use cases the system is utilised for (incidents, hazards, compliant, etc.), the naming convention of the report title is now modified as below:
- Where only a single incident type is selected, the report showcases the selected type as the report name.
- Format: <incident type> Register Report (e.g. Hazard Register Report)
 Figure 6.1.3: Incident register report dynamic report name based on incident type selection
6. 2 Visual and layout improvements
The Incident Register Report has been updated to include the visual and layout improvements detailed below.
The client logo and the report name, along with the print date is included as a header within the report.
 Figure 6.2.1: Incident register report report title and client logo
The background colour of the field headers have been changed to a lighter colour in relation to the adherence of the new Camms theme, and to bring about a clear visual aid.
The order of the fields within the report has been modified to cater for a more meaningful information interpretation.
 Figure 6.2.2: Incident register report report content