Camms is pleased to bring you the Quarterly Product Release Note for Camms.Risk Incident Management.
This quarter we've got a number of exciting new features and enhancements to improve your user experience within the system, which will be available in your Test environment on 4th December 2021 and will be available in your Live instance on 18th December 2021.
List of items
- 1. Introducing a new Getting Started landing page
- 2. User interface enhancements in the Incident Portal
- 3. Auto populating hierarchy nodes based on incident categories
- 4. Introducing a new User Permissions report
- 5. Introducing a new Notifications report and Email Trigger Details report
- 6. Customising Incident codes
- 7. Selecting Risk Category and Subcategory for Incidents
1. Introducing a new Getting Started landing page |
A new and simplified landing page will be introduced with this feature within the Camms.Risk Incident solution. This will be geared towards infrequent users, to provide a similar experience to what's currently available with our Incident Portal for external users. This can be configured as the default homepage for the Incident module and will provide an overview of the different types of incident records that can be created within the application, with quick links to get you started.
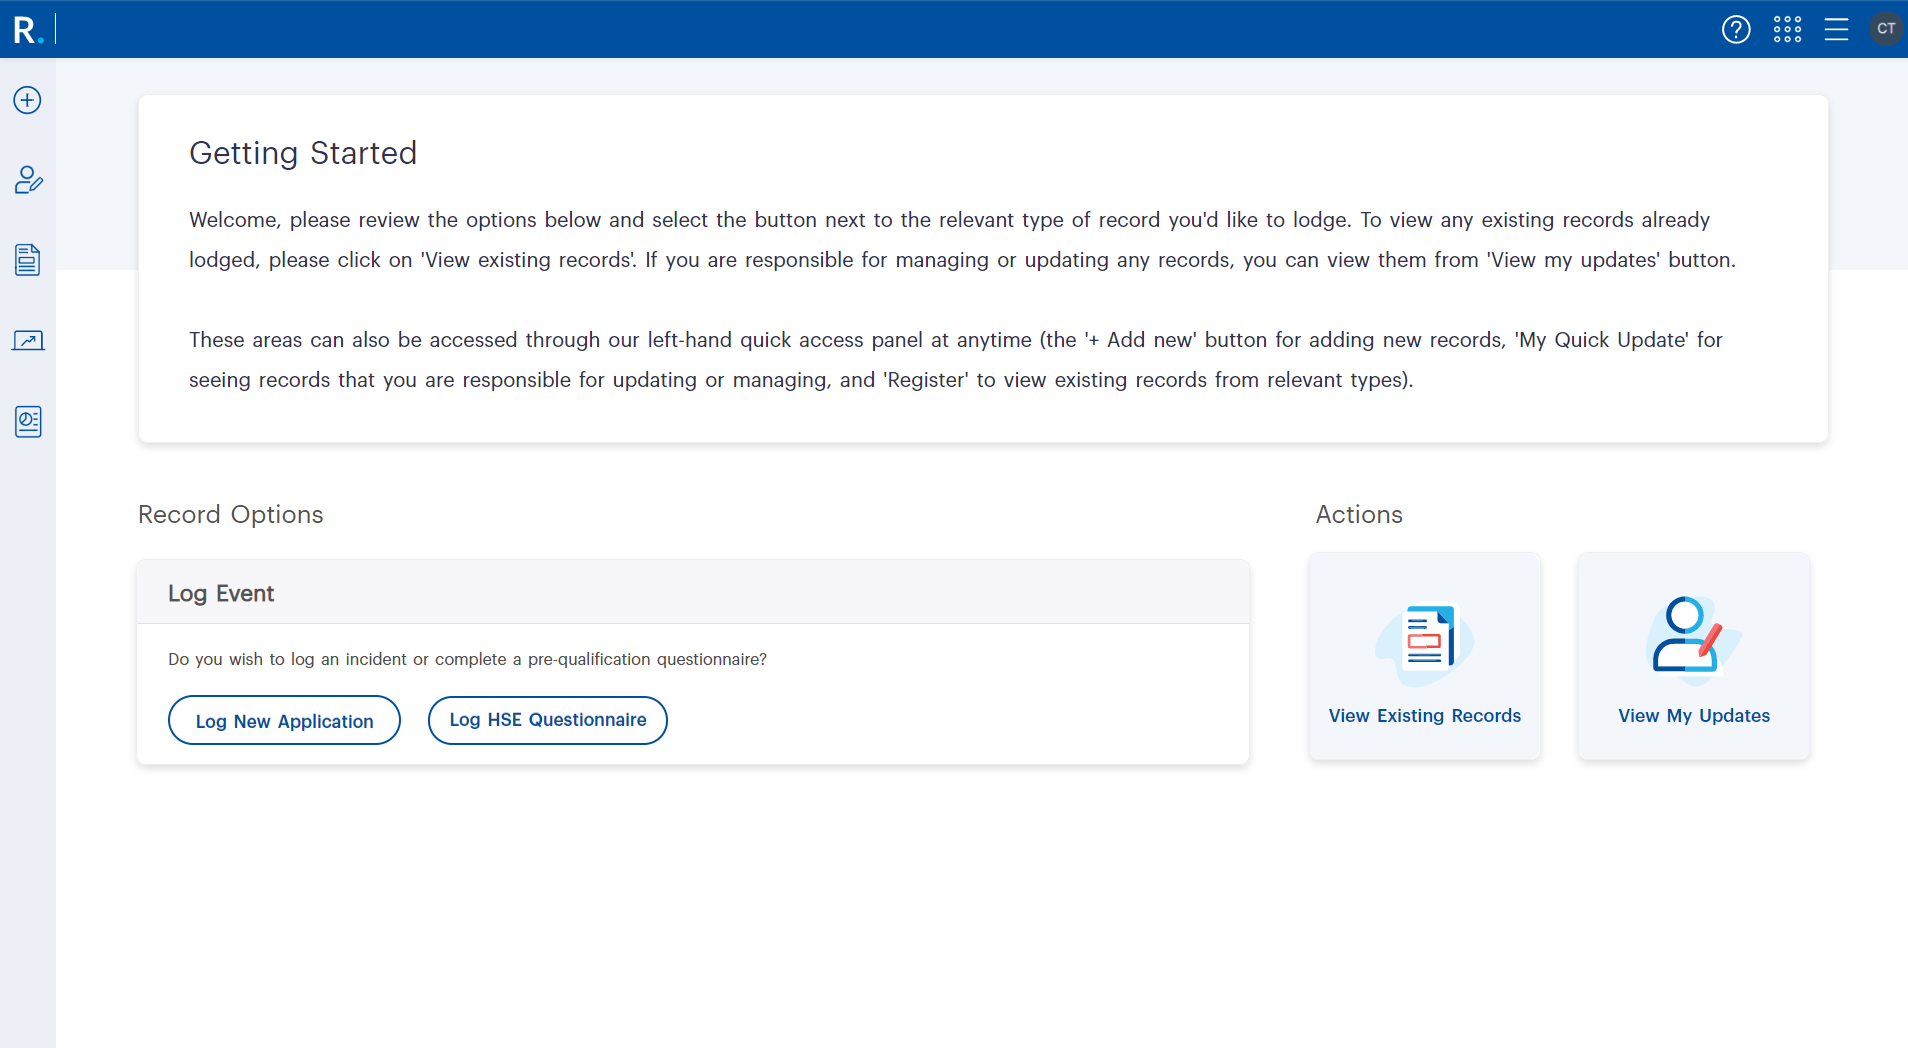
Figure 1.1: New Getting Started landing page
How do you configure this?
- Log in to the Incident application and navigate to Camms.Risk Incident Menu > Framework > Incident Settings > Incident Type Group Configuration and click on ‘Add New’ to configure an Incident Type Group. A separate widget will be created in the Getting Started page for each type group configured in this page.
- Enter an Incident Type Group Name and Description. From the ‘Incident Types’ dropdown, select the types of Incidents you wish to allow a user to create.
- Tick the ‘Display in Getting Started’ checkbox if you wish to view the type group in the new Getting Started page. Tick the ‘Display in Portal’ checkbox if you wish to view the type group in the Incident portal, and click ‘Save’.

Figure 1.2: Configuring the Incident Type Groups for Getting Started page.
Note: Existing Incident Type Groups configured under Camms.Risk Incident Menu > Framework > Incident Settings > Incident Type Group Configuration will appear in the Getting Started page by default. You may remove them by unticking the ‘Display in Getting Started’ checkbox. |
- Follow the steps below if you wish to customise the interface of the Getting Started page:
- Navigate to Camms.Risk Incident Menu > Framework > Incident Settings > Getting Started Page Configuration.
- Select ‘Main Body’ to apply changes to the Getting Started page.
- You can customise the default title and description that appears in the Getting Started widget to a title and description of your choice. This will be displayed in the Getting Started page to all users across the application.
- You can change the font colour using the font colour picker.
- You can change the background colour of the page using the ‘Background Colour’ colour picker. Alternatively, you can upload a background image via the image selector. Note that the background image will supersede the background colour configuration above.
- Tick the visible checkbox and click ‘Save’ to apply the changes.
- Select the ‘Incident Type Group Button’ to change the colours of the Incident Type Group Button.
- You can change the text colour by using the ‘Font Colour’ option and the background colour of the Incident Type buttons using the ‘Background Colour’ option.

Figure 1.3: Customising interface of the Getting Started page
Note: Only users with the ‘Getting Started Page Configuration’ permission under Camms.Risk Incident Menu > Framework > Incident Settings > User Roles > Standard, can access the ‘Getting Started Page Configuration’ from Incident Settings. |
- To set this as the default Home page for Incident module users:
- Navigate to Camms.Risk Incident Menu > Framework > Incident Settings > Miscellaneous Settings > Default Incident Home Page.
- Select the ‘Getting Started’ page from the dropdown and click on ‘Save’ to apply changes.
- The Getting Started page will be set as the home page at the immediate next log in for all users accessing the Incident module.
 Figure 1.4: Configuring Getting Started page as the default home page
Note: If you wish to set this as your home page in the Camms.Risk solution, you can set it up individually by navigating to Camms.Risk Incident Menu > Workspace > My Settings > Homepage. |
- If you wish to be directed to the Getting Started page after submitting an Incident record:
- Navigate to Camms.Risk Incident Menu > Framework > Incident Settings > Miscellaneous Settings > Configurable redirect for submit.
- Select ‘Getting Started’ page from the dropdown.
How does this work?
- If the ‘Getting Started’ page has been set as the default home page under Camms.Risk Incident Menu > Framework > Incident Settings > Miscellaneous Settings, all users accessing the Incident module will be directed to the Getting Started page upon logging in.
- If you have both Camms.Risk and Camms.Risk Incident solutions enabled, the ‘Getting Started’ page will appear as your Home page when logging in via the Camms.Risk solution, only if it's set as the ‘Home page’ in the ‘My Settings’ area.
- The ‘Getting Started’ page will display the page description configured by the administrator on the ‘Getting Started’ widget.
- The ‘Record Options’ area will list all Incident Type Groups that are configured to be visible in the Getting Started page by the administrator under Camms.Risk Incident Menu > Framework > Incident Settings > Incident Type Group Configuration.
- You may create Incidents of required Incident type, simply by clicking on the relevant button in the widget.
Note: Buttons will be visible only if you have ‘Standard Incident Add Permission’ assigned.
- The ‘ View Existing Records’ button will direct you to the Incident Register, while the ‘View My Updates’ button will direct you to the ‘My Quick Update’ page when clicked.
- You may further access the Getting Started page by navigating to Camms.Risk Incident Menu > Workspace > Getting Started.
- If the ‘Getting Started’ page has been set as the ‘Configurable redirect for submit’, you will be directed to the 'Getting Started’ page upon submitting an Incident record.
2. User interface enhancements in the Incident Portal |
With our constant focus on improving our user interfaces and user experience, this enhancement will revamp the user interfaces of the Incident Portal; bringing it in line with the latest user interface theme currently present in the Camms.Risk solution.
2.1 Page tab improvements
The font size in page tabs has been increased; making it prominent and easier for you to know where you are at, in the incident workflow.
What has changed?
- Font size of tabs has been increased.
 Figure 2.1
2.2 Clarity for function buttons
Buttons with icons at the top of a page are now replaced with buttons with text and an icon, providing you with instant clarity on the purpose of each button.
What has changed?
- Documents button will be highlighted in blue color when the mouse hovers over it, as in the application.
 Figure 2.2
2.3 Improved Next/Previous navigation
The Next/Previous buttons at the bottom of pages are now equipped with better visual cues (including the name of the next tab) and they are anchored visually as a footer.
What has changed?
- Next/Previous buttons updated to a text link in the footer section.
- The Next/Previous tab names listed below the Next/Previous text with a direction indicator as a link.
 Figure 2.3
2.4 Improved pagination
Pagination has been introduced in Incident Registers where you can select the number of items to be displayed per page, directly navigate to a page, directly navigate to first/next/previous/last pages, and key-in a page number to directly navigate to.

Figure 2.4
2.5 Success/error popup messages
The success or error popup messages will disappear automatically within three (3) seconds without requiring you to manually close the popup message.
What has changed?
- Popup messages auto exits after a given time without requiring any user interaction.
 Figure 2.5
3. Auto populating hierarchy nodes based on incident categories |
This feature will enable administrators to specify one or more hierarchy nodes that an incident should be automatically linked to, based on which category is selected for that incident. This will provide a useful mechanism to automatically control access and for reporting based on hierarchies, by removing the need for users to manually make such linkages.
How do you configure this?
- Navigate to Camms.Risk Incident Menu > Framework > Incident Settings > Category and toggle the ‘Auto populate hierarchy linkage based on category’ setting to enable this feature.
- Select the desired Incident Type from the ‘Incident Types’ dropdown.
- Click on the ‘Link Hierarchy’ icon placed alongside the category for which you wish to link hierarchy nodes.
 Figure 3.1: Link hierarchy icon
 - Click on ‘Add New’ and select the Hierarchy type from the dropdown, which will automatically load the hierarchy tree below.
- Select one or more hierarchy nodes and click on ‘Save’ to link the hierarchy nodes to the given category.
- If you wish to remove a linked hierarchy node, click on the ‘Delete’ button placed against the hierarchy linkage in the 'Linked Items' grid.
- Click the 'Close' button to exit the ‘Hierarchy Linkages‘ popup.
 Figure 3.2: Link hierarchy nodes to category
How does this work?
- When the Incident Creator selects one or more Categories from the standard Category multi-select field in the Incident object and saves the Incident record, the application will automatically populate the hierarchy linkages associated with that category within the Linkage tab, hierarchy fields, and within the Links button.
Notes:
|
4. Introducing a new User Permissions report |
A new User Permission Report will be introduced with the ability to see all primary permissions assigned to users (via Manage Users or Role Management pages) and individually assess their Incident Permissions. This will be an Admin-Only report, therefore only administrative users will be able to run and access data within the report.
The report body consists of two sheets: Legend and User Details.
4.1 Sheet 01: Legend
- This section provides a list of User Roles against their User Role type and available user permissions. Both Primary User Role and Incident User Role permissions are depicted.
Note: Primary Permissions will not be included in the non-flex instance.
- It further depicts the date when each permission was allocated for the respective Primary and Secondary User Role.
- Thereby this section consists of the following four columns:
- User Role
- User Role Type
- Description
- Timestamp
 Figure 4.1: Legend sheet
4.2 Sheet 02: User details
- This sheet displays an overview of User details. It consists of the below 13 columns.
- Username
- Staff Name
- Position
- Reporting Officer
- Staff Status
- Salutation
- User Status
- Organisational Node
- Resource Location
- Primary User Roles/Linked Node/Linked Level
- Staff Last Update Date
- Secondary User Roles.
Note: The Linked Node and Level will not be included in the non-flex instance. Only Primary User Roles that are assigned via Manage Users will be depicted. |
 Figure 4.2: User details sheet
- The report filter page will consist of the Tree View Hierarchy filter and three (3) multi-select filters for Staff, Primary User Roles, and Secondary User Roles. It will also consist of a tick box filter to extract Inactive Staff details to the report, once enabled. Additionally, you will have the option of generating the report as per the Staff last updated date, and the date range will be defaulted to one year.
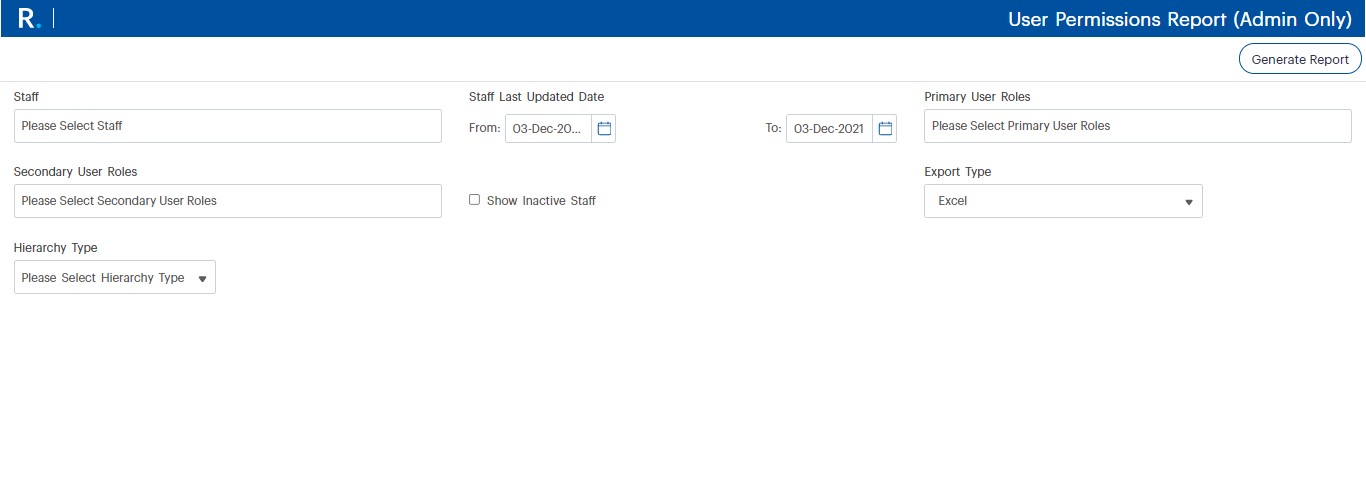
Figure 4.3: User Permissions report filter page
5. Introducing a new Notifications report and Email Trigger Details report |
Two new reports around Notifications and Email Trigger Details will be introduced with information about all current Incident Notification Triggers setup in your instance and any actual Notifications that the system has sent out. These will be Admin-Only reports, therefore only administrative users will be able to run and access data within the reports.
5.1 Notifications Trigger Details Report
- This report details out the information around Triggered Notifications, including the relevant Notification Name and Type, Template Name, Recipient, Email Body, and the selected Hierarchy Node.
 Figure 5.1.1: Notifications trigger details report body
- The report filter page will consist of the Tree View Hierarchy filter and three (3) multi-select filters for Notification Template Name, Notification Recipient, and Trigger Criteria.
 Figure 5.1.2: Notifications trigger details report filter page
5.2 Notifications Report
- This report displays the actual email notifications along with their respective Incident ID, Recipient name, Organisational Hierarchy Linkage, and other associated details.
 Figure 5.2.1: Notifications report body
- The report filter page will consist of the Tree View Hierarchy filters and three (3) multi-select filters for Notification Template Name, Email Recipient, and Email Trigger Criteria.
- You will have the option of generating the report in order to retrieve emails which were sent off within a selected period using the Date Range filter. This filter is defaulted to three (3) months preceding the current report generated date.
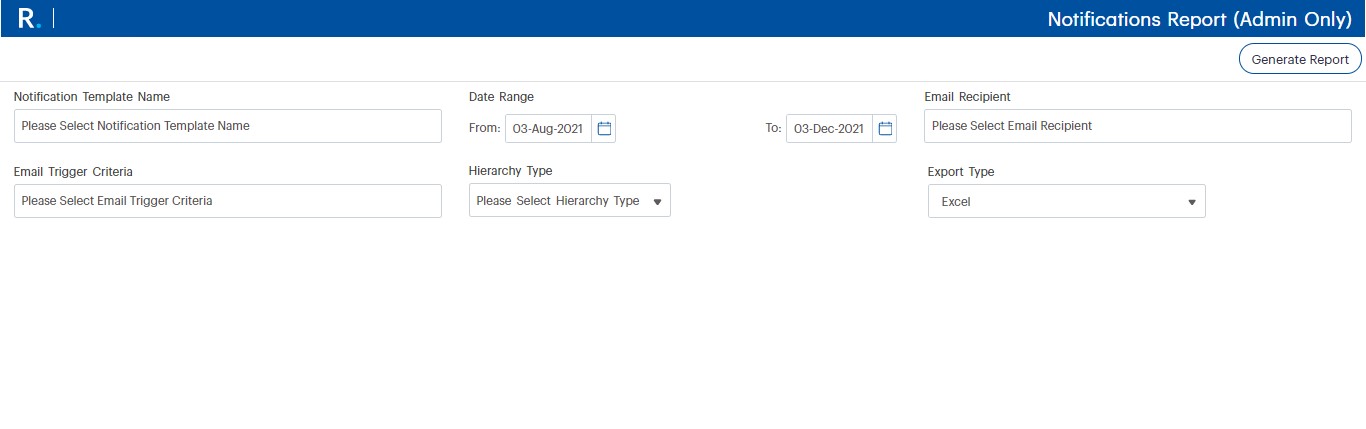
Figure 5.2.2: Notifications report filter page
6. Customising Incident codes |
This enhancement will let you customise the incident code using elements such as Prefix, Suffix, Sequence, and YYYY/MM/DD.
How do you configure this?
- A new textbox ‘Custom Sequence Formula’ will be introduced to the ‘Code Setup’ page (accessed via Camms.Risk Incident Menu > Framework > Incident Settings > Code Setup), which can only be accessed by users with the ‘Code Setup’ permission (accessed via Camms.Risk Incident Menu > Framework > Incident Settings > User Roles > Permissions: Standard > Object Configuration Settings).
 Figure 6.1: Custom sequence formula
- This text box can only be enabled by checking the ‘Identify Incident Code against incident type’ checkbox and selecting either ‘Strict Sequential Numbering’ or ‘Editable Sequential Numbering’ in the ‘Numbering Sequence Option’ dropdown.
 Figure 6.2: Identify Incident Code against incident type checkbox
 Figure 6.3: Numbering sequence options
- Users with access to the ‘Code Setup’ page can formulate the ‘Custom Sequence Formula’ using available elements such as Prefix, Suffix, Sequence, and YYYY/MM/DD in an order they wish to see.
Example: (Prefix)/(YYYYMMDD)/(Suffix)/(SequenceNumber) - The following rules must be followed when creating a custom formula for the incident code.
- Each element must be within brackets
- Each element must be separated with '/'
- A help text will be provided to make instructions clearer when creating a custom sequence formula
 Figure 6.4: Help text for custom formula for incident codes
- You can create unique sequences for individual incident types or have one formula for all incident types by selecting the preferred incident type using the ‘Type’ dropdown.
 Figure 6.5: Custom formula for individual incident types or all incident types
Note: If two or more incident types are selected under one group, you can create different incident code sequence formulae for different incident types under one group. Only the ‘Start number’ will be shared across all incident types of one group. |
How will this work?
- Once the above configuration is complete, Incident codes will be generated based on the configuration.
 Figure 6.6 Custom sequence configuration
 Figure 6.7: The incident code that is generated based on the configuration
- If ‘Strict Sequential Numbering’ is selected in the ‘Code Setup’ page, then the Incident Code will be disabled.
- If ‘Editable Sequential Numbering’ is selected in the ‘Code Setup’ page, then users with Edit permission for the incident object for the relevant workflow, or the Responsible Officer of that record will be able to edit the Incident Code.
7. Selecting Risk Category and Subcategory for Incidents |
This new enhancement will allow you to create fields to select Risk Categories and Subcategories for incident records that are created in the Camms.Risk Incident solution.
How do you configure this?
- Administrator users with the 'Object Configuration Settings' permission (accessed via Camms.Risk Incident Menu > Framework > Incident Settings > User Roles > Permissions: Standard > Object Configuration Settings) will be able to configure the Risk Category and Risk Subcategory fields by accessing Camms.Risk Incident Menu > Framework > Incident Settings > Object Configuration > Incident Object.
 Figure 7.1: Object configuration settings permission
 Figure 7.2: Object configuration page with Risk Category and Subcategory fields
- You can configure properties of the fields by clicking on it.
 Figure 7.3: Configuring Risk Category and Subcategory fields
How will this work?
- Once the above configuration is complete. You will be able to select the Risk Category using a dropdown, and Risk Subcategory using a multi-select dropdown for Incident records.
 Figure 7.4: Selecting Risk Category and Subcategory for incidents
- Any Risk Category or Subcategory that is added via Camms.Risk Menu > Framework > Risk Settings > Categories will appear in the Risk Category and Subcategory fields in the Camms.Risk Incident solution.
 Figure 7.5: Adding Risk Categories and Subcategories to appear in incidents