Click on ‘Set up’ under the administration menu.
This functionality gives the administrator to configure the system and establish custom fields, set terminologies, Upload templates prior to system use.
Set up can be done for the following areas:
Site Configuration
The site configuration allows to set the standard features across the system such as Name, Logo Time zone, etc. The logo should not exceed 5 MB.

Notes: a. It is not recommended to change the Font and the Font size frequently. The changes will affect Draft agendas, where the new setting will not be applied for existing reports b. The function to take a division vote during a meeting, is enabled only if the setting is ‘Yes’ c. Confidential report item output will depend on the setting. If the setting is ‘Yes’ then the report outputs for the agenda and minutes will be individual. It is not recommended to change this setting as it will impact the meetings in the Join Meeting stage. |
Output Configuration
Ability to change the font size for an Agenda Item Title and TOC
The output configuration allows changing the font size for Agenda items title and TOC. It is possible for the Administrator to customise the sizes of the fonts in the table of content and the agenda item title in the below stated items.
- Output font
- Output font size
- Font size for item title
- Font size for group title in TOC
- Font size for item title in TOC
Output Font Type
This change will enable the administrator to select the font type for all report field types including rich text fields in Draft Agenda, Finalised Agenda, Draft Minutes and Finalised Minutes, both confidential and non-confidential reports.
Output Font Size
This change will enable the administrator to select the font size for all report field types including rich text fields in Draft Agenda, Finalised Agenda, Draft Minute and Finalised Minutes, both confidential and non-confidential reports.
Further, changes were made to the font size for Agenda and Minutes item title and TOC in the Output.
Configurations section:
Item Title of Agenda & Minutes – Font Size
This change will enable the administrator to select the font size for all the agenda item titles in Draft Agenda, Finalised Agenda, Draft Minute and Finalised Minutes, both confidential and non-confidential reports.
Group Title of Agenda TOC – Font Size
This change will enable the administrator to select the font size for all agenda group titles in Table of Content in the Draft Agenda and Finalised Agenda, both confidential and non-confidential reports.
Item Title of Agenda TOC – Font Size
This change will enable the administrator to select the font size for all agenda item titles in Table of Content in the Draft Agenda and Finalised Agenda, both confidential and non-confidential reports.

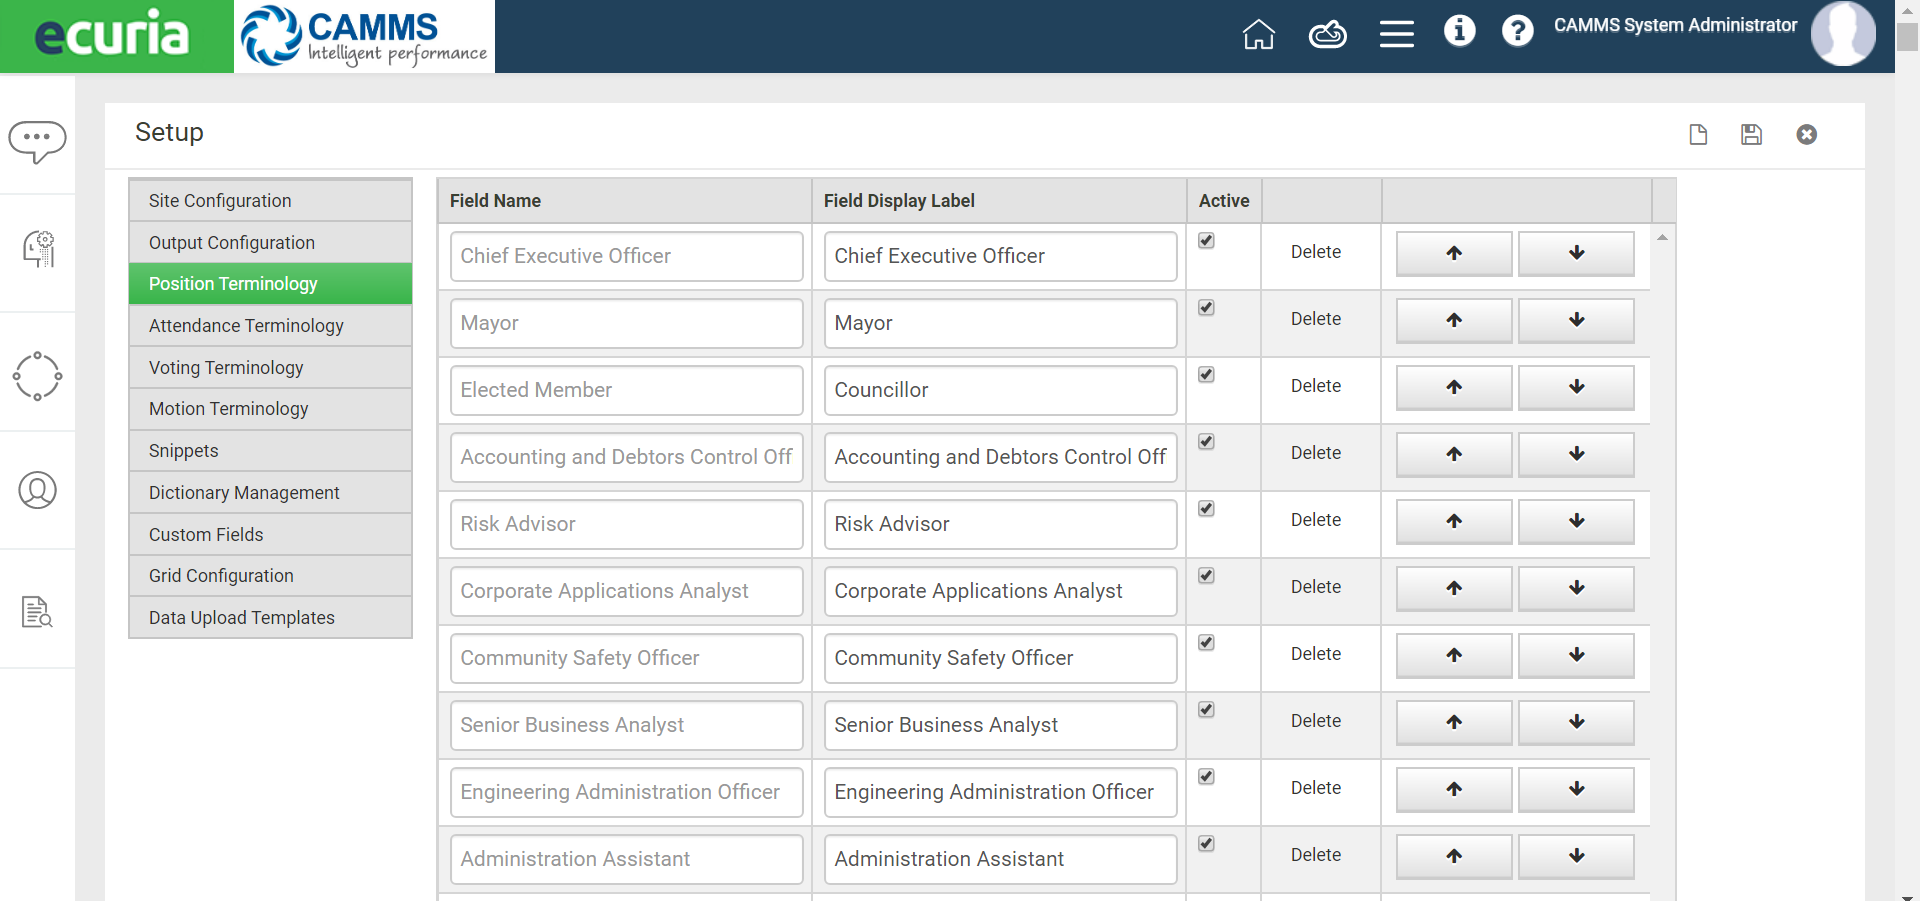
Position Terminology
This functionality can be used to add different types of positions for staff and non-staff users. To Add a new position:
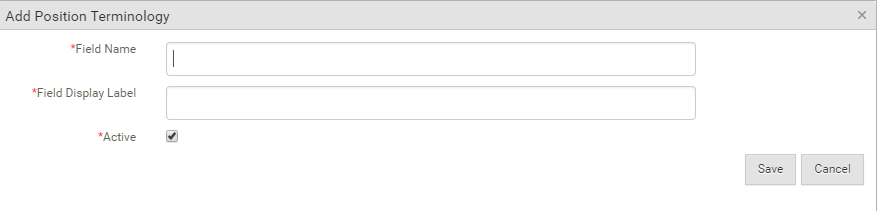
- STEP 1: Click on ‘Add position’ Icon. A pop up as shown in the figure, will be shown.
- STEP 2: Enter the fields for Add position and Click ‘Save’.
a. Name – Mandatory
b. Field Display name – This is the name the position that needs to be displayed throughout the system. Mandatory
c. Mark Active or Inactive – Tick box. Mandatory
To Edit, the user can make changes in the editable text boxes. To save changes, click ‘Save’.
The Order of appearance in the drop down can be set up by arrow up and the arrow down button. Positions can be deleted, if not linked with any other functionality or can be marked inactive. Refer to Figure 14 given below for position set up.
Attendance Terminology
This functionality can be used to add different types of attendance in a meeting. To Add a new attendance terminology,
- STEP 1: Click on ‘Add attendance’ Icon.
- STEP 2: Enter the fields for Add position and Click ‘Save’.
a. Name – Mandatory
b. Field Display name – This is the name the position needs to be displayed throughout the system. Mandatory
c. Mark Active or Inactive – Tick box. Mandatory
To Edit, the user can make changes using the editable text boxes. To save changes, click ‘Save’.
Attendance can be marked inactive or deleted if it's not linked. Refer to the figure below for the attendance terminology set up.

Voting Terminology
This functionality can be used to add voting terminology that will be used in the join meeting when members cast their votes. To Add a new Voting terminology,
- STEP 1: Click on ‘Add voting terminology’ Icon. A pop up as shown in the below figure, will be appear.
- STEP 2: Enter the fields for Add position and Click ‘Save’.
a. Name – Mandatory
b. Field Display name – This is the name the position needs to be displayed throughout the system. Mandatory
c. Mark Active or Inactive – Tick box. Mandatory
To Edit, the user can make changes in the editable text boxes. To save changes, click ‘Save’.
Terminologies can be marked inactive and deleted if not linked. Refer to the below figure for the Voting terminology set up.

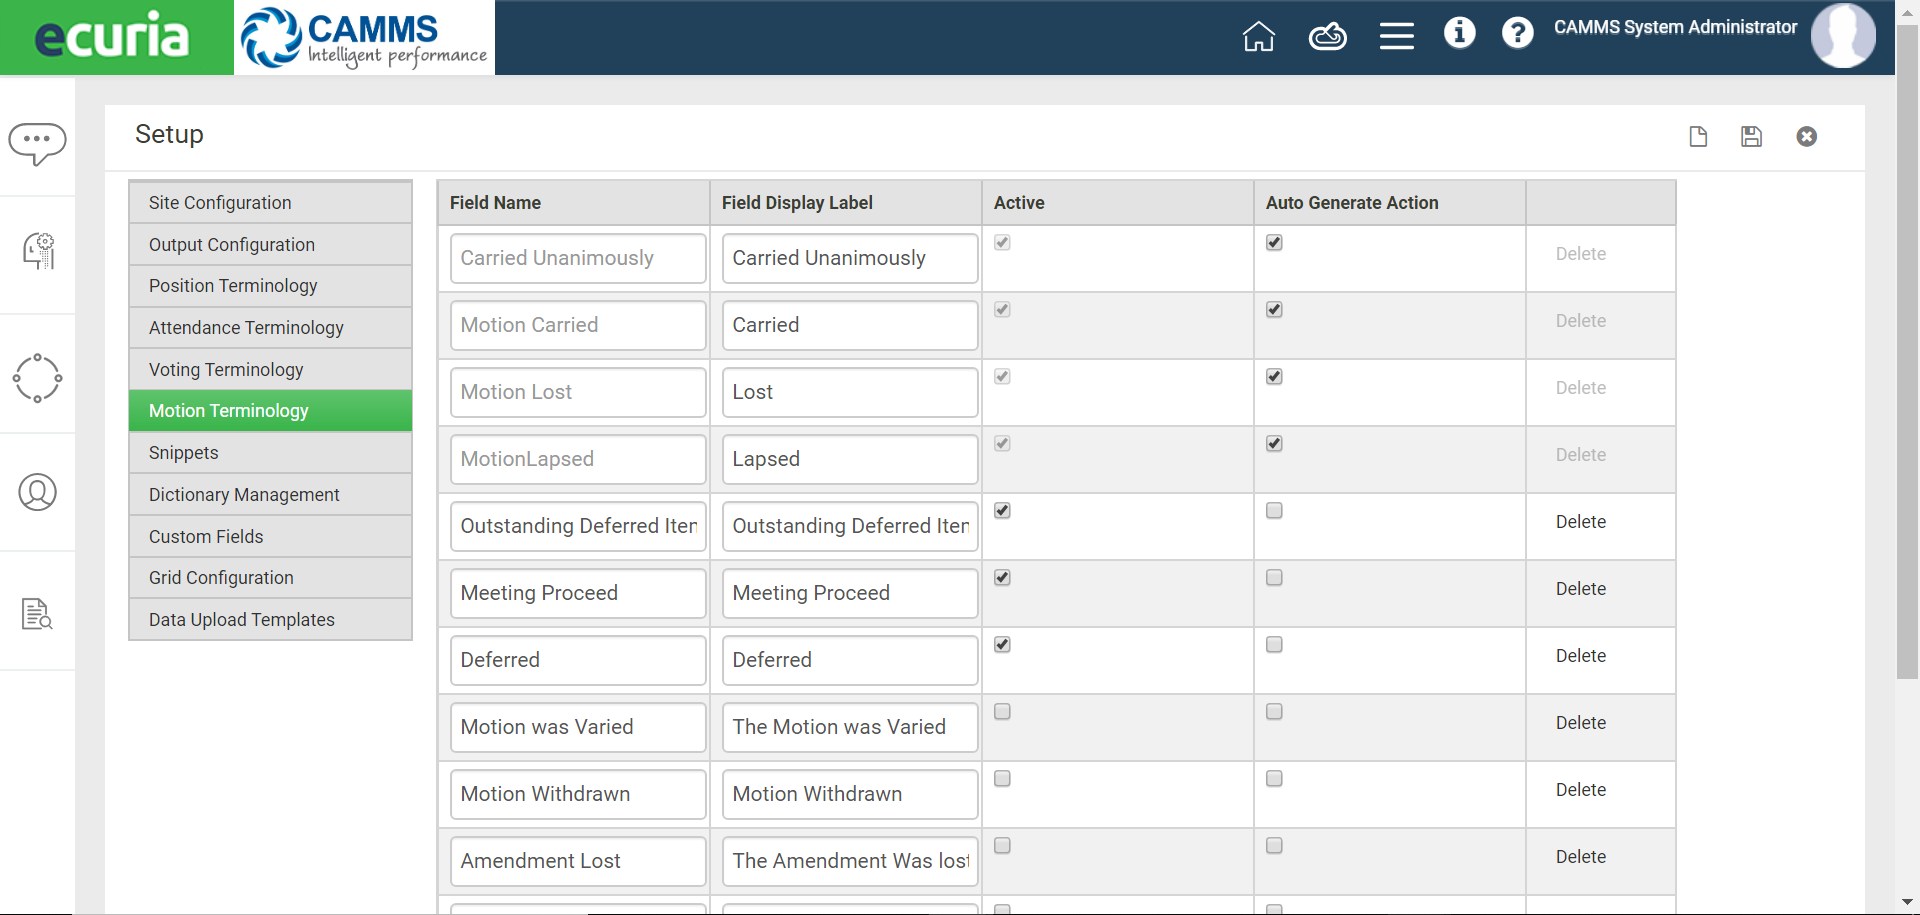
Motion Terminology
This functionality can be used to add a motion terminology that will be used when members cast their votes. To Add a new Motion terminology,
- STEP 1: Click on ‘Add Motion terminology’ Icon. A pop up will be appear.
- STEP 2: Enter the fields for Add Motion and Click ‘Save’.
a. Name – Mandatory
b. Field Display name – This is the name the position needs to be displayed throughout the system. Mandatory
c. Mark Active or Inactive – Tick box. Mandatory
To Edit, the user can make changes in the editable text boxes. To save changes, click ‘Save’.
Terminologies can be marked inactive and deleted if not linked.
The motions also need to be configured for Auto Generate Actions by ticking the tick box for motions that actions need to be auto generated. Actions will be auto generated in the Join meeting and Meeting minutes phase for voting items that has a resolution, setup in this module. Refer to below the figure for the Voting terminology set up.
Snippets
This functionality can be used to add snippets which can be used when creating notes and Minute notes in the join meeting stage. To Add a new Snippet,
- STEP 1: Click on Administration- Setup and navigate to Snippet section where once the ‘Add Snippet’ Icon. A pop up as shown in the below figure will appear.
- STEP 2: Enter the fields for Add position and Click ‘Save’.
a. Snippet Title – Mandatory
b. Snippet – This is the Snippet. The snippet can be populated with variable selected from the drop down. This is Mandatory
c. Mark Active or Inactive – Tick box. Mandatory
- The system administrator has the facility to create snippets that can be formatted using basic styling such as bold, Italics, underline, line spacing, etc.
- When snippets are created, the administrator can use these snippets as variables for the snippet content
- The snippets will be displayed by Snippet title in a drop down in the Join meeting and meeting minutes’ phase, in the Note RTF, Vote RTF and Division RTFs. The snippets can also be inserted using shortcut keys. The shortcut keys can be inserted within the body of the Add Snippet RTF by simply typing as '@' and the shortcut key number. For example; the shortcut key '@V1' would be for variable 1 - absent members.


To Edit, the user can make changes in the editable text boxes. To save changes, click ‘Save’.
Snippets can be edited, marked inactive or deleted, if not linked. Refer the below figure for Snippets set up.

Dictionary Management
This functionality can be used to add words to the dictionary file. Refer the below figure for Dictionary Management set up.

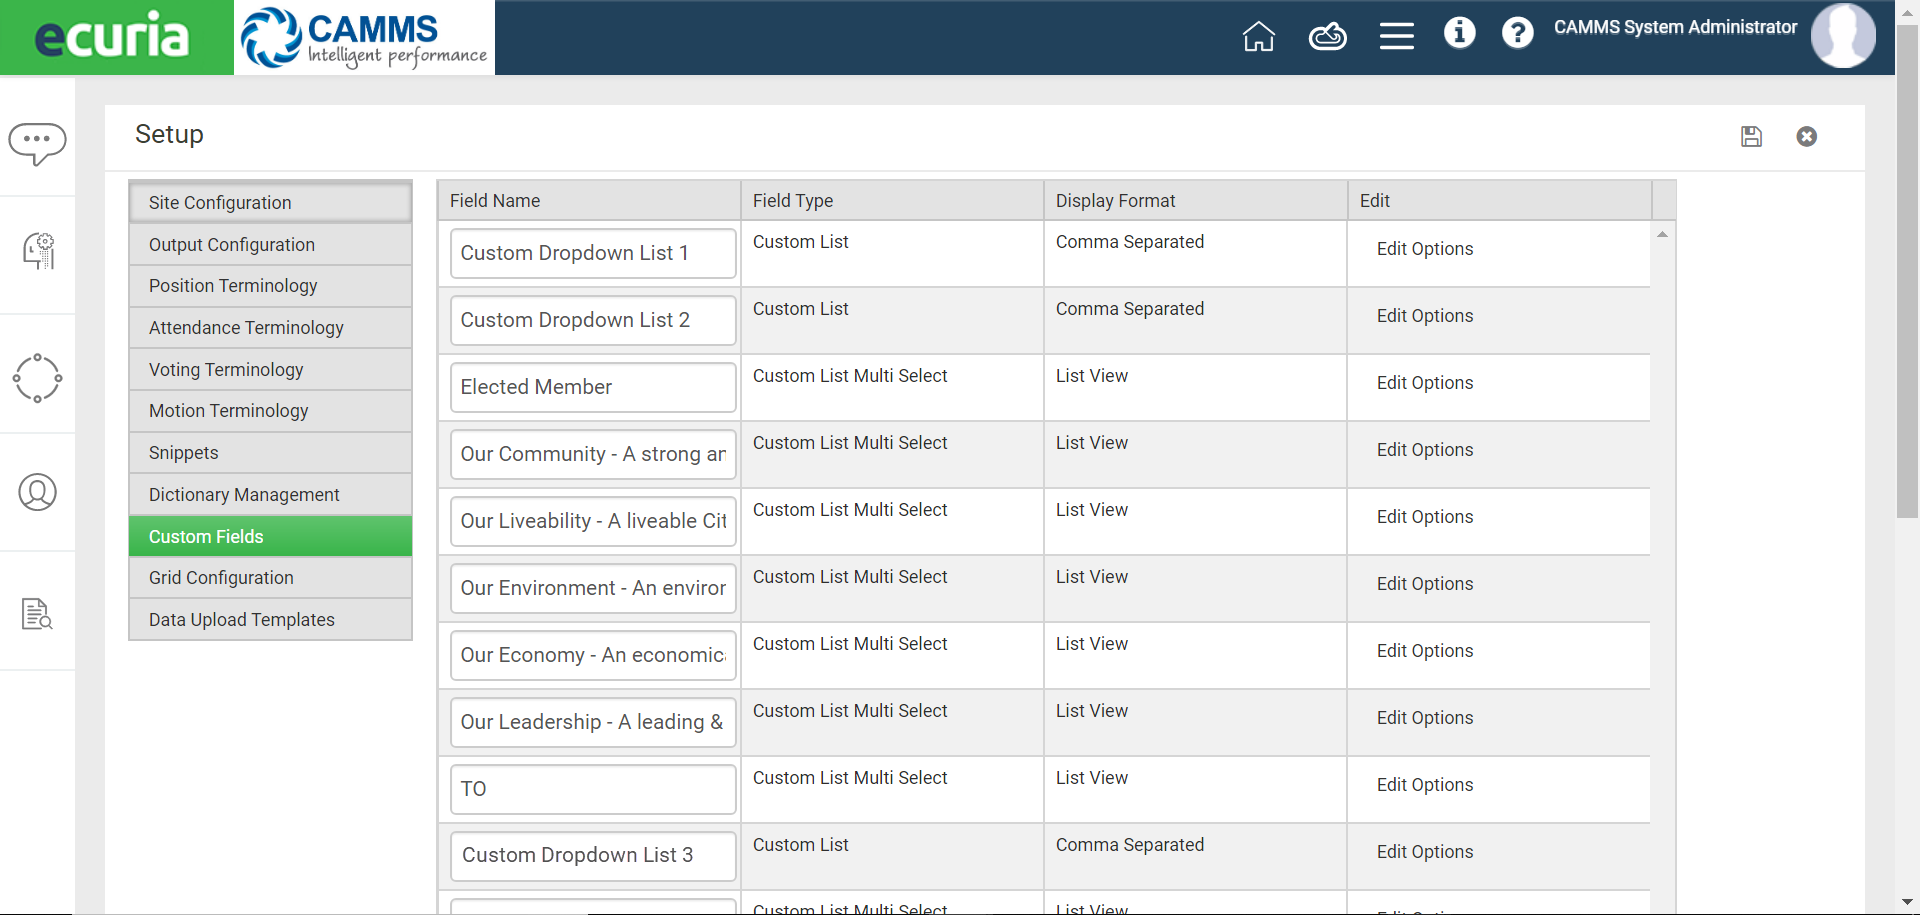
Custom Fields
This functionality can be used to add custom fields for the report and/or agenda templates. The Field types are List and multi select lists. The admin can add/edit options for the custom lists by clicking the ‘Edit options’ button and sett the order of the options by Arrow up and arrow down buttons. Options can be deleted if not linked.
Note: Special Custom Multi Lists have been created for ‘General Manager’ and ‘Corporate Manager’ under custom list in ‘Setup’. The options for each list can be added via ‘Edit Options’. These will be linked to the Report template. |

Grid Configuration
This functionality can be used to configure the columns of a grid. The grid name must be selected from the drop down. The current grids that can be customised are:
- Action Centre
- Agenda Item Search
- Committee List
- Meeting centre
- Member list
- Public Excluded List
- Team List
Columns can be marked as inactive. The order of the columns can be set up with the arrow up and arrow down buttons. Refer the below figure for grid configuration.

Data Upload Templates
This functionality can be used to Upload Excel Data files to populate the database of the system. The columns of the data file have to be the same as the database table. A script will run every 10 minutes to update the database, if any files have been uploaded by the administrator.
Data files can be uploaded for Dictionary, Legislation and User data by selecting the type from the drop down. A history of the uploads will be shown in a grid layout.


