Camms is pleased to bring you the Camms.Project Transformation, designed to enhance, streamline, elevate responsiveness, improve performance and above all deliver an overall optimised user experience.
Beta Testing will begin on 08th October 2022 for four weeks, and will subsequently be available in your Live environment on 05th November 2022.
List of release items
1. All new and improved user interfaces
1.1 Common interface enhancements
1.2 My Quick Update page interface enhancements
1.2.1 Updating Project Details
1.3 Project Hub interface enhancements
1.4 Project Settings interface enhancements
1.5 Project Workflow interface enhancements
1.6 Removal of unused button in an object phase in the Project Workflow
1.7 Removal of the spell checker functionality in pages
2. Improved Project Register functionality
2.1 Freezing header row and columns
2.2 Ability to view more project records in one page
2.3 Enhancements to sorting and grouping functionalities
2.7 Create new projects via the Project Register
3. Improvements in Tasks Planning and Scheduling in the Gantt Chart and Kanban Board
3.1 Improvements to the Gantt Chart
3.1.1 Moving Gantt items using the 3-dot icon
3.1.2 Performance of the chart indicated in green or red in the Chart View
3.1.3 Critical tasks will be highlighted in the Chart View with a red dotted line
3.1.4 Easily access the Task Properties popup whilst in the Grid View
3.1.5 Converting a task into a milestone and milestone into a task
3.2 Improvements to the Kanban Board
3.2.1 Task responsible persons will be displayed by their profile image
3.2.2 Better user experience when moving tasks between columns of the Kanban Board
4. Enhanced individual project and object phases with status indicators in Project Workflows
5. Page level improvements in Board & Team and Custom Objects
5.1 Load time of objects when updated
5.2 Clear indication for a team member playing an Implementation Role and Responsible Person, by denoting it with a Yes/No field
5.3 Ability to select the number of resources/staff members to be displayed in one page
5.4 Default Staff Name dropdown set to a placeholder text
5.5 Improved performance when updating the Custom Object and Custom Table
6. Removal of the Open Project feature
7. Improvements in Project Settings pages
7.1.2 Visibility of the special ‘working’ and ‘non-working’ days
7.1.3 Visibility of the ‘working’ and ‘non-working’ days
7.1.4 Adding special ‘working’ or ‘non-working’ days
7.1.5 Editing special ‘working’ and ‘non-working’ days
7.1.6 Complete adding a calendar
7.1.7 Making a calendar visible once added
7.1.8 Checking if a calendar is linked to a workflow
7.2 Progress Calculation Settings
7.2.2 Progress Threshold setting changes
8. New and improved user guide platform
8.1 What's new and how to access the new guide
8.3 User-friendly navigation between articles
8.4 Exporting articles into PDF/Word
Areas requiring further improvements
1. All new and improved user interfaces |
Effortlessly navigate through pages and projects faster, enjoy heightened functionality and a concise view of all project details with a best practice, modern user experience with our completely revamped user interfaces.
1.1 Common interface enhancements
- Our latest interface enhancements will feature a completely revamped and modernised design, with simplicity and clarity in mind. This delivers a new user experience and refines many aspects of a user’s day-to-day interaction with the solution. As we continue to build out this next-generation platform, this redesign sets the stage for further improvements in our upcoming releases.
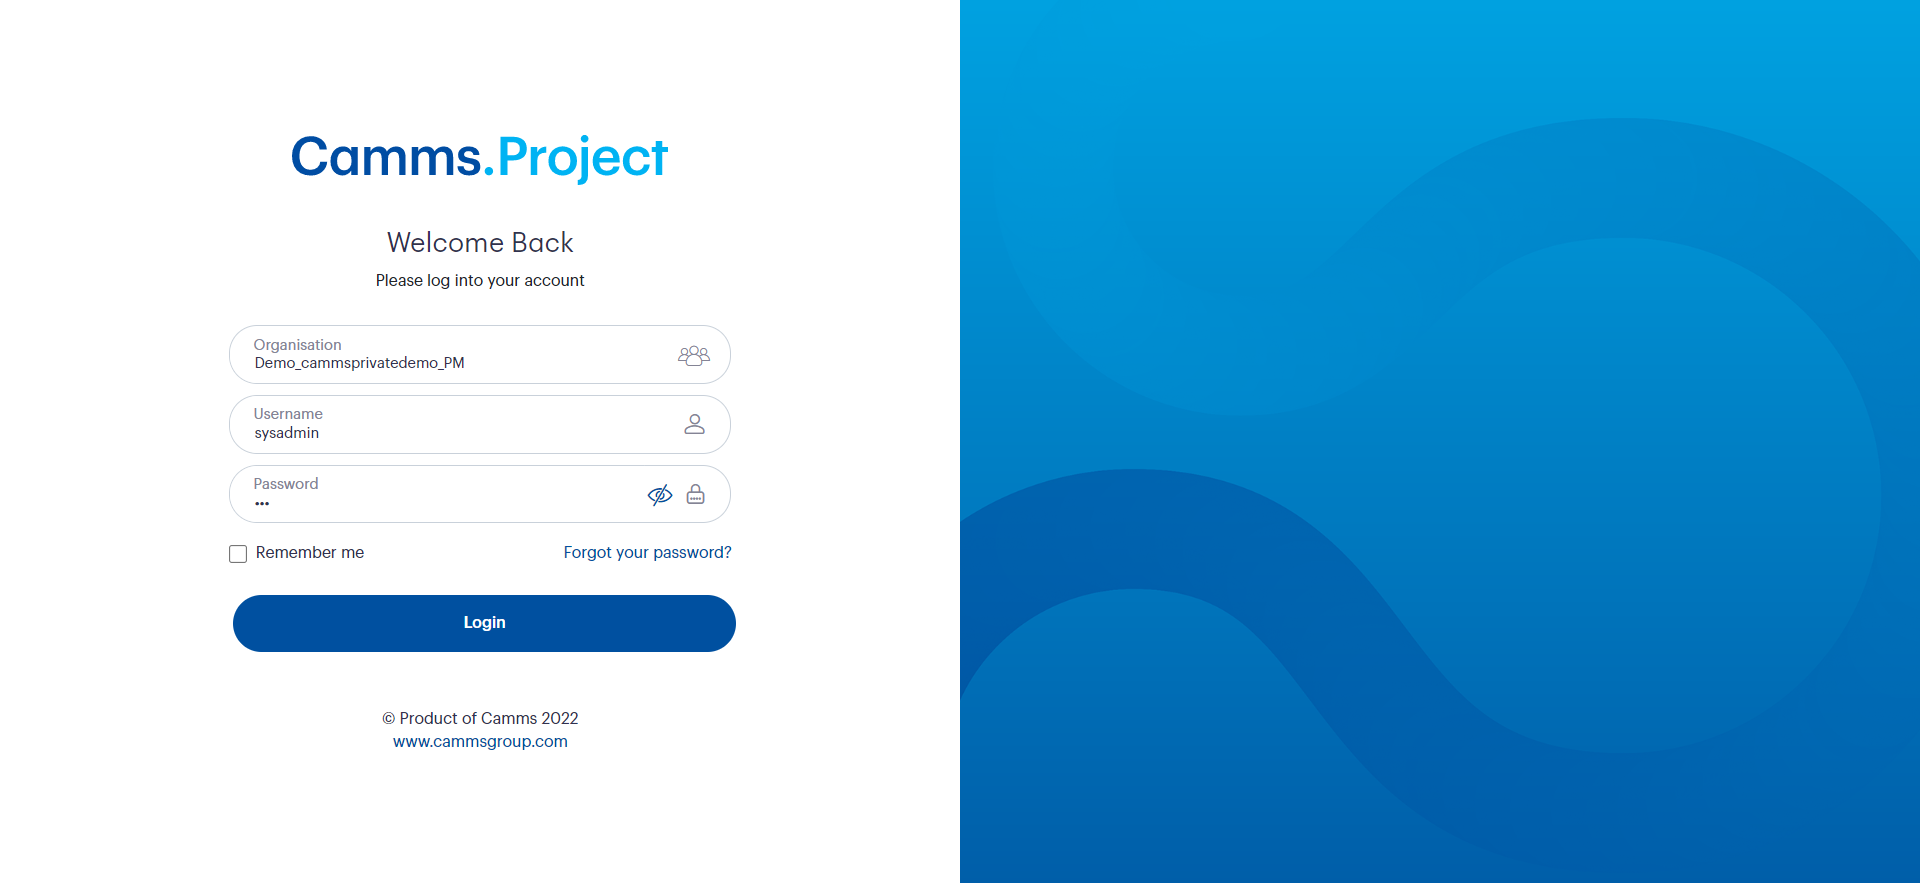
- Login page– The Login pagewill have a new look-and-feel with few modifications including the following:
- A show/hide password icon will be displayed in the Password box where you can click this icon to display the password you key in the box. If you do not click on this icon, the password will be displayed as asterisks (*) when keyed in.
- Error messages when an incorrect username or password is entered, will now display under the respective field.
- Colour theme and and refined look-and-feel – A modernised colour palette, new clearer fonts and font sizes, refined buttons with both icon and text for easy identification of functionality, and table/grid colour.
- Page header panel – The header panel will be visible throughout the application and will include the following features:

1. Camms.Project logo or Organisation logo: The Camms.Project product logo or your organisation logo (if requested instead of the product logo), is placed at the top left-hand corner.
2. Organisation logo/name: Next to the product logo, your organisation logo and name are displayed. If your organisation logo is placed instead of the product logo, then this area will remain empty.
Note: An administrator can edit this under Menu > Framework > Project Settings > Client Details. You can upload a picture of the logo and additionally, change the colour of the top banner and left navigation menu here. This will be activated via an internal setting only for certain clients. Please contact Camms Support on support@cammsgroup.com to make this feature available for your organisation as well. |
3. Favourite: The Favourite icon is available in most pages within the Camms.Project product to add a page as a favourite for easy access under the 'Favourites' menu item.
Clicking the favourite icon will open the ‘Favourite’ popup window to enter the name of the page you want to add as a 'Favourite'.
You can view the list of favourite pages from the navigation menu under Menu > Favourites. Click on any of the listed menu items to navigate directly to the related section in the application.
4. Support Menu: The support menu will display the following options:
- About Us – Navigate to the Camms.Project About Us page with version details.
- Support – Navigate to the online support portal: CAMMS Online Support Portal
- User Guide – Access the latest Camms.Project user guide platform here.
5. Product Menu: Navigate to other Camms products activated for your organisation via this menu.
6. Main Menu: The main menu for Camms.Project will be displayed once you click on this icon to navigate within Camms.Project.
7. Profile image: Your image, name, designation, email, and number of alerts will be displayed in this menu item. Click the image menu to access the following options:
My Settings – Navigate to the 'My Settings' page.
Alerts – Navigate to the 'Chat Messaging Panel' page.
Sign Out – Click on this menu option to sign out from the Camms.Project web application.

- Project Main Menu – The main menu is now displayed in a clearer white background, making it more easy on the eyes.

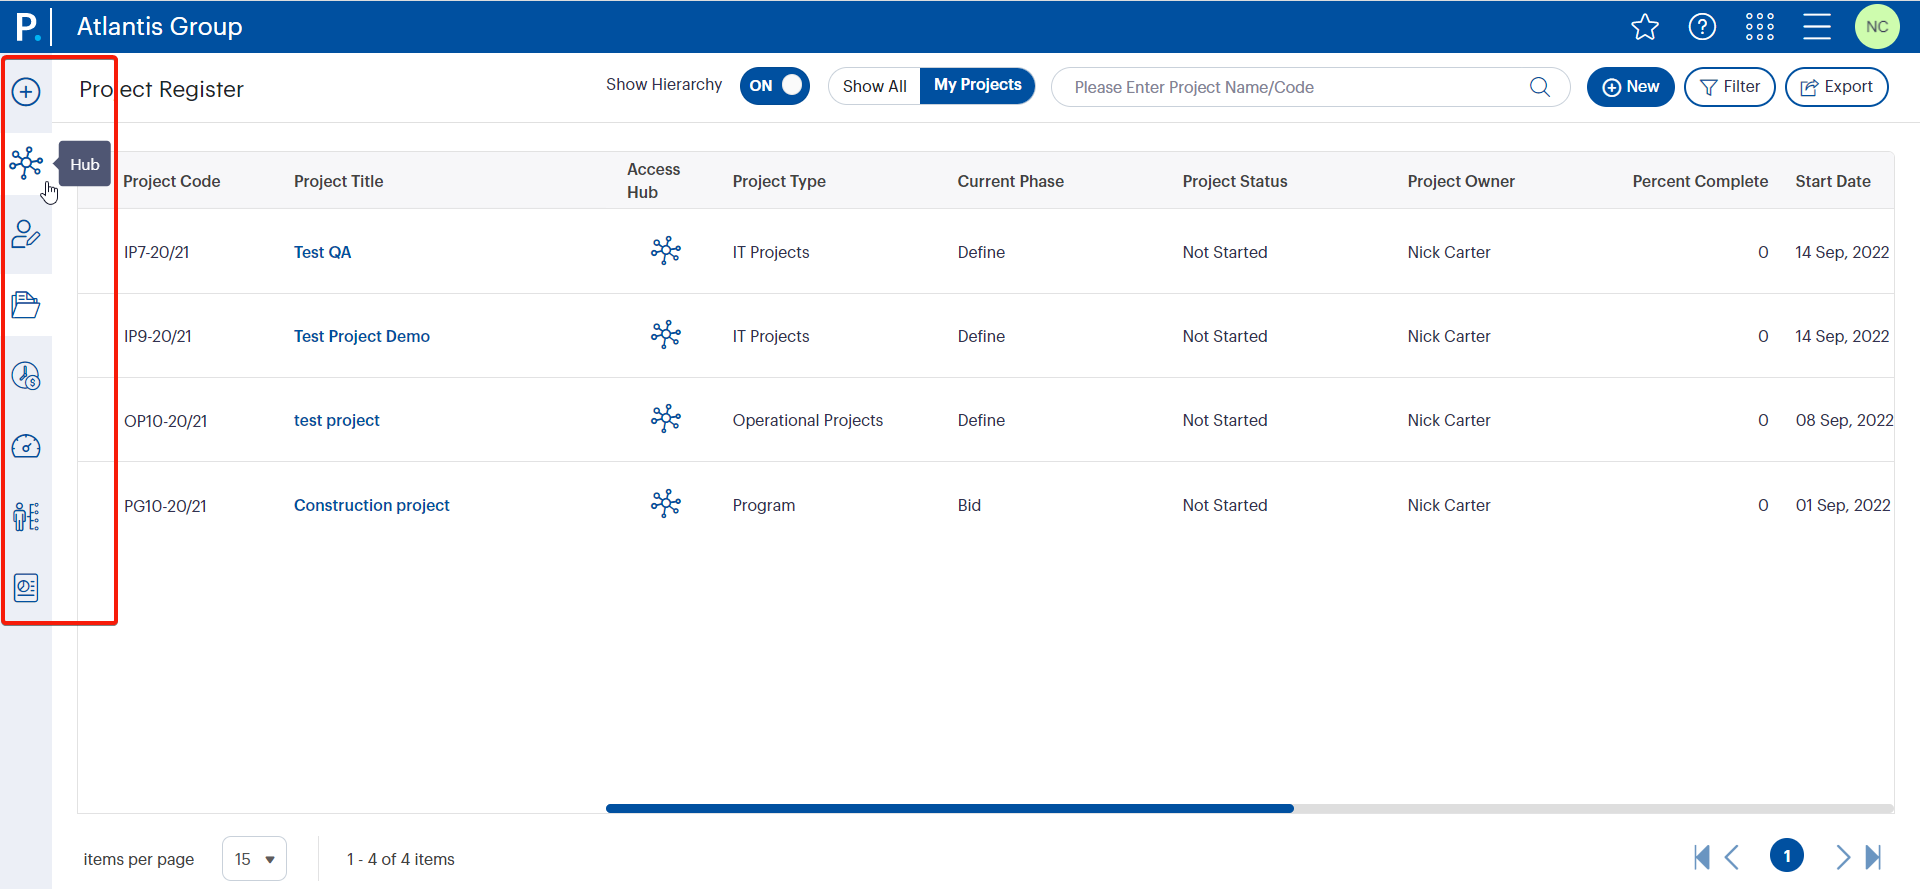
- Left-hand navigation panel – The quick access left-hand navigation panel has a revamped new look, along with completely new icons that make it easier to distinguish the different functionalities at a glance.
Note: An administrator can change the background colour of this panel under Menu > Framework > Project Settings > Client Details.
- Filters – Filter buttons placed at the top of the page will open a pulldown half window when clicked. This will let you select any details related to that page to be filtered once the 'Filter' button is clicked.
- When filter criteria have been applied and filtered, the colour of the filter icon changes to blue so that you know the page has already been filtered by some criteria.

- Page tab changes – The background colour of tabs are now changed to a clearer white colour, a prominent blue underline below tabs clearly indicates which tab you are on, and tabs stay frozen on top while scrolling down the page.

- Function buttons changes – Common function buttons at the top of a page are now converted into buttons with text and an icon, providing users with instant clarity on the purpose of each button.

- Improved pagination and page navigation – For pages with several records, at the bottom of the page, you can select the number of records to display in a single page using the bottom left panel, and in the bottom right panel, you can navigate to the first, previous, specific page number, next, and last pages.

- Success/Error popup messages – Success and error messages will be displayed clearly at the top of the page for a short while, prior to disappearing. Success messages will have a green icon in its message, error messages will have a red icon in its message, warning messages will have an orange icon in its message, and info messages will have a grey icon in its message.

- Improvements to tables – Several improvements have been done for tables displayed in the system:
- Headers stay frozen when you scroll down.
- The 'Add New' button is now at the top-right corner.

- The 'Add' and 'Edit' buttons will open a popup window to add/edit details. This will let you have more space to update details in the page.

- Input fields
- Numeric steppers – This will let you enter numbers manually (numbers only) and increase or decrease the value using arrow icons.

- Date Picker – To add today's date without keying in a value, you can now select a ‘Today’ link in the date picker.

- Numeric steppers – This will let you enter numbers manually (numbers only) and increase or decrease the value using arrow icons.
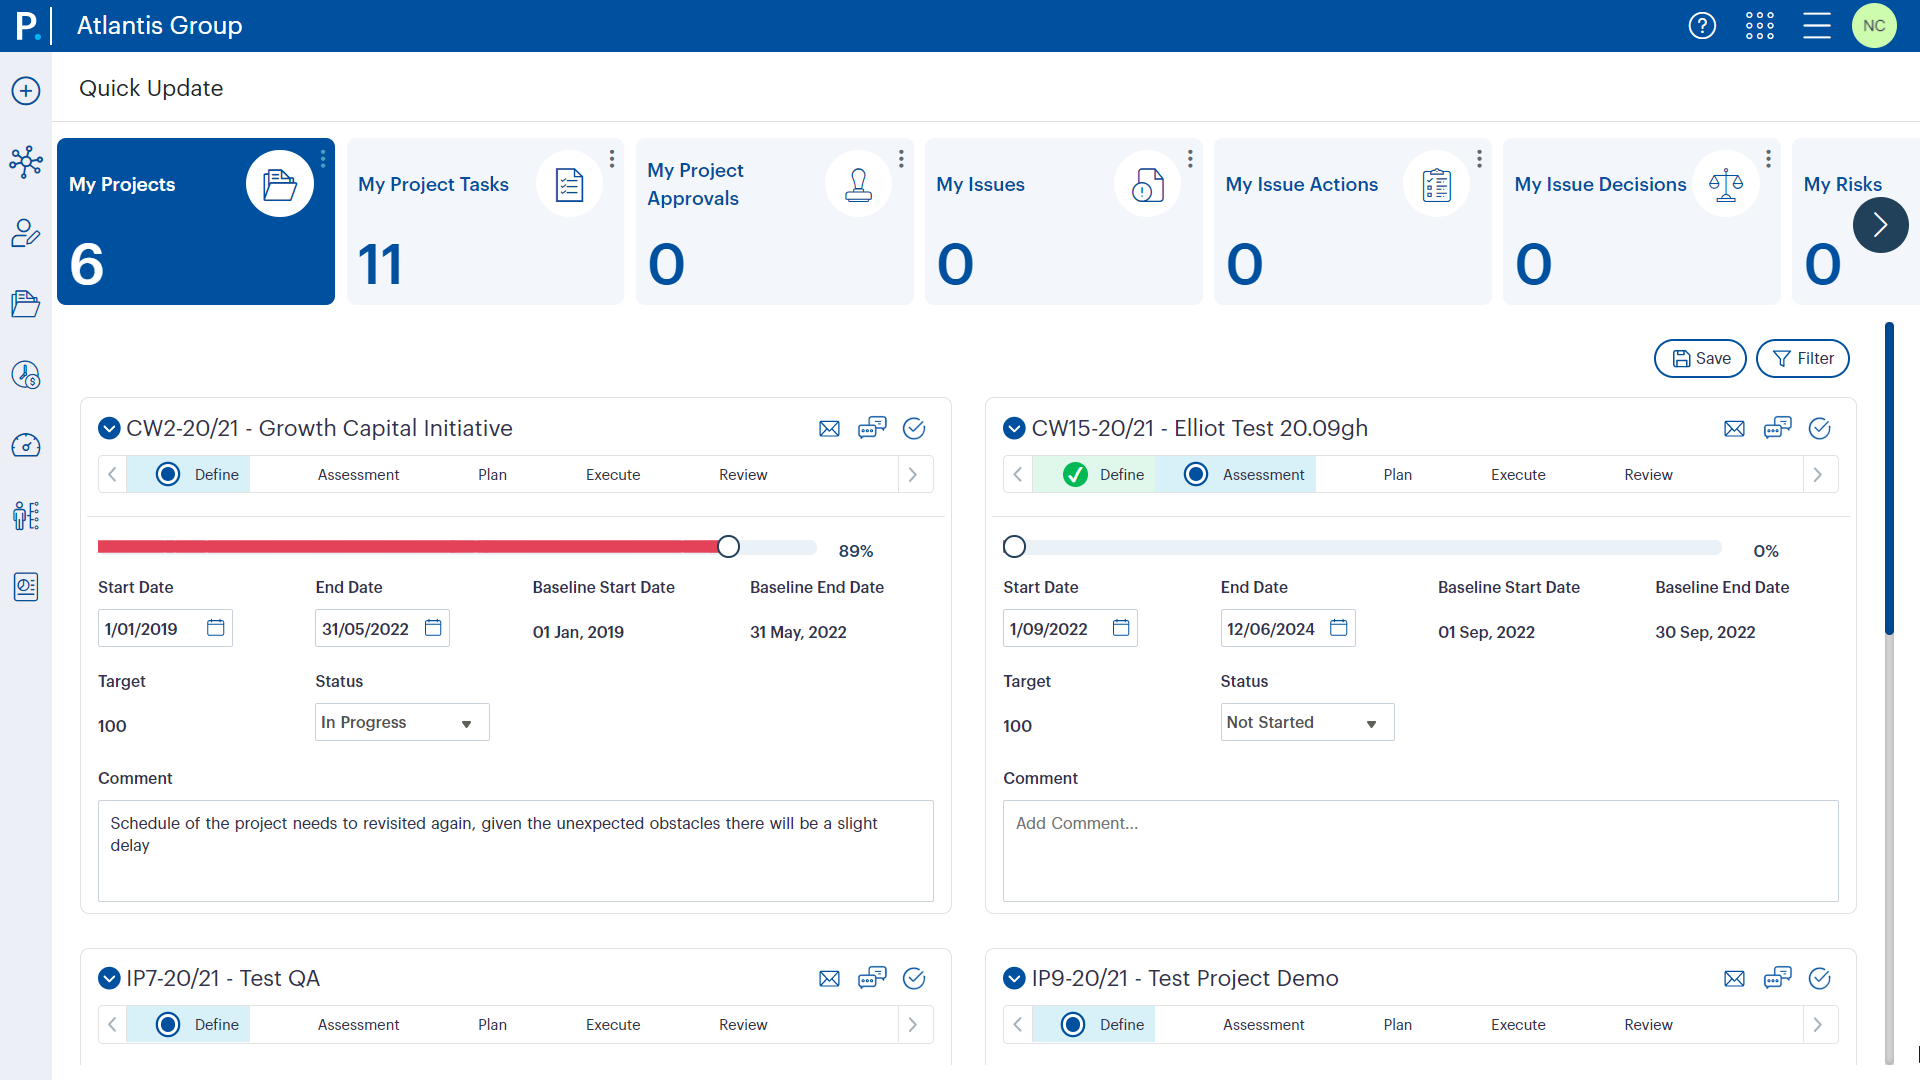
1.2 My Quick Update page interface enhancements
With the new interface enhancements to this feature, widgets will be displayed with summary details at the top of the Quick Update page, with the total number of Project updates, Project Task updates, Project Approval updates, and all other assigned responsibilities for the logged in user to take action upon, will be listed here. Additionally, Project Details will be listed one below the other with easier controls to update the respective projects.
- Widgets will be displayed at the top of the Quick Update page displaying the total number of responsibilities assigned for each responsibility type that your organisation has activated.
- The number displayed here, will represent the total number of items the logged in user is responsible for each responsibility type. However, if the details are filtered, then the number displayed here, will represent the filtered number of items the logged in user is responsible for.
Notes:
|
1.2.1 Updating Project Details
To update a project's details, scroll to the respective project or use the 'Filter' button to search the expected project, update details in each tab, and click the 'Save' button at the top-right corner of the page.
Note: The Project Tasks widgets are developed using the new technology and therefore, will have a significant improvement in performance when loading project details compared to other widgets. The technology will be upgraded in other widgets as well in a future release. |
1.2.2 Project Tasks widget
- The Project Task widget will receive a full technology upgrade, which in turn, you will experience a significant performance improvement.
- Two new columns ‘Project Name’ and ‘Parent Task Name’ will be introduced to the Project Task gird.
- Clicking the 'Project Task Title' will open the popup window for the Project Task within the same window.
- A new button 'more details' will be introduced against each Project Task. Clicking this button will open a popup window to view more details.
- Task Planning will be the default tab in the popup window, which will display the Gantt chart..
- Attachments, Email, and Discussion will be shown as tabs within the popup window.
- By dragging and dropping a column header to the top of the table, it will let you group the Project Tasks by the relevant column.
Note: By default, Project Tasks will be grouped by ‘Project Name’ and ‘Parent Task Name’. - You will be able to sort the Project Tasks by clicking on the column headers in the Project Task grid.
- The filter icon will be displayed in blue colour when there are active filters, making it easier to identify at a glance.
- You will be able to configure the number of records visible within the Project Task grid per page, using the dropdown at the bottom left corner.
- You will be able to navigate between the pages, using the buttons at the bottom right corner.
1.3 Project Hub interface enhancements
- The Project Hub will now display a clean and clear filter with more details to filter projects. When the filter icon is clicked, it will open a pulldown half window with a more spaced out view than the previous filter.
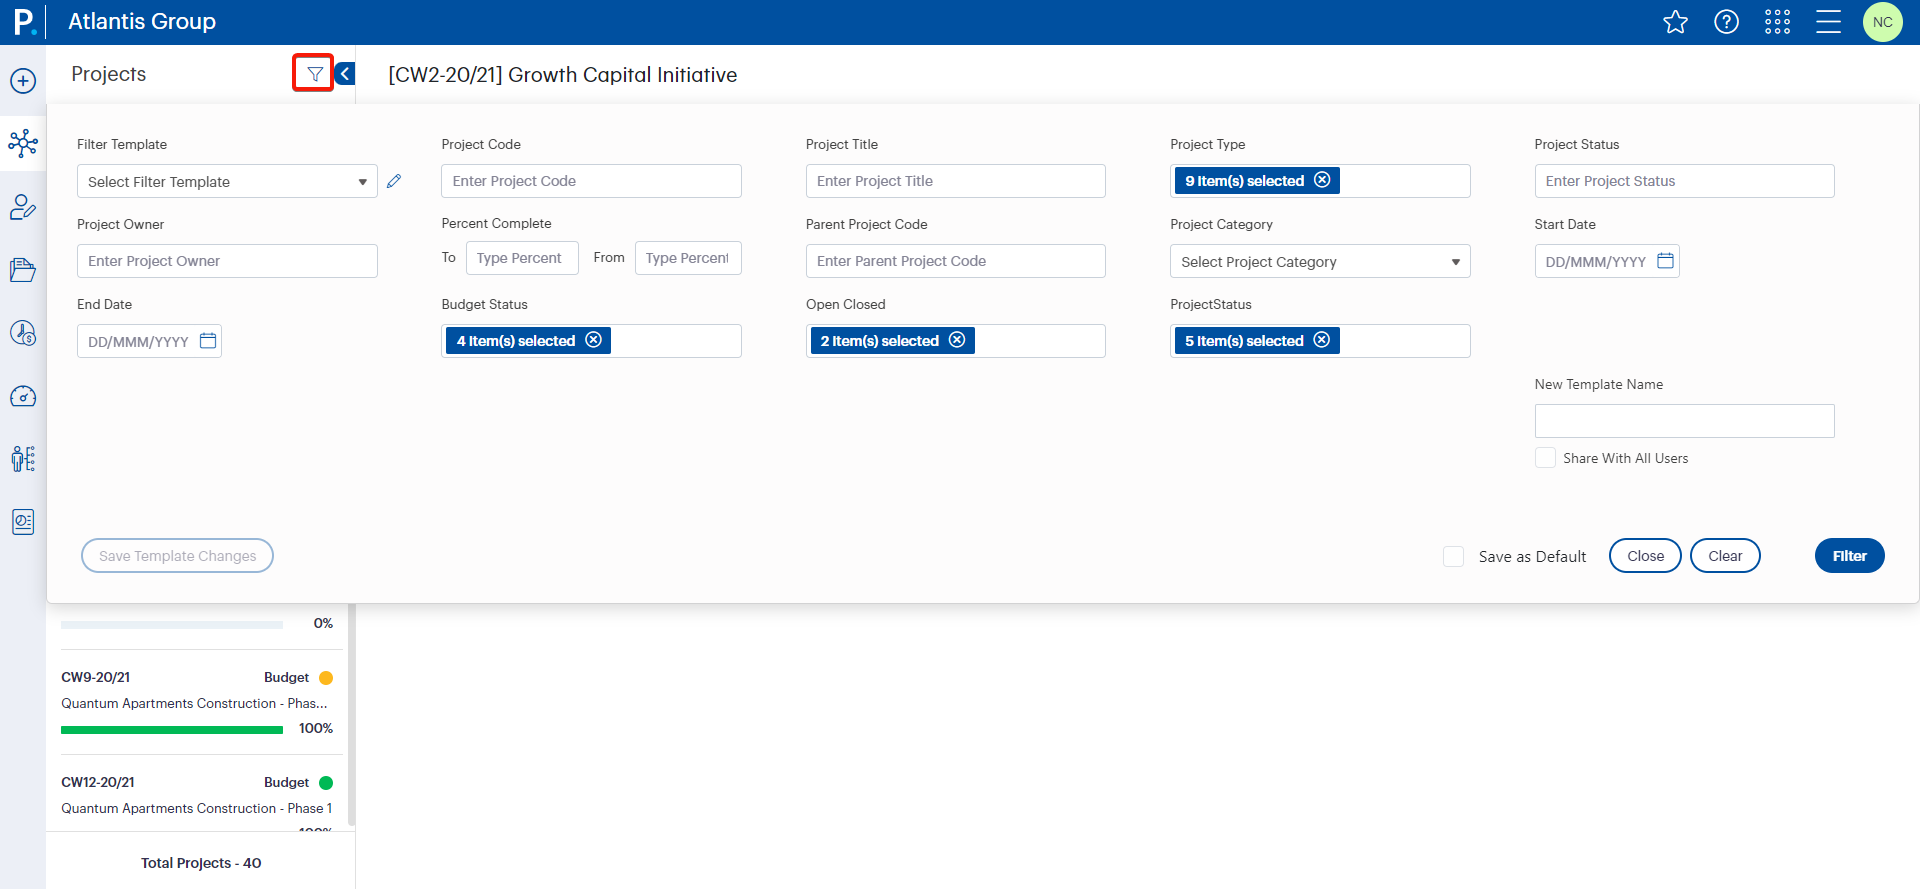
- The Project Hub will have a more compact and clearer view of all project details listed at the top of the page and will remain visible throughout, when accessing all project tabs..

1.4 Project Settings interface enhancements
- The Project Settings pages will now have a short description of what each Settings page does at the top of the page.
- The Settings pages now have been revamped to display more clearer and spaced function buttons, records displayed per page, page navigation, and tables.
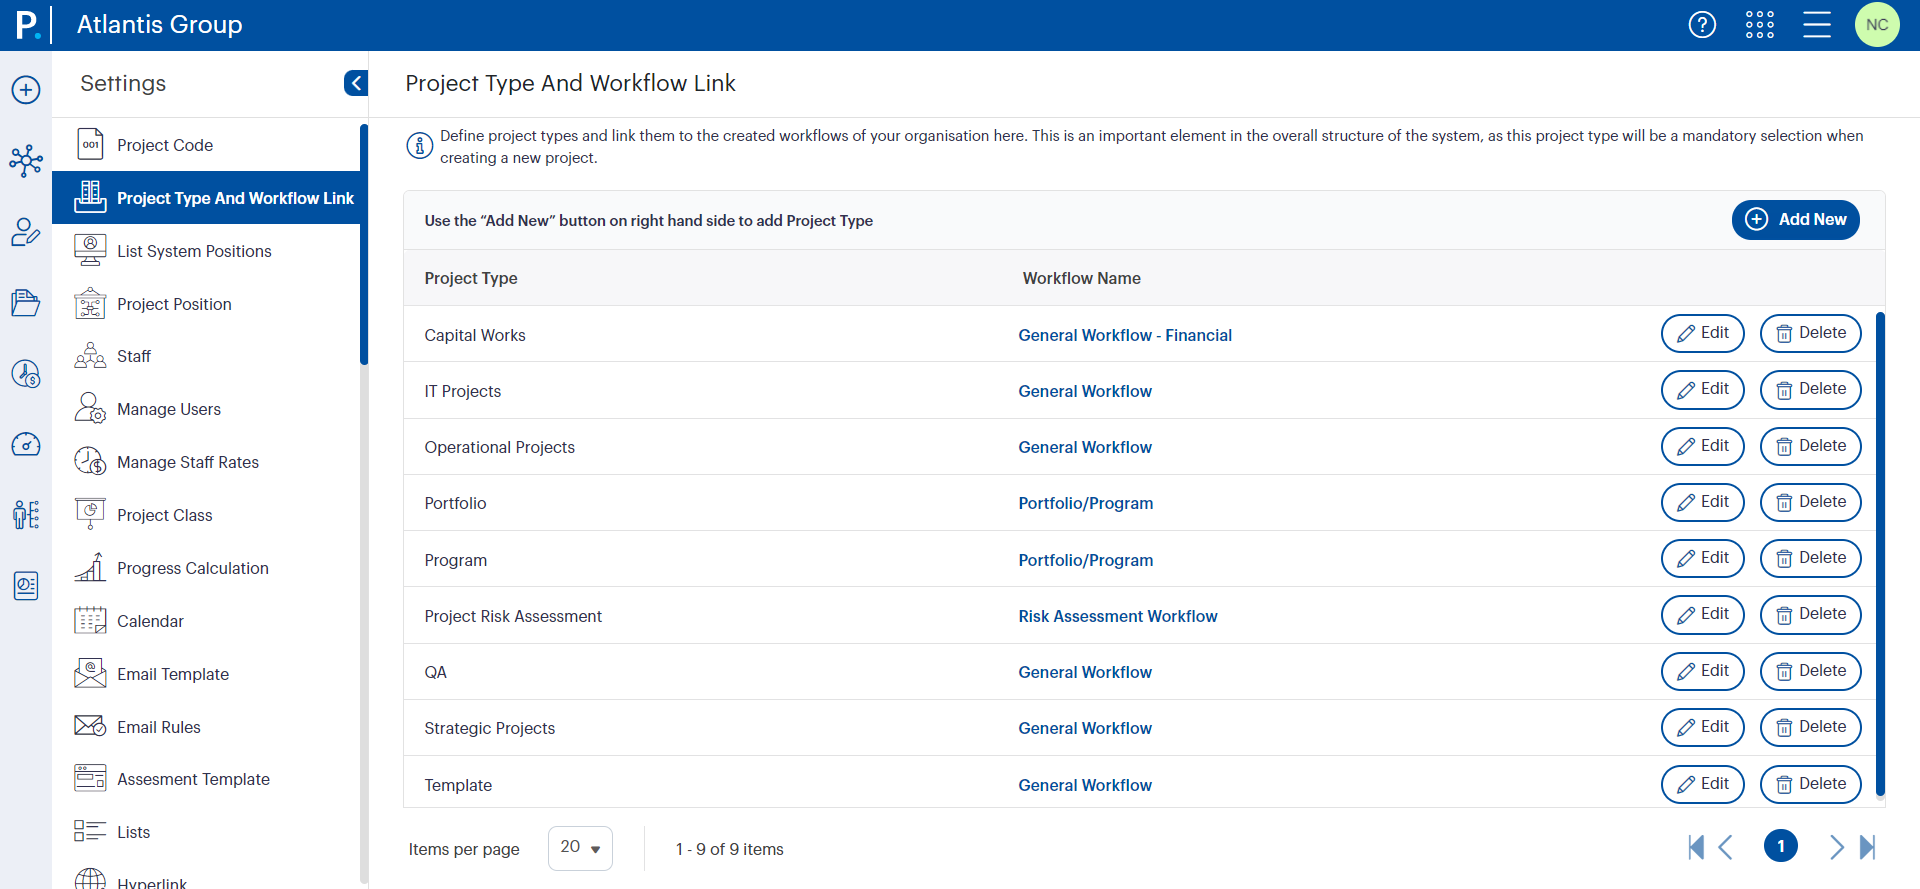
- More intuitive functions have been introduced in the Calendar and Progress Calculation Settings pages. See more details on this feature under item 7. Improvements in Project Settings pages.

1.5 Project Workflow interface enhancements
- A Project Workflow's phases and objects will now be denoted with a coloured icon in its left panel to easily identify its status or stage of the project. See more details on this feature under item 4. Enhanced individual project and object phases with status indicators in Project Workflows.

- Project Schedules in a Project's Workflow will now have a more detailed and easy to use Gantt Chart and Kanban Board with improvements in both the Gantt Chart and Kanban Board. See more details on this feature under item 3. Improvements in Tasks Planning and Scheduling in the Gantt Chart and Kanban Board.

1.6 Removal of unused button in an object phase in the Project Workflow
- The 'Add All' button under the Link to Portfolio/Link to Strategic Plan object phase in a Project Workflow has been removed as it is not commonly utilised.
- Previous window with the 'Add All' button:

- New window with the 'Add All' button removed:

1.7 Removal of the spell checker functionality in pages
- The spell checker functionality in Camms.Project has now been removed.
2. Improved Project Register functionality |
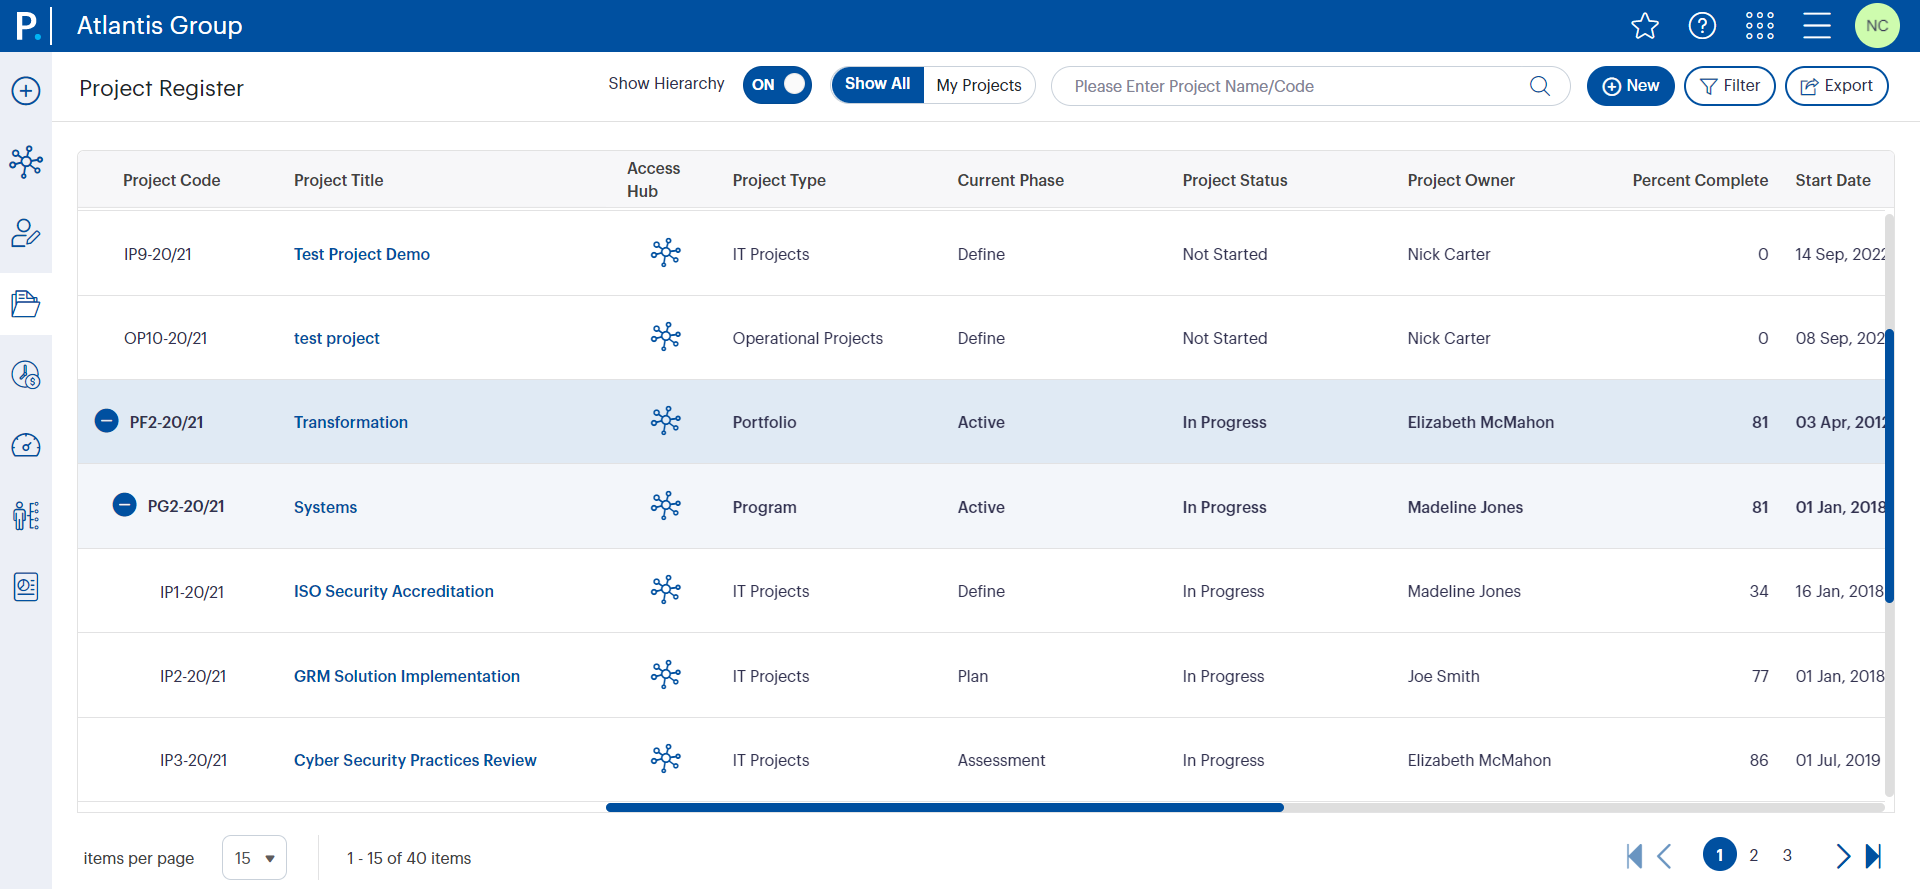
The Project Register has been revamped with new and improved features that will enhance your experience when using its functionality.
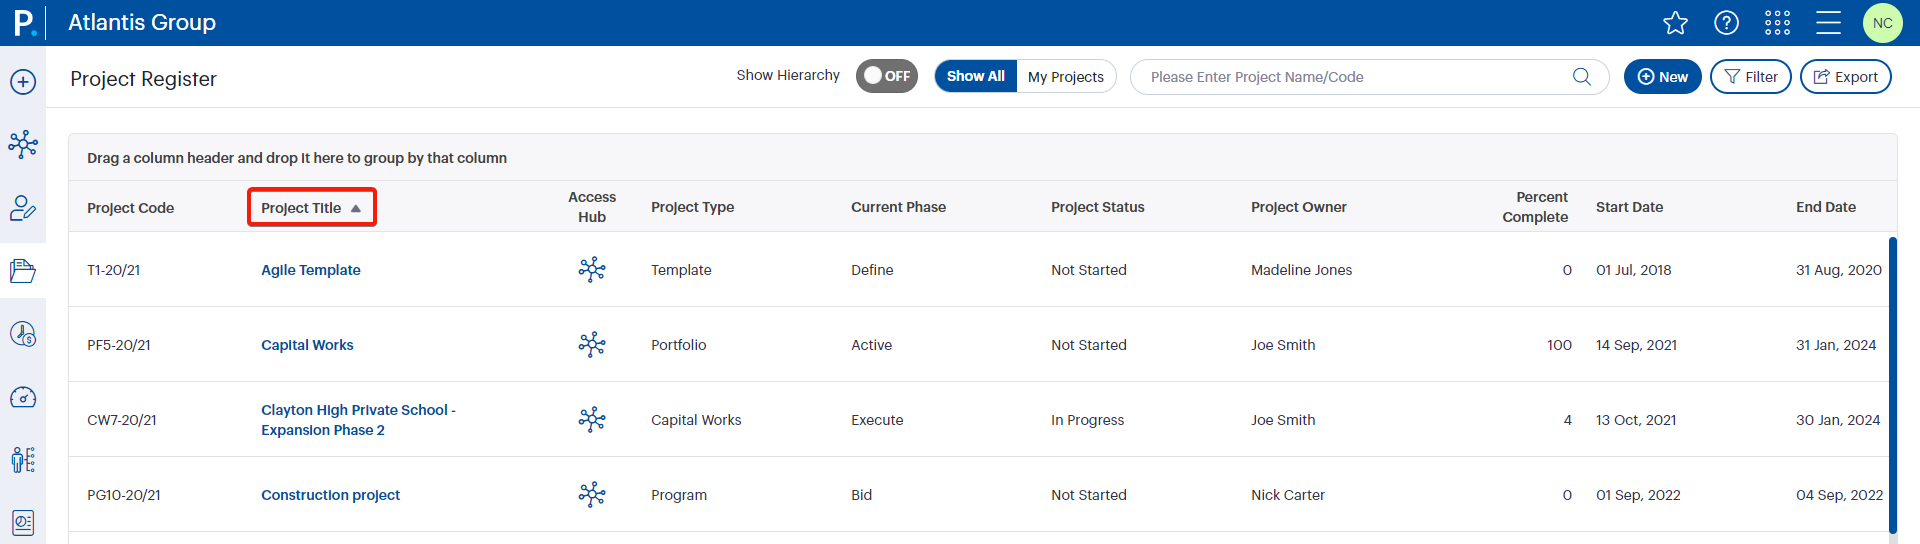
2.1 Freezing header row and columns
- The Project Register's header row and columns up to the 'Project Title' column, will be frozen when scrolling horizontally or vertically, for easier viewing purposes.

- The 'Project Title' is now hyperlinked as opposed to the 'Project Code', which will direct you to the relevant project.
2.2 Ability to view more project records in one page
- You can now select the number of projects to be displayed in the page under the ‘Items per page’ dropdown at the bottom. The default value is set to 15 records.

2.3 Enhancements to sorting and grouping functionalities
- When the Register is sorted or grouped by a column, it is now applied not only to the current page, but also to all pages of the Register.

2.4 Traffic light icons
- Traffic light icons will be used to denote a status of a project for a much clearer look-and-feel for quick identification of a project's status.
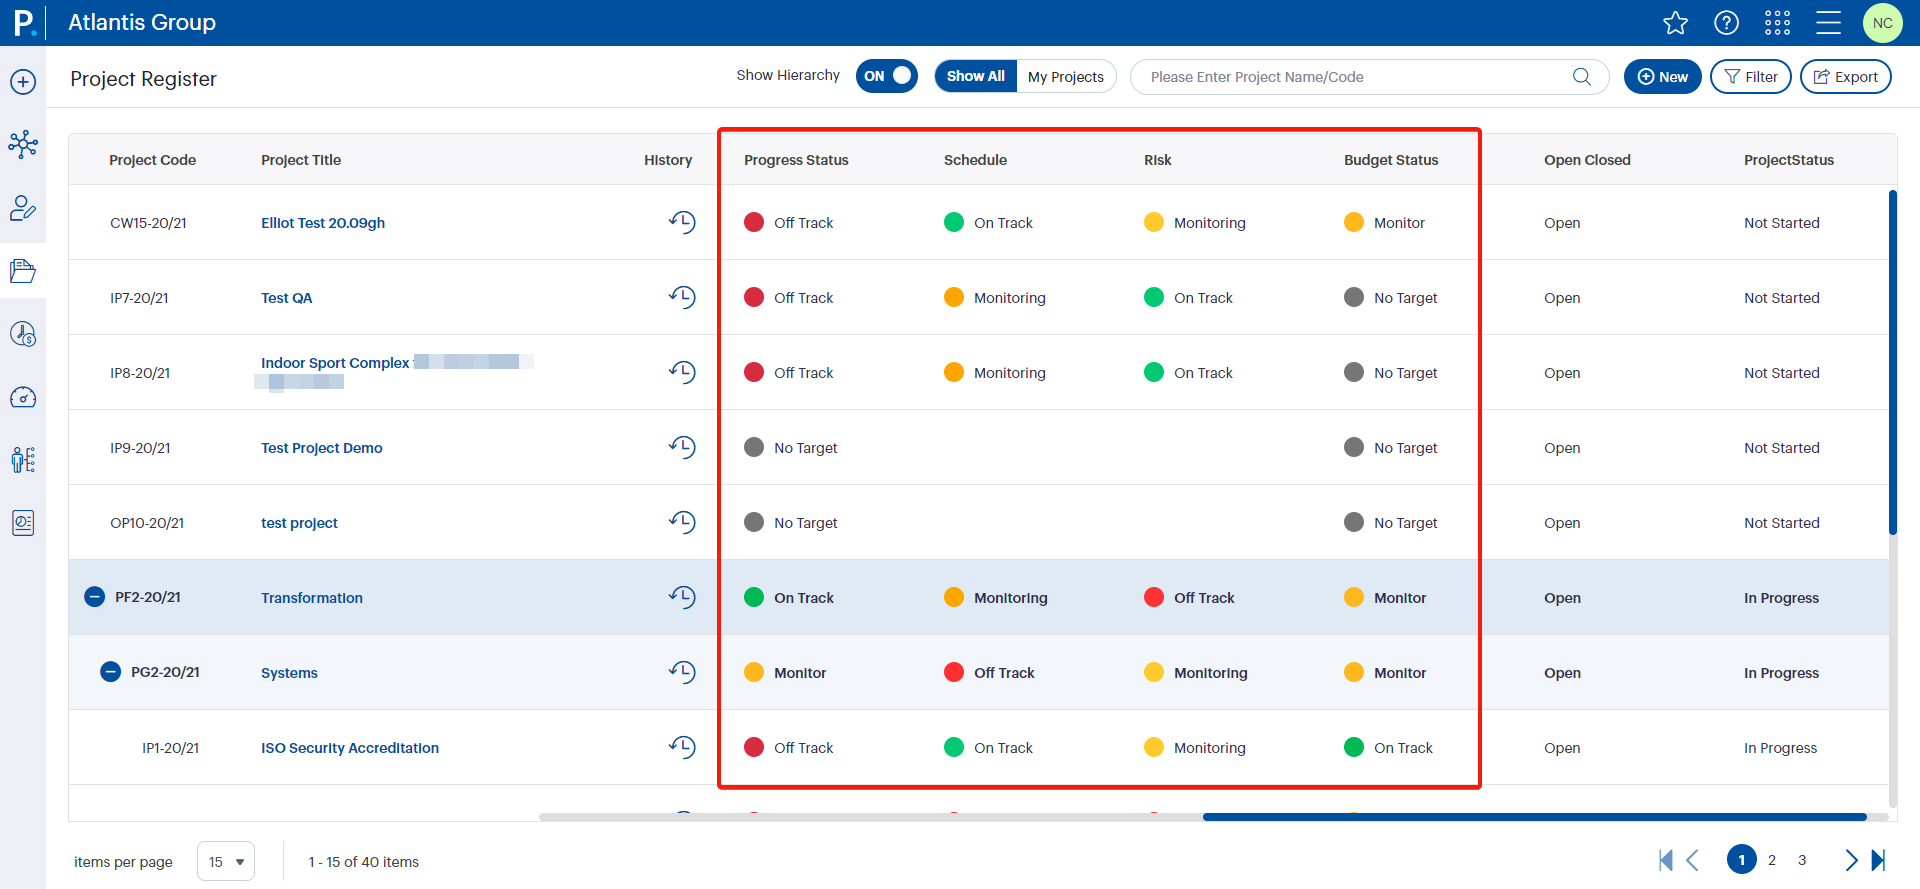
- Off Track statuses will be denoted with a red circle.
- Monitoring statuses will be denoted with an amber circle.
- On Track statuses will be denoted with a green circle.
- No Target statuses will be denoted with a grey circle.
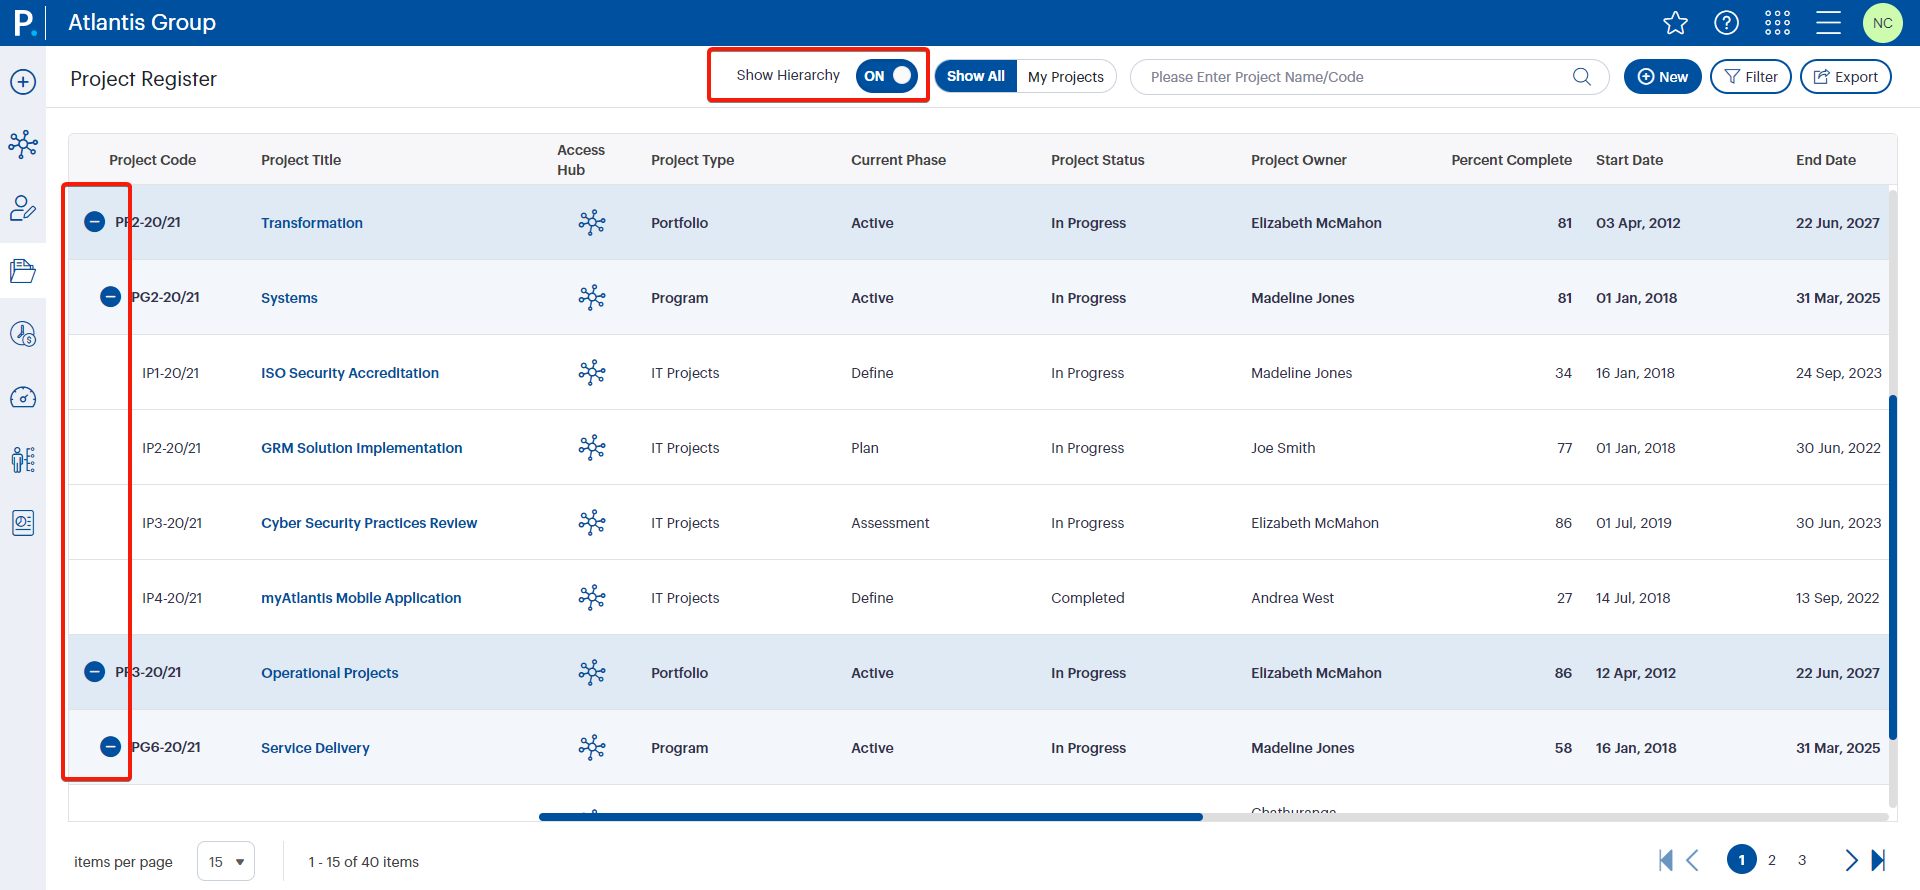
2.5 Hierarchy view
- The Portfolio Hierarchy View accessed via the ‘Show Hierarchy’ toggle in the Register, will now have a much clearer view of the Portfolio Hierarchy, with different colours and indentations for different levels of the hierarchy. This will enable you to easily identify how projects are grouped.
2.6 Exporting register
- The Project Register can be exported to a Microsoft Excel or a PDF by clicking on the ‘export’ icon in the toolbar.

- Excel – Will consist of all columns that have been made visible in the register.
- PDF – Will consist of only the first 10 columns.
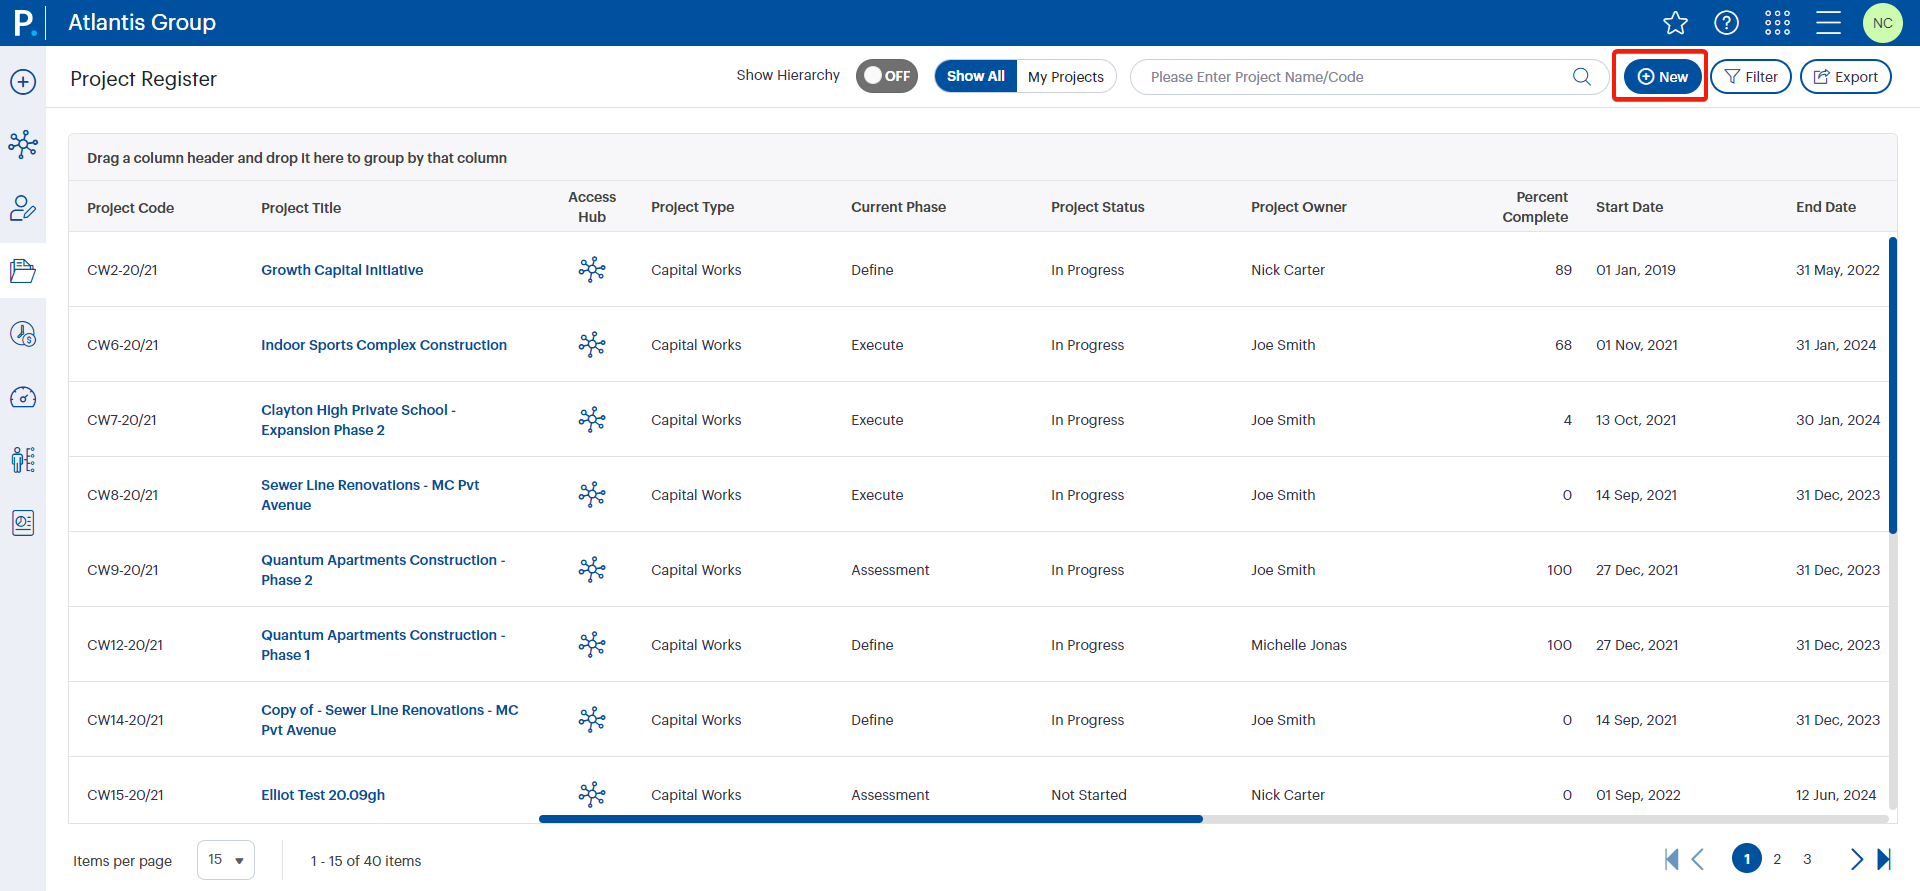
2.7 Create new projects via the Project Register
- You can now Create New Projects from the Register by clicking on the ‘New’ button in the toolbar, if the required permissions allow you to do so.
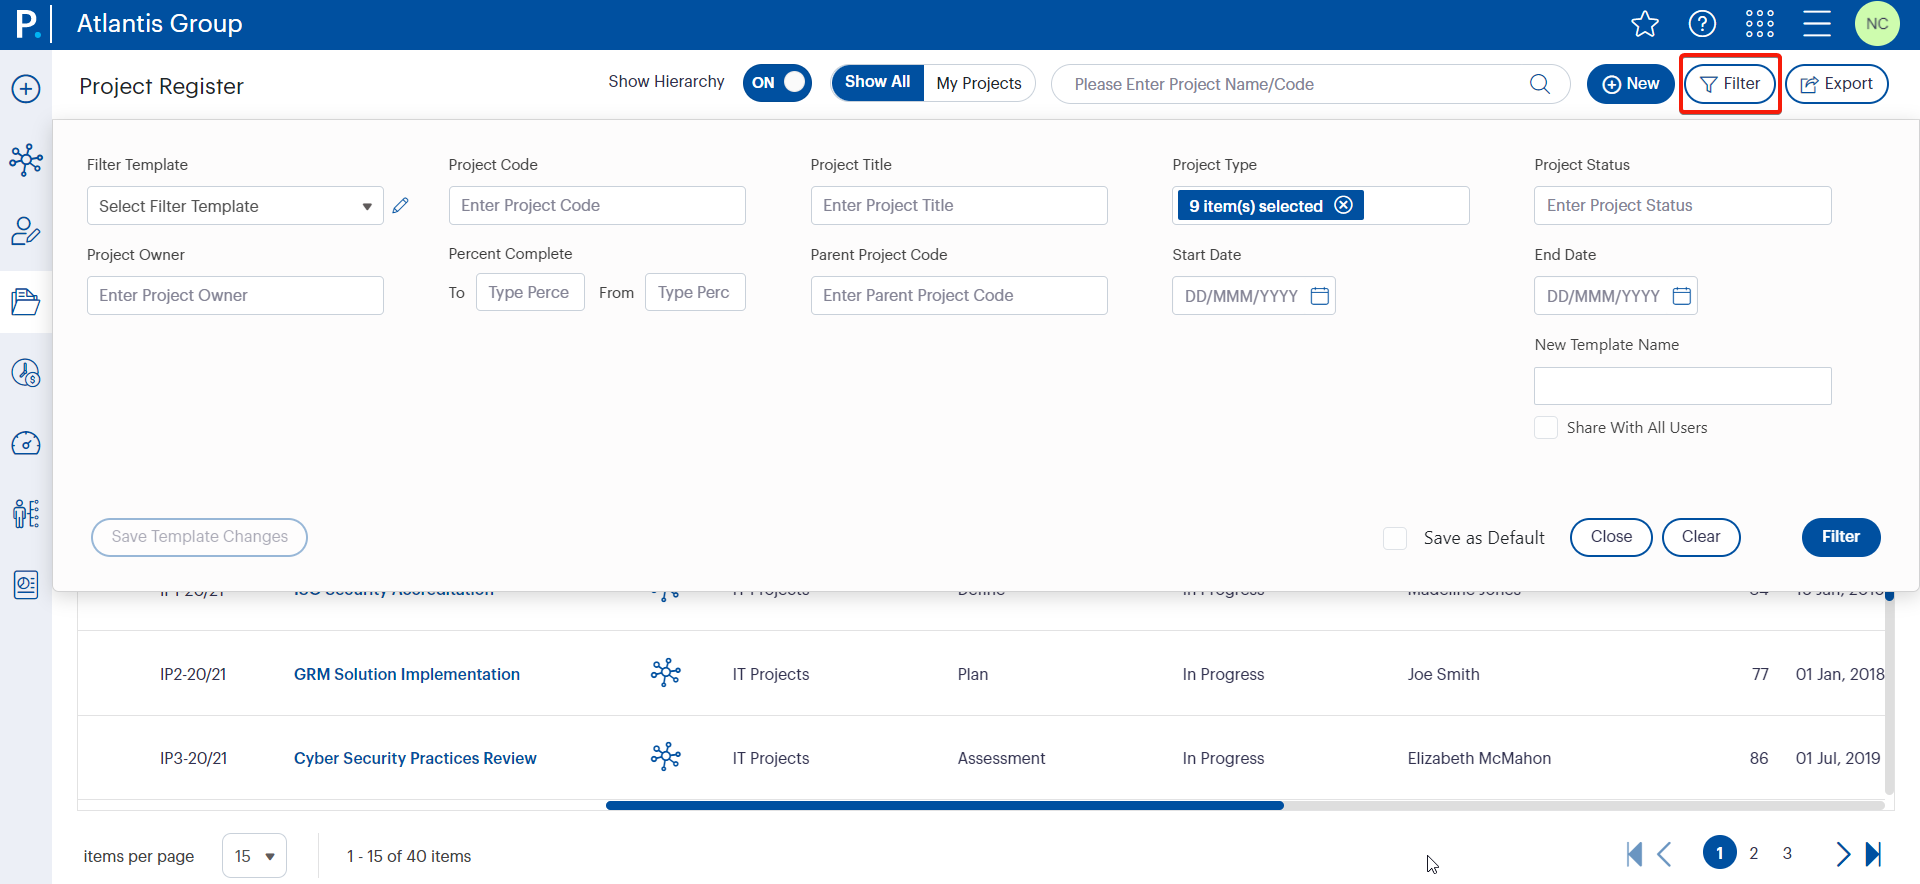
2.8 Register filters
- You can now view filters according to the sequence setup via Project Settings by an Admin user: Filters will be displayed in the order which it has been configured by an Admin, under the 'Project Register View' page.

- The following new filters will be available:
- Project Status – This filter is now a multi-select dropdown, which will enable you to filter projects by multiple statuses at once.
- Progress Status – A new multi-select dropdown filter, which will let you filter projects by its 'Progress Status'.
- Budget Status – A new multi-select dropdown filter, which will let you filter projects by its 'Budget Status'.
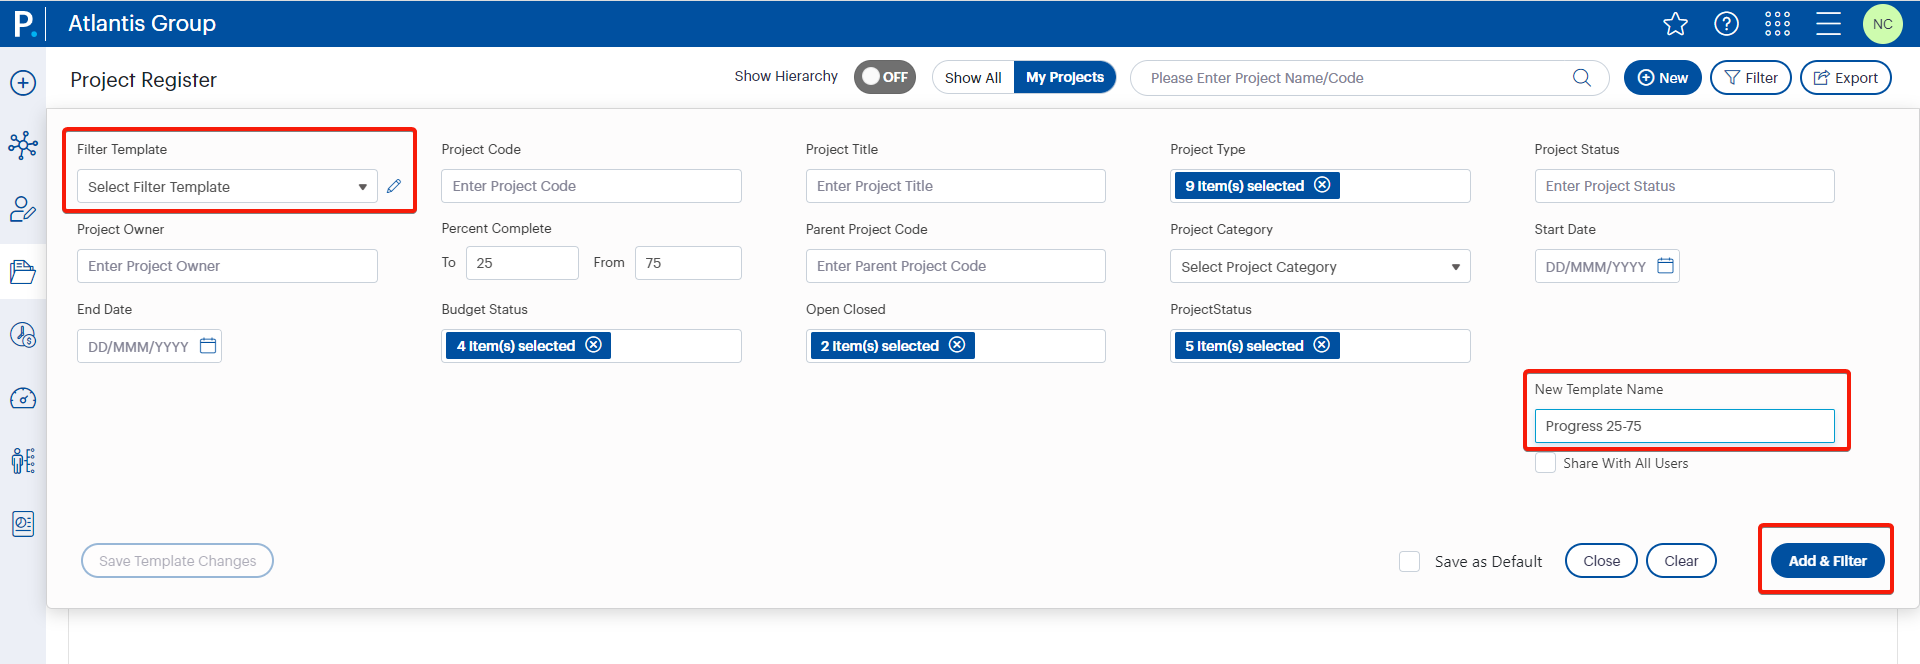
- Create filter templates – You can now save filter criteria as a filter template which can be reused later to filter the Project Register without having to select filter criteria repeatedly.

- Once the required filter criteria are selected and the 'Filter Template' dropdown is set to ‘Select Filter Template’, enter a name for the template within the 'New Template Name' text box.
- Click the 'Add & Filter’ button to create the new template, and it will be displayed within the ‘Filter Template’ dropdown once created.
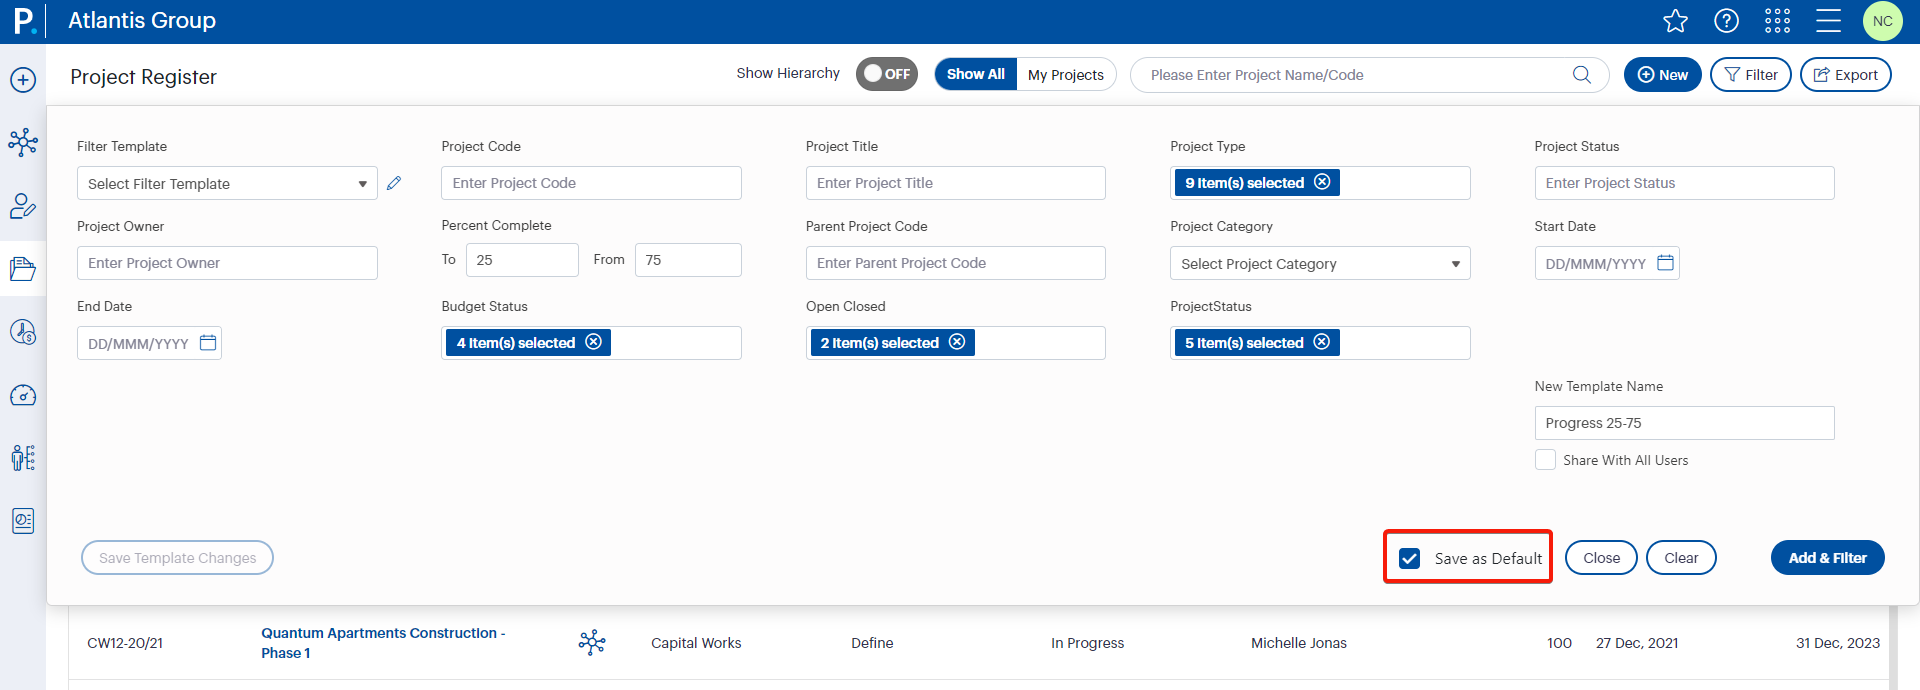
- Create a default filter template – Default filter template selection is optional. Hence, you can click the ‘Save as Default’ tick box if you want to set the created template as the default filter template of your register.
- Edit existing filter templates:
- You can edit the name of the filter templates you created and set them as your default template by clicking the 'edit' icon in front of the 'Filter Template' dropdown.
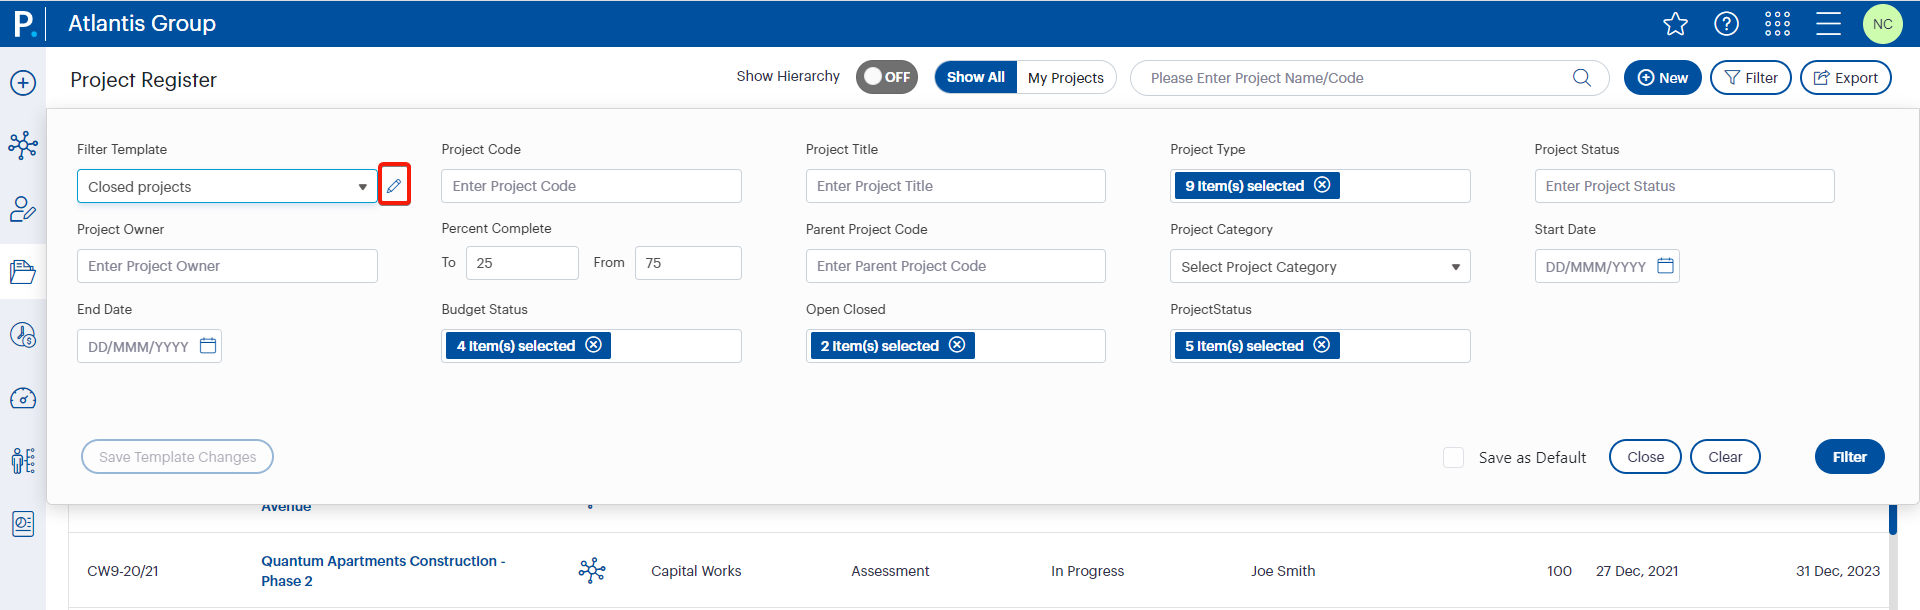
- This will list down all filter templates created with options to edit and delete. Once the changes are made, click on 'Save'.

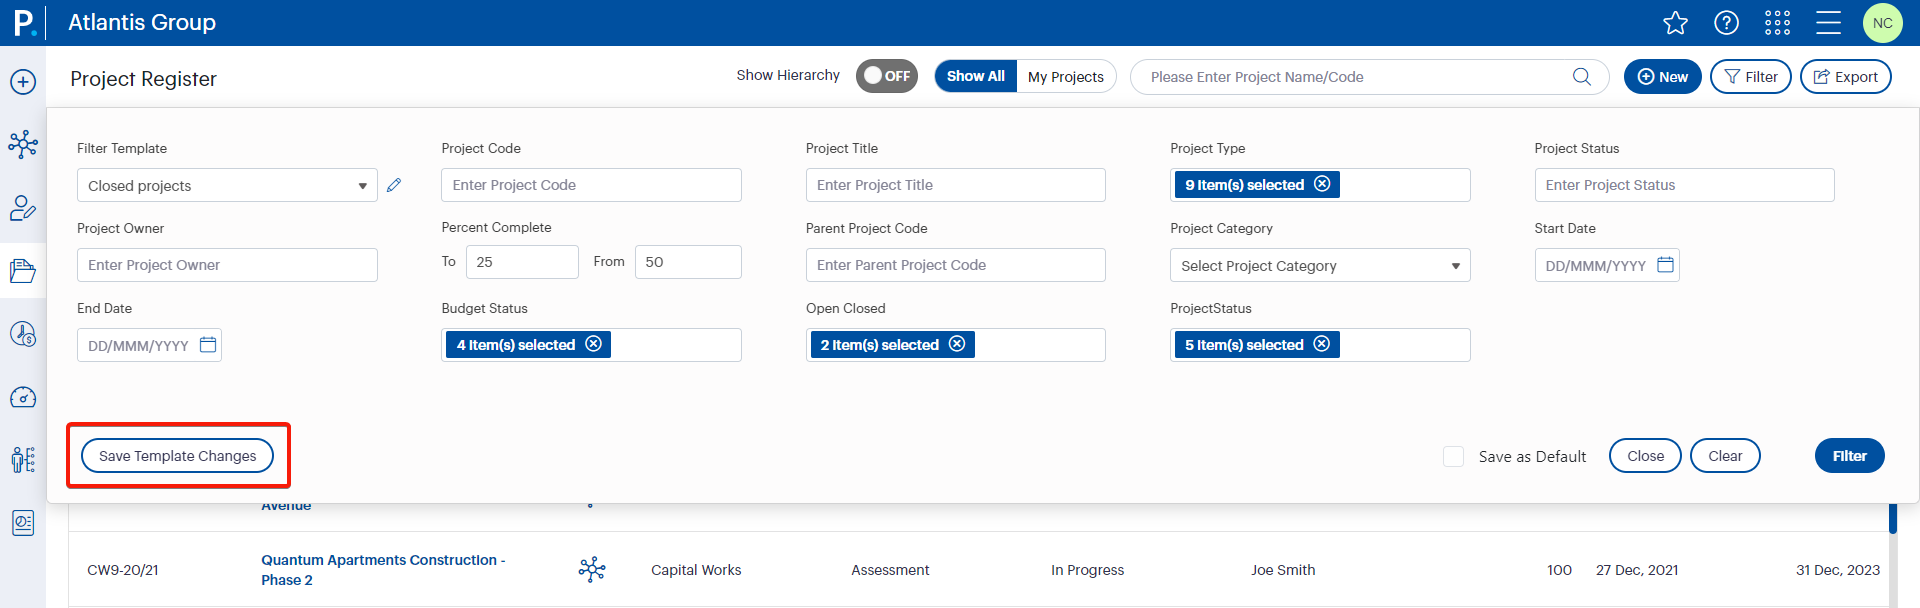
- To change the filter criteria selected in your filter templates, you can select the respective template from the 'Filter Template' dropdown, make the necessary changes to its filter criteria, and click on the ‘Save Template Changes’ button at the bottom.
- You can edit the name of the filter templates you created and set them as your default template by clicking the 'edit' icon in front of the 'Filter Template' dropdown.
- Delete filter templates:
- The created filter templates can be deleted by clicking the 'edit' icon in front of the 'Filter Template' dropdown and selecting the 'Delete' button in the popup.
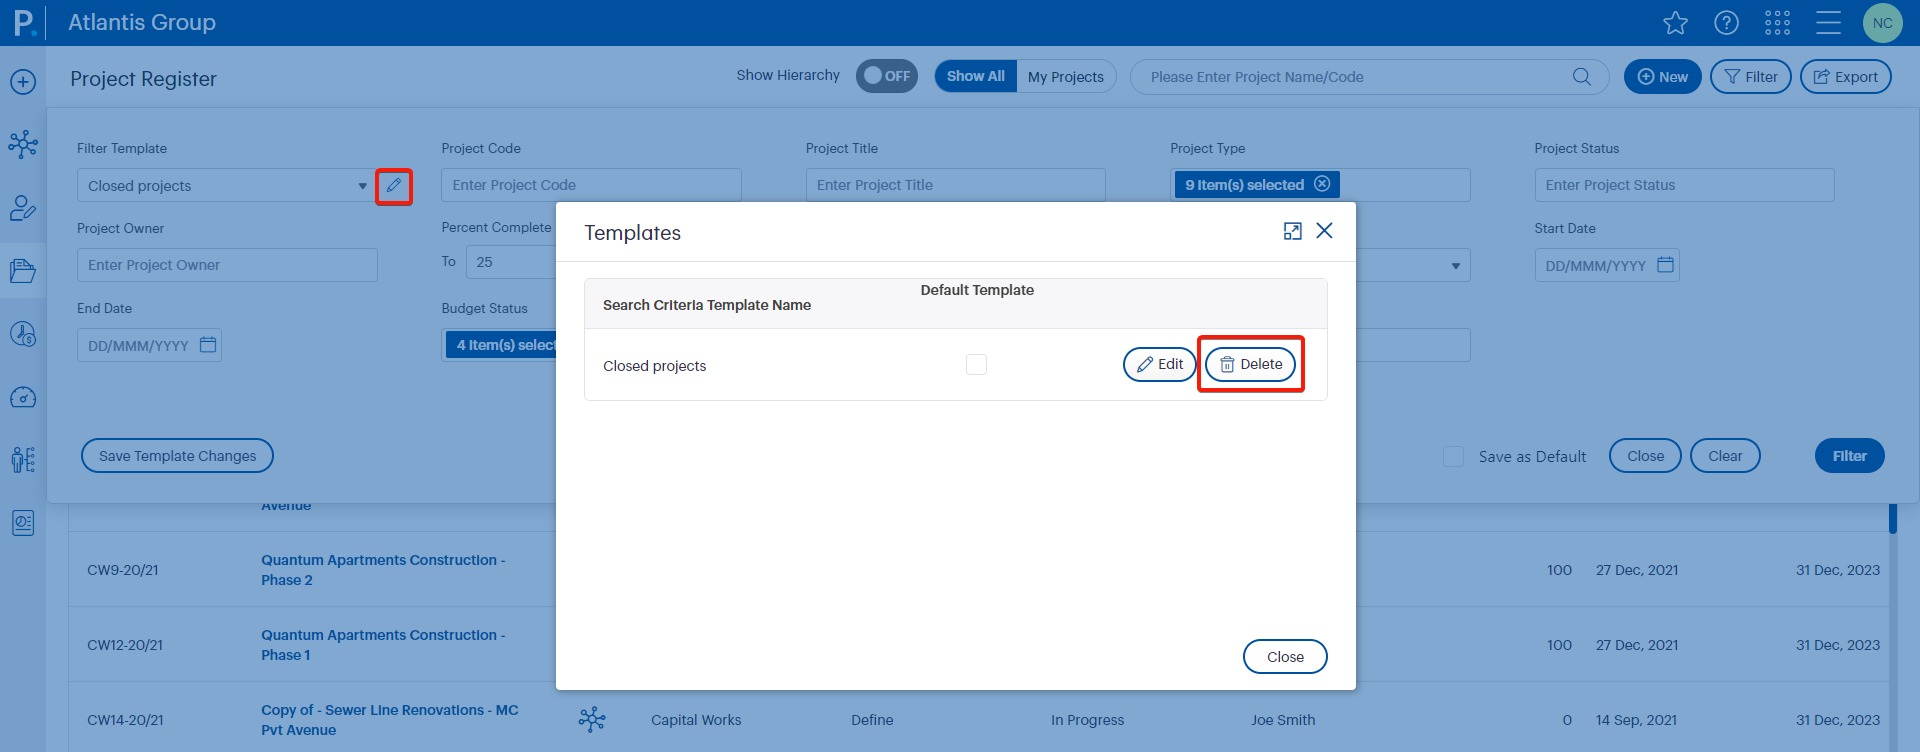
- Since having a default filter template is now optional, you can delete the default template, if needed.
- The created filter templates can be deleted by clicking the 'edit' icon in front of the 'Filter Template' dropdown and selecting the 'Delete' button in the popup.
- Share filter templates with users – Admin users can share filter templates created with other users, letting them utilise the same templates without having to create them from scratch.
- When a new filter template is created, admin users can share it with other users by clicking on the ‘Share With All Users’ tick box. Once the template is created, it will be available under the ‘Filter Template’ dropdown for all users. However, they will not be able to make any changes to the shared templates or delete them.

- If an Admin user makes a template the Default Template when creating/sharing the template, that template will still be shared with all users. However, it will not be the Default Template for other users.
- If an Admin user makes any changes to a shared filter template, those changes will reflect on the respective template of other users.
- If an Admin user deletes a shared template, it will be removed from ‘Filter Template’ dropdown for other users as well.
- When a new filter template is created, admin users can share it with other users by clicking on the ‘Share With All Users’ tick box. Once the template is created, it will be available under the ‘Filter Template’ dropdown for all users. However, they will not be able to make any changes to the shared templates or delete them.
- Closing filter – To close the register filter, click on the 'Close' button.

3. Improvements in Tasks Planning and Scheduling in the Gantt Chart and Kanban Board |
3.1 Improvements to the Gantt Chart
3.1.1 Moving Gantt items using the 3-dot icon
- You can now easily move tasks to the desired position in the Gantt chart by using the 3-dot icon adjacent to the relevant task.

- The system will clearly show where you will be dropping the task on to, i.e., whether you will be dropping the task in between tasks, or on top of a task; thus making it easier for you to check if you are dropping the task in the right location.

3.1.2 Performance of the chart indicated in green or red in the Chart View
- You can now easily view the performance of each task at a glance whilst in the Chart View. The tasks in the Chart View will be coloured in red, amber, and green depending on its performance.

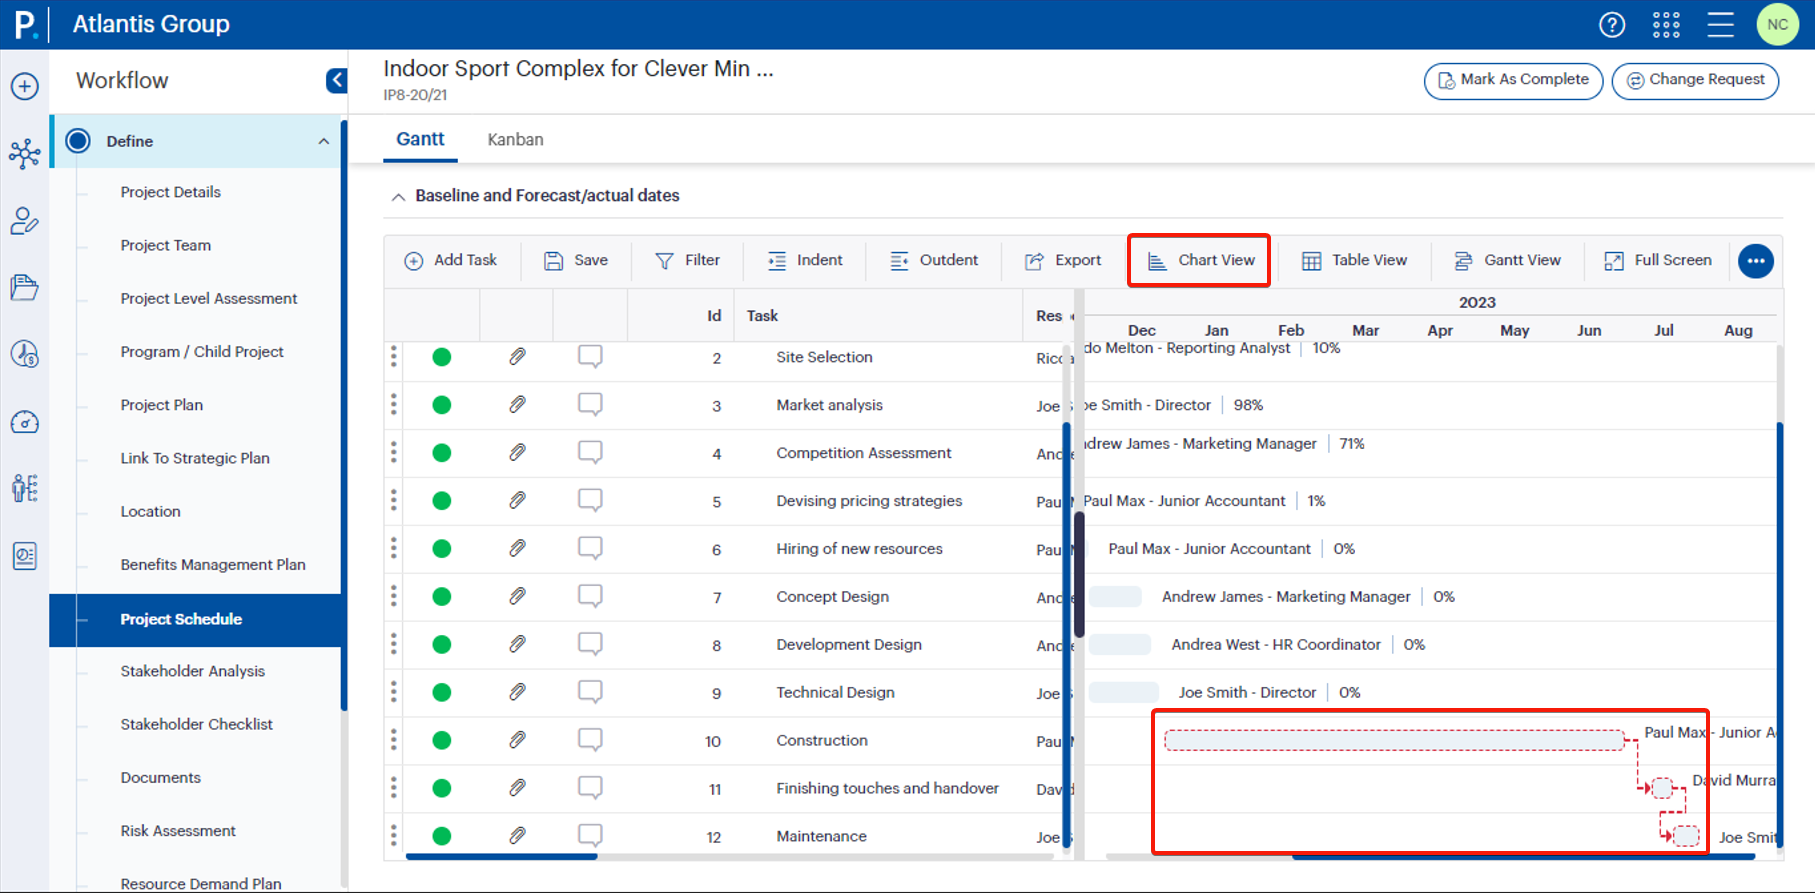
3.1.3 Critical tasks will be highlighted in the Chart View with a red dotted line
- You can now easily identify the tasks that are in the critical path by the red dotted line around it in the Chart View.
3.1.4 Easily access the Task Properties popup whilst in the Grid View
- You can now easily access the Task Properties window and update its constraints whilst in the Grid View.
- The Properties window will open when you right-click on a particular task and then select the Properties option from the menu that appears.

3.1.5 Converting a task into a milestone and milestone into a task
- To convert a task into a milestone, right-click on a task and click the 'Convert to milestone' option.

Note: You cannot change a task into a milestone by decreasing the duration to 0. - Similarly, to convert a milestone into a task, right-click on a milestone and click the 'Convert to normal task' option.

Note: Similarly, you cannot change a milestone to a task by increasing its duration.
3.2 Improvements to the Kanban Board
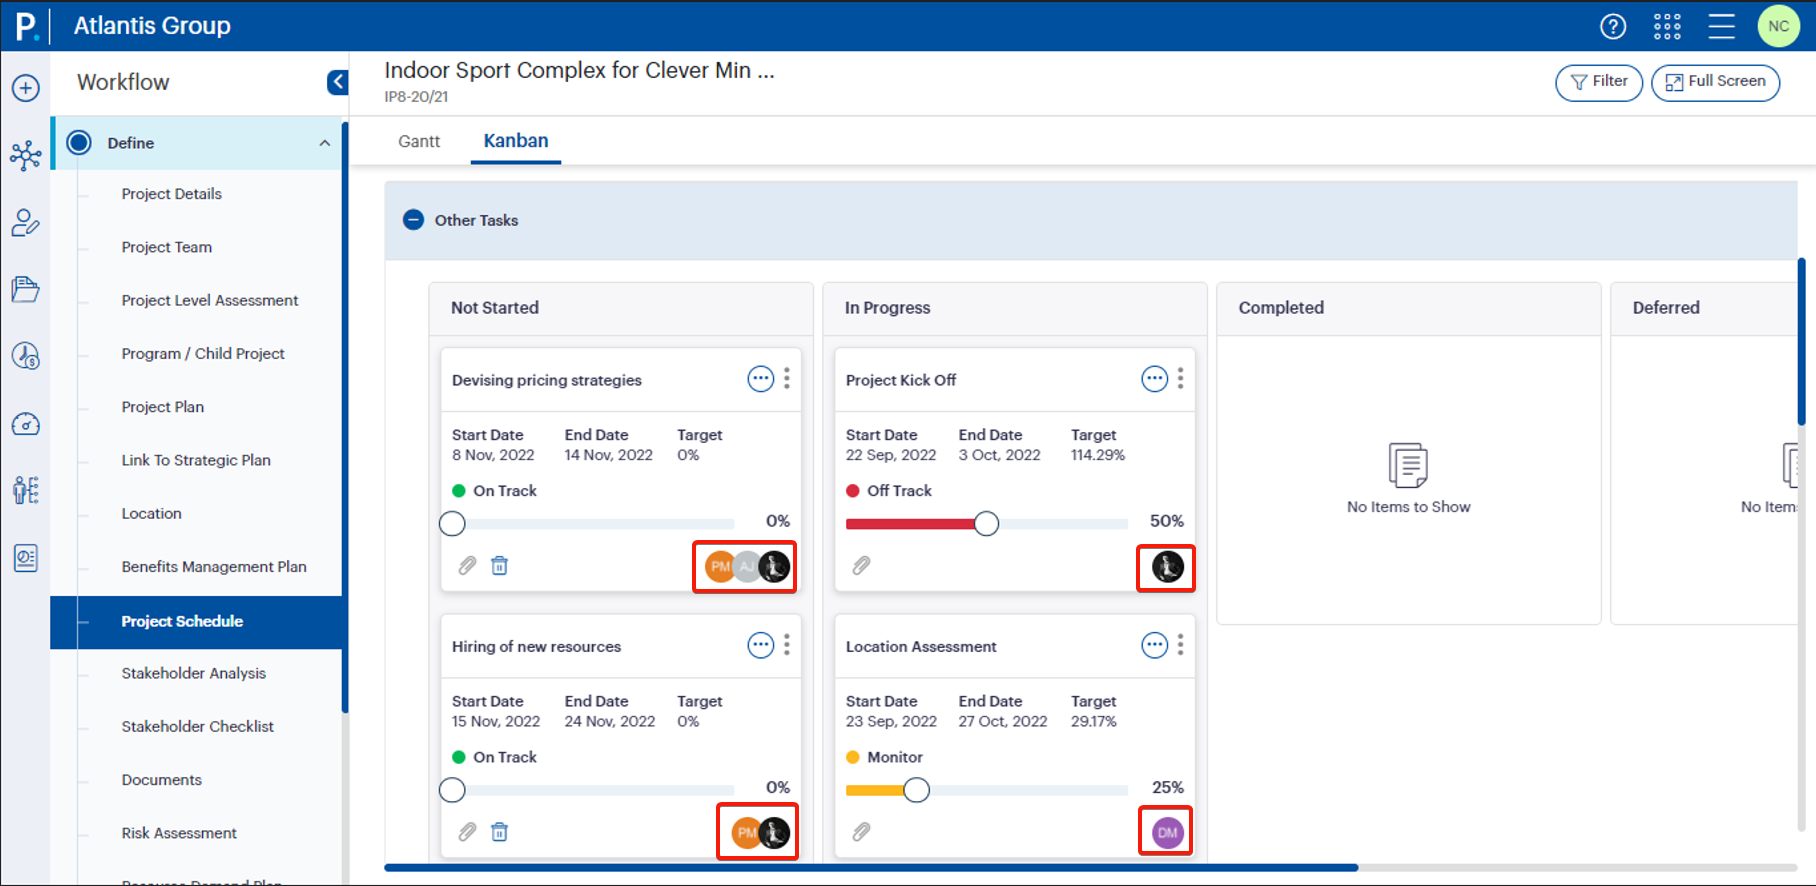
3.2.1 Task responsible persons will be displayed by their profile image
- The profile images of the Responsible Persons of tasks will now be displayed in the respective cards in the Kanban Board.
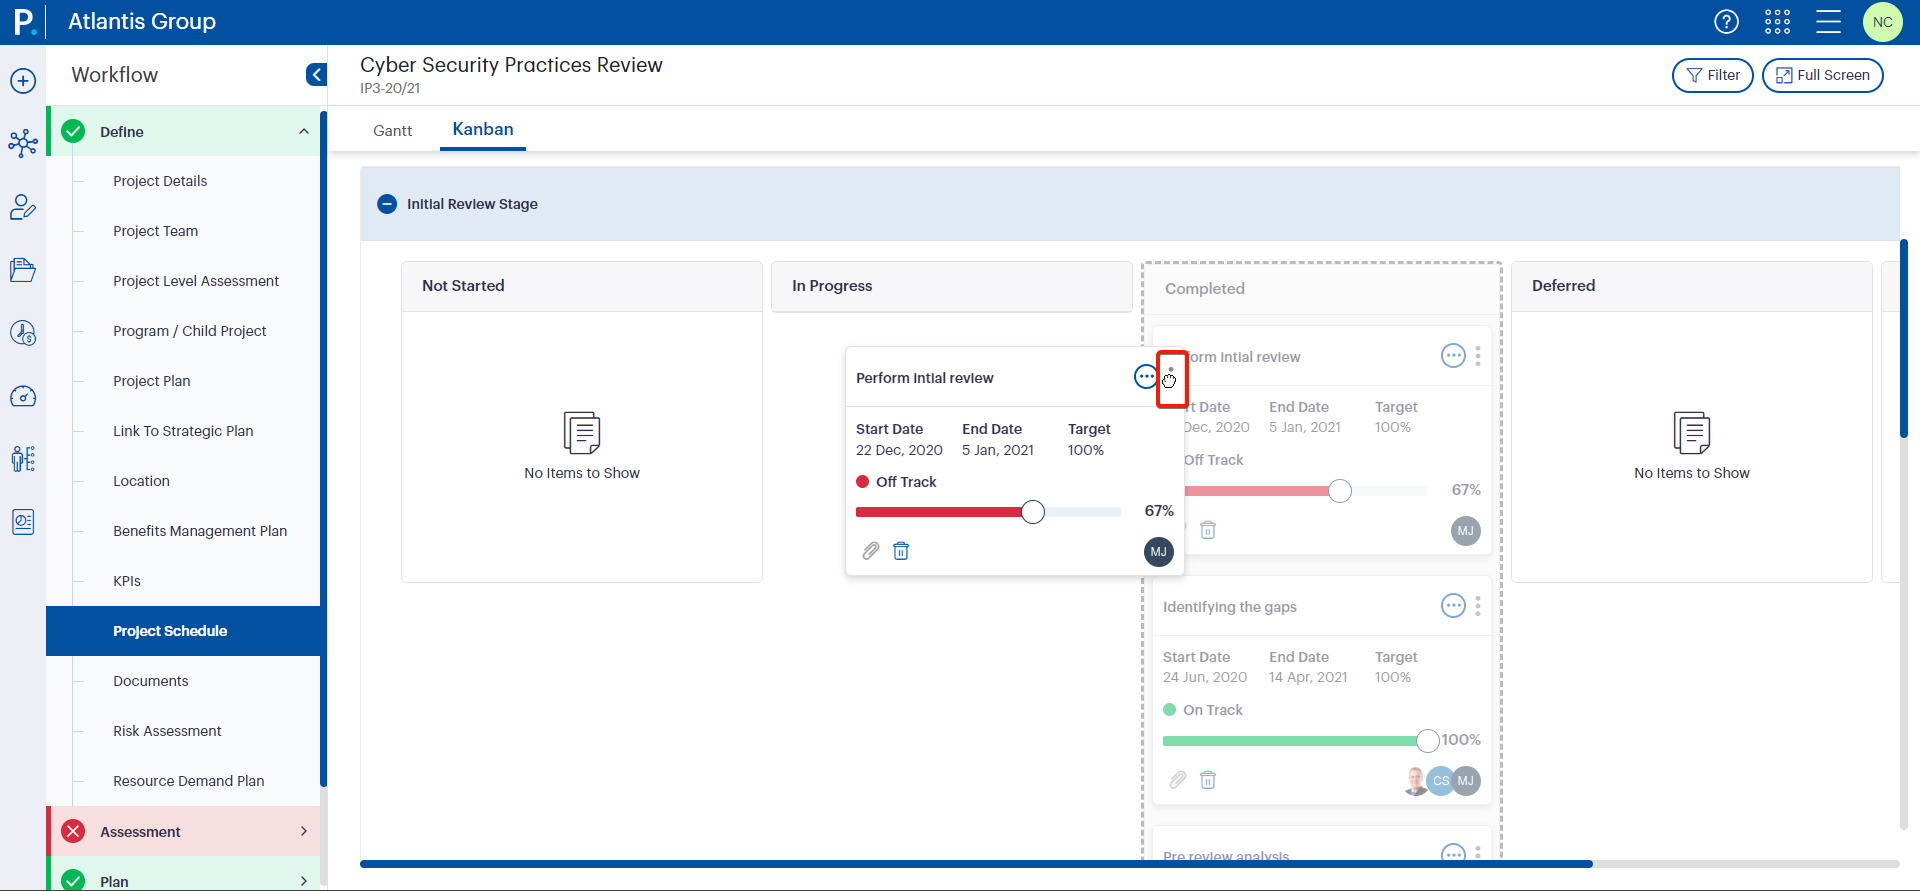
3.2.2 Better user experience when moving tasks between columns of the Kanban Board
- Moving tasks between different stages within the Kanban Board has never been easier, with the numerous adjustments made to it, for a smoother experience.
4. Enhanced individual project and object phases with status indicators in Project Workflows |
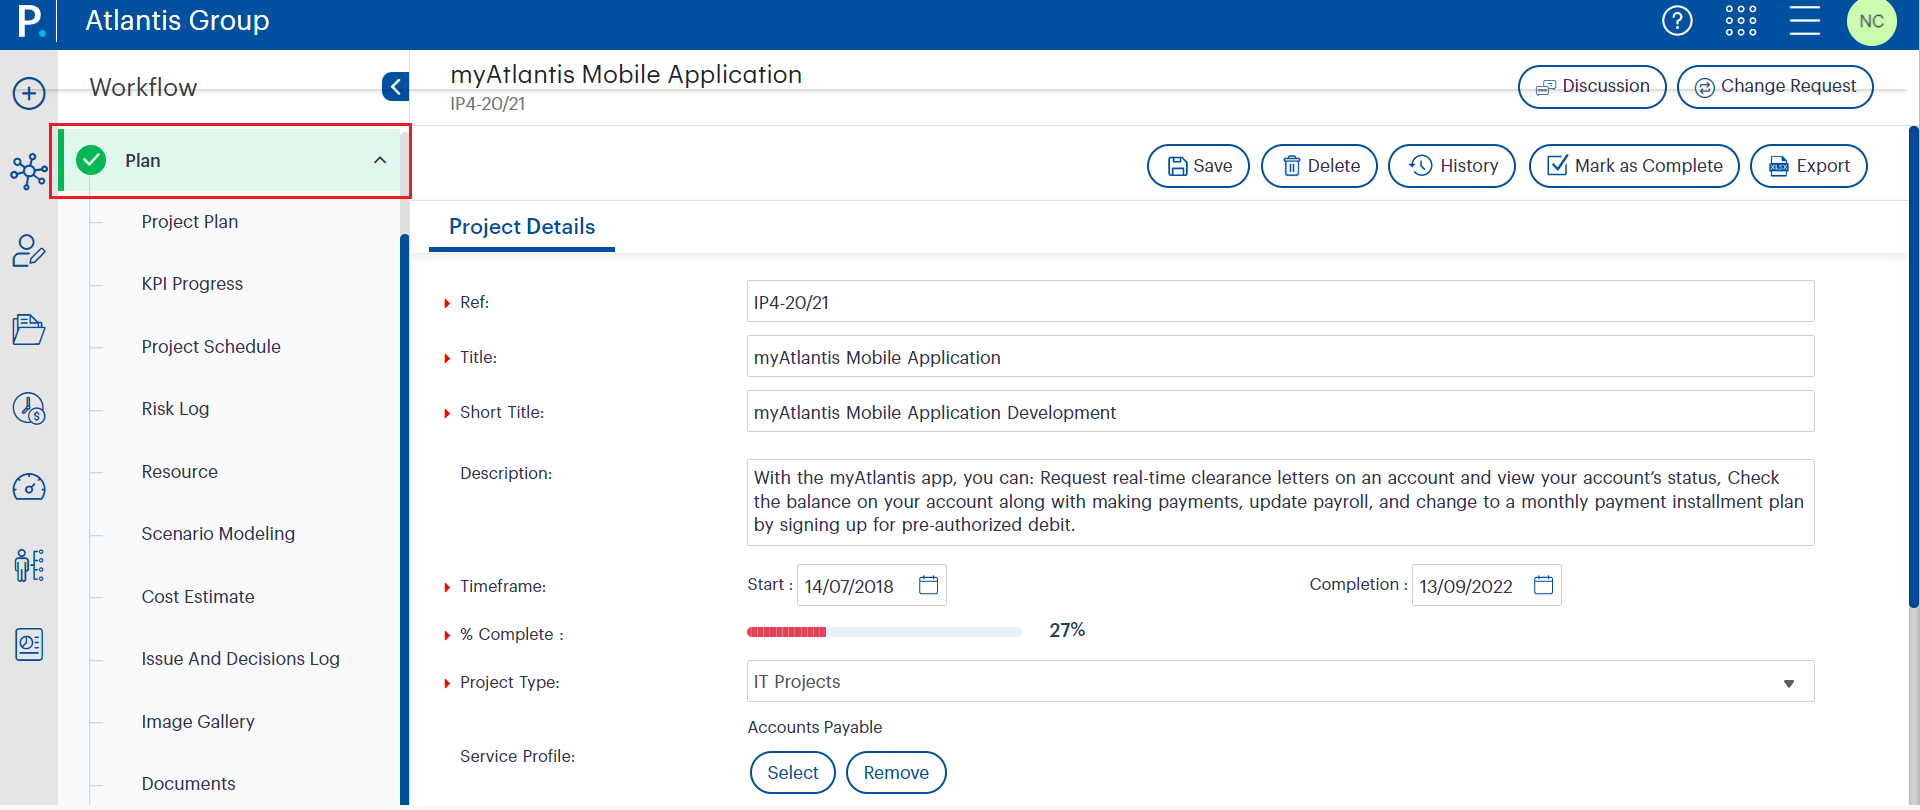
Phases and objects within a project workflow will now be denoted by a coloured icon to identify the status it is at.
- Phases – Current, Future, Not yet submitted for approval, Pending approval, Approved, Rejected
- Objects – Completed but not yet submitted for sign off, Not completed and not submitted for sign off, Completed but pending approval, Not completed and pending approval, Completed and approved, Not completed but approved, Completed but rejected, Not completed and rejected.
4.1 How do you configure this?
- If Sign Off has been added to a phase, then you can view the View Sign Off statuses of phases by glancing at the left panel of the screen as soon as you navigate to a project.
Note: For this, the user requires to have added a Sign Off object to the phase. - If Sign Off has been added to an object, then you can view the Sign Off statuses of objects added by glancing at the left panel of the screen, as soon as you navigate to a project.
Note: For this, the user requires to have added a Sign Off to the object. - You can additionally view the completion status of objects immediately, when navigating to a project.
Note: For this, the user requires to have switched ON the external setting 'Allow members to mark the object as completed', then you can mark objects as complete, by clicking on the ‘Mark As Complete’ button available on the top toolbar.
4.2 How does this work?
The below table depicts the status indicators for the various project phases:
| Indicator | Phase | Description |
| No icon displayed | Not submitted for sign off yet/In Progress | This status will be applicable when the relevant phase is not yet submitted for sign off. |
 | Pending Approval | This status will be applicable when the phase has been submitted for sign off and is pending approval. |
 | Approved | This status will be applicable when the phase sign off has been approved. |
 | Rejected | This status will be applicable when the phase sign off has been rejected. |
- Additionally, the phase will be highlighted as per the sign off status:
- The current phase will be highlighted in a light blue colour and blue indicator. Essentially, the future phases will be denoted by the same indicator. However, these will not be highlighted.

The below table depicts the status indicators for objects:
| Indicator | Object | Description |
| No icon displayed | Not submitted for sign off yet/In Progress | This status will be applicable when the relevant object is not yet submitted for sign off. |
 | Pending Approval | This status will be applicable when the object has been submitted for sign off and is pending approval. |
 | Approved | This status will be applicable when the object sign off has been approved. |
 | Rejected | This status will be applicable when the object sign off has been rejected. |
The below table depicts the status indicators for the completion of objects:
| Indicator | Object | Description |
| No icon displayed | Mark as Complete | This status will display if the object is complete but not yet submitted for sign off. |
 | Pending Approval | This status will display if the object has been completed and submitted for signing off and is pending approval. |
| Sign off completed | This status will display if the object is complete and approved. |
 | Complete and pending approval | This status will display if the object is complete and is in a pending approval stage. |
 | Rejected | This status will display if the object is complete and is in a rejected stage. |
 | Not complete and pending approval | This status will display if the object is not complete and is in a pending approval stage. |
 | Not complete and rejected | This status will display if the object is not complete and is in a rejected stage. |
 | Completed but resubmitted | This status will display if the object is completed but has been resubmitted. |
| No icon will be displayed | Not completed but resubmitted | If the object is not complete but has been resubmitted. |
5. Page level improvements in Board & Team and Custom Objects |
A pain point faced in the past on the time spent when updating the Board and Team Object and the Custom Object have now been fixed with the overall performance upgrade in Camms.Project.
5.1 Load time of objects when updated
- With the upgrade in technology, you can now access and edit the Project Board and Team details and Custom Objects much faster and easier.
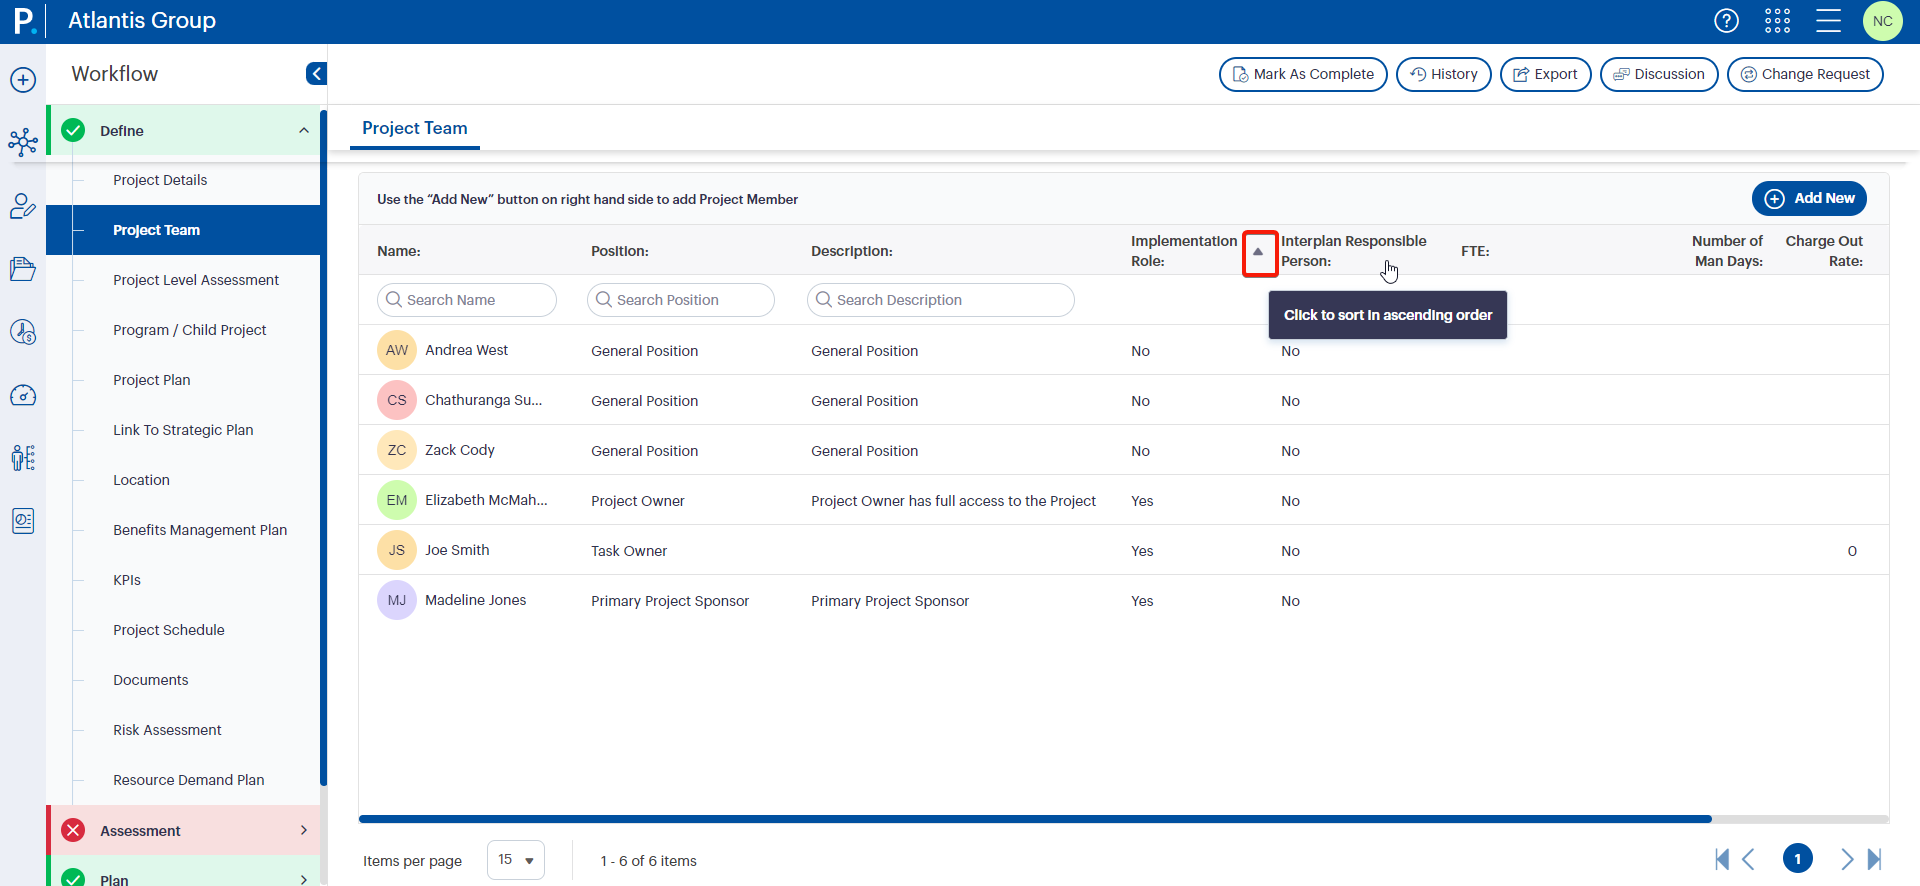
5.2 Clear indication for a team member playing an Implementation Role and Responsible Person, by denoting it with a Yes/No field
- Values under the 'Implementation Role' column and 'Interplan Responsible Person' column will be denoted by 'Yes/No' fields.

- You will now be able to view the current page number at the bottom-right corner of the Grid View and will be able to navigate across existing pages, by clicking on page numbers at the bottom-right corner of the Grid View. It will further let you navigate to the first page, last page, and next page using icons in the pagination panel.
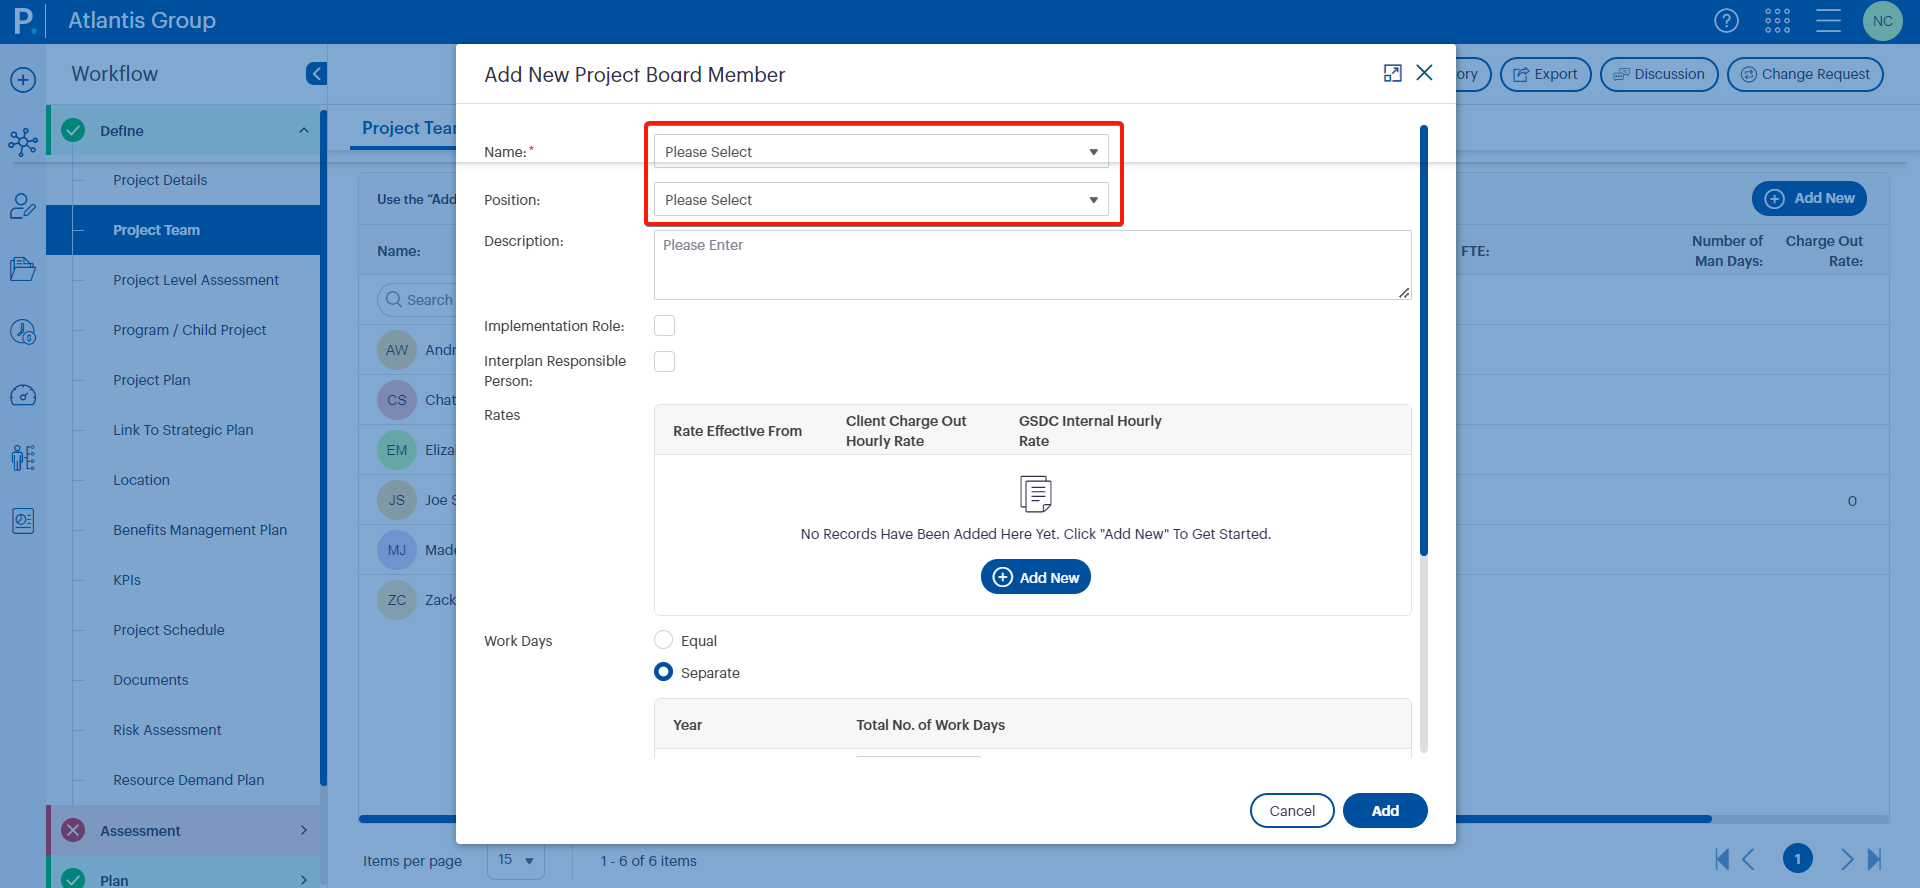
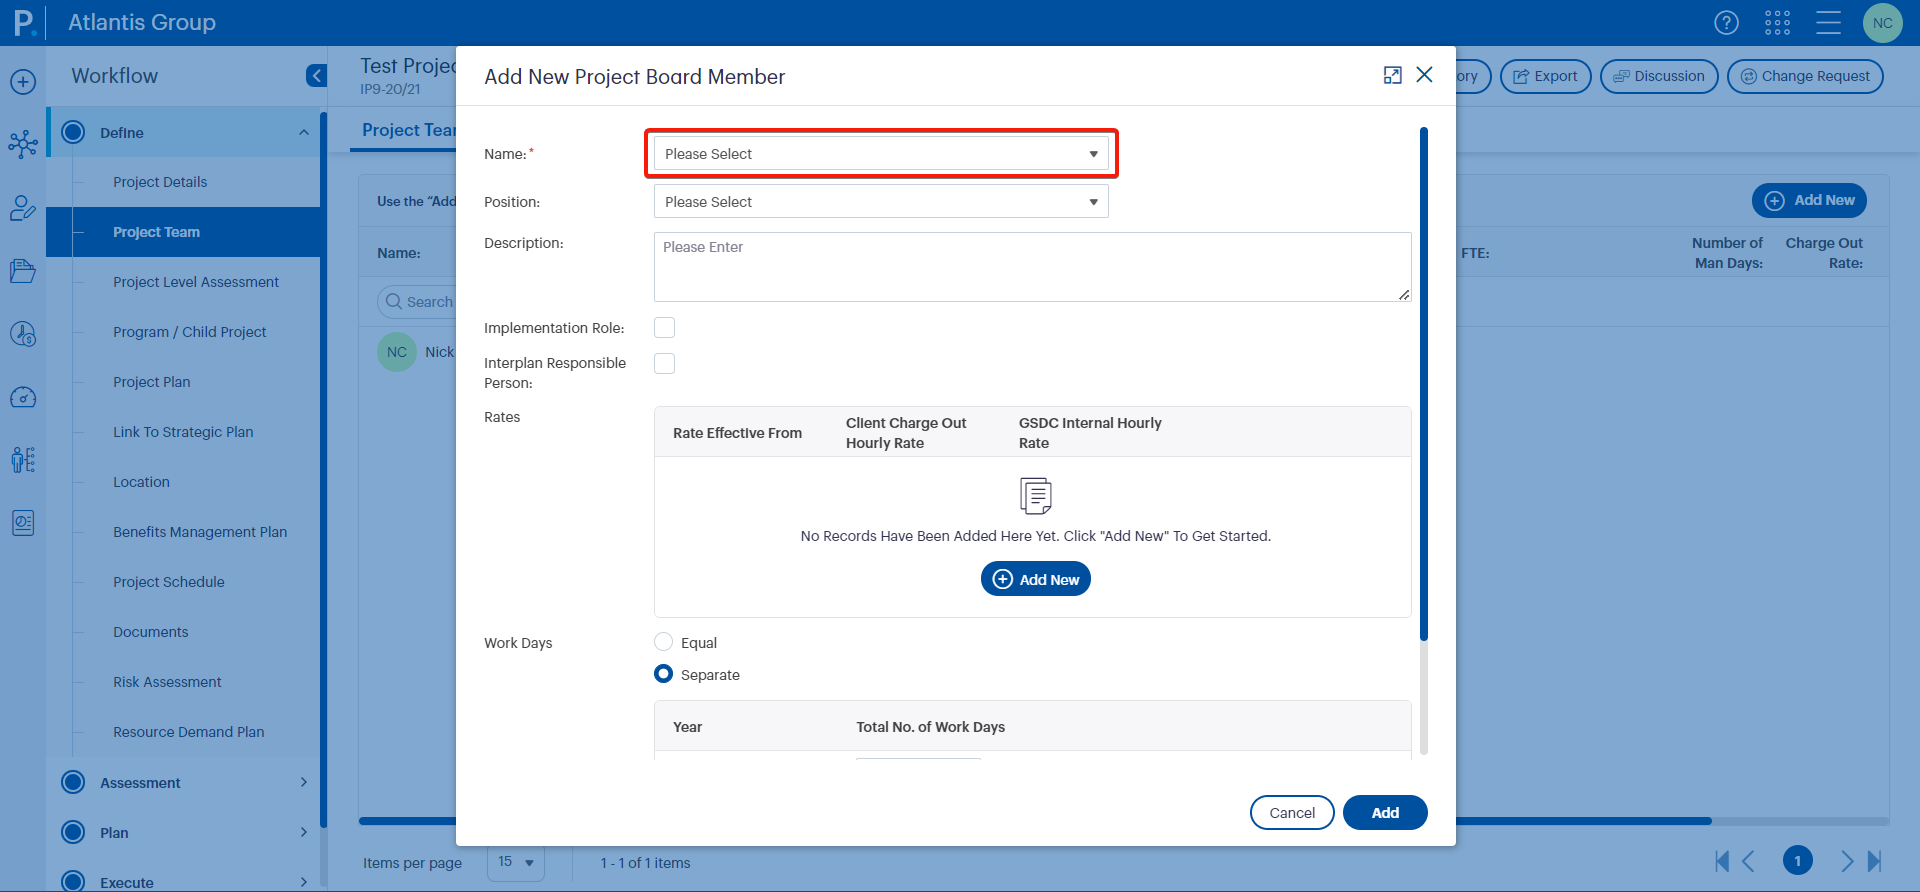
- Add new members by clicking the 'Add New' button at the right-hand side of the Grid View, and upon clicking ‘Add new’, the following actions will be seen:
- A popup window will be displayed with relevant fields made visible from the object editor area.
- For the available text dropdown selections, the default value will be ‘Please Select’.
- From this release onwards, you will be able to sort the below columns to descending, ascending order, and can change it back to Default View:
- Position, Description, FTE Grid, Implementation Role, Interplan Responsible Person, Number of Man Days, Charge Out Rate, and Total Cost
- When sorting columns for the Implementation Role column and Interplan Responsible Person column:
- When a column is sorted in an ascending order, you can view the ‘No' records as the top records, and 'Yes' records as the last records in the grid view.
- When a column is sorted in a descending order, you can view the ‘Yes' records as the top record list, and 'No' records as the last records in list in the grid view.
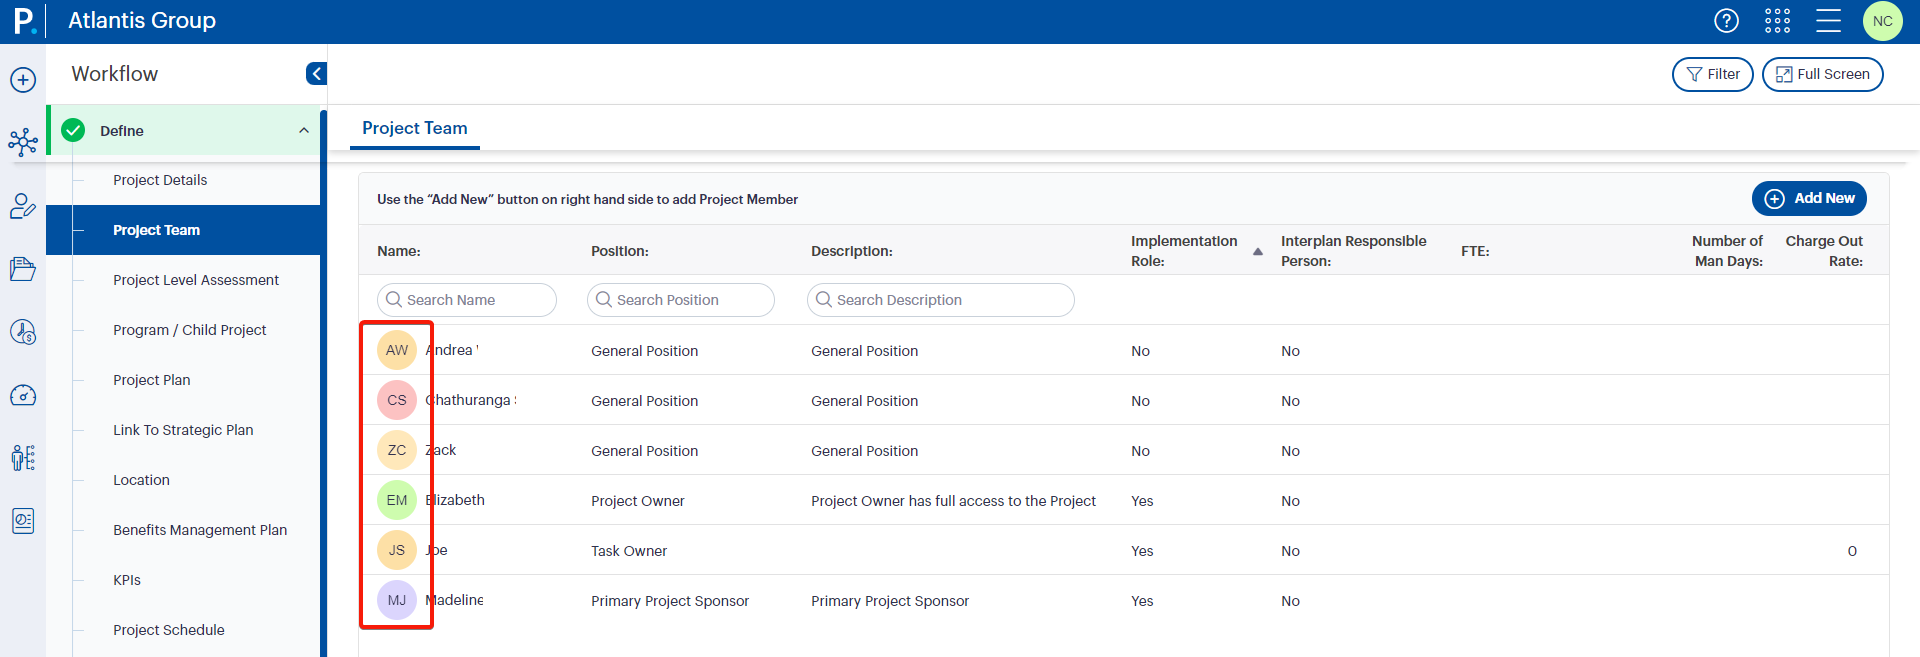
- When the “Show Staff Information” setting is activated, you will be able to view avatar images of staff members in the Staff Name column.
- From this release onwards, the placeholder of date picker will display in the DD/MMM/YYYY format.
5.3 Ability to select the number of resources/staff members to be displayed in one page
- The total number of resources/staff members to be displayed in a page can be set now. The default number of records is set to 15.

5.4 Default Staff Name dropdown set to a placeholder text
- By default, the Staff Name dropdown is now set to ‘Please Select’. Hence, you can select the required staff member from the dropdown when you add a new staff member to the Project Board. (This was previously defaulted to the first option in the Name dropdown.)
5.5 Improved performance when updating the Custom Object and Custom Table
- The Custom Object is made to work significantly faster, along with the new user interface. Please refer the below images as to how a Custom Object would look like in your projects.
- Custom Object View
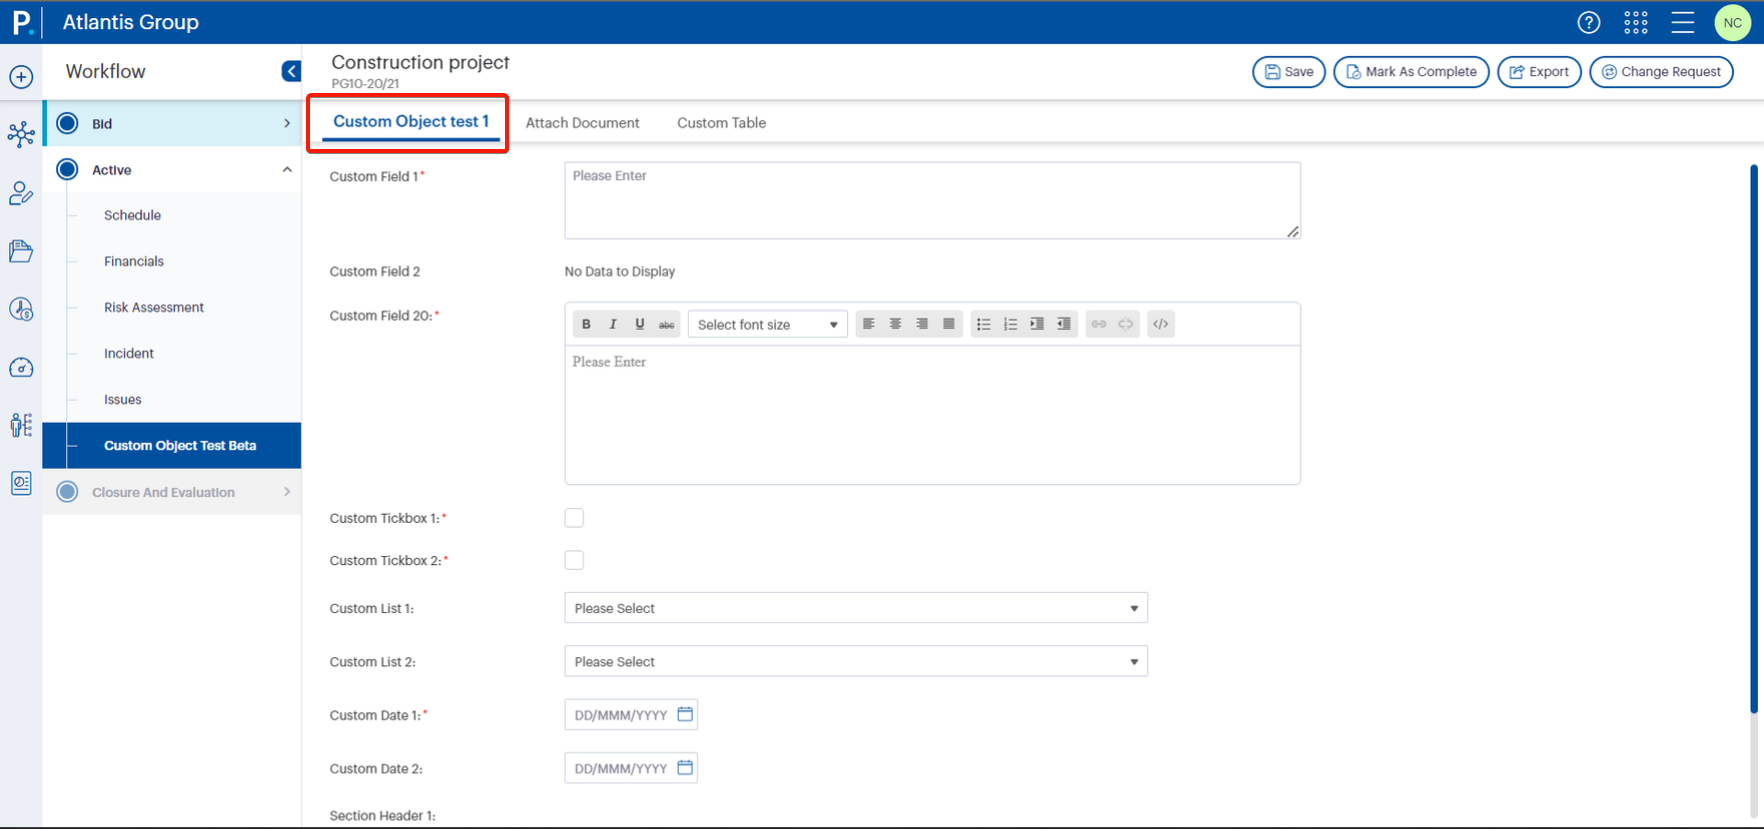
- Custom Table View
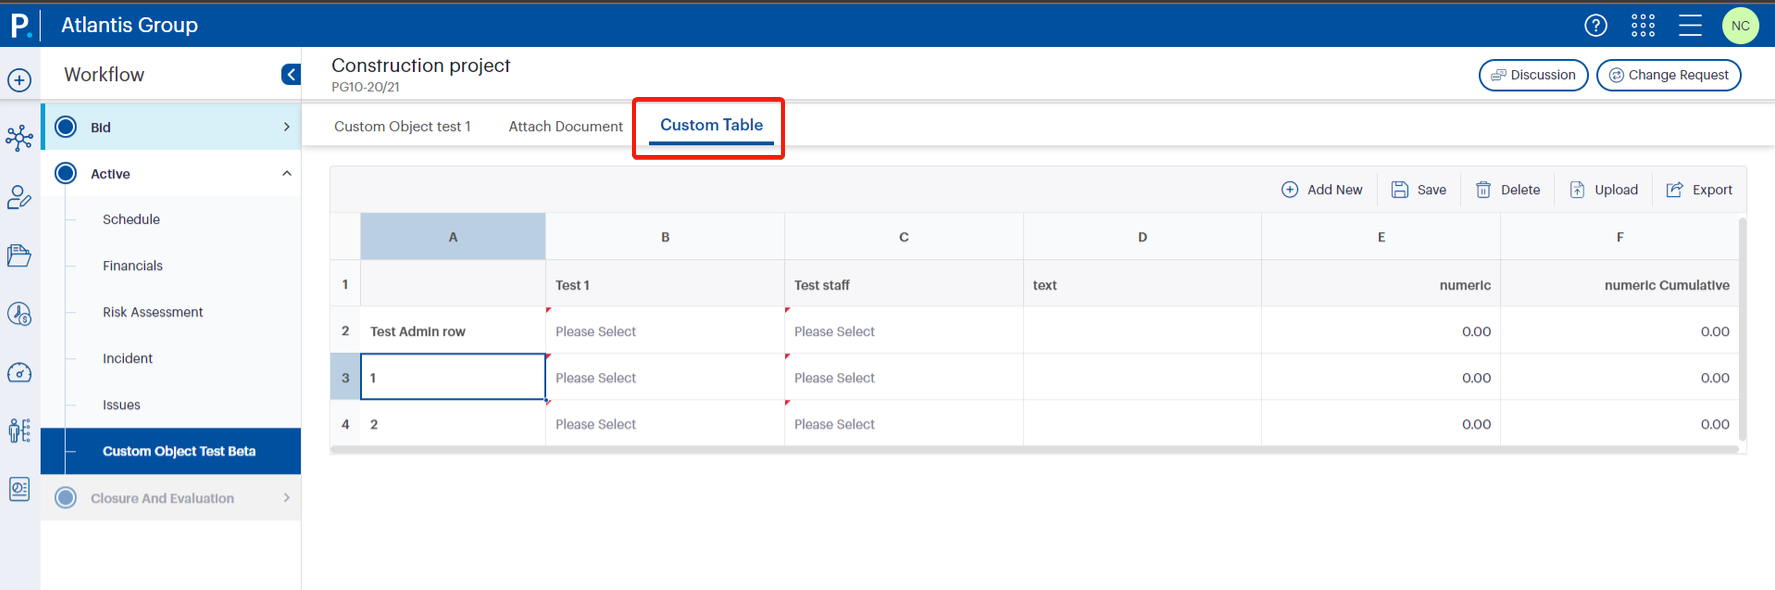
- Custom Object View
6. Removal of the Open Project feature |
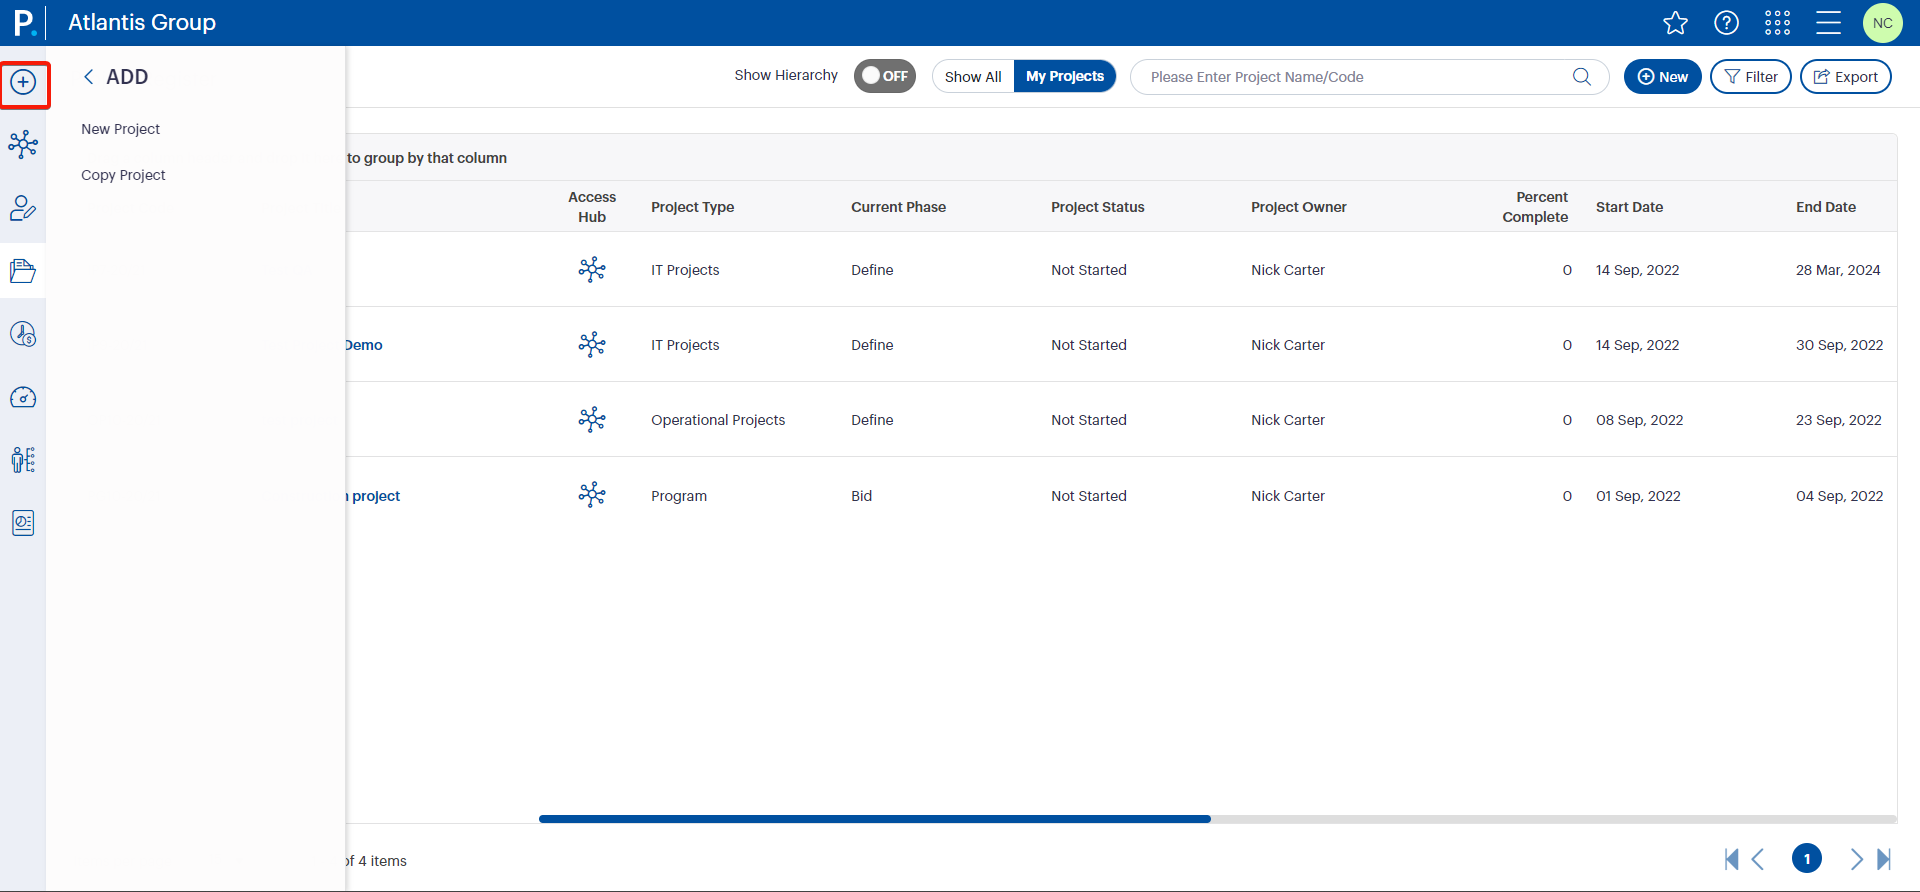
The feature where you would open a project in a popup window using the ‘Add New > Open Project’ option via the left-hand navigation panel, has been removed with this update as projects can be opened from the Project Register and Hub.
6.1 What has changed?
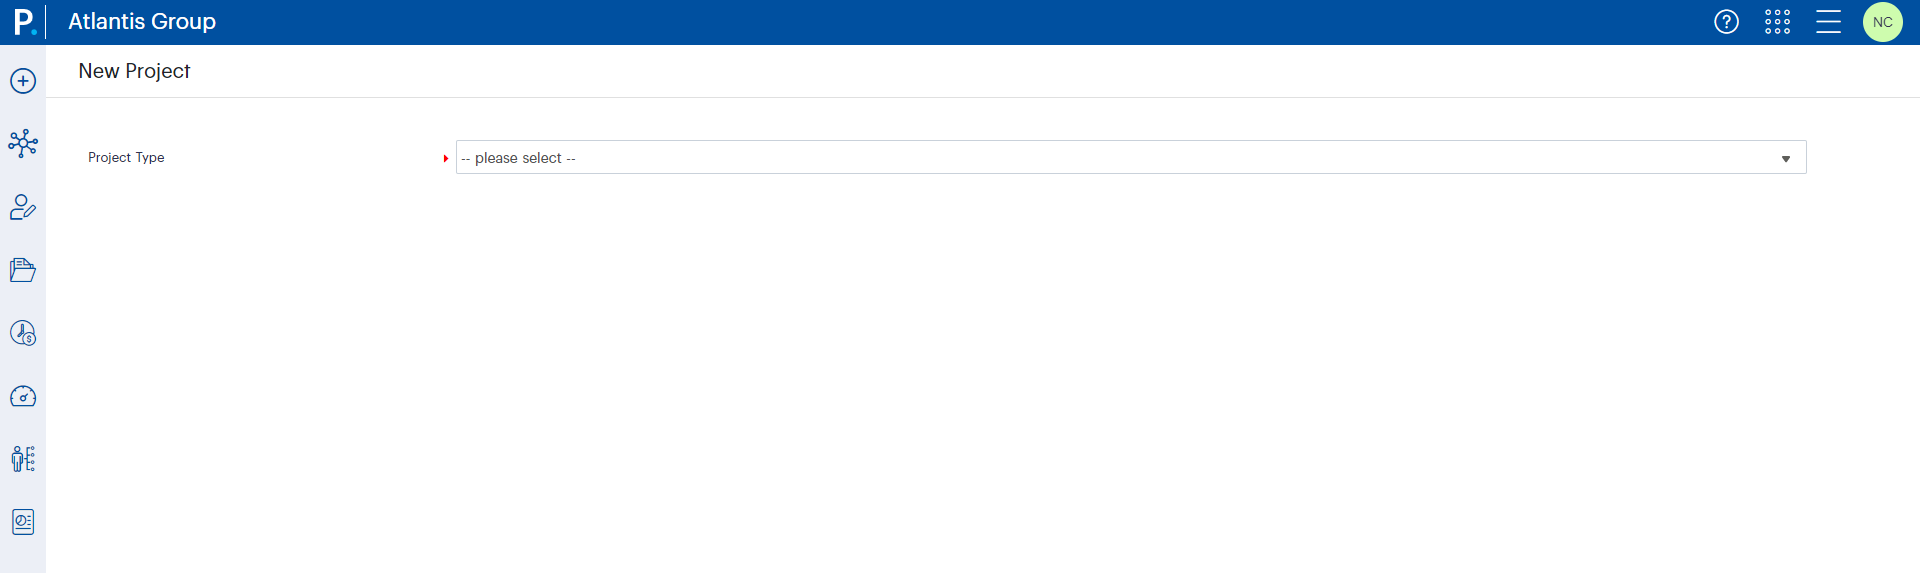
- Creating a new project is now done by clicking the ‘+’ icon in the left navigation and clicking on ‘New Project’ in the side menu.
- Once clicked on New Project, you will be directed to the Project Explorer area, from where you can select the Project Type you need to create the new project in.
- When you have selected the Project Type you need, the application will automatically load the fields that have been added to the project details object of that Workflow the Project Type is connected to.
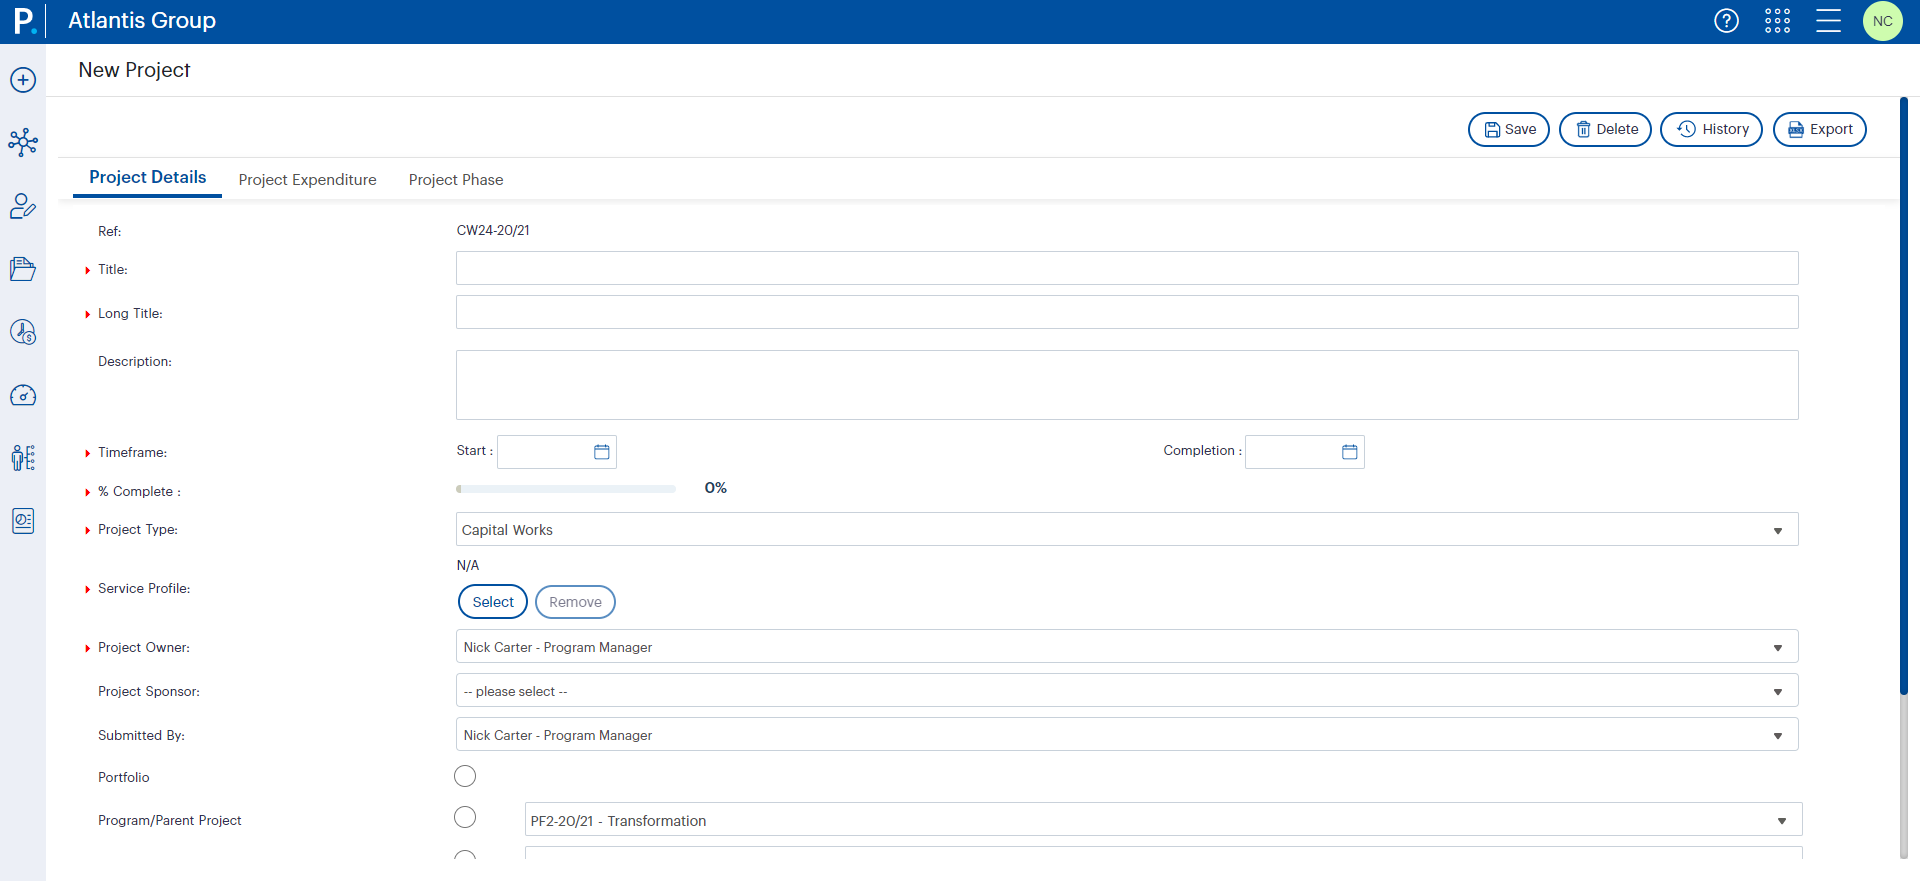
- You can add the necessary details and click on 'Save'. Once saved, your project will be created.
7. Improvements in Project Settings pages |
As an administrator you can access the following settings faster and with improved flexibility and user experience.
- Manage Staff
- Manage User Roles
- Project Progress Calculation
- Project Register View
- Project Class
- Project Types and Workflows
- Calendar Configuration
7.1 Calendar Settings
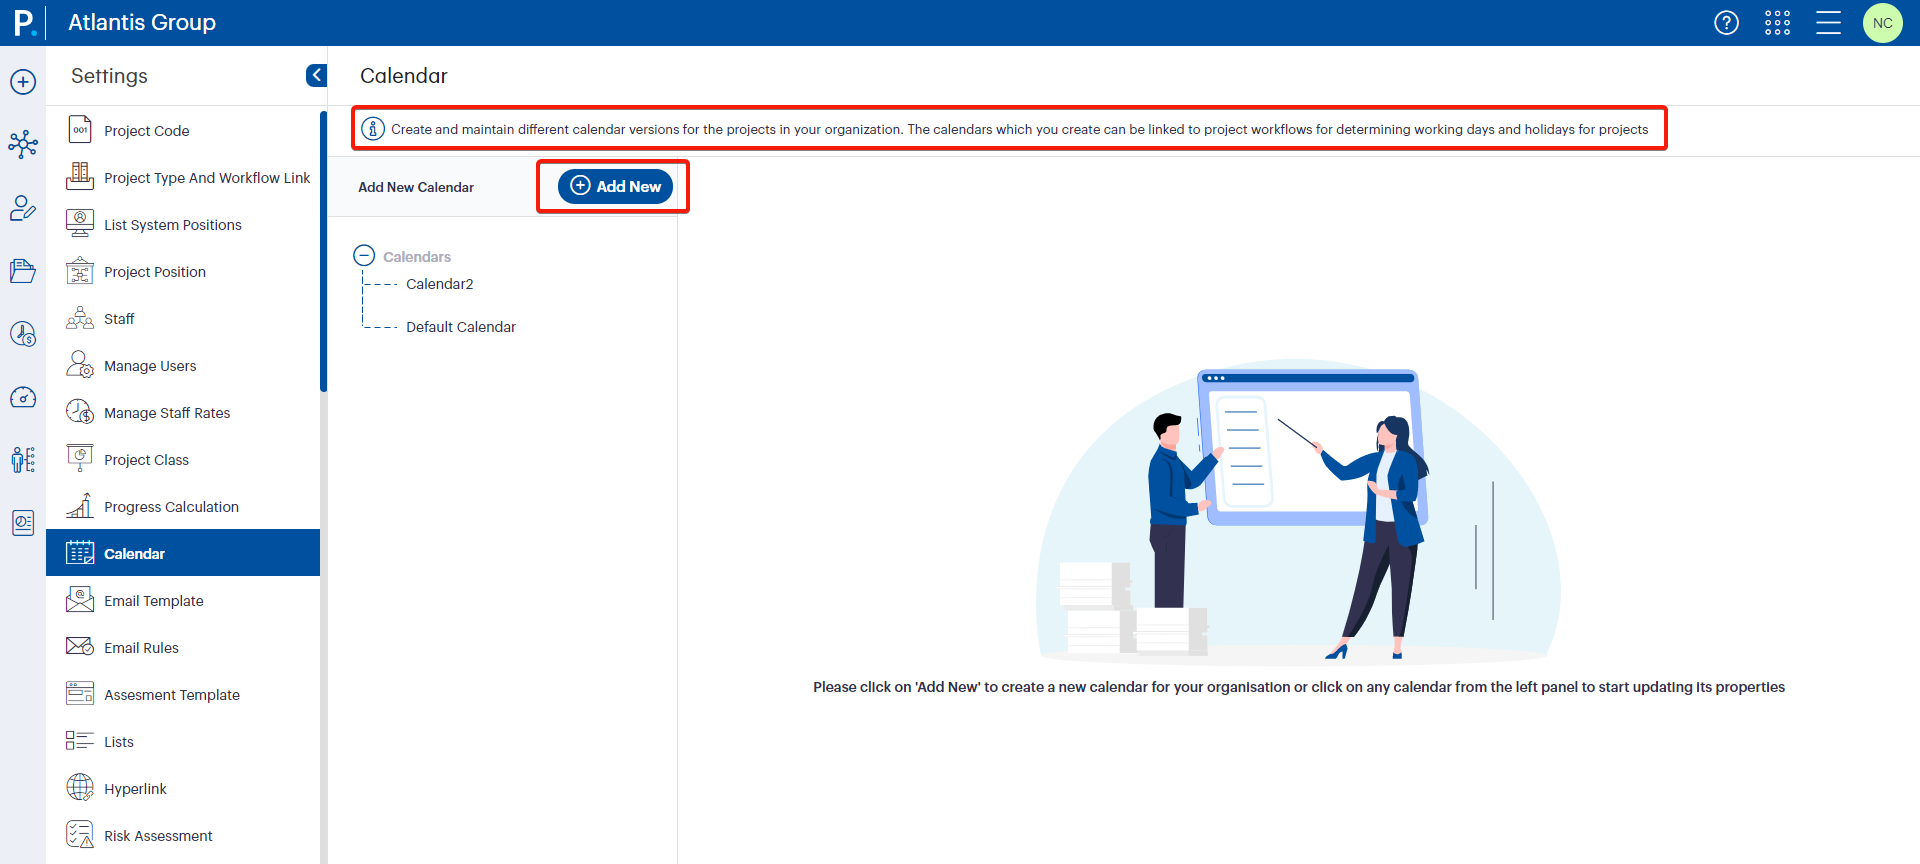
You can navigate to the 'Menu > Project Settings > Calendar' section, where you will be able to create multiple calendar versions, which can be later linked to Project Workflows, clear demarcation of working days and non-working days are available, and identification of the Workflows linked to the calendar.
7.1.1 What’s changed?
- Now you can view a description of the page through the information description placed at top of the page,
- Adding a new calendar is now made faster and is made simpler for you. Clicking ‘Add New’ will open a popup window.
7.1.2 Visibility of the special ‘working’ and ‘non-working’ days
- A clearer view of the working and non-working special days will be visible in the grid below.

7.1.3 Visibility of the ‘working’ and ‘non-working’ days
- A clearer view of the working and non-working special days will be visible in the grid below.

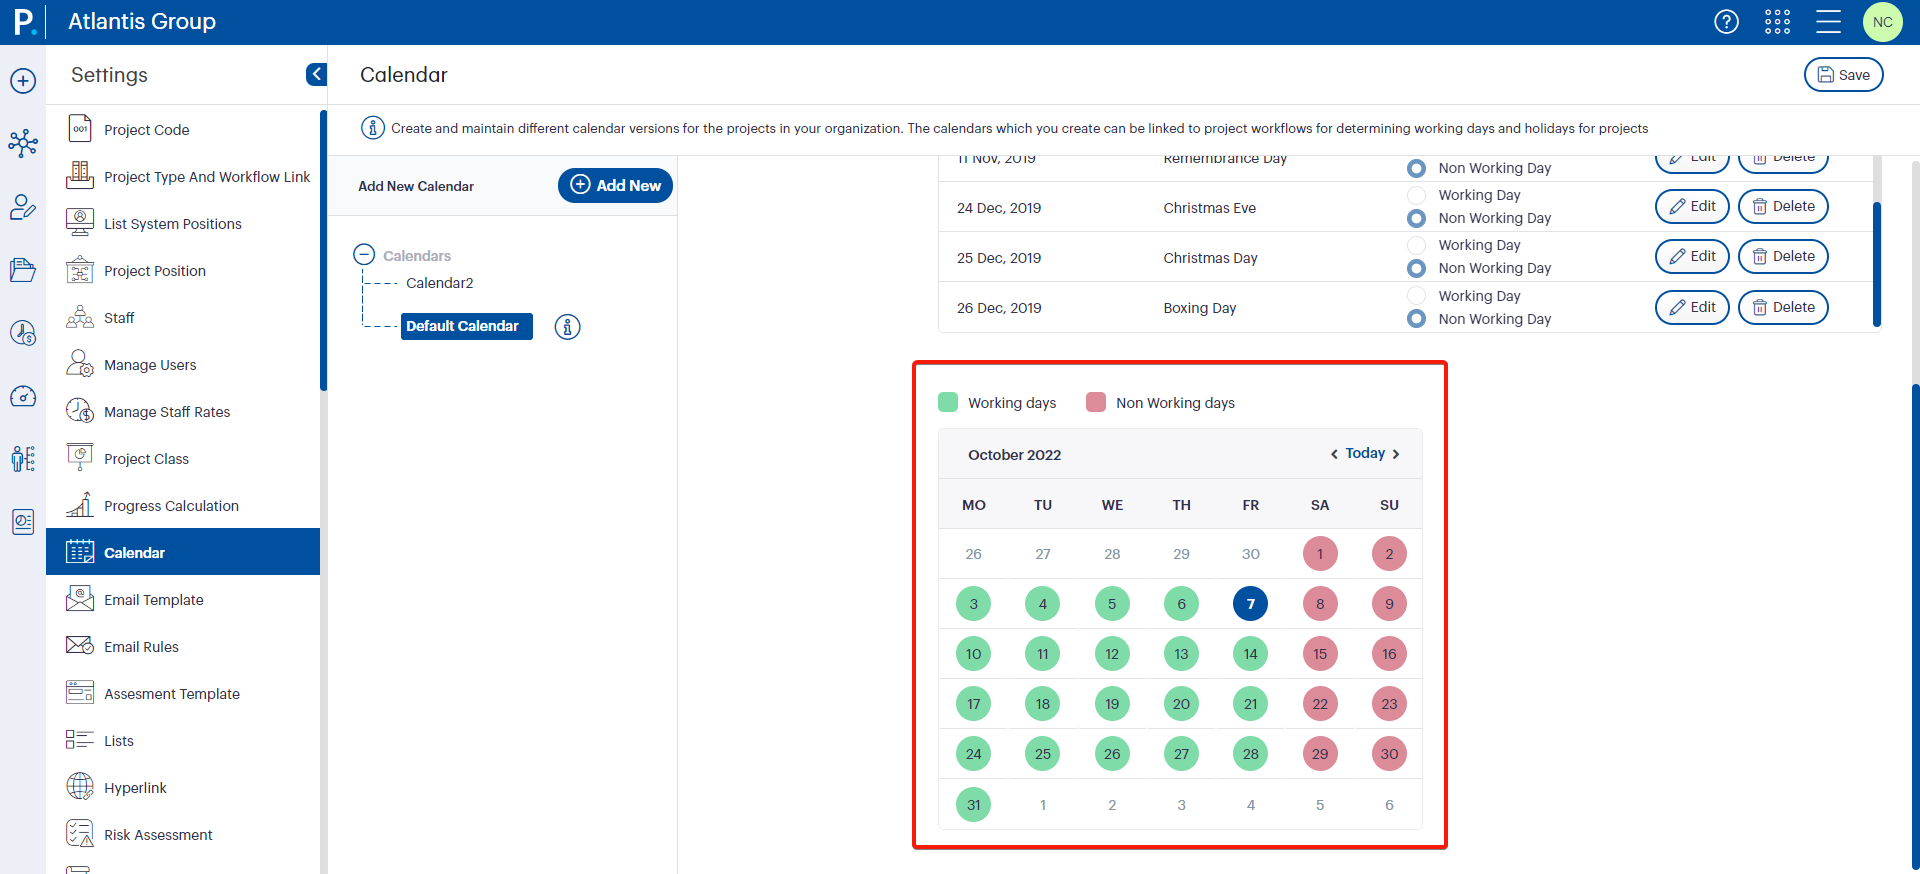
- Working days denoted in green.
- Non-working days will be denoted in dull red.
- Present date will be automatically denoted in blue.
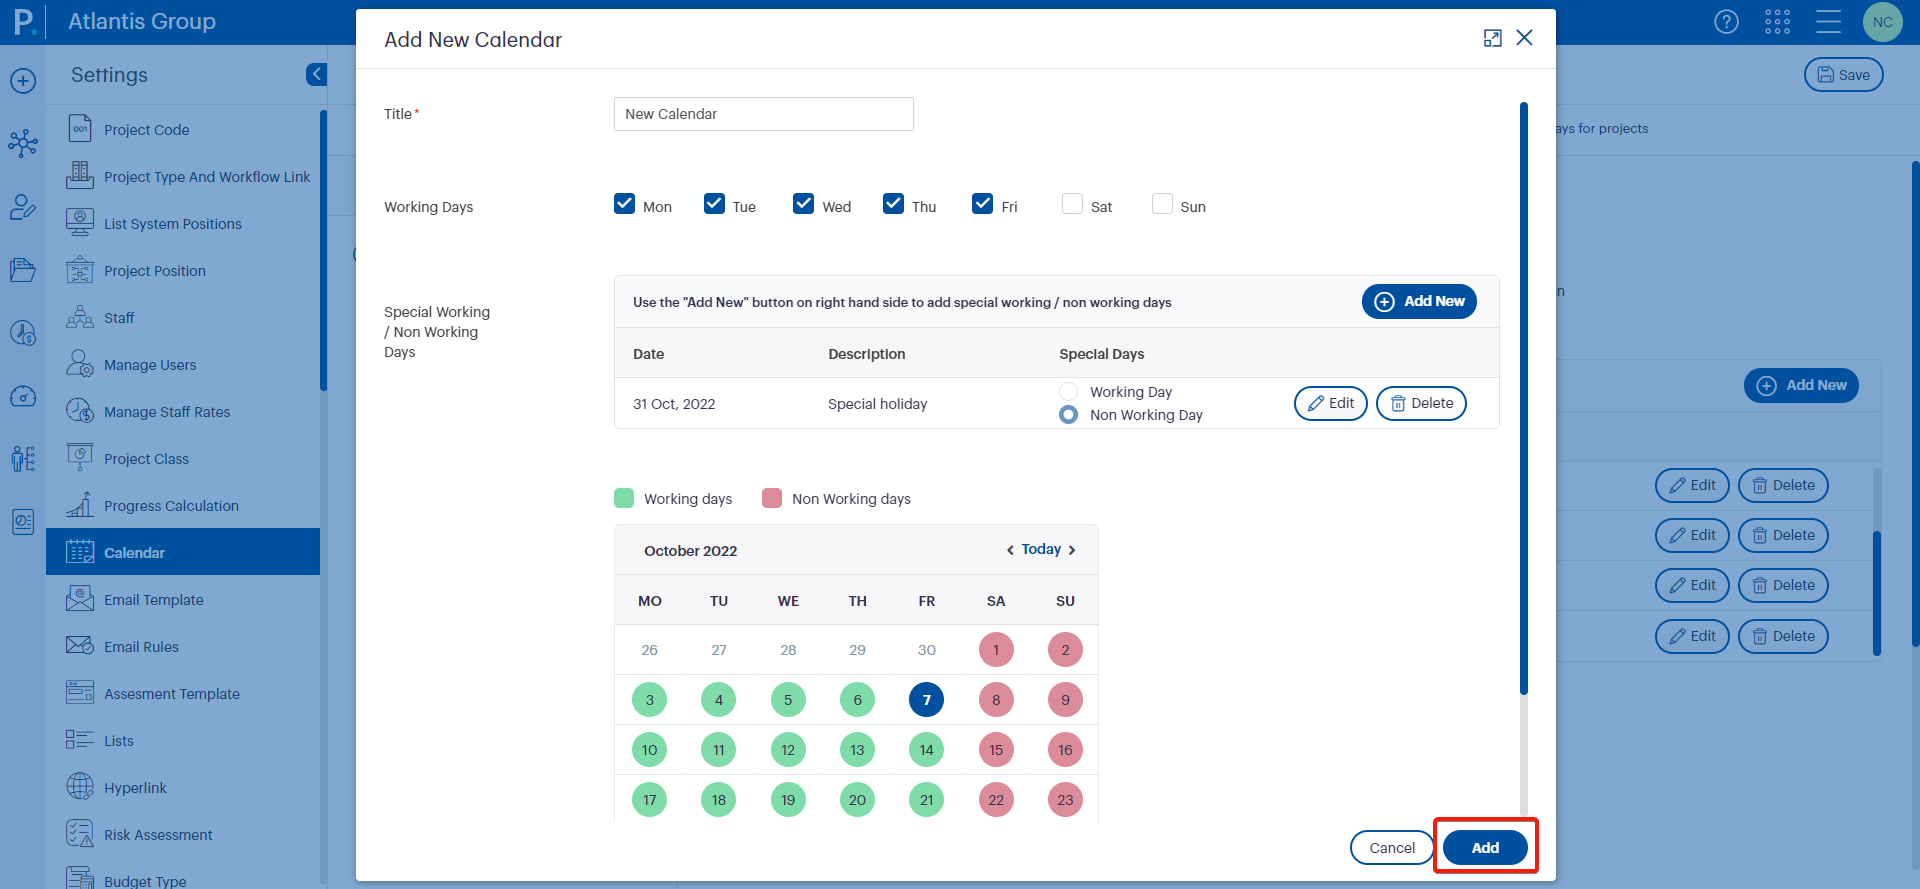
7.1.4 Adding special ‘working’ or ‘non-working’ days
- You can now add special days as ‘working days’ or ‘non-working’ days by clicking the ‘Add New’ button. A popup window will appear to enter the special working/non-working days.

- Once you have completed adding your details, click the 'Add' button to add the details you have entered.

7.1.5 Editing special ‘working’ and ‘non-working’ days
- Once you click the 'Edit' button, a popup window ‘Edit Special Working/Non-Working Days’ will be displayed.

- Make the necessary changes and click the ‘Save’ button to update the changes made.

7.1.6 Complete adding a calendar
- The calendar configuration can be completed by clicking the ‘Add’ button at the bottom of the ‘Add New Calendar’ window.
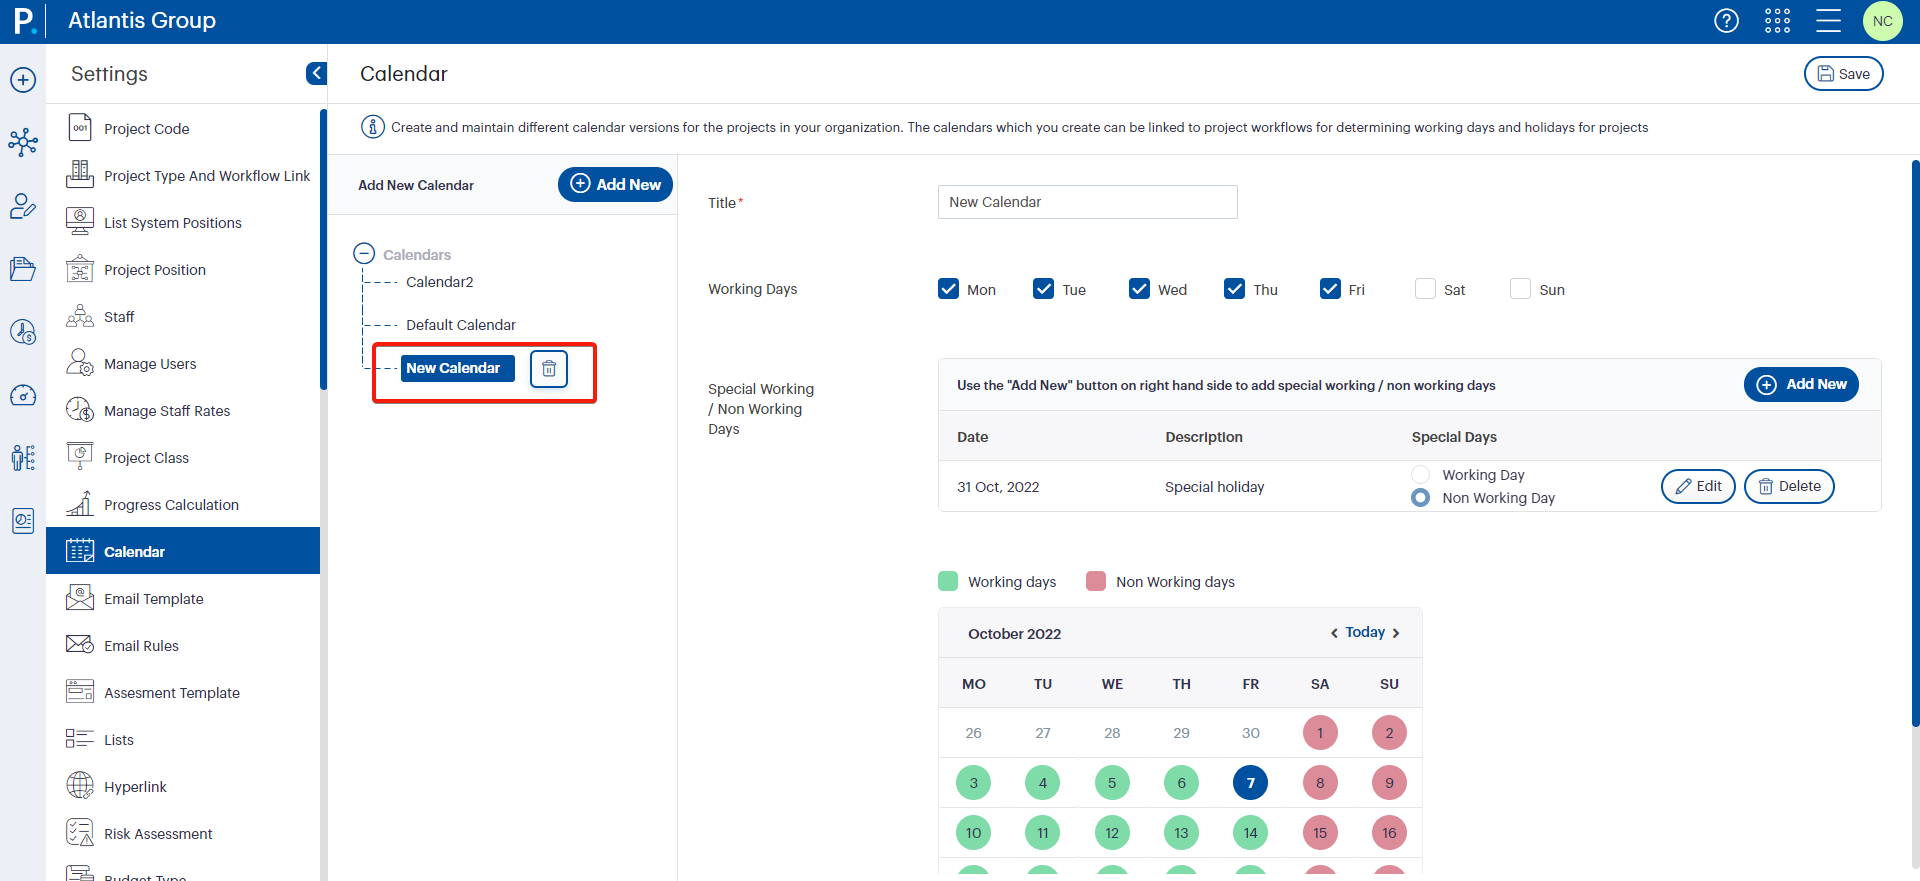
7.1.7 Making a calendar visible once added
- Once you add additional calendars, it will be visible at the left side of the page, with the capability of expanding the list of calendars added.
7.1.8 Checking if a calendar is linked to a workflow
- When a calendar is linked to a workflow or multiple workflows, it cannot be deleted.
- Now you can clearly identify if the calendar is linked to a workflow or multiple workflows by clicking the ‘Information’ icon.

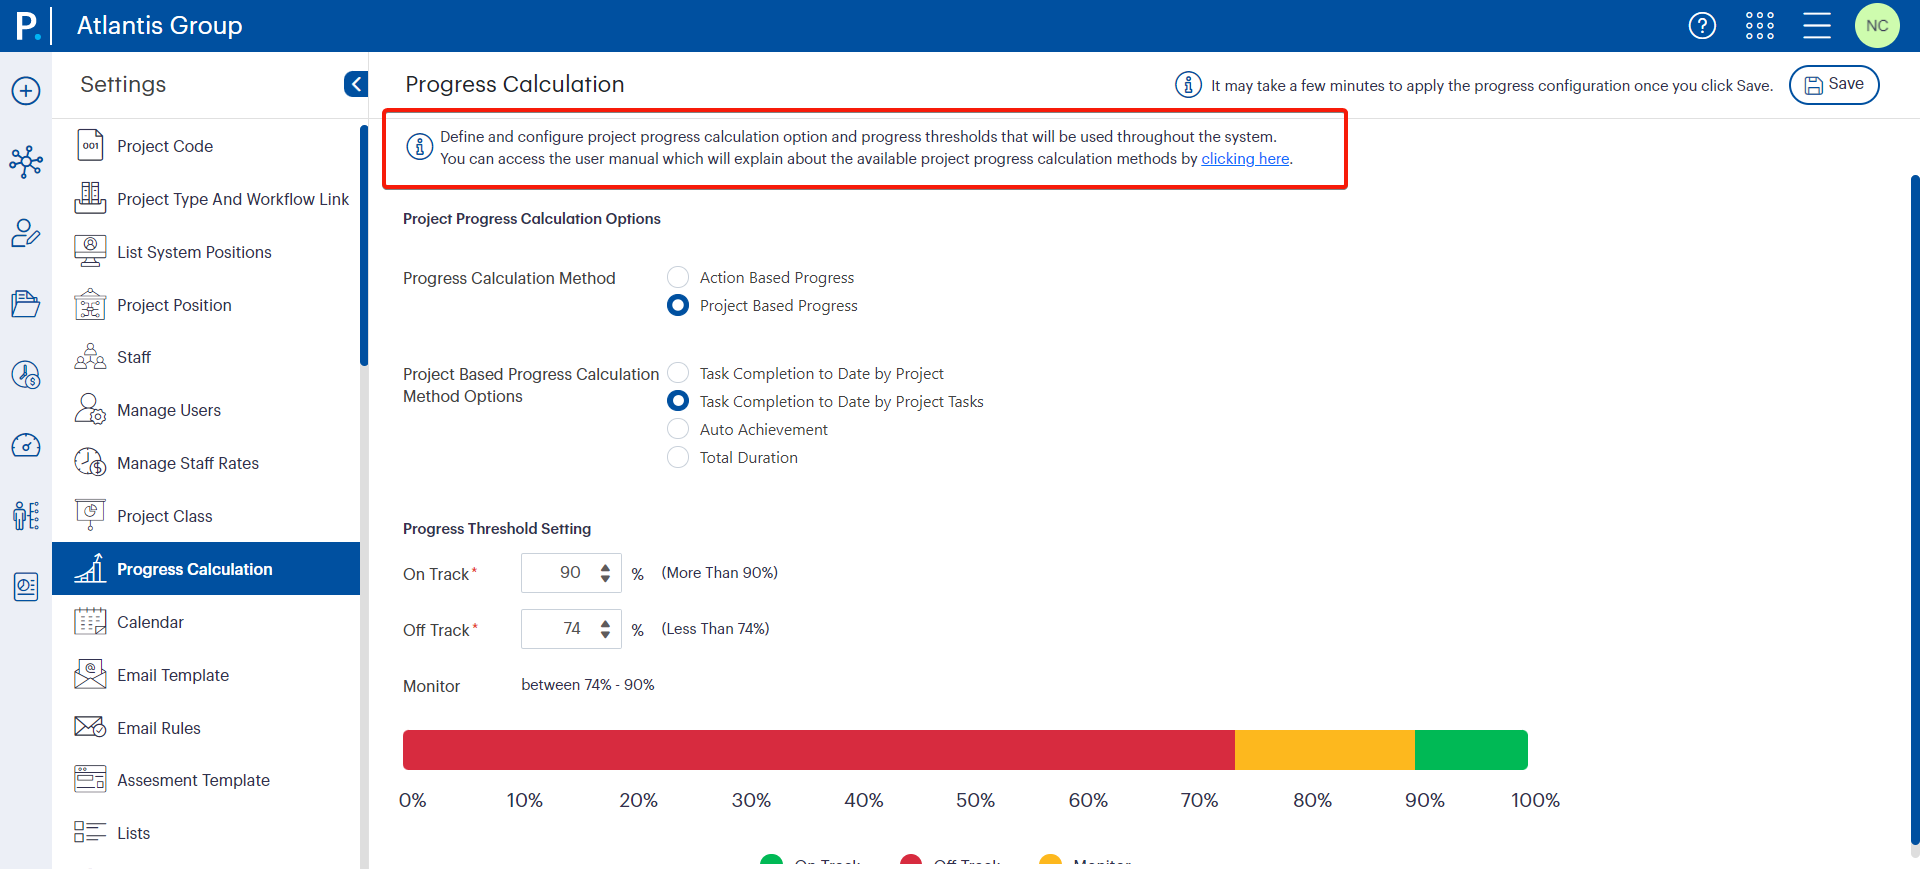
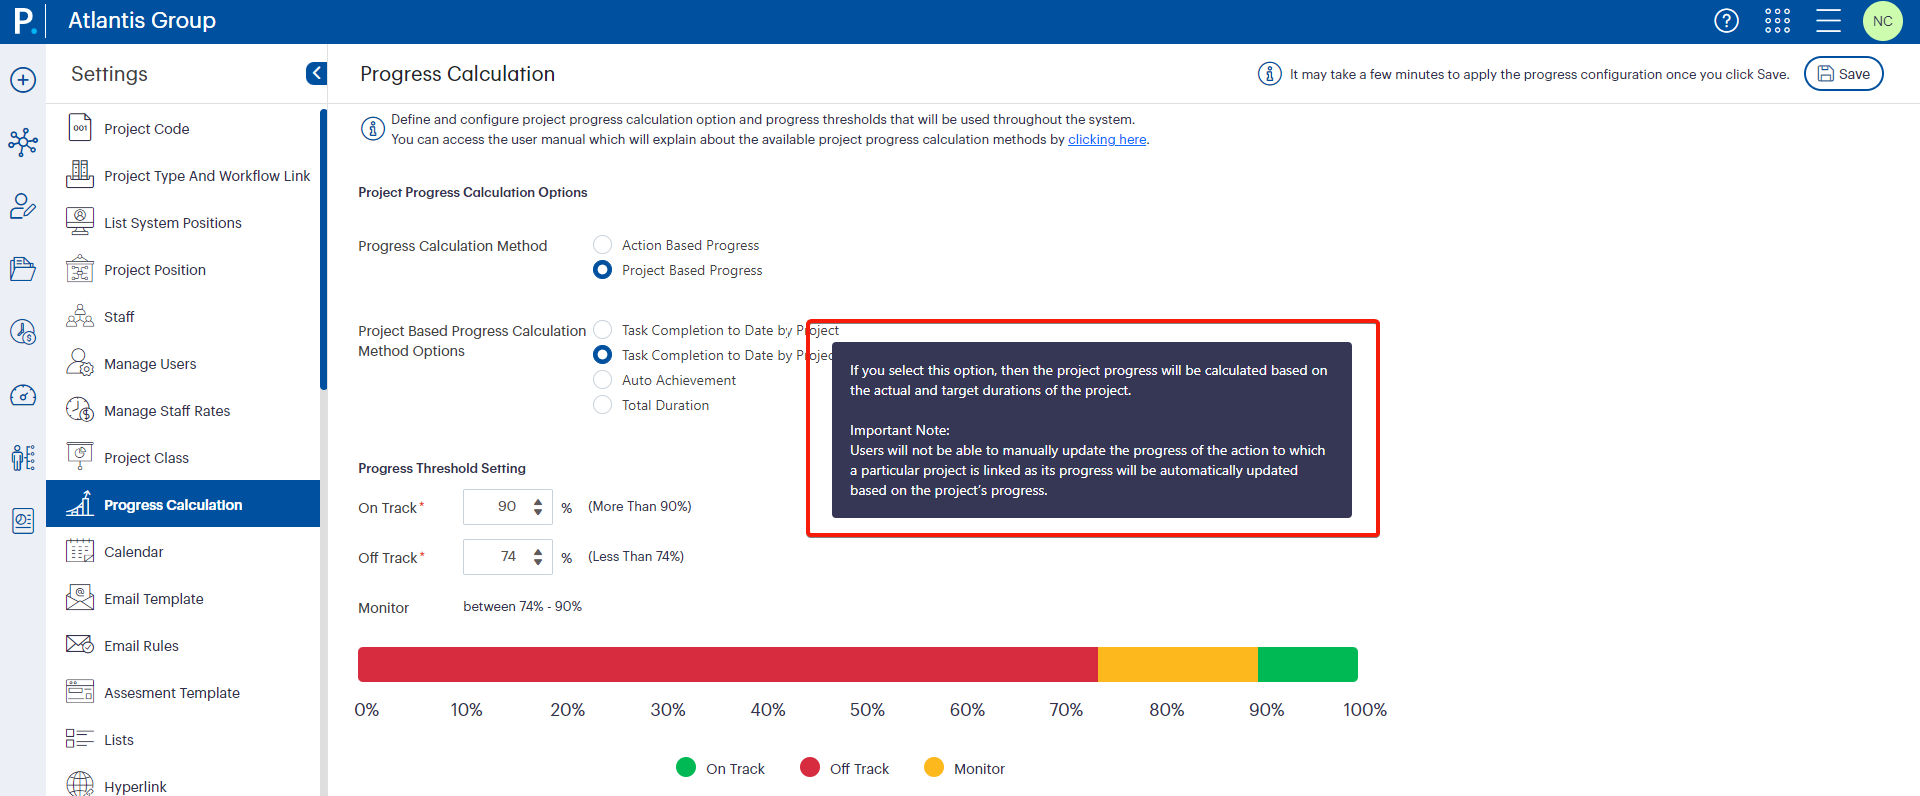
7.2 Progress Calculation Settings
A user can define the Project Progress Calculation by navigating to 'Menu > Project Settings > Progress Calculation'.
7.2.1 What’s changed?
- A description of the Progress Calculation page through an information icon is now available.
- A direct link to the User Guide page which defines how the Progress Calculation Settings can be defined and activated.
- A description alongside the ‘Save’ button with an information icon, which elaborates that saving the Progress Calculations changes/additions may take a while when applying the configuration added by the user to the application.

7.2.2 Progress Threshold setting changes
- A cleaner view of the Progress Threshold Setting details.
- Now you can easily increase/decrease the Progress Threshold Settings on track or off-track values in a sequence.
- When sequencing and entering ‘on track’ and ‘off track’ values, the newly introduced 'on track’ and ‘off track details’ would change dynamically.
- When sequencing and entering ‘on track’ and ‘off track’ values, colouring the progress bar would change dynamically.
- When the sequencing and entering ‘on track’ and ‘off track’ values, the newly introduced ‘monitor’ values will change dynamically.

7.3 Project Register View
- A new option to set the sequence of a field as opposed to drag and drop fields to arrange the order of the columns in the Project Register.
7.3.1 What’s changed?
- A new sequence column is introduced to enter the sequence of each column name which will appear in the Project Register.

7.4 Project Classes
- The Project Classes section under Project Settings will let you define and configure the different classes of projects such as portfolios, programs, and projects for your organisation.

7.4.1 What’s changed?
- You can now easily show or hide project hierarchy levels via the Project Classes page depending on your organisation requirements. For example, if the project hierarchy in your organisation uses three levels of the hierarchy (i.e., portfolios, programs, and projects), but you do not have it activated in your system yet, you can activate and show the portfolio level by following the steps below:
- Click on the 'Edit' button adjacent to the relevant level.

- Select the 'Used in organisation' tick box from the popup window that appears.

- Save your changes by clicking the 'Save' button in the popup window.

- Click on the 'Edit' button adjacent to the relevant level.
- The levels that you activate within the Project Classes page will be shown as radio buttons in the Project Group field within the Project Details object. For example, if you activate the Portfolio level form the Project Classes page, it will now be displayed as an additional radio button within the Project Group field in the Project Details object(shown below).

SYCLE Note: All the above updates and enhancements will be available for our SYCLE customers. |
8. New and improved user guide platform |
Camms is pleased to introduce our all-new user guide platform with improved search features that will help you find the right information easier and faster. Furthermore, additions in the form of links to related articles, as well as page level table of contents have been made available for easy navigation of the content, for an improved experience when reading our user guides.
You may read more details on what's available for you in this new platform here: https://camms.atlassian.net/wiki/spaces/CD/pages/272465924/How+to+use+this+platform+for+all+users |
8.1 What's new and how to access the new guide
A quick preview of some of the features that will be made available to you are listed below:
- An advanced set of search features to locate what you are looking for
- User-friendly navigation between articles
- Exporting articles into PDF/Word
To access the Camms.Project help guide:
- Click the 'Support' menu icon and select the 'User Guide' option.

- This will open the Camms.Project User Guide.

8.2 Advance search features
- Quick search
- To search any content quickly, simply click on the search bar at the top of the page.
- Key in the search word within “” (double quotations) and select the page if you see the exact page.
Note: Keying in words within “”, will filter out pages having the exact phrase. To filter pages with multiple words which isn’t the exact phrase, enter the words without “”. 
- Advanced search options
- If you wish to filter out more details, key in the search word within “” (double quotations) and press the Enter key.
- This will open a ‘Search’ page listing out all pages with your search content.

- Search filters – The following filters will further assist you in filtering details more accurately:
- Spaces – This will not be used, as all content will be held under one space. However, if you have access to other private spaces as well, you can filter content by its space name as well.
- Contributors – You can filter content by its content contributors as well, if you know who has added any content to a page.
- Type – This filter can be used to filter details if content is located in locations other than in pages (e.g. spaces, attachments, blog posts, comments). Most content will be in pages, therefore, this filter will not be used much.
- Last modified – Enter a timeframe to filter content by, if you know when the page was last updated.
- Labels – Most pages will have a label added to it, at the bottom of the page. You can further filter details by entering the label added to a page.
- Pages under – If you want to search content within a known page, then you can key in the page name and select it. This will search the content within that page.
- Archived content – By default the value will be set to ‘Don’t include in search’. This will not include pages having the content, in archived old/discarded pages. In case you wish to search in the archives as well, then select the ‘Include in search’ option.
- Other filters – Search titles only – By ticking this checkbox, you will be able to search only pages having the content in its title.
8.3 User-friendly navigation between articles
Each page will have its own navigation controls, which will make it easier for you to traverse within the guide’s content.
- Page-wise table of content – At the top of each page, there will be a page-level table of contents, listing out the main and subtitles within that page. This will help you, if the page is too lengthy. Simply click on a title and go directly to that section.
- Previous/Next article – At the bottom of each page, there will be a link to the Previous article and Next article, along with the page title. Simply click on the title to access that page.
- Access to main Table of Contents page – At the bottom of each page, a link to the main Table of Contents page will be available for you to click on it and go directly to the main page.

- Navigate to sub pages under a main page – Some pages will have sub level pages under it. These pages will have a linked list of page titles at the bottom with all its sub level pages. Simply click on a sub level page to access any of it.
8.4 Exporting articles into PDF/Word
Each article can be downloaded separately as a PDF or Word document if required.
- Select the More Actions (...) icon at the top-right corner of the page.
- Select the Export option, and select if you wish to download the page as a Word document or a PDF document.

Areas requiring further improvements |
Last updated: 2-Dec-22
- General
- Icons in the 'Support' Menu in the header bar does not display.
- The navigation menu items of the Project can be viewed with product names given by the product users.
- There are several user interface mismatches and alignment problems that currently exists, and are being looked into.
- My Quick Update
- An error message appears when you click on the 'Kanban' button in the 'Task Schedule' popup within the 'Project' widget.
- The 'KPI' widget does not function as expected.
- You cannot navigate to 'My Settings' by clicking on 'Profile Picture > Settings' while you are in the 'My Quick Update' area.
- When you click on the 'Project Title' while in the 'My Project' widget, the Project Details opens in the same tab of the browser.
- The widget count displays as object, after navigating to the relevant responsibility.
- Clicking the 'Risk Tittle' in the 'Risk' widget, opens the Risk in a new window.
- An error message is shown when opening the Risk in a new window.
- When you click on the 'Risk Action' title while in the 'My Risk Action' widget, the 'Risk Action' details opens in the same tab of the browser.
- The filters that are saved as default in the 'Project Task' widget gets cleared when you log out.
- The 'KPI' widget is shown as KPI/KRIs.
- The 'Attachments' and 'Discussion' tabs within the detail popup of the 'Task' widget, does not show the details.
- Project Register
- When you navigate to the Project Register, the “Show All” view will be displayed as the default view, instead of “My Projects”.
- Project Hub
- When updated the project %complete value in the 'Schedule' object, it will automatically be updated in the Project Hub area as well.
- Custom Object
- .You can search and filter the dropdown list options in custom tables to easily find the options you are looking for.
- Reference Object
- 'Reference Projects' are not displayed accurately.
- Incident Object
- Currently, you cannot add a new Incident.
- Project Terminations
- Project Terminations cannot be completed.
- Workflow Configuration
- Currently, you cannot create or duplicate workflows.
- Sign Off Object in Project Workflow
- Currently, you are unable to add 'Sign Off Authorities' and submit a phase/object for approval.
- Sycle Clients
- You cannot navigate to the Camms.Project application via the 'Product Navigation' Menu.
- The 'Sycle' Menu icon in the header, does not display.
Note: All these areas will be improved/fixed withinin the next few days. |
Additional Note: To access the modernised Camms.Project Product, you can continue using the existing links. However, if you wish to access the updated links, please contact your respective Account Manager. |