STEP 1: To add a new task, click 'Add' on the top of the Gantt chart. A new line will appear after the listed last task.
Field | Description | Mandatory/Optional |
Progress | Indicates the progress of the task with a colour. | N/A |
Progress Comments | Add progress comments for a particular task. | Optional |
ID | The task ID. Non-editable for all Tasks. | N/A |
Task | Define the task title. Defaults to ‘New Task’. | Mandatory |
Start Date and End Date | Define task start and end dates. By default, start date will be set to the project's start date and end date will be set to one week from the start date. This may change according to the values set by your system administrator. | Mandatory
|
Responsible Person | Select the task responsible person. The icon here will list only the members in the ‘Project Board and Team’. By default, the responsible person will be copied from the previous task recorded. If this is the first task being recorded for the project, it will default to the Project Owner. By clicking on this icon ' The Responsible Person column in the Gantt will show the primary responsible person first, followed by the secondary responsible persons in alphabetical order. | Mandatory |
Duration | Define the duration (in days) for the task. The task finish date will adjust according to the duration defined. Non- working days will be automatically excluded. Set to 7 days by default. | Mandatory |
Status | Select the task status from the dropdown.
| Mandatory |
Progress % | Input the current progress percentage of the Task. | Mandatory |
Predecessors | Designate which task will be preceding the task that is being updated. Enter the task ID of the preceding task. | Optional |
Completion Date | Enter the task completion date. | Optional |
Constraints | If the Task Start Date is changed, the below constraints will be applicable. However, this will only be applied when the 'Enable Manual Scheduling On Gantt' setting is ticked.
| N/A |
 ' you will be able to view all of the staff members in your board and team. This allows you to select multiple responsible officers for the task. However, you will be required to select a 'Primary' responsible officer (this is the person which will show up as the task responsible person from planning (IP) if you have this linked). The person selected as the primary responsible officer will also be responsible for updating the task (the task appears on their quick update home page only). You can allocate % and hours per each day against each person. See below example.
Multiple Staff Assigning
You can assign multiple resources to a task by clicking on the icon ' ' in the 'Responsible Person' column.
STEP 1: Tick the staff which you need to allocate as resources and click 'OK'. You have to select the primary resource by selecting the 'Primary' radio button and it is compulsory that you choose one.

You can also see the percentage of involvement through the 'Percentage' which will be decided by the user (double click on the 'Hours Per Day' box in order to edit the value).
STEP 2: Click the ‘Save’ icon to save the modifications.
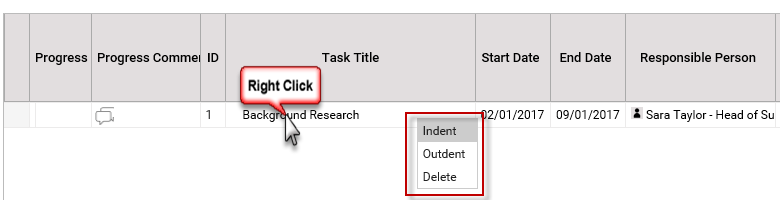
Outlining Tasks into Sub Tasks and Summary Tasks
- Create an outline for your tasks by indenting and outdenting them to create the summary tasks (main task) and sub tasks. The summary tasks are bold and out-dented, and the sub tasks are indented beneath them.
- Select the task that you need to modify and click on indent/outdent icons above the Gantt.
OR - Right-click on a task and select indent/outdent.
 | If the main task has sub tasks, then the main task start and end date will be dependent on its sub tasks. You will not be allowed to edit the main task start and end dates. This may change according to the settings configured by your system administrator. The progress percentage of the main task is auto calculated as an average of the sub-task(s) progress. Therefore, you will not be allowed to edit the progress of the main task. |
Creating a Milestone
To convert a task to a milestone by
Right-clicking on the task timeline and click ‘Convert to Milestone’ button
Or
Change the duration of the task to ‘0’.
You can convert a milestone to task by
Right-clicking on the task timeline and click ‘Convert to task’ button
Or
Change the duration of the task to a value greater than ‘0’.
Creating Task Dependencies
You can create logical links to depict dependencies between two or more tasks. The status of the "Preceding" task directly affects the "Successive" task.
STEP 1: Select the timeline of the predecessor task and connect it to the successive task by drawing a link using the mouse pointer. Connect this line to the other task that you need to link this task to.
The dependency will be set as finish-to-start by default.
STEP 2: The system provides the following options to define task dependencies. To customise the linking, right-click on the connecting line.


Link Type | Description |
Finish to Start | The preceding task must be completed in order for the successive task to start. |
Finish to Finish | The preceding task must be completed in order finish the successive task. |
Start to Finish | The preceding task must be started in order to finish the successive task. |
Start to Start | The preceding task must be started in order to start the successive task. |
Remove the dependency between the tasks by selecting 'Delete' option.
Adding Constraints to Tasks
Constraints can be applied to your tasks to impose restrictions on the on the task's start and finish dates are calculation.
STEP 1: To add a constraint to a task, right click on the task timeline and click ‘Properties’. A pop-up will open with all constraint types available.

Field | Description |
As Soon As Possible | Schedules the task to begin as early as possible. The constraint date will be grayed out. |
Start No Earlier Than | Schedules the task to start on or after a specified date. Use this constraint to ensure that a task does not start before a specified date. |
Finish No Earlier Than | Schedules the task to finish on or after a specified date. Use this constraint to ensure that a task does not finish before a certain date. |
Start No Later Than | Schedules the task to start on or before a specified date. Use this constraint to ensure that a task does not start after a specified date. |
Finish No Later Than | Schedules the task to finish on or before a specified date. Use this constraint to ensure that a task does not finish after a certain date. |
Must Start On | Schedules the task to start on a specified date. Sets the early, scheduled, and late start dates to the date that you type and anchors the task in the schedule. |
Must Finish On | Schedules the task to finish on a specified date. Sets the early, scheduled, and late finish dates to the date that you type and anchors the task in the schedule. |
STEP 2: Select a constraint type from the Constraint type list and specify a date if required. Click ‘OK’ to save.
Set Lead or Lag Time between Tasks
When you set up task dependencies, there may be some successor tasks that can start before their predecessor tasks are completed and other successor tasks that cannot be started until after a delay that follows the conclusion of their predecessor tasks.
Lead time: This is an overlap between two tasks that are linked by a dependency.
Lag time: This is a delay between two tasks that are linked by a dependency.
To set lead/lag time,
STEP 1: Right click on the dependency link and select ‘Properties’. A pop-up window will open.

STEP 2: Type in the lead/lag time. To enter a lead time, you need to type the value as a negative number. In order to enter lag time, type the value as a positive number.
STEP 3: Click ‘OK’ to save the record.
 | You can set lead time or lag time between a maximum of two tasks and the lead or lag time must be set after a dependency is created between those tasks. |
Auto-saving functionality
All changes made in the Gantt chart is auto-saved at the frequency defined by your administrator. The default Auto Save frequency will be configured to 5 minutes. The minimum frequency will be 0.1 minutes (6 seconds).
The standard and custom fields within the Task Planning Object, if made mandatory will be auto populated with default values as described below. This is also applicable on clicking away from the relevant cell if there are no values inserted into the field.
Standard Fields
- When a new task is inserted the text ‘New task’ will be auto populated as the task name.
- If the task name is deleted from an existing task, the previous task name will be auto populated
- If the Revised Start Date is edited to be greater than the Revised End Date or if the Revised End Date is lesser than the Revised Start Date, the Task Start and End Date will be auto populated for Revised Start Date and Revised End Date
- Mandatory field validations for all standard fields will work as per existing standard behaviour
Custom Fields
- Gantt Custom Lists – The first value in the custom list
- Comment and Gantt Custom Text fields – Field label name
- Numeric Fields – Numeric value ‘Zero’
- Standard and custom Date fields – Current system date
- Standard and custom Check Box – False
- Calculated fields – Numeric value ‘Zero’
Note: The Auto Save functionality will not be applicable to the following features of the Gantt;
- Scale to Fit
- Show Hide/Critical paths
- Highlight my Tasks
- Full screen
- Full View / Month View / Table View
- Weekly / Monthly / Yearly View
- Changes within resource allocation popup (Note: changes will be saved once you click on the ‘OK’ button in the resource allocation pop-up, after making the changes)
The data changes done within each view listed above will be Auto Saved. Only the ‘view’ of the Gantt will not be saved. For example, if you change the Gantt from a weekly view to a monthly view and then refresh the Gantt, the Gantt will load the default view.
If the project time frame is NOT based on the Gantt and the task dates are outside the project time frame, you will be prompted with a validation to adjust the dates as per the existing functionality. The Auto Save will not work until you correct the dates.
Additionally, you can manually save your changes by clicking on the Save icon.
