 CAMMS is pleased to announce the May Feature Release for cammsincident.
This was released on 29th May 2020 and includes the following new features and enhancements to improve your user experience within the system.
1. Ability to configure the default Incident Status in the Dashboard
Admin can now configure what the default status should be, when selected for incidents (out of Open, Closed and None – which behaves as Show all) in your ‘Incident’ tab within the dashboard.
- When accessing the miscellaneous settings area via Framework>Incident Settings, you will find a new configuration where you can select the default status, in the Incident Status Filter within the Dashboard.

Image 1 (a): The newly available configuration
- This will be set to ‘None’ by default which will show the incidents of all statuses.
- You will be able to select and filter the incidents based on their preference, using the filter in the usual manner.
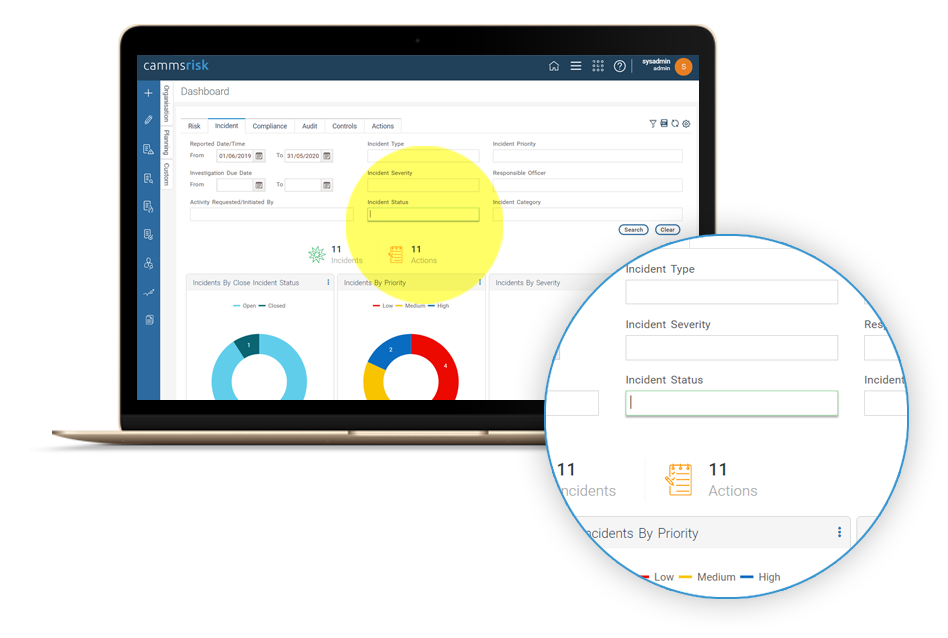
Image 1 (b): The Incident Status will be set to ‘None’ by default
2. Ability to have the Responsible Officer for the Incident in anywhere in the workflow
Administrators, can now configure the standard field ‘Incident Responsible Officer’ to be anywhere in the workflow without it being mandatory for incident creation.
- A new field type ‘Responsible Officer Dropdown’ is available in the object configurations area, accessed via Framework>Incident settings. You will be able to create a new field selecting the field type as above.

Image 2 (a): The Incident Status will be set to ‘None’ by default
- When you make the field visible for the object, you will be able to use the field in place of the standard field, thereby all its functionality and properties will be inherited to the newly created field.
- You can configure the existing standard field ‘IncidentResponsibleOfficer’ in the ‘IncidentDetails’ object as non- mandatory by un-ticking the ‘Required in Save’ and ‘Required in Submit’ configurations (based on your set up) from the field configurations, so you can fill in the Incident Responsible Officer field at a later stage in the workflow.
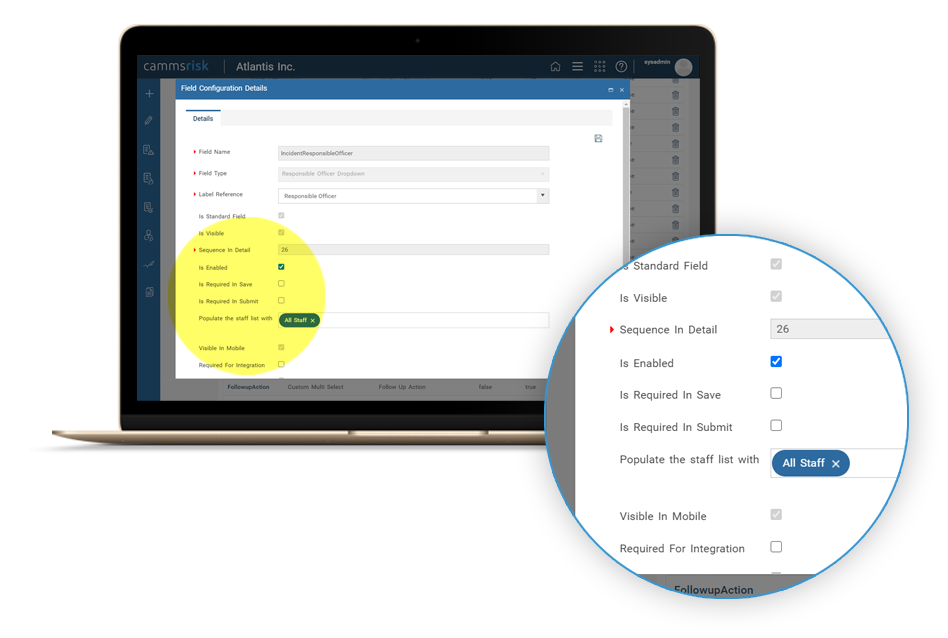
Image 2 (b): Standard Responsible Officer field
Note: You will be able to completely hide the standard responsible officer field, which will be available in a future sprint release.
- You can configure the Incident Responsible Officer field in any of the Standard and Custom Objects except for the Documents, Actions, Linkage, Risk Analysis and Task objects.

Image 2 (c): Responsible officer configured on a custom object
- If you have multiple fields configured in different places in your workflow, the selections will synchronize with each other, so any update in either area will get updated in every place.
- The rest of the functionality behaves as it currently does for the new fields.
3. Ability to display additional information of any staff within the incident workflow
Administrators can now configure to show additional information for the staff fields.
- The current field type ‘Staff Drop down with Details’ available in the field configurations area, accessed via cammsrisk>Framework>Incident Settings>Object configurations, has been improved to provide more configurations to display additional information about the staff such as:
- Position
- Location
- Resource Location
- Phone
- Payroll
- Organisational Link
- Reporting Officer
- This information for the staff will be directly mapped to the same fields available for the staff, under the Administration>Staff area.

Image 3 (a): Staff details
- When selecting the field type ‘Staff Drop down with Details’ from the field configuration area, an additional configuration named ‘Show additional details in the tool tip related to’ will help you select what to show from the above details as a tool tip, next to the staff field. This will be selected as 'None' by default.
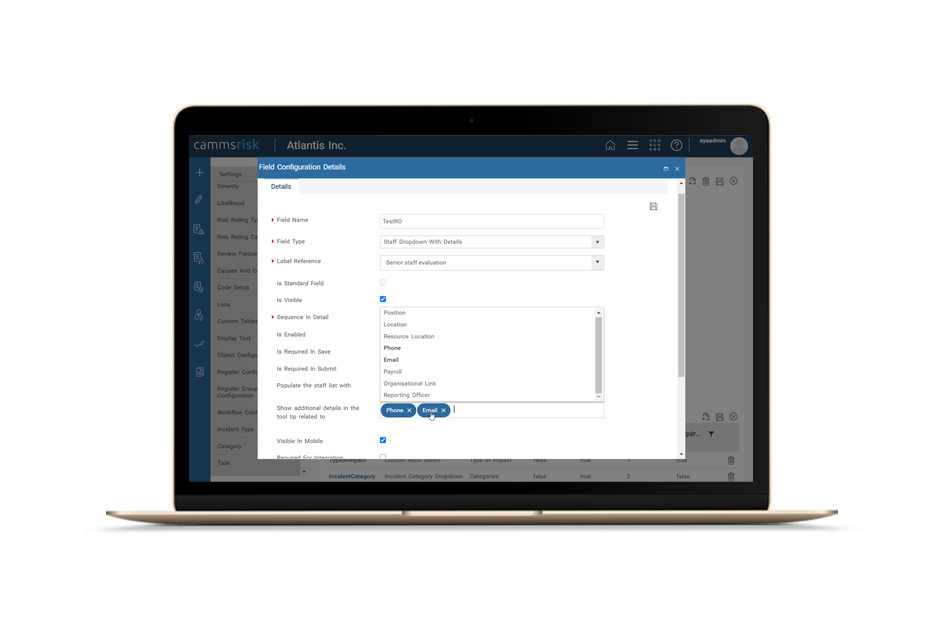
Image 3 (b): Configuring the additional details
- If you don't want a tool tip against your field, you can do this by not selecting anything from the configuration and leaving it blank as default.
- If you prefer to have the extra fields populated as text fields within the same form/object rather than a tool tip, you can do this via a custom configuration of fields as shown below;
For example, if your main staff field is named ‘StaffDropdown’ and you have selected the field type as ‘Staff Dropdown with Details’, let's assume you'd like to auto populate the staff details, Phone and Email on the incident form, you can do this by configuring two new fields as StaffDropdown_Phone and StaffDropdown_Email.
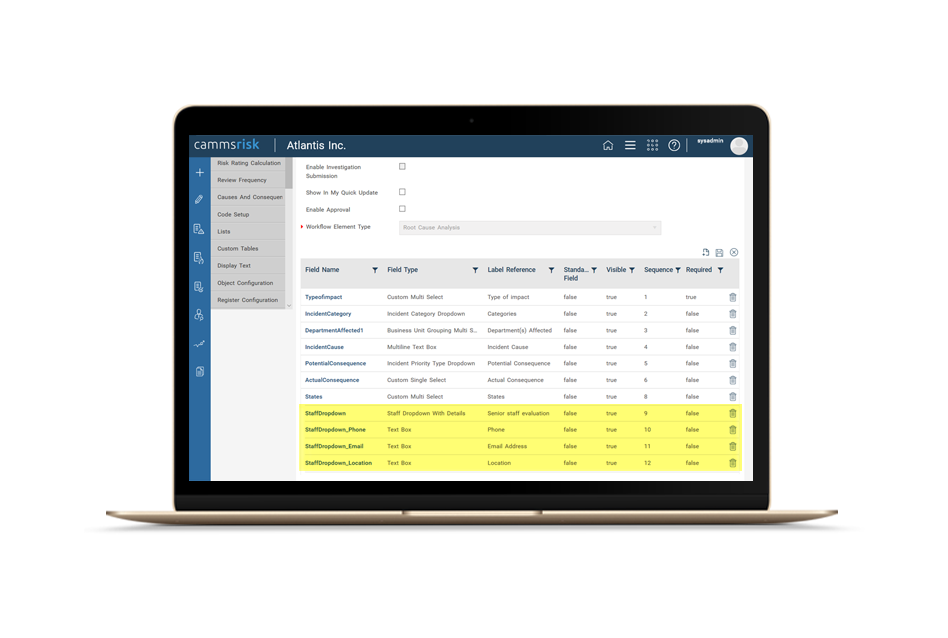
Image 3 (c): Example configurations
Note: As any edits from the incident form will not synchronize with the staffs details page under Administration , we would advise you to disable the ‘Is Enable’ tick box in field configurations for any configured text fields, in order to make them non-editable for the end-users.
- The sequence and the labels for the fields can be anything you choose and the rest of the functionality would follow the existing standard. However it is important to configure the fields following the MainFieldName_StaffDetail format, so the feature can function as expected.
- Once the configurations are done, the additional information will be shown in either/both ways shown below.

Image 3 (d): Tool tip and configured fields displaying the additional details
4. Ability to display an instructional text against categories
The administrator can now configure instructional text to show against each category, which will display when an end-user selects a category, to guide them on the categories they select.
- The existing category settings area which can be accessed via cammsrisk>Framework>Incident settings, has been improved to have an ‘Edit’ option when clicked on, you then have a rich text editor available to configure the instructional text.

Image 4 (a): ‘Edit’ option for categories
- You can enter up to 4000 characters of text and also use the available configurations within the rich text editor to be shown to the end-user when selecting a category for the incident.

Image 4 (b): Adding instructional text for categories
Note: There are some known technical difficulties when rendering rich text within HTML pages, therefore there can be some formatting issues with high resolution images and tables while in use. Please let us know if you come across any issue as such and we will try and work with you to find a solution. In the meantime, CAMMS will continue to improve the behavior and more updates will be available in future releases.
- Once you have configured the text for categories, the end-user will see them as below. Only the categories selected for the incident will have the description shown in the tool tip. Each category description will have separate tabs within the pop-up.
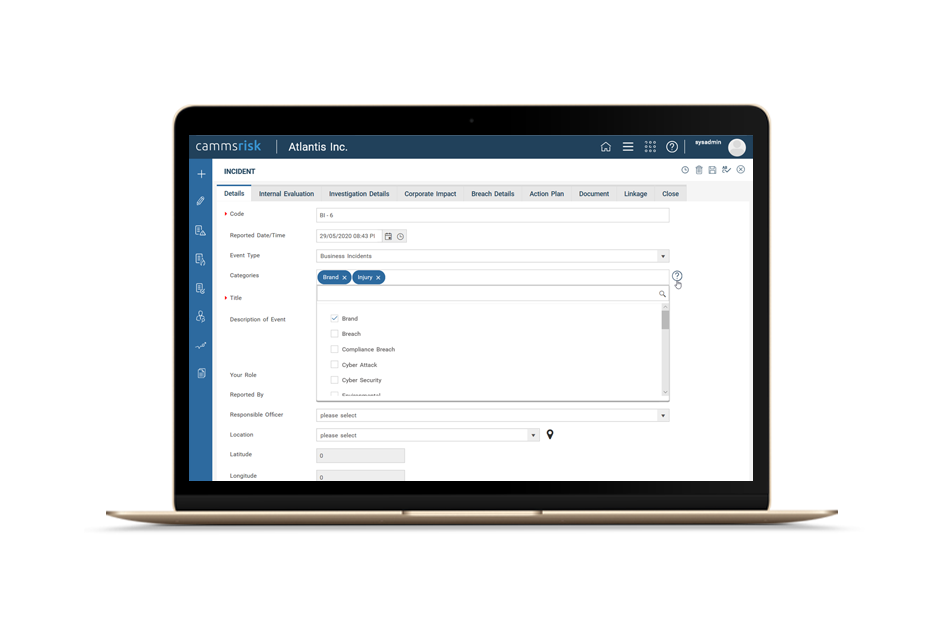
Image 4 (c): Tool tip to show the text
- A Tab will not appear for any categories selected for the incident, but with no text configured.
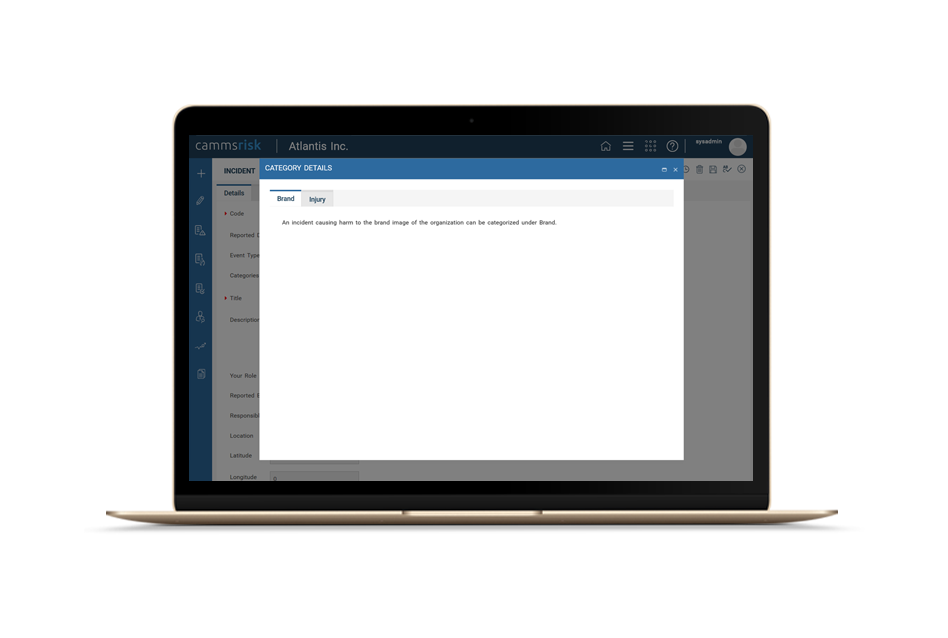
Image 4 (d): Displaying the text for categories
5. Auto-populate a task list based on categories for the incident
As an administrator, you can now enable the ability to have a task list auto-populate for the incidents linked with the category/s they are linked to.
- We have introduced a new standard object ‘Tasks’ that can be used in your workflows just as other objects. The purpose of this object is to define the fields that are shown for the tasks that will be assigned to the incidents.
- Via object configurations accessed through cammsrisk>Framework>Incident Settings, a new object ‘Task’ will be available with the following standard fields:
- TaskName – The name of the task
- TaskStatus – The status of the task (standard statuses Not Started, In Progress, Deferred, Completed and On Going will be available here)
- TaskStartDate – The start date for the task
- TaskEndDate – The end date for the task
- TaskTimeFrame - A timer which can be set to run down from the moment of incident creation counting down to task completion. Emails can be configured based on the timer which is explained below
- TaskDescription – A description for the task
- TaskComment – Comment field to add progress comments on the task performance
- IsMandotory – Whether or not the task is mandatory
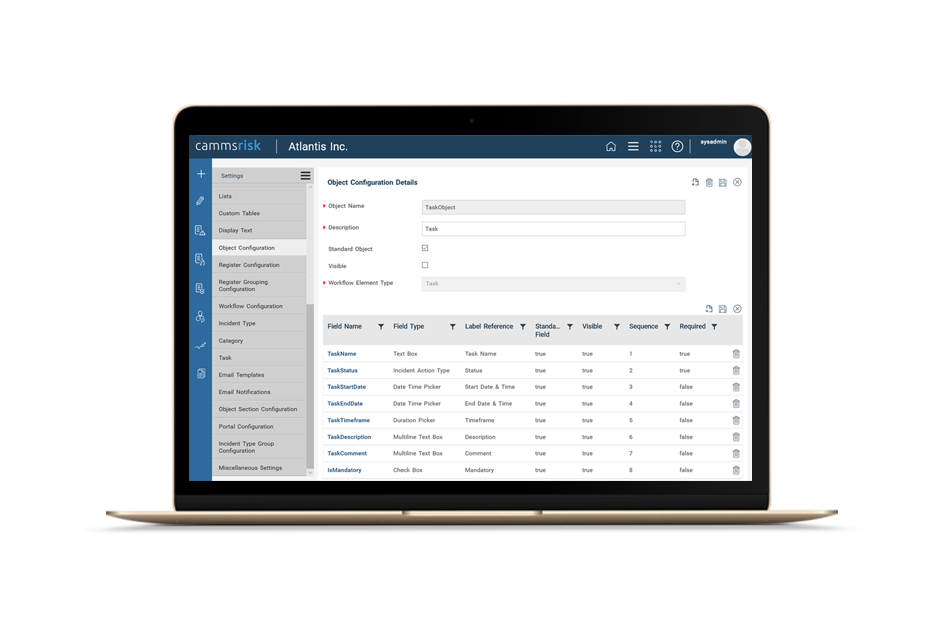
Image 5 (a): Task Object
Note: For the moment, the task object will only allow the usage of the above standard fields. CAMMS will be working to further improve the task object to allow having custom fields as well in the future via the road map
- Once the object configurations are done, if you wish to enable the task object as a separate object in the workflow, you should tick on the ‘Visible’ configuration to make the object visible in the workflow. If you wish to enable the task object as a field on another object in the workflow, you should un-tick the ‘Visible’ configuration from object configurations>TaskObject
Note: Both of the above configurations will not function together, hence it is advised to keep the task object not visible and enable the object as a field within another object – ideally, the Incident Details standard object with the category field enabled. We will improve the feature to provide the ability to use tasks in both ways in the future.
- Next, add the object to the workflow you desire to have this in. This object cannot be replicated yet, hence in every workflow, the same field configurations will follow.
- Next, the user roles will have to be given permissions for the task object via cammsrisk>Framework>Incident settings>User roles area in the standard manner object permissions are given. Any user with access to the incident will be able to add/edit/delete tasks based on the permissions their user roles would have for the Task object. The Incident Responsible Officer will have all permissions to the task object by default as standard behaviour.
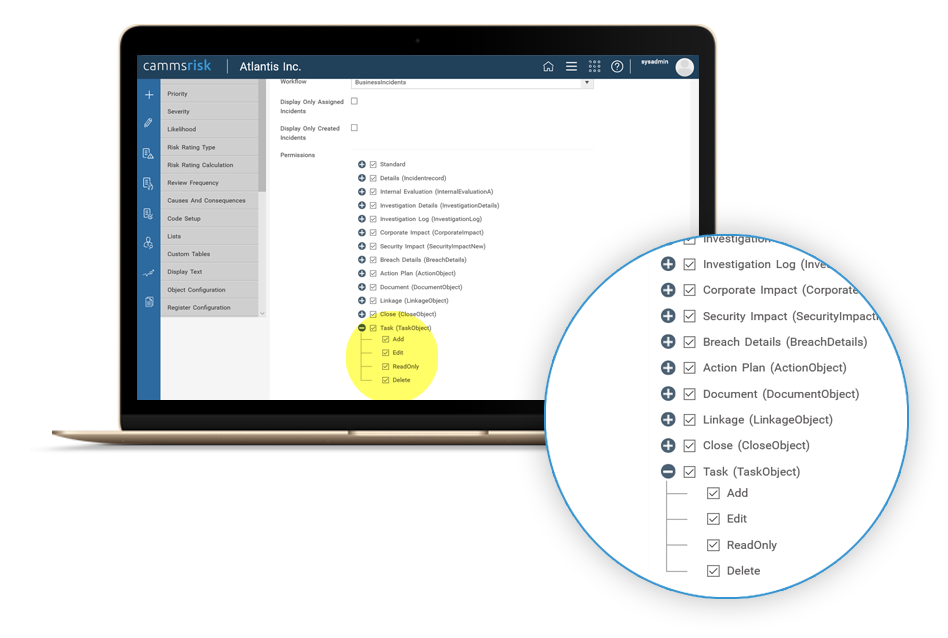
Image 5 (b): Task Object permissions
- The next step would be to configure the task object visibility on an object in your workflow as a field. A new field type ‘Task’ is introduced within the field configurations area, selecting which the task object can be configured.

Image 5 (c): ‘Task’ field type
- Additionally, there will be another configuration ‘Enable Adding Tasks Within Task Grid’ to enable adding tasks from within the grid itself for the end user for the incident.
- After the field configuration is done, the next step would be to create tasks globally to later link with categories. This is done via the new ‘Task’ setting accessed via cammsrisk>Framework>Incident settings. Only the users with permission given via User roles in incident settings, will be able to see and access this area.
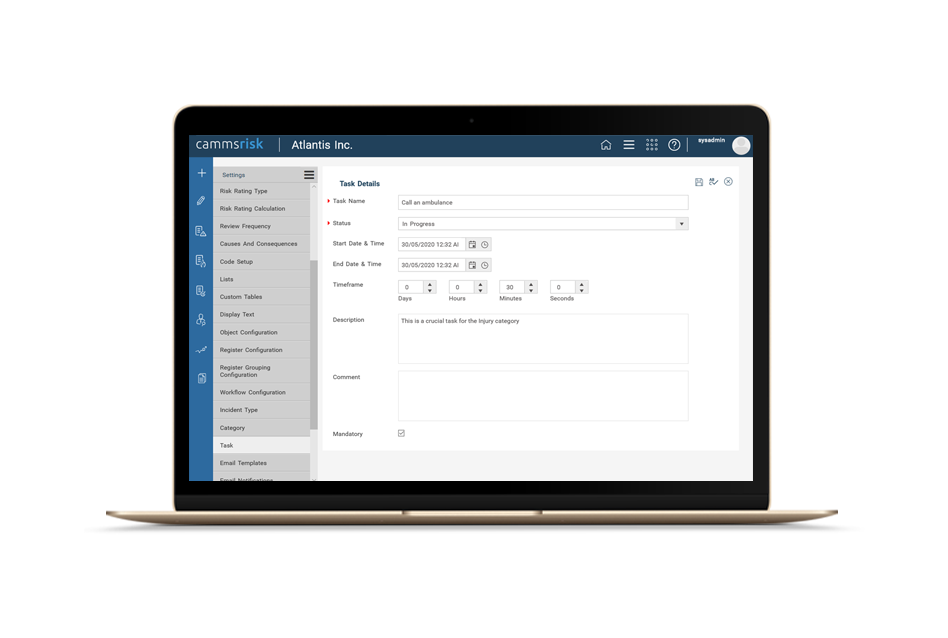
Image 5 (d): ‘Task’ settings
- You can create tasks from here adding the relevant details. This will behave as the task library from which you can link tasks to categories later on.
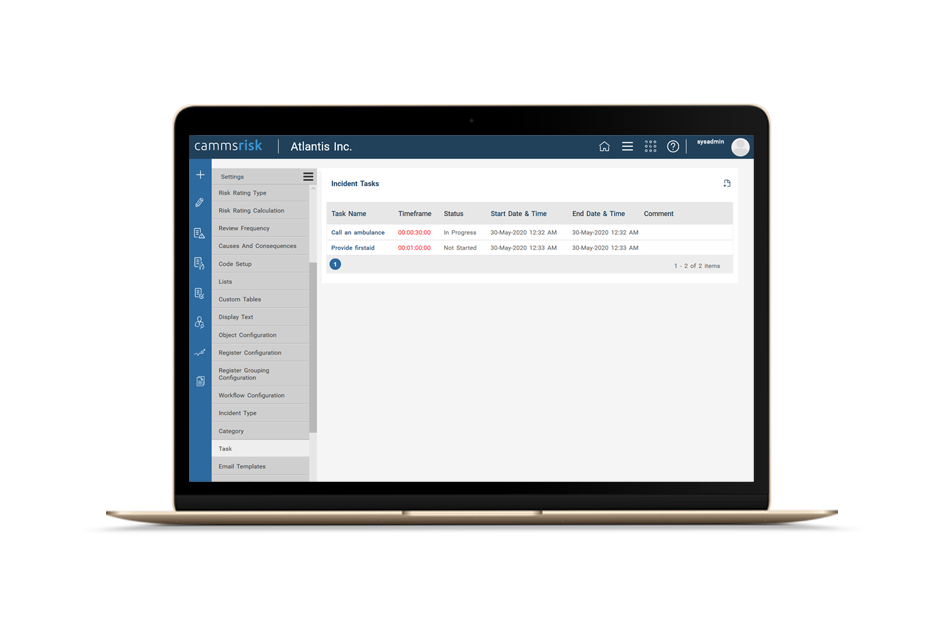
Image 5 (e): Task Library
- Tasks can then be linked to categories via Category Settings available at cammsrisk>Framework>Incident Settings from the ‘Task List’ option. All available tasks will be listed here, and you can pick and add those which are applicable to the category. All saved tasks will be shown under each category as shown below.

Image 5 (f): Linking tasks and categories
- Once the configurations are done as above, for any new incident created, upon selecting the categories for the incident, any relevant linked tasks will auto-populate within the tasks grid. The countdown for the time frame will begin from the moment the category is saved for the incident. You will be able to add/edit/delete tasks from the task grid within incident based on the permissions the user has via user roles.
- A new configuration is available in the standard ‘CloseObject’ object for the ‘CloseIncidentStatus’ field, as ‘Restrict users to close incidents until task completion’ upon enabling which, the incident will not be closed until all linked tasks are in either completed or deferred statuses.

Image 5 (g): Tasks in the Incident
Important:
- For tasks marked as mandatory, the time frame will not be editable for the incident user. However, if the task is made non-mandatory the time frame clock can be edited and the time frame will reset to the new time upon save and begin the countdown based on the updated time frame.
- The ‘Task’ field can only be configured once in each workflow and having more than once will not have the subsequent fields in the workflow function properly.
- If the same task is added to both parent and child category and both are selected for the incident, the task will be added to the incident only once and be shown under the parent category. Similarly, if the same task is linked to categories of which both are linked with the incident, the task will be added to the incident only once and the category under which it is displayed will be chosen randomly.
- If you have enabled the ‘Enable Adding Tasks Within Task Grid’ configuration and have add permissions to the task object, any new tasks added from the incident will be categorized under ‘Other’ as they cannot be linked with a category from the incident page. However, if required the administrator user can link the task with a category as explained above later on.
- As soon as you enable this feature and carry out the configurations as above, for any existing incidents with categories already selected, the task grid will appear empty until you deselect the category and re-link with the incident and save again. If required, this can be done manually, individually for all records and since that is inconvenient, CAMMS can assist you with the data population if you choose to enable this feature. Please reach out to CAMMS via Support for any assistance.
What’s coming up?
- We will soon be introducing email triggers associated with task completion, progress and time frame in the upcoming sprints.
- There will also be reports and insights datasets providing the ability to report on tasks and their information.
- We are also working on improving this feature to have the task auto-population be based on other key elements of an incident such as incident type, severity, risk rating etc. via the road map. So, stay tuned for these updates!
6. Improvements to the Incident Portal
We have made major improvements to your Incident Portal user experience to make the process more intuitive and user-friendly proving functionality around accessing secure information by your external users.
- We have now introduced the ability for portal users to set up an account in the application where they can access their submitted/draft records in the Dashboard register. They will be able to access their records, edit, filter and submit them.
Note: The functionality remains the same for the configurations already in place, where the portal users are guest users submitting records using their email addresses. The improved features will only be applied if the below configurations are enabled.
Configurations
- As an administrator with access to the ‘Portal configuration’ settings accessed via cammsrisk>Framework>Incident Settings, three new configurations as below are now available.
- Register Header – Provide the ability to configure the header area for the register for the portal users. This allows you to add a header image/text/description within minimal configurations such as font and background colour. This is also known as the Dashboard.
- Navigation to Page Links – Provide the ability to define what the landing page should be for the portal users once they have successfully submitted a record via the portal. You are able to choose between the Dashboard or Homepage.
- Login Button - Provide the ability to change the name of the ‘Login’ button, add a font and background colour. This will also provide the ability to configure the visibility of the button on the portal.
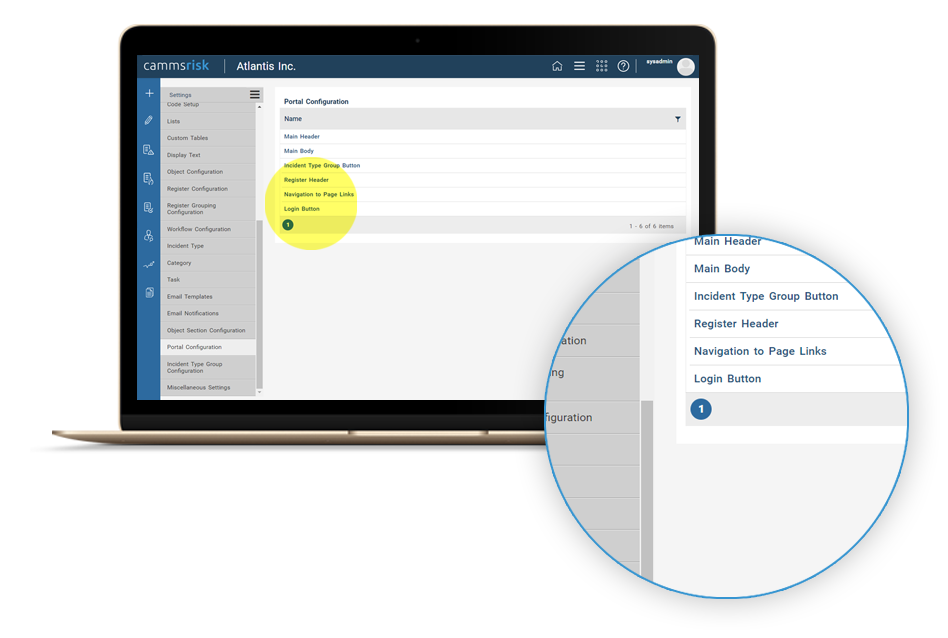
Image 6 (a): Portal Configuration settings
- You will also be able to define the filters and fields of the incident as columns appearing in the Dashboard for portal users via the Register Configurations area accessed via cammsrisk>Framework>Incident Settings where 2 new columns as ‘ Visible in Portal’ and ‘Searchable in Portal’ are available in Incident object based registers.

Image 6 (b): Register configurations
- We have also introduced new email triggers and snippets to the Email Type ‘Incident’ as shown below for the modification to set up notifications to be sent out to incident portal users via Email Notifications/Templates area accessed via cammsrisk>Framework>Incident Settings.

Image 6 (c): Email notification configurations
- Web Account created – This will be triggered when a new user accesses the portal and submits a record entering an unregistered email address. This will send a password set up link to the user’s entered email address to guide them to set up their password for the auto created accounts after submission of a record.
Snippet to be used with this trigger: [PasswordSetupLink] - Reset Password – This trigger will be triggered when a user requests to reset the password and the email will send a link to reset the password for the user.
Snippet to be used with this trigger: [ResetPasswordLink]
- There will be 2 types of users in the system hereafter, as Users and Portal Users in the User area accessed via cammsrisk>Framework>Incident Settings, and all users who access the application via the portal only and create portal accounts will be shown in the system under Portal users. Any existing users cannot be converted to a portal user within the system and they will need to access the portal and have an account created as any other user as explained above. The portal user accounts will not be shown in the staff drop downs accessed within the application.
Note: Only the new portal users created with the above feature will be not shown in the staff drop down within the application. Any existing portal users/email addresses currently being shown in the drop downs will need to be removed (if required) with the help of CAMMS, therefore, please do reach out to us should you need the same.

Image 6 (d): Users
- For the workflow accessed via the portal, the view/add/edit permissions for the portal users are governed by the ‘Standard Incident Creator’ permission accessed via cammsrisk>Framework>Incident Setting>Standard user roles.
- The configuration of the permissions is similar to the standard workflow permission assign mechanism.
Note: It should be noted that this will be the same permission used by the non-portal users as well who creates incidents within the application. Therefore if separate behaviors are required for the incident creator within the portal and within the application, this needs to be handled via separate permissions. Please reach out to CAMMS if you wish to seek our help on the configurations.
- The ‘guest’ role created to grant access for users to the portal and now available at Portal users section accessed via cammsrisk>Framework>Incident Settings>Users will need to be assigned with a user role with at least the below 2 standard permissions enabled.
- Standard Incident Add Permission
- Standard Unlock All Objects In Incident Drafts For Editing Permission
Portal user experience
- Portal users will be able to go to the landing page and submit records in the usual manner by submitting an email address.
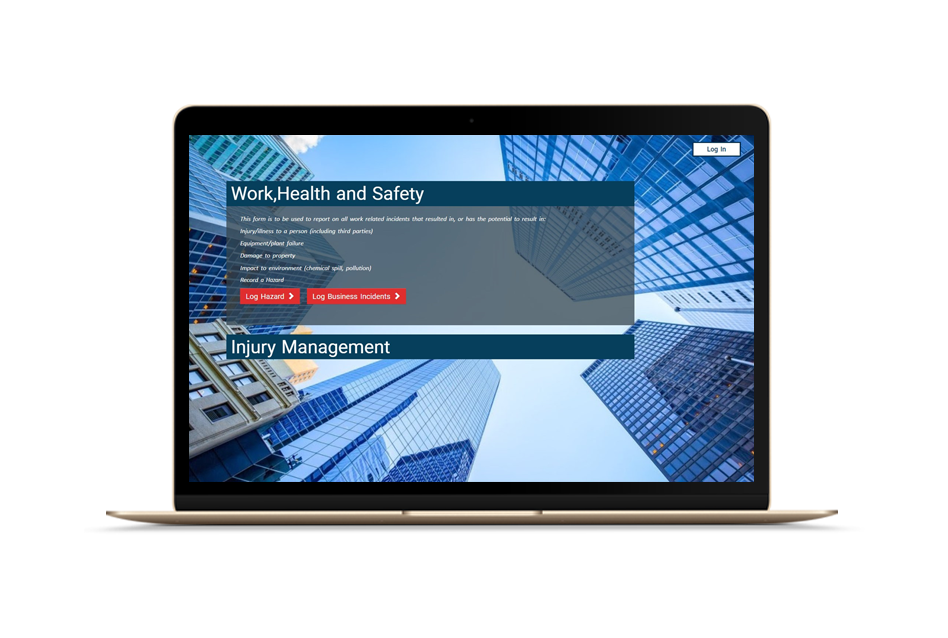
Image 6 (e) - Landing page and Log In button

Image 6 (f): Password Set up
- If the configurations are done as above, an email will be triggered notifying the user of an account being auto created post incident submission with a link to set up the password.
- The user would be able to navigate via the link and set up the password which they can use to log in to the application via the portal the next time they are recording incidents. This can be done via the ‘Log In’ button available atop the portal homepage.

Image 6 (g): Log In
- Users are able to log in to the application and access the dashboard that contains all of the records they have submitted so far, saved as draft for them to access/edit and delete.
- In case the user is unsure of the password and would like to request to reset, this can be done via the reset password option. The reset password trigger above will notify the user of a reset password link which will navigate to the password reset screen.
 Image 6 (h): Re-set password

Image 6 (i): Portal Dashboard accessed upon successful log in
Important:
- In case a user who was once notified of the account created and received the set up password email, yet, had still not set the password and submits a record using the same email used before, for which an account is already created, they will once again be notified with the password set up email . Also for a user with an account already created and password already set up, but who is logging incidents without logging in to the portal first, a reset password email will be triggered (this is a known issue with the feature which will soon be fixed via a maintenance release). Hence it is advised to always log in to the portal to submit records after the first time.
- CAMMS is continuously working on more improvements to the feature and among some key changes will be;
- Introducing a captcha on the login page as an extra step of security.
- Ability to completely hide the tabs the creator doesn’t have permission to see from the workflow. At the moment they will be notified that they do not have view permissions when they access the tab. Stay tuned for the road map updates!
