There are three ways the meeting agenda can be prepared:
Option 1: Click on the 'Meeting preparation' tab in the left side quick links panel. Then click on 'meeting title' to access the meeting details.

Option 2: Click 'Save' on Create meeting. Then the user is directed towards the meeting preparation page.
Option 3: Click on Main Menu > Click on Meeting Centre > Click on Meeting Title > Click on Agenda Tab

Use the Search function to search meeting names and click on ‘Meeting Title’. This will direct the user to the meeting details page by default. Only the Agenda Organiser, Secondary Organiser and system administrator can edit the meeting details. For others, it will be disabled.
Each meeting is linked with an agenda template. If the agenda template has a pre structured agenda, this will auto populate. The user can edit the agenda, if necessary.
- An alternative search facility with multiple filters has been provided for the user in the ‘meeting preparation’, ‘join meeting’, ‘meeting minutes’ and ‘follow up action’ page for each meeting phase.
- The user needs to click the filter icon on the top right corner of the meeting selection page, and it will expand the search filters as shown below.

- The user should be able to filter and search for a meeting by one or more of the following criterion:
- Meeting title
- Date From
- Date to
- Venue
- Minute Taker
- Agenda template name
- The search criterion can be saved by ticking the ‘Save selection for next time’ check box.
Agenda Access
| Administrator | Meeting organiser/secondary organiser | Report Writer | Report Prepared By | Report Creator | Members | Participants | Assigned individual (s)confidential user | Global confidential user | Report approver | Meeting Manager |
Add/Edit Agenda Group | √ | √ |
|
|
|
|
|
|
|
| √ |
Add Agenda Item | √ | √ | √ | √ | √ | √ | √ |
|
|
| √ |
Edit Agenda item | √ | √ | √ | √ | √ |
|
|
|
|
| √ |
View agenda item (excl confidential Items) | √ | √ | √ | √ | √ | √ | √ | √ | √ | √* when sent for approval | √ |
View Confidential Agenda Item |
| √ | √ | √ | √ |
|
|
| √ | √*when sent for approval |
|
Edit Confidential Agenda Item |
| √ | √ | √ | √ |
|
| √ | √ | √*when sent for approval | √ |
Copy/move agenda item | √ | √ | √ | √ | √ |
|
|
|
|
| √ |
Draft agenda download – excl confidential items | √ | √ | √ | √ | √ | √ | √ | √ | √ |
| √ |
Draft Agenda download – incl confidential items |
| √ | √ | √ | √ |
|
| √ | √ |
| √ |
Preview agenda item excl confidential | √ | √ | √ | √ | √ | √ | √ | √ | √ | √ | √ |
Preview agenda item including confidential | √ | √ | √ | √ | √ |
|
| √ | √ | √*only until approved |
|
Mark As complete | √ | √ | √ | √ | √ |
|
|
|
|
| √ |
Revert to Draft | √ | √ | √ | √ | √ |
|
|
|
|
| √ |
Force Approval | √ | √ |
|
|
|
|
|
|
|
| √ |
View history | √ | √ | √ | √ | √ | √ | √ | √ | √ |
| √ |
Finalise Agenda | √ | √ |
|
|
|
|
|
|
|
| √ |
Send Agenda as email | √ | √ | √ | √ | √ | √ | √ | √ | √ |
| √ |
Prepare Agenda
Add Agenda Group/Agenda Item
Only certain users are allowed to add agenda groups and agenda items.
An agenda group and/or an agenda item can be added using the following ways:
1. By Clicking the following action icons in the left side horizontal bar.
Action Icon | Description |
| Add Agenda Group |
| Add Agenda Item |
| Expand/Collapse |


2. Click on '+' next to the Agenda item in the Agenda TOC.

3. Clicking on the following icons when mouse over a new Agenda group.

Edit Agenda Group
Only certain users are allowed to edit an agenda group item. There are a few commonly used Action Icons when editing an agenda group. To Edit an agenda group, click on the ‘Group title’.
Action Icon | Description |
 | Spell Check |
| Duplicate |
| Check Out / Check In |
| Delete |
| Save |
| History |


Edit Agenda Item
Only certain users are allowed to edit an agenda item.
There are a few commonly used function Action icons when editing an agenda item.
Action Icon | Description |
 | Spell Check |
| Duplicate |
| Check Out / Check In |
| Delete |
| Save |
| History |
| Confidential user |
| Preview output |
| Report Output Configuration |
 | Send Agenda Item |
| Mark As complete |
| Revert to Draft |
| Force Approval |


To edit an agenda item, the user must follow the following steps:
- STEP 1: Click on the agenda item title
- STEP 2: Click 'Check out'
- STEP 3: Edit item
- STEP 4: Click 'Save'
- STEP 5: Click 'Check In'
Important Notes when Editing or adding data into an Agenda Item using a RTF.
1. Font of Report – The user cannot select a font style or a number. The global Font style, which is configured in the set up, will be applied to all report outputs. The Font within the RTF can be different but it will not be applied to the report outputs.
2. Copy Pasting Text from another source – Facility has been provided for the user to copy and paste text from an external document, where the user could apply the necessary formatting to the text in the RTF. Failing to clear format will result in Discrepancies in the margins, lists and line spacing before and/or after a paragraph.
3. Copy Pasting Image from another source – Facility has been provided for the user to copy and paste images from via two options:
- Ability to open an image on the desktop, copy and paste the image onto the RTF
- Ability to copy an image on the word document and paste the image onto the RTF
4. Including a table – To insert a table into a report, the user must insert a separate RTF via ‘+’ into the report. An RTF can only have a single table, with no text and multiple tables. If text is included, the entire content will be converted into an image. If multiple tables are included, then only the 1st table will be picked and included in the Report outputs. Table formatting such as Merge/Split sells, format colors will not be applied. The table column width will be split for the total page width.
5. Adding custom fields – The user can add fields in addition to the fields configured in the report template using the ‘+’ sign placed next to the pre-configured fields of the reports.
6. Including Numbering Lists and bullets – Ensure any previous formatting is cleared and select the text to apply numbering or bullets and select the list from the toolbar. The indentation for different levels can be adjusted by selecting indent/outdent from toolbar, or by using the tab key in the keyboard.
The content entered within the RTF can be formatted using bullet and numbering for unordered lists and within ordered lists:
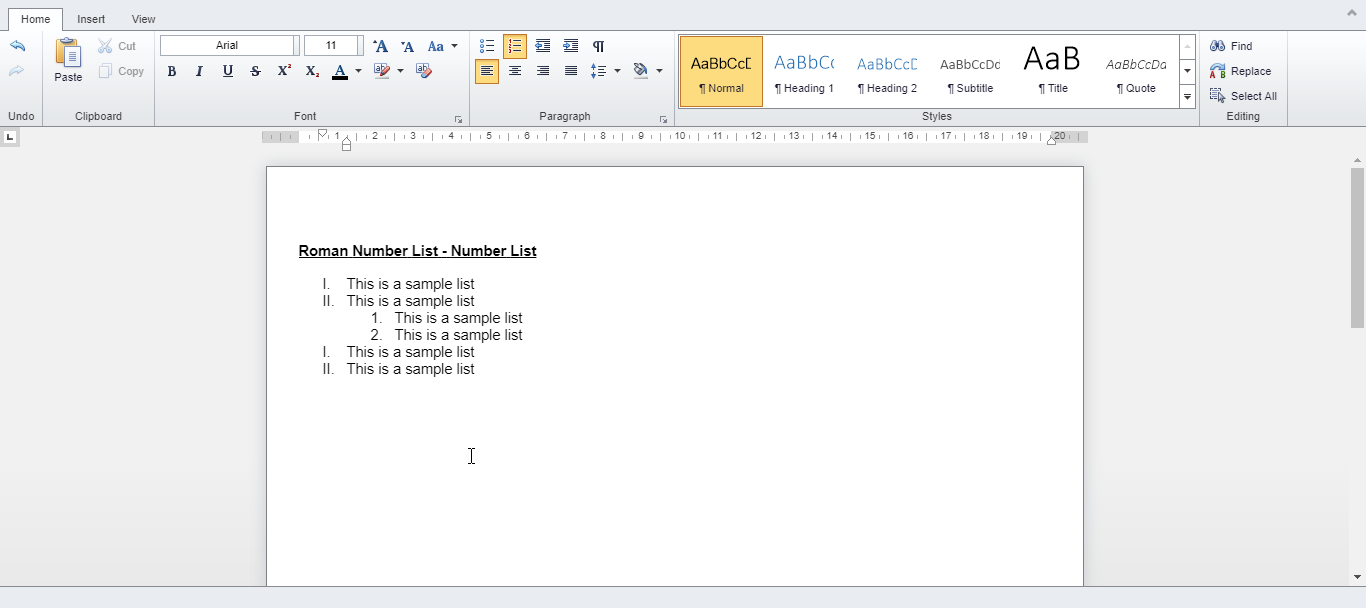
- Include numbered lists with sub level numbering
- Include roman numbering or another numbering style
- Include bullet list with Sub level bullet lists
- Include Mixed Lists – Include Bullet and numbered lists within the report
- Include Mixed Lists – Numbered and Bullet lists within Tables
Include numbered lists with sub level numbering – Include numbered lists within the report

There are two methods in including numbering lists with sub levels:
Option 1
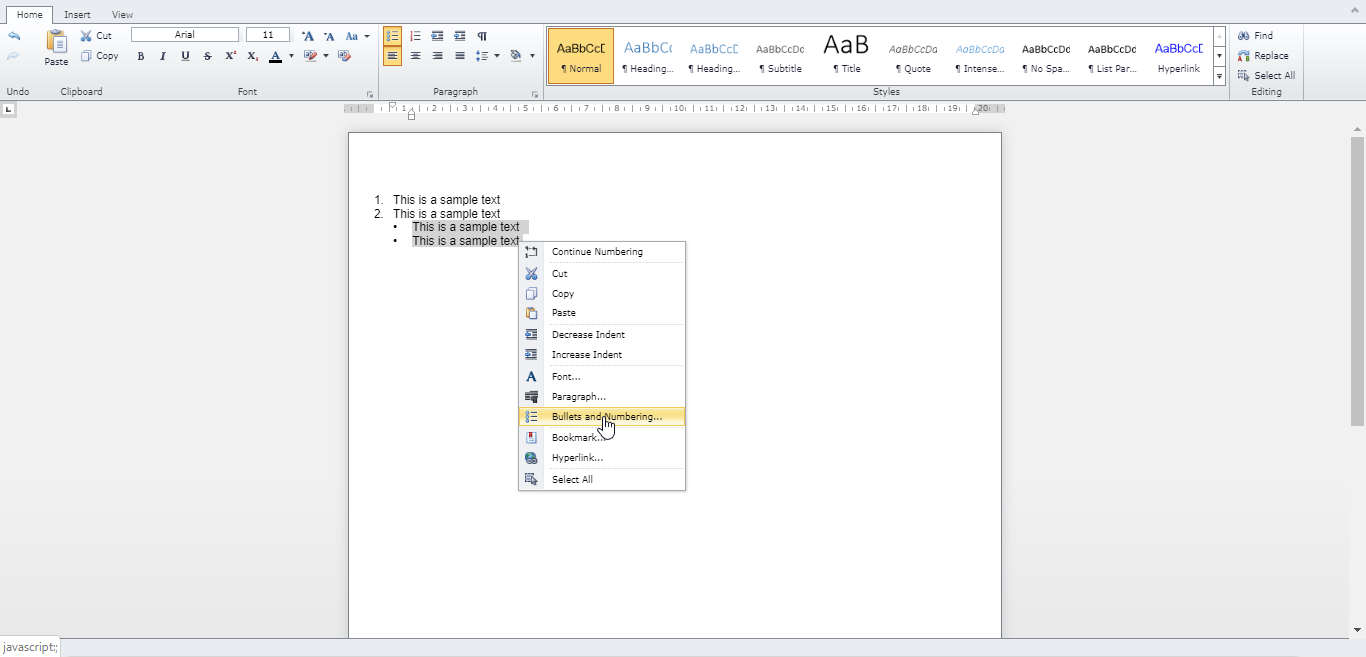
- STEP 1: Place cursor on RTF and press the right click mouse button.
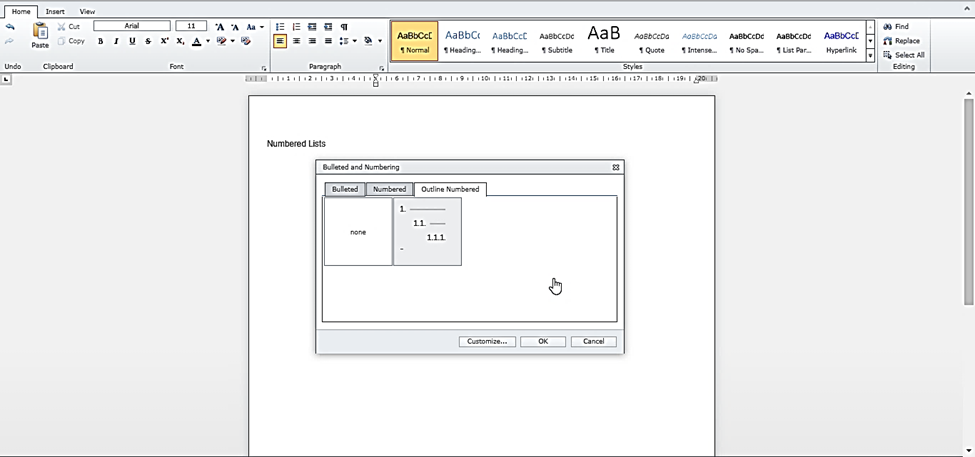
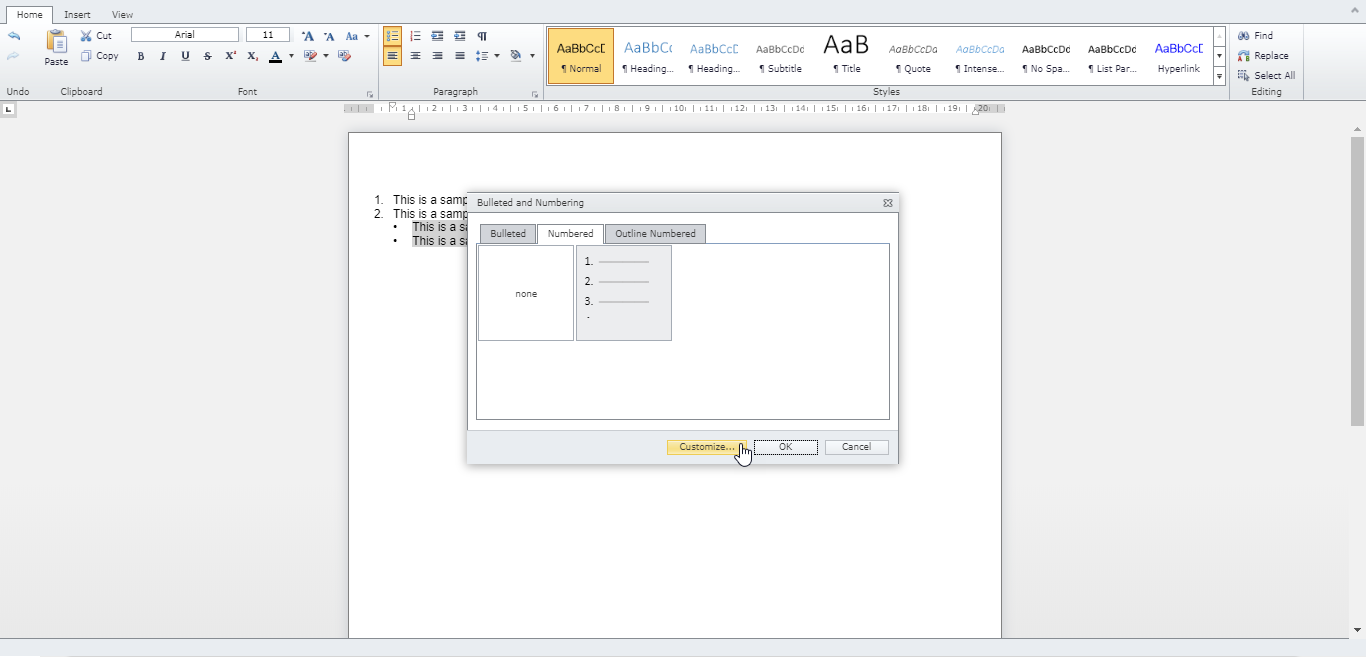
- STEP 2: Select bullet and numbering from the drop-down list menu.

- STEP 3: Select the ‘Outline Numbering’ tab and click OK.
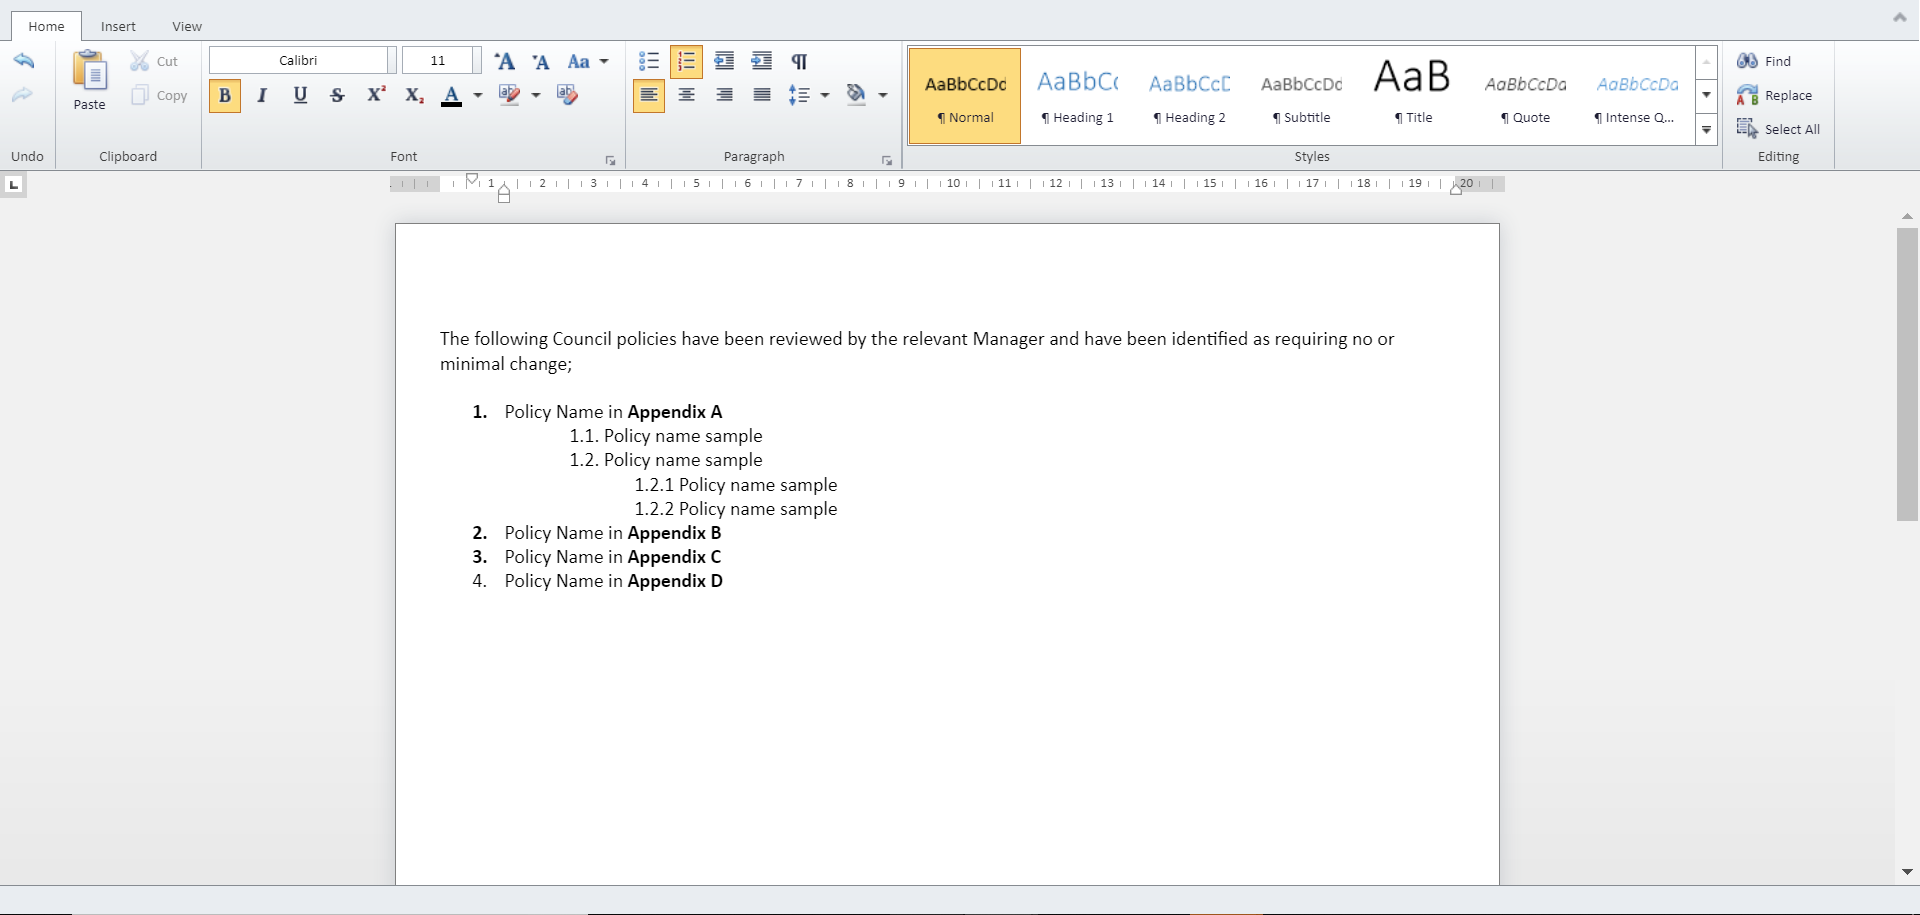
- STEP 4: The first level of numbers will depict as 1,2,3, etc. To create a sub level, press enter key, and indent using the tab key in the keyboard or ‘Increase indent’ from the tool bar. This will create the sub level. The sub level numbers will depict as 1.1, 1.2, 1.3, etc.
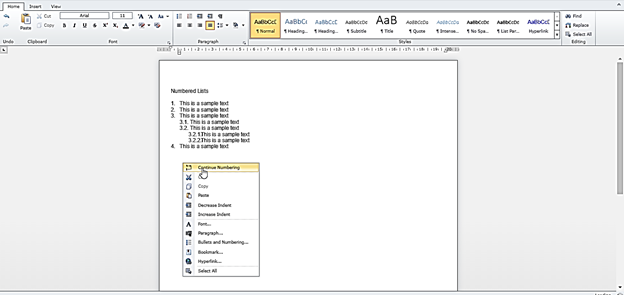
1. Continue numbering: If the document has a previous number list ending at a sub level, this will automatically take the indentation of that sub level number list. Adjust the indentation by clicking on the ‘Decrease Indent’ key from the toolbar where the numbering list will continue from the previous number list.
Alternatively, if the numbering list needs to be continued from the previous number list, press ‘start a numbered list’ from the toolbar. Press the right click mouse button and select continue numbering from the drop-down list menu.
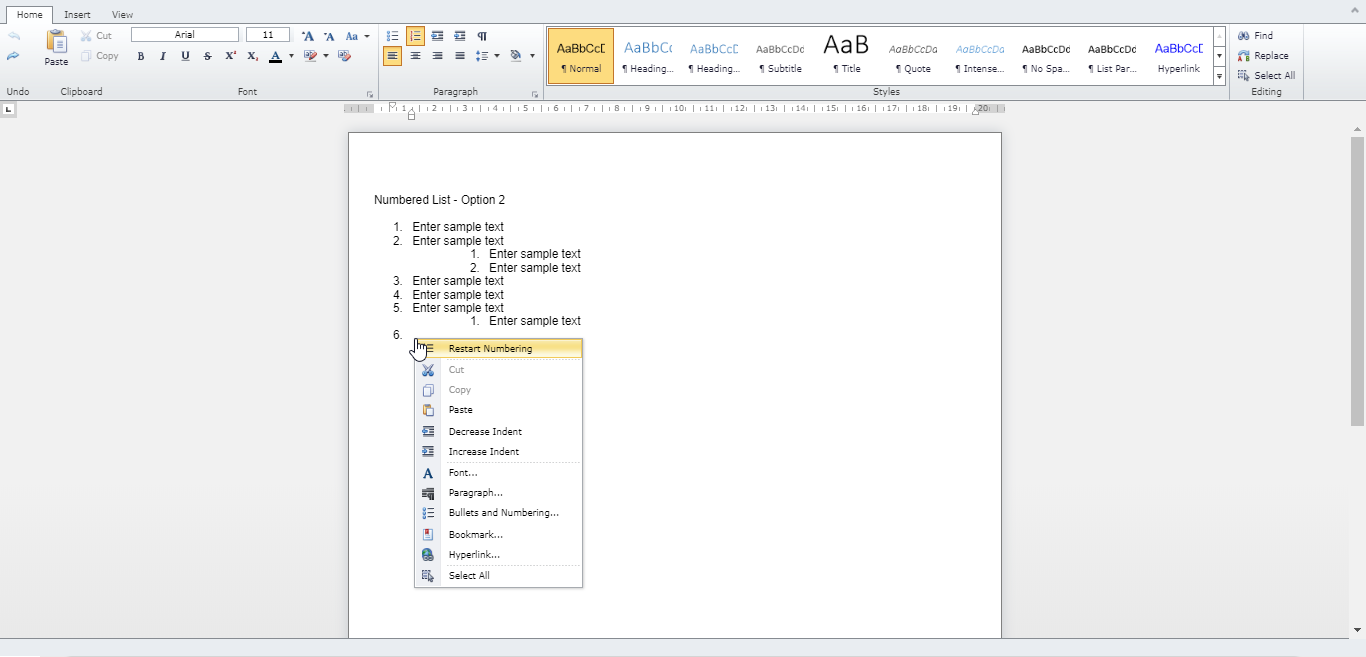
2. Restart numbering: To restart the numbering list, click on the ‘numbering list’ icon from the tool bar.
Note: If the document has a previous number list ending at a sub level, it will automatically take the indentation of that sub level number list. Adjust the indentation by clicking on the ‘Decrease Indent’ key from the toolbar or simply clicking the backspace.
If the numbering list does not appear as expected, press the ‘Clear formatting’ button to restart the numbering list.

If the sub – level numbering is required:
- Select bullet and numbering from the drop-down list menu.
- Select the ‘Outline Numbering’ tab and click OK.

3. Number indentation in the report
As specified by the client, the indentation of the sub level numbering will begin below the first parent level.
4. Sub levels can be included up to three levels only:

5. When this option of ‘outline numbering’ has been selected, the sub level numbering cannot include roman numbering or a different numbering style.
Option 2
- STEP 1: Click on the ‘numbering list’ from the tool bar and then type text. Alternatively, numbered lists can be inserted by selecting all text and then clicking the ‘Numbering List’ in the tool bar.

- STEP 2: The first level of numbers will depict as 1,2,3, etc. To create sub levels, Indent using the ‘Increase Indent key’ in the toolbar or use the Tab key in the keyboard. This will create the sub level. The sub level numbers will depict as 1, 2, 3 within the RTF but will show as 1.1, 1.2, 1.3 in the SSRS report output.
Notes:
- Continue numbering: If the document has a previous number list ending at a sub level, this will automatically take the indentation of that sub level number list. Adjust the indentation by clicking on the ‘Decrease Indent’ key from the toolbar where the numbering list will continue from the previous number list.
Alternatively, if the numbering list needs to be continued from the previous number list, press ‘start a numbered list’ from the toolbar. Press the right click mouse button and select continue numbering from the drop-down list menu.

- Restart numbering: To restart the numbering list, click on the ‘numbering list’ icon from the toolbar.
NOTE: If the document has a previous number list ending at a sub level, it will automatically take the indentation of that sub level number list. Adjust the indentation by clicking on the ‘Decrease Indent’ key from the toolbar or simply clicking the backspace.
If the numbering list does not appear as expected, press the ‘Clear formatting’ button to restart the numbering list.
If the sub – level numbering is required:
- Select bullet and numbering from the drop-down list menu.
- Select the ‘Outline Numbering’ tab and click OK.
- Number indentation in the report
As specified by the client, the indentation of the sub level numbering will begin below the first parent level.
- Sub levels can be included up to three levels only:

Include roman numbering or another numbering style
- STEP 1: Type text
- STEP 2: Select all text and right click
- STEP 3: Click on ‘Bullet and numbering’
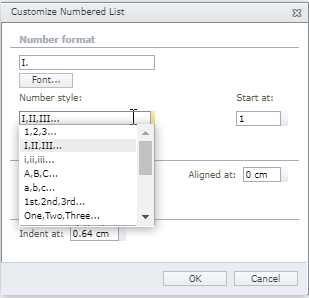
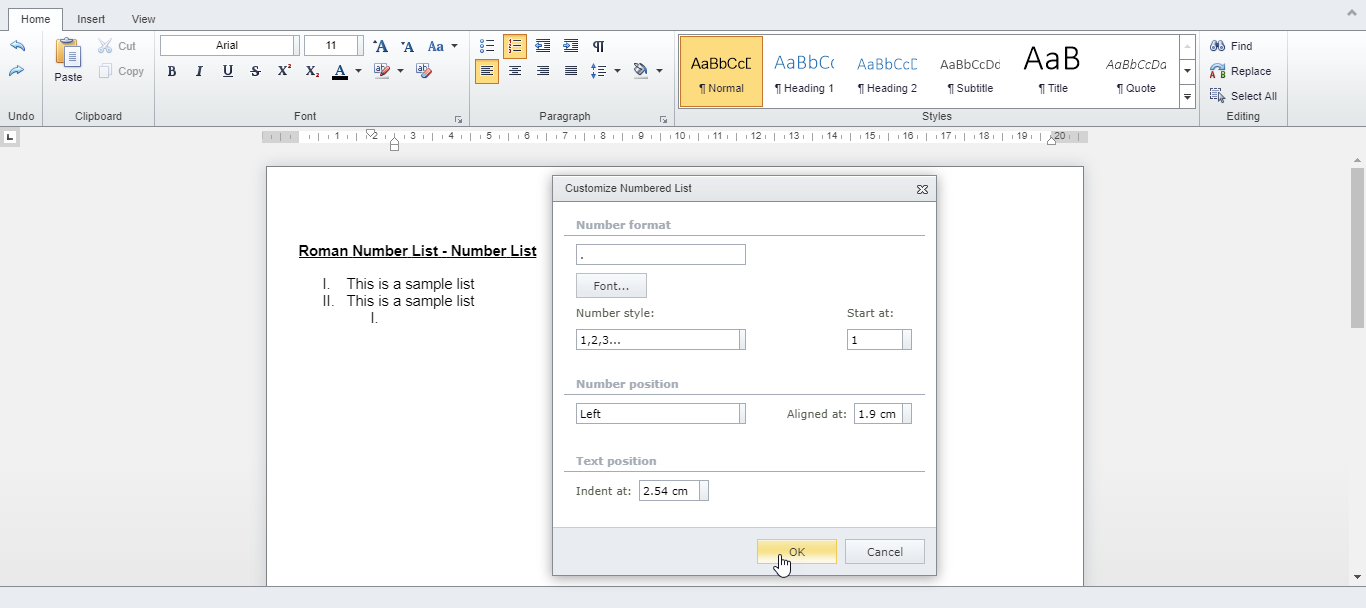
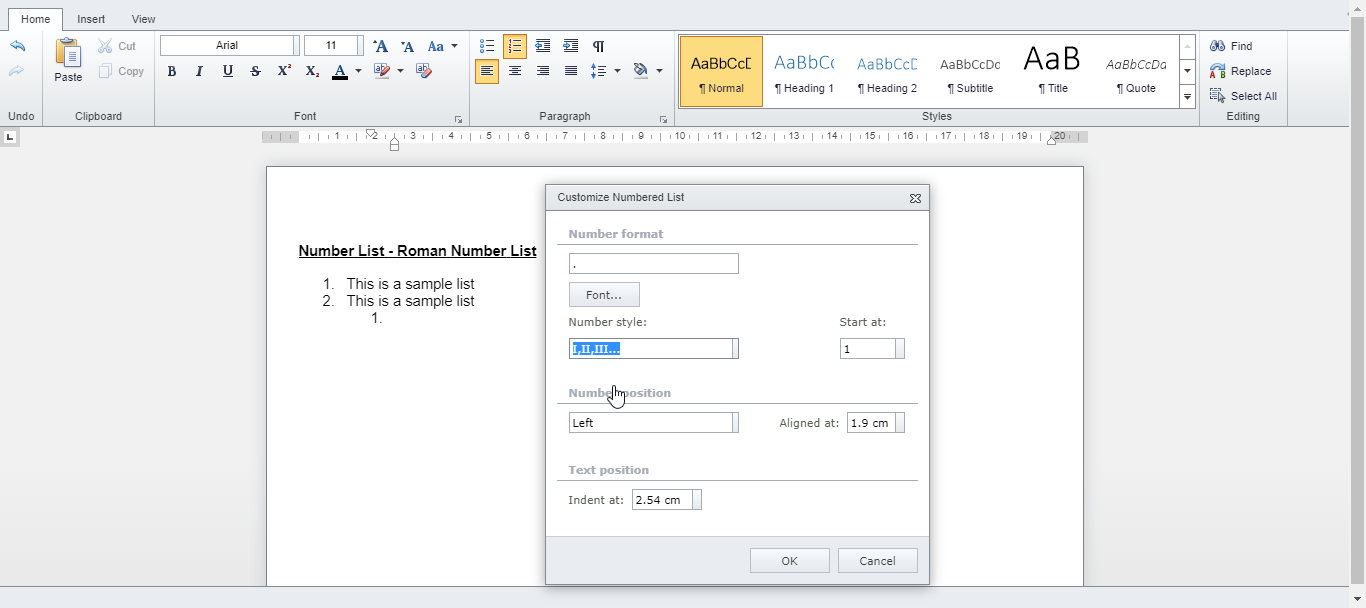
- STEP 4: Under the ‘Numbered’ drop down, select the roman numbers or any other preferred numbering style.
Notes: If Roman numbers need to be applied to multiple numbering levels, each level must be handled separately. If all levels are highlighted and roman numbering is applied, it will only be applied to the 1st level. Roman numbering for sub levels will not work if used with Outline Numbering (Option 1) described above.
If the sub – level numbering is required as Roman numbering:
- Press Tab/ Increase indent
- Select bullet and numbering from the drop-down list menu
- Select the ‘Outline Numbering’ tab and click Ok
Include bullet list with Sub level bullet
- STEP 1: Click on the ‘Start a bullet list’ from the toolbar and then type text. Alternatively, bullet lists can be inserted by selecting all text and then clicking the ‘Start a Bullet List’ in the toolbar
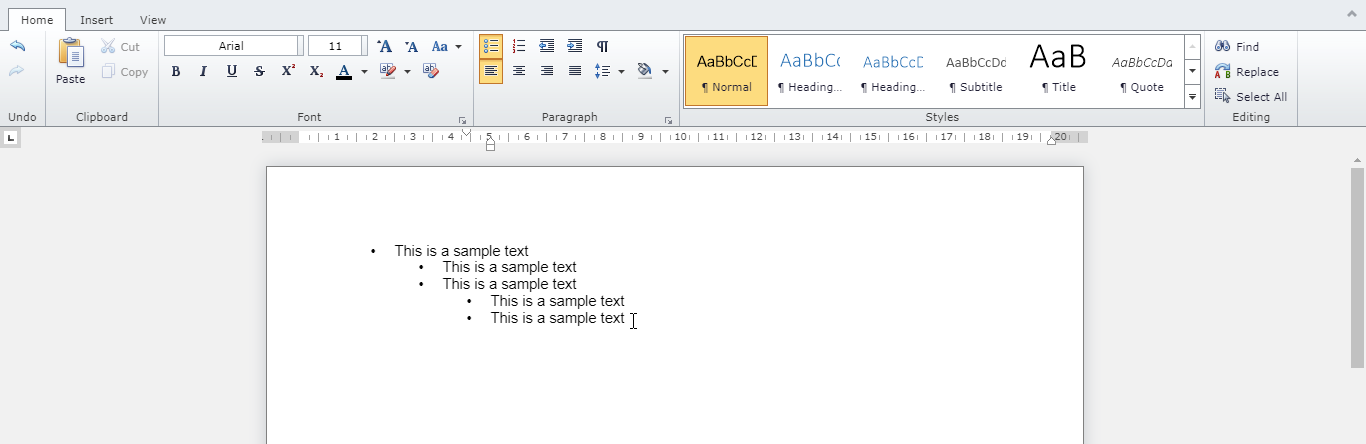
- STEP 2: Indent using the Indent key in the toolbar to create sub level
- STEP 3: Include sub levels up to three levels only
- STEP 4: Bullet indentation
As specified by the client, the indentation of the sub level bullets will begin below the first parent level.

Include Mixed Lists – Include Bullet and numbered lists within the report
Bullet and numbered lists can be inserted within the report following steps mentioned in Points (1) and (3) above.
- When a bullet list is inserted as a sub level under a number list, ensure to remove the number list and then apply the bullet list. In order to remove the number list, press enter and press the tab button. This would bring the cursor to the level to start off the new list with a bullet.

To insert a number list back again, press enter button, and decrease the indent into sub level position. This will bring to the continued numbering position which needs to be restarted through the right mouse click – restarts numbering.

- When a numbered list is inserted as a sub level under a bullet list, ensure to remove the bullet list and then apply the number list. To remove the bullet list, enter and press the tab button. This will bring to the restart numbering position.

- When applying numbered list into the roman numbered list, first select the roman number lettering through ‘Bullets and numbering’ from the right mouse click. Similar method to 3.2. Next, press the enter and tab button to change the numbering list. Roman numbering can be applied only to one list at a time within a mixed list.
- When applying roman numbers into a numbered list, first select ’start a numbered list’. Next, press the enter and tab button to change the numbering list. Then, select the roman number lettering through ‘Bullets and numbering’ from the right mouse click. Roman numbering can be applied only to one list at a time within a mixed list.

Include Mixed Lists – Numbered and Bullet lists within Tables

- Numbered lists can be inserted within a table cell. Multiple numbered lists can be included but the numbering will continue from the previous list. Restart numbering cannot be applied.
- Bullet lists can be inserted within a table cell. Multiple bullet lists can be included as well.
- Mixed lists cannot be inserted within a table.
- The report output will display the numbered and bullet lists as per the indentation specified by the client. The numbering format will display as outlined numbering (e.g. 1, 1.1, 1.1.1, 1.1.1.1) for each sub level in the report, although it displays as whole numbers within the RTF.
Including a table – To insert a table into a report, the user must insert a separate RTF via ‘+’ into the report. An RTF can only have a single table, with no text and multiple tables. If text is included, the entire content will be converted into an image. If multiple tables are included, then only the 1st table will be picked and included in the Report outputs. Table formatting such as Merge/Split sells, format colors will not be applied. The table column width will be split for the total page width.
Adding custom fields – The user can add fields in addition to the fields configured in the report template using the ‘+’ sign placed next to the pre-configured fields of the reports.
Check In / Check Out
- Agendas are loaded in a non editable view. In order to edit an agenda item or agenda group, the user has to Click 'Check Out'. Then the user will be directed to an editable view of the agenda item/group. This is to ensure only one user can edit the item at a given time because an agenda item has multiple user access. This will avoid duplication of data or data loss through multiple logins.
- Once the edit is complete, the user must Click 'Save' to save changes. If the user clicks 'Check in' without saving, the user will be prompted whether to proceed. A user cannot navigate away without checking out the agenda item.
- In the event, an item or group has been checked out, and a another author wishes to edit the exceptional situation, the system administrator has the ability to Check in item through the admin panel. However, this will result in data loss.
Send Agenda Item
The agenda item can be emailed to all users. The following steps need to be followed to send an agenda item.
- STEP 1: Click the 'Send Agenda Item' icon.
- STEP 2: Pop up will appear.

- STEP 3: By Default the names of the participants will load. The user can add or remove participants.
Duplicate an Agenda Item
An agenda item can be copied or moved into another upcoming meeting. This functionality can be done only by a selected list of users.
To copy or move an item the following steps needs to be followed:
- STEP 1: Click on the agenda item
- STEP 2: Check out the Agenda item
- STEP 3: Click on the copy icon
- STEP 4: Then, a popup screen will appear.
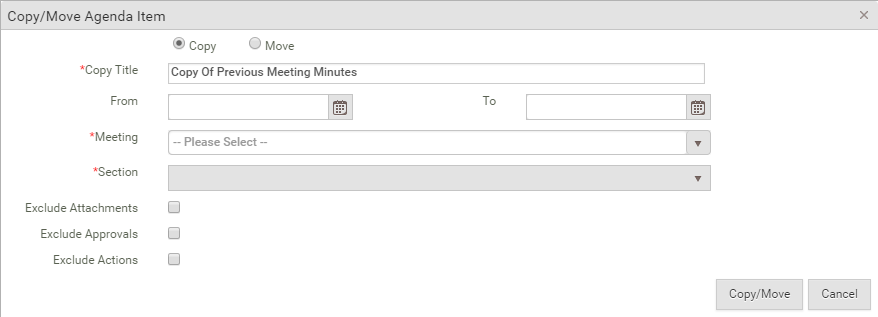
- STEP 5: Select Copy or Move.
- If the user selects ‘Copy’ then the item will be duplicated. If the user selects ‘Move’, the agenda item will be permanently moved to another meeting’s agenda.
- STEP 6: Enter ‘Copy Title’ – this is a mandatory field.
- STEP 7: Set From and To Date
- STEP 8: Select ‘Meeting’ from Drop down. This will show all the meetings for the selected date range
- STEP 9: Select ‘Section’. This will show all the Agenda Group from the meeting agenda.
- STEP 10: Tick if needed:
- Exclude Attachment
- Exclude Approval
- Exclude Actions
Delete Agenda Item
An agenda item can be deleted only by the item owner, writer, prepared by users, meeting organiser and system admin. The following steps need to be followed to delete an item.
- STEP 1: Click on the agenda item
- STEP 2: Click on 'Check out'
- STEP 3: Click on the 'Delete' icon
- STEP 4: Pop up will appear to confirm the delete
- STEP 5: Click on 'Ok' to confirm
Assign Confidential Users
This is possible only if the report template which is linked to the agenda item has a 'confidential' tick box. The user has to click the 'confidential' tick box field to make the item confidential. Thereafter the user has to assign confidential users to whom the agenda item can be made visible.
- STEP 1: Click on 'Confidential User' icon
- STEP 2: Select the user from Drop down – The drop down will show only users who are eligible to join the meeting as shown in the below figure.

- STEP 3: The selected confidential users will be able to view the agenda item and edit it.
The agenda report and the minute report will be shown to the other users who have joined the meeting, excluding the confidential items.
Add New Input Field
The user can add new input fields between the existing fields by clicking the '+'. The input options available are single text box, rich text box, rich text box light, number box & date selector.

This default setting for manually added fields has been changed to NOT include in ‘Minute taking’ and ‘Minute Report’. However, the configuration of these fields can be changed via the Report Output Configuration pop up in Check out mode.
The input field can be added without a field name, by ticking the ‘Hide field name’ tick box as shown in the below figure. To remove a field, click on the '-'.

Agenda Item Preview
To view a preview of the report of the agenda item, click on the 'preview' outputs icon. This will generate an instant report view of the agenda item. Any attachments will display inline within the report.
Report Output Configuration
The report fields can be customised into an individual report level as well.
Mark as Complete
Once the agenda item has been completed and no further changes are needed, the user can mark it as complete. Once the item is marked as complete, then users are prevented from making any changes. This functionality can be performed only by a selected set of users.
Send for Approval
An agenda item can be sent for approval. This is only possible if the Report template linked with the agenda item has been configured for ‘approval required’. If it has been configured, then the system will start the approval workflow.
The following steps have to be followed to send an item for approval:
- STEP 1: Click on 'marks as complete' Action Icon.
- STEP 2: The ‘Approval workflow’ pop up will appear. The user has the option of requesting for one or all three approvals.

- STEP 3: Each approval level would have a Staff multi-select drop down boxes with search functionality. One or more approvers can be selected.
- STEP 4: For Immediate approval – click ‘Save Approvals and submit’. This functionality will save the approvers’ names and start the approval workflow.
- When an agenda item is sent for approval, Approver/s would be notified.
- STEP 5: To save Approvals and send later – click ‘Save Approvals’. This will save the Approver details.
- STEP 6: to send for approval once the item has been completed, Click the ‘Mark as complete’ icon. This will start the approval workflow.
Note 1: If the approval has been saved, the user can send items for approval. The alternative ways this can be done is at my agenda item and agenda item search.
Note 2: Approvers with Meeting manager user role permissions can also route the approval. This will change the standard approval workflow and will be redirected to the routed approver only.
The item will not be marked as complete until all pending approvals have been granted. If the approver rejects the agenda item, it reverts as a draft. The item needs to be corrected and resubmitted for approval. Alternatively, the approver can edit the agenda time and approve. The organiser can also approve and force approve the Agenda item. This will cancel the approval workflow.
Revert to Draft
This functionality is available only for agenda items that have been 'marked as complete'. If the user wants to edit the agenda item, it can be reverted to draft by clicking on the 'Revert to draft' icon. If the agenda item has been approved, all approvals will be erased and the item has to be resubmitted for approval once the item is completed.
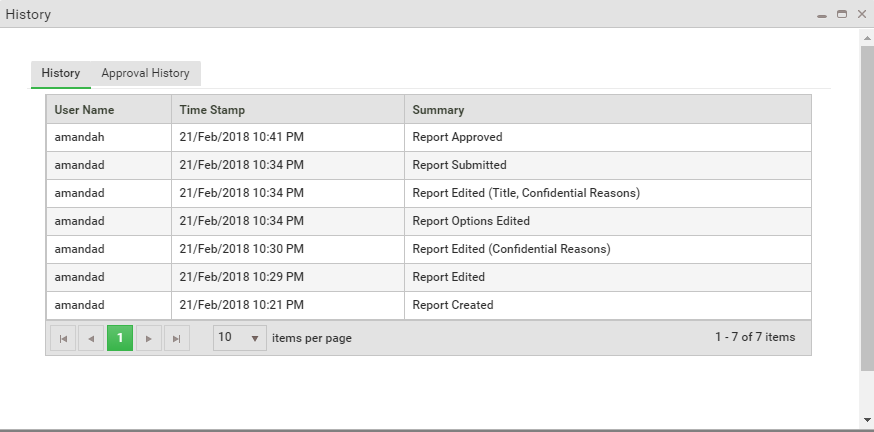
View History
This is the audit trail of all the activities performed on an agenda item. This can be viewed by clicking the 'View History' icon. The History of the approval flow also can be viewed.
Move Agenda Item
The order of the agenda can be changed by moving the agenda item. The user can move an item into a new group or change the order within the group by ‘clicking and dragging’ the item. This functionality can be done only by the administrator, report owner, report creator and multiple authors.
Force Approval
This functionality is used to approve all pending approvals from one or more approvers. This functional will surpass the approval workflow and approve the agenda item and the pending approval items will get cleared from the 'my approvals' grid. This is used only by the administrator and the meeting organiser.
Download Agenda
This functionality is available to all users eligible to participate in the meetings. (I.e. members and participants). If the agenda is not finalised, only a draft agenda report will be downloaded with the watermark Draft will be displayed. For Formal public meetings, if the agenda is finalised, the public users can download the agenda report.
The Agenda can be downloaded as a PDF document by clicking the 'download agenda' icon in the top left side menu drop down.

The report will be generated without attachments. If the Appendixes needs to be included in the TOC, kindly contact CAMMS support.
The attachments can be configured via an internal setting, if it needs to be displayed as inline or as an appendix. If Inline, all attachments will be displayed within the item report.
Change Font Colour of TOC in the Agenda Report
The font Color of the Table of Content in the agenda report is in black colour. This is applied to both confidential and non-confidential agenda reports. The preview of the agenda report throughout the application will also reflect this change. If the font color needs to be reverted to the standard font color (dark blue), kindly contact CAMMS Support.

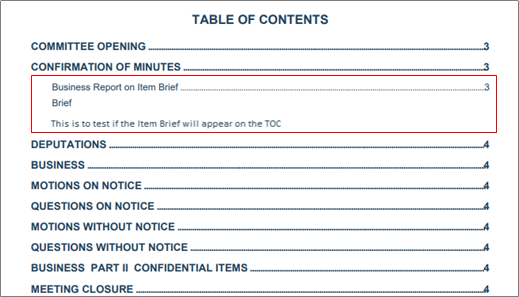
Display Brief in TOC in the Agenda Report
A new field ‘Item brief’ is introduced for agenda reports. This field is a rich text field where the content will show in the Table of Content (TOC) of the Agenda report, if it has been configured.
A new Rich Text field is introduced in the report template configuration in the Administration section. This field should be configured in order to be included in the Agenda and Minute reports.
To configure the brief item field the following steps is to be followed:
- STEP 1: Click on Administration à Report Template.
- STEP 2: Select on an existing report template or create a new report template.

- STEP 3: Select the ‘Item brief’ field as visible. This is necessary for the field to be included in the TOC.
- STEP 4: Click on Agenda and Minute report for the field to be included in the report body of the reports.
- STEP 5: If the details of the Item brief field during minute needs to be displayed in the minute taker’s view, click on ‘including in minute taking’.
- STEP 6: Set the sort order and the field will appear in the report based on this order.
Notes:
- Images should not be included in the Item brief field, although there is an option to insert an inline image from the RTF.
- The brief item field will not apply in existing meetings which are already created using existing report templates.
- The Item Brief field needs to be configured in the report template (as explained above) in order for it appears in the TOC. The field will appear on the TOC irrespective of it been ticked to be ‘included’ in the Agenda report.
- There is no character limitation specified for the Item brief field. Therefore, the entire content will be displayed in the TOC.
- All formatting applied for the content for this field will be applied to the TOC as well.
- The Brief item field has to be ticked and configured for it to be displayed in the TOC.
- The Minute report does not include a TOC, therefore the Item brief field will not appear.
- The Item brief field of a confidential item will still appear in the non-confidential agenda report TOC as well as in the body of the report and will not be considered as confidential.
To include content in the ‘Item Brief’ field to following steps is to be followed:
- STEP 1: Click on the ‘Meeting Preparation’ on the quick links menu.
- STEP 2: Add an Agenda item and select the Report template, which has the ‘Item brief’ field is included.
- STEP 3: Click on the RTF and include content.
- STEP 5: If the content is copied and pasted, clear all formatting from the source document and apply fresh formatting.

The ‘Item Brief’ field will appear in the Table of Content in the Agenda report as follows:
Once the agenda is ready for download, the user will be prompted and an email will be sent to the organiser.
A new setting is included in ‘Set up – site configuration’, for the admin to select if the output reports for confidential items must be individual reports or a single report. If the setting is configured to ‘Yes’ then all confidential items will generate individual reports for agenda and minutes, in the meeting preparation stage, and Join meeting stage respectively. Non confidential items will be generated as a single consolidated report.

Send Agenda
The agenda can be sent as an email to all users by clicking the 'Send agenda' icon in the top left side menu.

The participants names will be populated by default. But the user can remove or add more recipients by selecting the recipients from the user drop down list as shown in the below figure.

The email will include a link to view the agenda. If the agenda is not finalised only a draft agenda can be viewed.
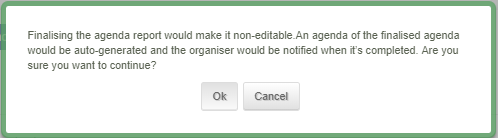
Finalise Agenda
This functionality is available only to the Administrator, Primary and secondary organiser and meeting manager. In order to finalise the agenda, the following step needs to be followed:
- STEP 1: Mark all Agenda items as complete. Agenda items pending approvals cannot be marked as complete. The user has two options:
- Approve the agenda by Clicking the ‘Thumbs up’ icon
- Force approve agenda item
- STEP 2: Click the 'Finalise agenda' icon on the top left corner.

If there are any pending items that have not been marked as complete, the user will be prompted by the message shown in the below figure.
If the user clicks ‘OK’, then a list of all incomplete items will be shown in a popup. The user can select which fields to include in the finalised agenda. If the selected agenda items are in the approval stage, it would be automatically force approved. Unticked items will be dropped from the finalised agenda.

- STEP 3: If the meeting type is Formal Public or Formal Internal, the system will show a message inquiring whether the agenda has to follow an approval process.
- STEP 4: Click ‘Yes’ to select the approvers to send for approval. Select ‘No’ to finalise the agenda straightaway.
Ability to Edit the ‘Report reference field’ after the Agenda item is finalised.
Note: if the internal setting has turned ‘On’, the user can edit the ‘Report reference field’ after the Agenda item is finalised.
Add close button and icon has been introduced for popup message shown on approval.
The agenda is sent for approval, after the list of approvers are selected, the close button and icon will be provided to cancel the selected approval and return the user back to the Edit Agenda screen as shown in the below figure.

View Agenda History
This functionality is to view the history of the approval process of the agenda after the agenda is finalised. This is available for all users eligible to participate in the meeting and can be viewed by Clicking the 'View history' icon in the top left corner menu drop down as shown in the below figure.

