This functionality allows managing all users of the system. To access Manage Users click, the hamburger menu icon and click on the Manage Users (Under Administration Tab).
All users will display in a grid view as shown in the below figure.

All users are listed in a grid view as shown in the above figure. The admin can select the number of records to view per page from the page number drop down.
The records can be sorted by clicking the Column Name. For Example; If the user clicks ‘Display name’ the records will be sorted on display in alphabetical order.
The records can be exported to Excel by clicking the 'Export to Excel' button on the top right corner of the grid.
Search Users
Users can be searched by User name. The User name will search from Username, First name and Last name.
Add Users
To Add a new user, the following steps has to be followed.
- STEP 1: New users can be added by clicking the “Add new user” link in the view user page. The admin will be directed to a new page as shown in the below figure.
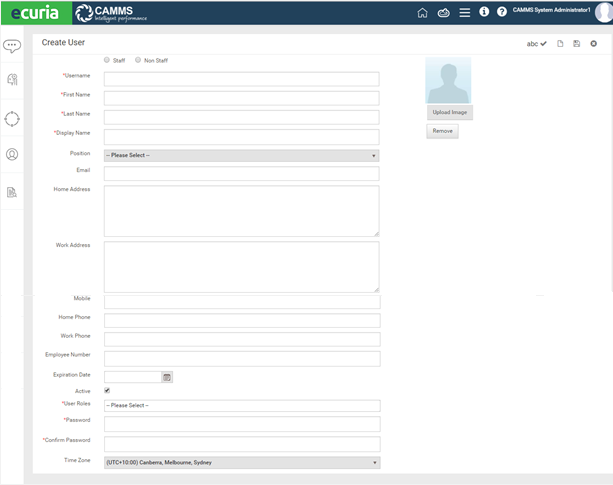
- STEP 2: Add a new user page that has the following fields:
1.Staff/Non Staff – Select if the user is staff or non-staff. Staff users are non-committee users. Non staff are committee members.
2. Username – Enter a username. The username has to be unique. System login is with the username. This is a mandatory field.
3.First Name - Enter the user’s first name. This is a mandatory field.
4.Last Name – Enter the user’s last name. This is a mandatory field.
5.Display Name – The display name loads the first name and the last name. This is editable. This also changes based on the position configuration done at set up. Refer ‘Set Up’ in 4.2
6.Position – Select position from position drop down. The drop down will populate based on the staff/non staff selection.
7.Email – Enter a valid email. Validation will be done to check if valid email with ‘@’ and ‘.’
8.Home Address – Enter the home address of the user
9.Work Address– enter the work address of the user
10.Mobile – Enter the mobile number. This is a numeric text box. Maximum number is 15.
11.Home Phone – Enter the home phone number. This is a numeric text box. Maximum number is 15.
12.Work Phone – Enter the work phone number. This is a numeric text box. Maximum number is 15.
13.Employee number – Enter the employee number of the user
14.Expiration Date – Select a date of expiration from date selection. The account will get deactivated after that date
15.Active – This is to tick if the user is active or inactive. Inactive users will not show in drop downs throughout the system.
16.User Roles – Select user role from the drop down. A user can have more than one user roles.
17.Password – Enter a password. Password has to be minimum 6 characters. It can be alpha numeric characters
18.Confirm Password – Re-enter the password. Both passwords have to match.
19.Time Zone – Select Time Zone
20.Upload Image– An image of the user can be uploaded. Maximum file size is 5MB
- STEP 3: Click ‘Save’ to save all data.
Alternatively, A new field named ‘Shortcut key’ is included in the Add User page, placed below the username field as shown in the below figure.

Edit User
To edit, the following steps have to be followed
- STEP 1: Click on ‘Username’ in the grid display view page.
- STEP 2: The User profile details page will load as shown in the below figure. Click on ‘Edit’ icon.
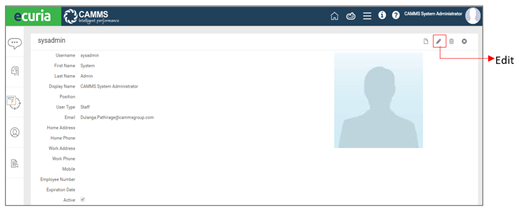
- STEP 3: User details will load as per the above figure.
Delete User
A user can be deleted only if the user doesn’t have any dependencies associated with the system functionalities. All dependencies have to be cleared, prior to delete.
To delete a user, click on the ‘Delete’ icon. The user will be prompted, to click ‘Ok’ to continue.