Camms is pleased to bring you the latest features and enhancements to be included in our newly evolved Camms.Risk,solution.
These essential upgrades will improve performance and enhance the user interface and experience within the application, ensuring that you have all the latest functionality for effectively managing GRC.
Important:
|
1. Revamped interface functions and improved experience
1.2 Pagination and page navigation
1.3 Help text icon displayed next to fields
1.4 Search option in dropdown fields
1.6 Collapse/Expand Individual heatmap and risk assessment panel
1.7 Collapse/Expand Risk Settings panel
1.8 Lengthy page descriptions in Risk Settings pages displayed in a tooltip
1.9 Add New/Edit popup windows and Delete function
1.10 Availability of filters in table header column fields
1.12 The ‘Save’ button will not be enabled until mandatory fields have been filled.
2. Modernised Quick Update widgets
2.1.1.1 Inherent/Residual and Future risk assessment tabs
2.1.1.5 Updating and Completing the Risk Review
3. An all-new feature to create new Risk Types
3.1 Configuring Risk Types in Risk Settings
3.1.5 Editing a Risk Type Grouping
3.1.6 Deleting a Risk Type Grouping
3.2 Newly created Risk Types in the left navigation panel
3.3 Newly created Risk Types on the Risk Details page
4. Flexibility to create custom Registers with one or more Risk Types
4.2 Displaying the created Risk Registers
4.3 Creating a Risk from a Register with multiple Risk Types
4.4 Displaying created Risk Types in the Register filter
5. Modifications to enhance Field Configurations
5.1 Selecting Risk Types or a Risk Group to configure fields
5.2 Active field property handled via permissions
5.3 Next Review Date field property handled via permissions
5.4 Renaming Risk Assessment tabs
5.6 Changing the visibility of Risk Assessment tabs
5.7 Changing the sequence of fields
6.9 Field Configuration Settings
6.10 Register Configuration Settings
6.12 Review Frequency Settings
7.1 Expand/Collapse Risk Actions Grid
7.2 Adding a Risk Action in an Add Risk Action popup window
7.3 Editing a Risk Action using the Edit Action popup window
7.4 View only details in a popup window
7.6 Convert Actions to Controls
7.7 Selection of a Control from the Risk Action Grid
7.8 Creation of an Audit Recommendation via the Risk Action Links tab
7.9 Field Configurations of Risk Actions
8. Configuring Hierarchies to be loaded to the Hierarchy Links field in the Risk Details page
10. Changes in the Risk Aggregation Copy/Move popup
10.1 Introduced Primary Category field in Copy tab
10.2 Action checkboxes changed to YES/NO toggles
10.3 Mandatory fields were introduced to replace the fields ‘Action’ or ‘Project’ when selecting the Risk Type with
10.4 Updated hierarchy field user interface
11. Causes and Consequences Bowtie Grids
11.1 Causes and Consequences Permissions
14. User Interface changes in Hierarchy Linkages
17. Executive Intelligence (EIS)
20. Risk History in Risk Details
24. Introducing Standard Roles
25. Linking to the Planning Hierarchy
26. Critical Path Delay configuration for all Risk Types
27. Moving Business Process and Legislation settings under Custom Lists
28. User-wise Register Configurations
29.1 Control Record Grid within all Risk Types
29.2 Control Linkages to Multiple Risk Types
32. Project-Specific Risk Permissions
35. Additional Control Measures
37. Mapping Static Permissions to the Flex Permission Framework
38. Reassign Staff Responsibilities Feature
39. Incident & Compliance Impacts
39.1 Incident/Compliance Consequence Table
39.2 Incident/Compliance Menus
39.3 Incident/Compliance Linkages
40. Team & Responsibility Center Fields
40.2 Responsibility Centre field
42. Additional Controls for Risk Actions
43. Linked Risks Grid for Risk Actions
49. Convert Risk Actions to Tasks
51.1 Key/General Features across all Standard Risk Reports

1. Revamped interface functions and improved experience |
We have introduced a set of new functions on several pages, that will enhance your experience when using the Camms.Risk application.
1.1 Login page
- The login page will have a few modifications from its previous look and feel. These will include:
- A show/hide password icon will be displayed in the Password box where you can click this icon to display the password you key in the box. If you do not click on this icon, the password will be displayed as asterisks (*) when keyed in.
 Figure 1.1.1
 - Error messages when an incorrect username or password is entered will now display under the respective field.
 Figure 1.1.2
- A show/hide password icon will be displayed in the Password box where you can click this icon to display the password you key in the box. If you do not click on this icon, the password will be displayed as asterisks (*) when keyed in.
1.2 Pagination and page navigation
- New additions to pagination and page navigation, where you can select the number of records to display in a single page using the bottom left panel and navigate to the first, previous, specific page number, next, and last pages using the bottom right panel.
 Figure 1.2.1
 Figure 1.2.2
1.3 Help text icon displayed next to fields
- The help text that is configured to be displayed for fields on various pages, will now be displayed when hovered over the icon displayed next to its fields.
 Figure 1.3.1
- The help text that is configured to be displayed for fields on various pages, will now be displayed when hovered over the icon displayed next to its fields.
1.4 Search option in dropdown fields
- Some dropdown fields will have a search option at the top of the dropdown, where you can key in the value you are looking for and select it.
 Figure 1.4.1
1.5 Suggestive text in fields
- Some fields will suggest text while you key in values when a value already exists. While typing a new value, if that value exists, it will filter it down, and you can select the same value or change it to a value you wish.
 Figure 1.5.1
1.6 Collapse/Expand Individual heatmap and risk assessment panel
- In the risk details page, a collapse/expand panel has been introduced to the individual heatmap and risk assessment section providing users maximum space to view the other details.
- This panel will be expanded by default and if the user prefers to hide this section, the panel can be collapsed by clicking on the arrow.
 Figure 1.6.1
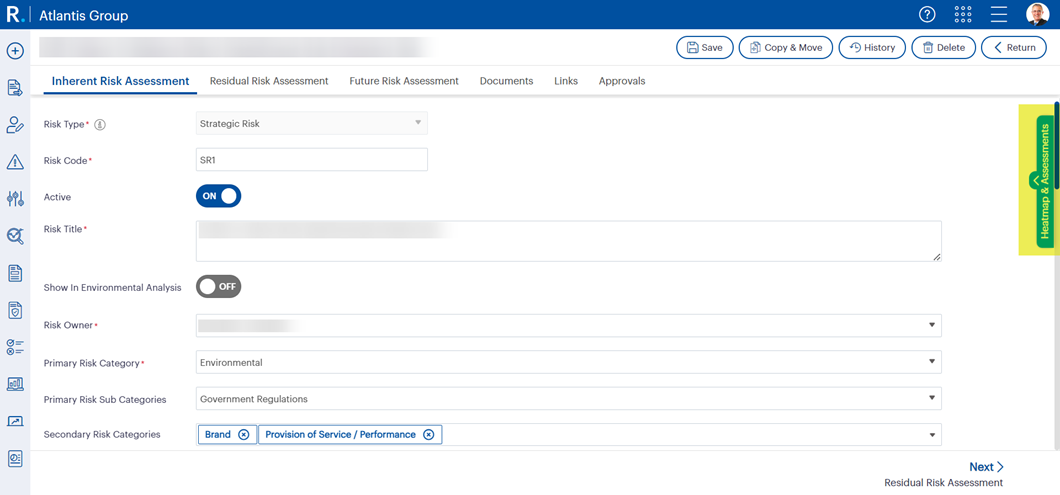
Figure 1.6.2
1.7 Collapse/Expand Risk Settings panel
- The Risk Settings page will have a collapse/expand icon which will let you hide/show other Setting pages to make more room when configuring a setting.
 Figure 1.7.1
 Figure 1.7.2
1.8 Lengthy page descriptions in Risk Settings pages displayed in a tooltip
- Risk Settings pages that have lengthy page descriptions at the top of the page, will be shortened with a … at the end of the page size has been reduced, and when hovered upon will display the full help text in a popup text.
 Figure 1.8.1
1.9 Add New/Edit popup windows and Delete function
- Adding details is now done via a popup window by clicking the Add New button at the top of the grid, filling in details, and clicking the Add button in the popup window.
- Clicking on the Edit button in each record row will, in turn, open a popup window as well, where you can edit details and click Save.
- Clicking on the Delete button in each record row will, in turn, remove the record after confirming the deletion. However, you will not be allowed to delete a record if any associations are linked to that record.
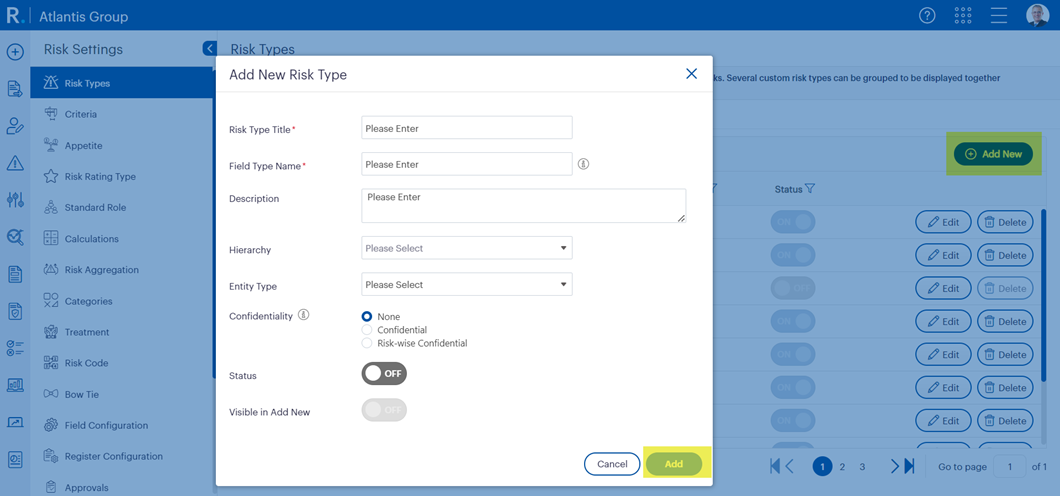
Figure 1.9.1

Figure 1.9.2
1.10 Availability of filters in table header column fields
- If you want to filter records displayed in a table, for a specific column, if a filter icon is available, you may click on this and enter the value you wish to filter by and click on Filter. This will then filter records in that column based on the filtered value.
 Figure 1.10.1
1.11 On/Off toggle buttons
- Some fields will require you to turn it ON or OFF. In these instances, there will be toggle buttons where you can change the ON/OFF value by clicking on it.
 Figure 1.11.1
1.12 The ‘Save’ button will not be enabled until mandatory fields have been filled.
- In the risk details page and all popups across Camms.Risk the Save button will not be enabled until all mandatory fields in the relevant page or popup have been filled in or any change has been done for already saved records.
 Figure 1.12.1
2. Modernised Quick Update widgets |
With this new feature, widgets will be displayed with summery details at the top of the Quick Update page, with the total number of Risks and Risk Actions assigned for thr the logged-in user, to take action upon.
- Widgets will be displayed at the top of the Quick Update page displaying the total number of responsibilities assigned for each responsibility type that your organisation has activated, categorised by Risk Type and additionally grouped by Entities for Project Risk Types.
- The number displayed here will represent the total number of items the logged-in user is responsible for each responsibility type. However, if the details are filtered, then the number displayed here, will represent the filtered number of items the logged-in user is responsible for.
 Figure 2.1.1
Notes:
|
2.1 My Risks
- My Risk widget will display the risks assigned to the logged-in user; the risks will be categorised by Risk Type and additionally grouped by Entities for Project Risk Types.
- To update details, click the More Details button at the right corner of each record, which will open a popup window, displaying the Risk record to be updated or viewed. From here, you can update Risk details and click the Update button.
 Figure 2.1.1
 - A pop-up window displaying the Risk record details will be opened by clicking on the More Details button at the right corner of each record. The pop-up window will have three tabs namely;
- Risk Details
- History
2.1.1 Risk Details
- A banner will be displayed with the Inherent, Residual and Target Risk ratings, appetite ratings, and aggregated risk ratings if enabled.
- The user will be able to navigate across the inherent, residual, and target assessment tabs along with risk action tabs.
- The fields which are displayed in these tabs can be configured in the configuration area to allow the respective fields to be displayed in my quick update more details view of a specific risk.
2.1.1.1 Inherent/Residual and Future risk assessment tabs
- These tabs will show the fields that are configured to show in My Quick Update in each risk assessment phase (Access field configuration area via Main Menu > Risk Settings > Field Configuration > Risk > [Select Risk type] > [Select Risk Assessment phase] > [Checked fields in ‘Quick Update’ column]).
- If the Risk Assessment field is configured to show in My Quick Update, the criteria required for the risk assessment (such as Likelihood, Consequence etc.), Risk Rating, Appetite rating, and Aggregated rating will be shown along with the Risk Heat Map.
- The risk assessment can be performed via quick update by updating the criteria (such as Likelihood, Consequence etc.).
2.1.1.2 Action Tab
- A grid will be shown with the risk actions linked to the selected risk.
- The columns shown within the grid will be based on the configuration (Access field configuration area via Main Menu > Risk Settings > Field Configuration > Action > Details > [Checked fields in ‘Visible in Actions Grid’ column]). Risk actions can be updated inline via the grid based on the permissions of the user.
 Figure 2.1.1.2.1
2.1.1.3 Controls Tab
- A grid will be shown with the controls grid linked to the selected risk.
- The columns shown within the grid will be based on the configuration (Access field configuration area via Main Menu > Control Settings > Field Configuration > Details [Checked fields under ‘Quick Update’ column will reflect in the grid in Quick Update]).
 Figure 2.1.1.3.1
2.1.1.4 Risk Review Fields
- .The risk review fields will be displayed based on the configuration (Access field configuration area via Main Menu > Risk Settings > Field Configuration > Risk > [Select Risk type] > [Select Risk Review] > [Checked fields in ‘Quick Update’ column]) throughout all the tabs (Inherent, Residual, Target, Action and Controls) allowing the user to update and complete the review.
2.1.1.5 Updating and Completing the Risk Review
- Cancel – Clicking on the Cancel button will redirect to the My risks section of the My Quick update without saving the latest information if entered.
- Update – Clicking on the Update button will show a Warning message informing the user clicking on ‘Yes’ will save both risk and review information and clicking on ‘No’ will only save the risk information.
- Complete Review – This button exists only to complete the risk review of a specific risk. Clicking Complete Review will save any information entered in the Risk review section and complete the review.
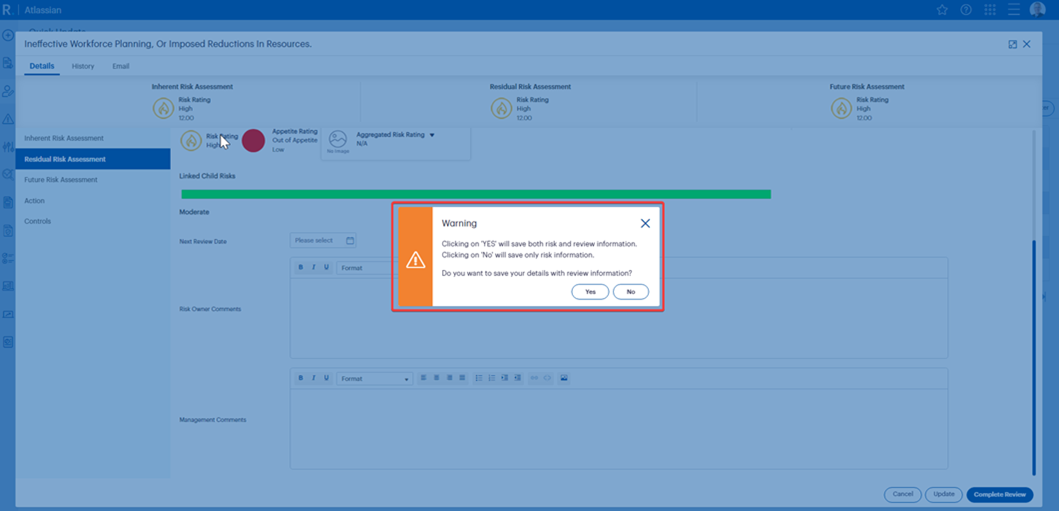
Figure 2.1.1.5.1
2.1.2 Risk History
- Clicking on the History tab on the top horizontal navigation bar will allow the user to view the trail of history logs if any changes have been made to the risk.
 Figure 2.1.2.1
 - Clicking on either the Inherent, Residual, Future Assessment or Risk Review tabs will allow the user to view the previous changes on each respective tab.
- Clicking on a history record will Display the Summary of the changes made to that specific record
 Figure 2.1.2.2
 - Clicking on the current representation tab will allow the user to view the latest changes.
 Figure 2.1.2.3
 - Clicking on the Previous Representation tab will allow the user to view the version before the latest change was made allowing the user to track down the trail more.
 Figure 2.1.2.4
2.1.3 Risk Email
- Clicking on the email tab on the top horizontal navigation bar will allow the user to send an email regarding the selected risk to another staff in the organisation by entering their email address. The title of the email will be auto-populated along with the name of the Risk. Users can enter the email content and click Send to the email.
2.2 My Risk Actions
- My Risk Action widget will display the risk actions assigned to the logged-in user; the risk actions will be grouped by risks by default.
 Figure 2.2.1
 - To update details, it will be done as before, where Risk Action details can be updated inline, in the Risk Action record row itself, and click the Save button at the top of the page.
- To view more details, click the More Details button at the right corner of each record, which will open a popup window, displaying the Risk Action record to be updated or viewed. From here, you can update the details and click the Save button.
- A pop-up window displaying the Risk record details will be opened by clicking on the More Detailsbutton at the right corner of each record. The pop-up window will have two tabs namely; Risk Details
- Risk Action Details
2.2.1 Risk Action Details Tab
- The Risk Action Details is the tab shown by default within the pop-up window. The Risk Action Details tab will show the Risk Action fields that are configured to be shown in My Quick Update area (Access field configuration area via Main Menu > Risk Settings > Field Configuration > Action > Details > [Checked fields in ‘Visible in Actions Details’ column]). From here, you can update the details and click the Save button.
 Figure 2.2.1.1
2.2.2 Email Tab
- The Email tab will allow you to send an email regarding the selected risk action to another staff in the organisation or by entering an email address. The Title of the email will be auto populated with the name of the Risk Action. You can type the email message and click Send to send the email.

Figure 2.2.2.1
2.3 My Controls
- My Controls bubble will display the controls assigned to the logged-in user; the controls will be grouped by Next Review Date by default.
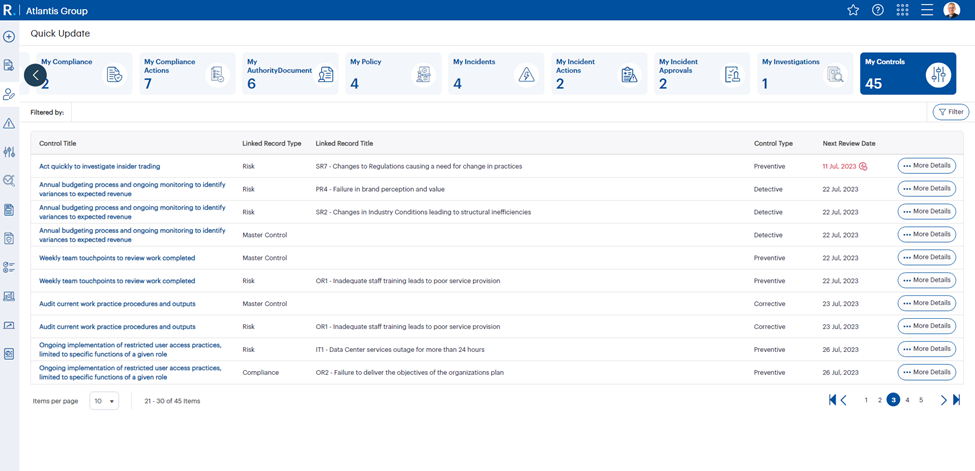
Figure 2.3.1
- The number of records displayed by default in the control grid will be 10 records, and user can change the number of records displayed up to 150 records per page once the grid is loaded.
2.3.1 Control Details Tab
- To view more details of a control, click on the More Details button at the right corner of each record, which will open a popup window, displaying the Control record to be updated, following with three tabs; ‘Control Details”, “Documents” and “Links” tabs.
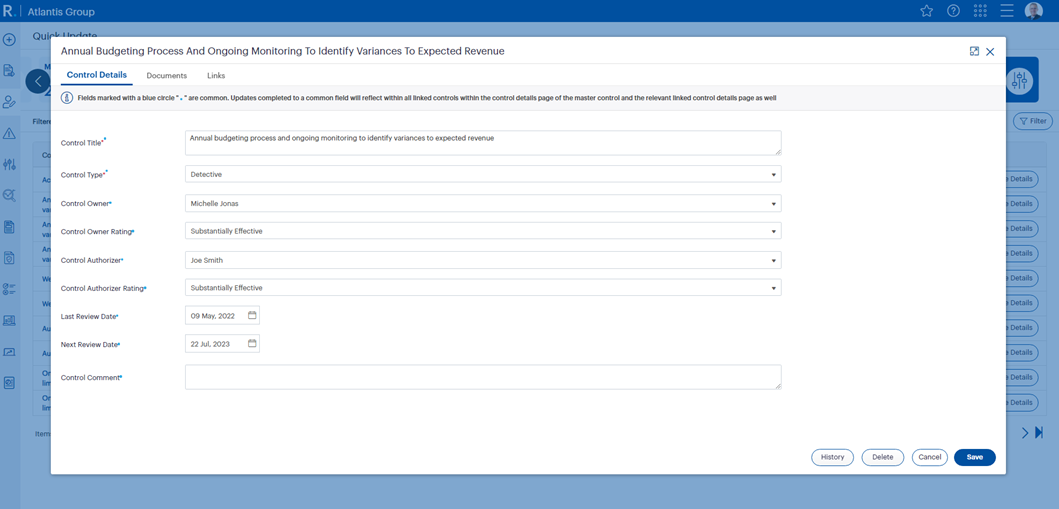
Figure 2.3.1.1
- From here, you can update the details and click the Save button if you wish to save the information.
- Click the Cancel button to cancel the changes you made to the record.
- Click the Delete button to delete the control record.
- Click the History button to view the changes made to the record previously.
- The columns shown within the grid will be based on the configuration (Access field configuration area via Main Menu > Control Settings > Field Configuration > Details [Checked fields under ‘Quick Update’ column will reflect in the grid in Quick Update]).
2.3.2 Documents Tab
- Clicking on “Documents” will direct you to the Documents tab where you can click on Add New button to attach any document or a URL for a document specific to the selected control record and upon clicking on Save the respective Documents will be attached to that record and saved.
- The visibility of this tab within the more details page will be based on the configuration (Access field configuration area via Main Menu > Control Settings > Field Configuration > Documents [Show Tab should be switched ‘ON’ for visibility]).
 Figure 2.3.2.1
Figure 2.3.2.2
2.3.3 Links Tab
- The Links tab will be, by default collapsed, and users are able to expand the sections by clicking on the downward arrow and view linkages related details.
 Figure 2.3.3.1
 Figure 2.3.3.2
 - To add a new linkage, click on the Add New button and select the type of linkage required from the dropdown menu options (Hierarchy, Risk, Treatment, Obligation, Policy, Authority Document and Event) and select the relevant node/record and click on Save button.
- The visibility of this tab within the more details page will be based on the configuration (Access field configuration area via Main Menu > Control Settings > Field Configuration > Links [Show Tab should be switched ‘ON’ for visibility]).
2.3.4 Control Assessment Tab
- This tab reflects the linkages between a survey and a control. If a control is linked to a survey, that will reflect in the control assessment tab.
- The visibility of this tab within the more details page will be based on the configuration (Access field configuration area via Main Menu > Control Settings > Field Configuration > Control Assessment [Show Tab should be switched ‘ON’ for visibility]).
3. An all-new feature to create new Risk Types |
Camms.Risk allowed only four main Risk Types to be used in our system. This feature will let you add multiple Risk Types in the system and further group these into identifiable categories if needed. Once these new Risk Types are added, it will provide more flexibility in identifying and managing your Risks within the product.
3.1 Configuring Risk Types in Risk Settings
3.1.1 Adding a Risk Type
- To add a Risk Type, under the ‘Risk Type’ tab, click the Add New button in the grid.
 Figure 3.1.1.1
 - This will open an ‘Add New Risk Type’ popup window to add details and click the Add button.
 Figure 3.1.1.2
- Users are able to create a new risk type by specifying the below-mentioned details:
- Risk Type Title
- users can specify the name of the risk type.
- Field Type Name and information icon.
- Users must specify a name that will be considered as the database field name for the specific risk type.
- Users must specify a name that will be considered as the database field name for the specific risk type.
- Help Text
- Users can enter a help text related to the risk type to be displayed across the application where needed. (Future)
- Users can enter a help text related to the risk type to be displayed across the application where needed. (Future)
- Description
- Users can enter a brief definition of the risk type.
- Users can enter a brief definition of the risk type.
- Hierarchy
- Users can link risk types to one or more hierarchy nodes and any risks created from this risk type will be automatically linked to the selected hierarchy node(s).
- This will be auto-selected at the point of Risk creation on the Risk Details page.
- Users can link risk types to one or more hierarchy nodes and any risks created from this risk type will be automatically linked to the selected hierarchy node(s).
- Entity Type
- Users can create risk types that are linked to entities (i.e. Projects and/or Actions) if required. Ex: Project Risk
- Users can create risk types that are linked to entities (i.e. Projects and/or Actions) if required. Ex: Project Risk
- Confidentiality
- Users can specify if they want to be able to create confidential risks of a particular risk type and which type of confidentiality to be considered.
- This is further explained under the ‘Risk Confidentiality’ section of the release note.
- Status
- Users can change the status of the risk type via this toggle. A risk type has to be active (toggled ON) to be used throughout the application.
- Visible in Add New
- Toggling on will be considering the risk type to be shown in the Add New section on the LHS navigation menu and vice versa.
- Risk Type Title
- Each time you create a new Risk Type, it will create a standard Register for this Risk Type.
3.1.2 Editing a Risk Type
- To edit a Risk Type, under the ‘Risk Type’ tab, click the Edit button next to the Risk Type record you wish to edit.
- This will open an ‘Edit Risk Type’ popup window to update details and click the Save button.
 Figure 3.1.2.1
3.1.3 Deleting a Risk Type
- To delete a Risk Type, click the Delete button next to the Risk Type record you wish to delete.
- This will open a confirmation dialog box and let you confirm the deletion of the Risk Type.
- If any associations exist for a Risk Type, you will not be permitted to delete a Risk Type. The error message will display the list of Associations the Risk Type has.
3.1.4 Risk Type Grouping
- Risk Type Groupings will let you classify Risk Types into clusters, based on your requirement.
- You can group Risk Types under the Risk Type Grouping tab, by clicking the Add New button in the grid.
- This will open an ‘Add New Risk Type Group’ popup window to add details and click the Add button.
 Figure 3.1.4.1
3.1.5 Editing a Risk Type Grouping
- To edit a Risk Type Grouping, under the ‘Risk Type Grouping’ tab, click the Edit button next to the Risk Type Grouping record you wish to edit.
- This will open an ‘Edit Risk Type Group’ popup window to update details and click the Save button.
 Figure 3.1.5.1
3.1.6 Deleting a Risk Type Grouping
- To delete a Risk Type Grouping, click the Delete button next to the Risk Type record you wish to delete.
- This will open a confirmation dialog box and let you confirm the deletion of the Risk Type Grouping.
3.2 Newly created Risk Types in the left navigation panel
- Newly created Risk Types will be listed in the left navigation panel, grouped by a Risk Type Group (if it has been added to a group), under the + Add New menu.
- If a Risk Type has not been grouped, it will be listed to display on its own, and not under any group.
 Figure 3.2.1
3.3 Newly created Risk Types on the Risk Details page
- When creating a new Risk on the Risk Details page, the Risk Type field will not be editable.
 Figure 3.3.1
4. Flexibility to create custom Registers with one or more Risk Types |
For every Risk Type you create, you will be able to customise the view of the Registers. In addition to the standard Registers (this will additionally include Registers that are created by default when a new Risk Type is created), now you will be able to create custom Registers with one or more Risk Types for better visualisation and management of Risks.
4.1 Configuring a Register
- To add a new custom Risk Register, click the Add New button at the top-right corner of the grid under the Register Configuration Settings page.
 Figure 4.1.1
 - This will open a popup window to add the new Risk Register details. Once details are filled in, click the Add button.
- The ‘Field Type Name’ will be the unique key that matches this Register with the database value.
- Under the ‘Risk Types’ field you can add multiple Risk Types to display in this created Risk Register.
- The ‘Status’ toggle will by default be enabled to display the Risk Register. You can disable and hide a custom Risk Register by turning this toggle to ‘OFF’.
 Figure 4.1.2
- For standard and custom Registers, you will be able to configure the Register columns and filters, show/hide the Register, and change the Sequence Order of the Register. To configure the fields of a standard or custom Register, click the Edit button, which will open an ‘Edit Risk Register Configuration’ window, where you can configure the following fields:
- Register Name of the register.
- The label of the field name will be displayed in the Register as the column title.
- Risk Types to display in this Register.
- Toggle to turn ON or OFF to display the field in the Register. Fields that cannot be hidden will be disabled.
- Toggle to turn ON or OFF to display the field in the Register Filter page to be filtered and searched by.
- By default, if not specified, the latest Register that is created will be displayed as the first tab.
- Set the Sequence in which the columns will be displayed in the Register.
- Set ‘Sort By’ and ‘Sort Order’ values to set a value to sort the Register by default and the sorting order (ascending or descending) when the Register is loaded. Previously, this will be available in the Register Filter as well, however, it will no longer be available in the Register Filter.
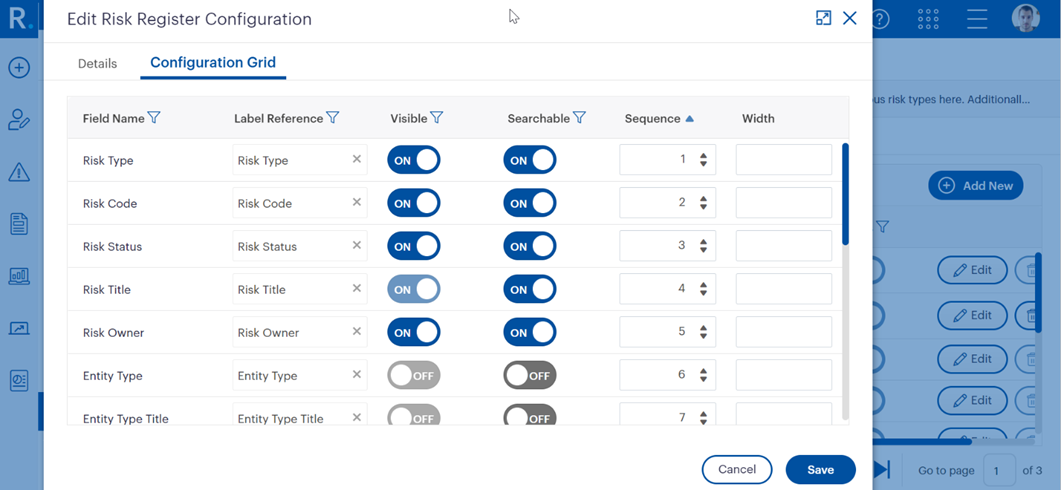
Figure 4.1.3
4.2 Displaying the created Risk Register
- The Risk Registers will display in the order in which the Sequence is configured in the tab strip.
 Figure 4.2.1
4.3 Creating a Risk from a Register with multiple Risk Types
- Upon clicking the Add New button, first select the ‘Risk Type’ you want to create a Risk from. Once the Create button is clicked, you will be redirected to the relevant Risk Creation page.
 Figure 4.3.1
4.4 Displaying created Risk Types in the Register filter
- Newly created Risk Types will be listed in the Risk Register filter where applicable:
- If a Risk Register is made up of one Risk Type, that Risk Type will be selected by default under the ‘Risk Type’ filter field and will be disabled.
- If more than one Risk Type is added to a Risk Register, these Risk Types will be added to the Risk Type field and you will be able to filter the Register based on the selection.

Figure 4.4.1
5. Modifications to enhance Field Configurations |
The Field Configuration Setting has been updated to add several changes that will help in upgrading our Camms.Risk application.
5.1 Selecting Risk Types or a Risk Group to configure fields
- To configure fields of a Risk Type in its assessment pages, first, select the Risk Type or Risk Type grouping from the ‘Risk Type’ dropdown.
- All Risk Types and Risk Groups will be listed in this dropdown.
 Figure 5.1.1
 - If a Risk Group is selected, it will list the Risk Types in tabs to configure fields.
 Figure 5.1.2
 - If a Risk Type is selected, it will simply list the Risk Assessment tabs to configure its fields.
 Figure 5.1.3
5.2 Active field property handled via permissions
The Active field property listed in the Risk Assessment tab has now been removed and will be handled in Role Management under the Edit Active Status permission.
- Under Role Management, a new role called Edit Active Status will be introduced under the Risk Identification and Assessment (Inherent) role which will be used specifically to edit the Active status of a Risk Record.
- The Edit permission will have to be given in addition to the ‘Edit Active Status’ for this to function as expected.
- Giving only the Edit permission will not let you edit the Active status of a Risk.
5.3 Next Review Date field property handled via permissions
Note: This section is only applicable to Static clients. |
The Next review date field property listed in the Risk review tab (which was only available for static users) has now been removed and will be handled in Role Management under the Edit Next Review Date permission.
- Under Role Management, a new permission called Edit Next Review Date will be introduced under the Risk Review section which will be used specifically to permit users to edit the next review date in the risk review tab.
- The Edit permission will have to be given in addition to the ‘Edit Next Review Date’ for this to function as expected.
- Giving only the Edit permission will not let you edit the Next review date of a Risk.
5.4 Renaming Risk Assessment tabs
- You now have the flexibility to rename the Assessment tabs. To change the name, click on the Assessment tab you wish to change and under the ‘Object Name’ field, enter the new name you wish to change it to. A suggestive list of words will be listed when you edit the name, for you to select from too.

Figure 5.4.1
5.5 Rearranging workflow tabs
- You can change the order of the Assessment tabs if you wish to rearrange the order. To change the order, in the ‘Tab Order’ field, enter the new number of the tab order you wish to change it to.
- However, you cannot change the Inherent, Residual and Target tab order.

Figure 5.5.1
5.6 Changing the visibility of Risk Assessment tabs
- You can now hide the visibility of all Risk Assessment tabs, including the Risk Review, Documents, and Links tabs if required.
- To hide the visibility, click on the tab you wish to hide and click on the ‘Tab Visibility’ toggle button from ON to OFF.
- However, you cannot hide the Inherent tab. The ‘Tab Visibility’ toggle will be disabled for this Assessment tab.

Figure 5.6.1
5.7 Changing the sequence of fields
- To change the sequence of fields displayed within the Risk Details page, under the Assessment tab, you now need to simply enter the sequence number in which you wish to display the field.
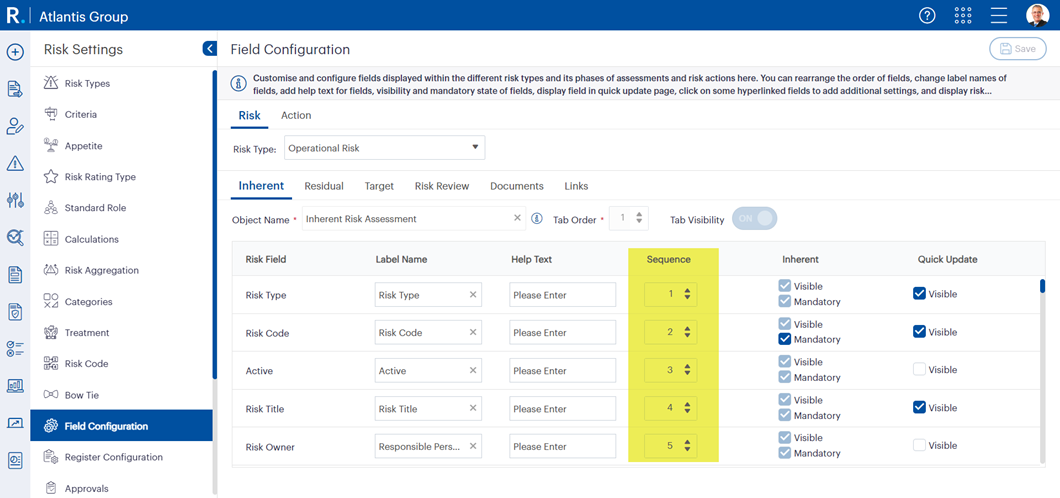
Figure 5.7.1
6. Revamped Risk Settings |
This section will cover how each Risk Settings page has been revamped and how it will reflect in the Register View and the Risk Details pages.
6.1 Initial Settings
- This settings page will be removed and will be configured under the Field Configuration Settings page, under the Target Assessment tab, via the Tab Visibility field, with an On/Off toggle button.
- With this update, you will be able to hide the visibility of all Assessment tabs (excluding the Inherent tab), including the Risk Review, Documents, and Links tabs.
 Figure 6.1
6.2 Risk Type Settings
- Please see Section 3 – An all-new feature to create new Risk Types for details.
6.3 Criteria Settings
- Risk Criteria tab – Adding new criteria will be now done by clicking the Add New button found in the grid, which will open a popup window to add new details.
- Editing and deleting will be done by clicking the Edit button for a particular Risk Category, which will open details in a popup window to be edited and saved. To delete, click the Delete button for a particular Risk Category, which will open a confirmation dialog box to delete a record once confirmed.
 Figure 6.3.1
 - Criteria Configuration tab – Configuring criteria can be done under this tab by first selecting from a dropdown the Risk Criteria Name. This will then lead you to a page with criteria configuration details. Previously, this page was accessed by clicking on the Risk Criteria Name link.
 Figure 6.3.2
 Figure 6.3.3
6.4 Rating Type Settings
- Adding a new Rating Type will be now done by clicking the Add New button found in the grid, which will open a popup window to add new details.
- Editing and deleting will be done by clicking the Edit button for a particular Risk Rating Type, which will open details in a popup window to be edited and saved. To delete, click the Delete button for a particular Risk Rating Type, which will open a confirmation dialog box to delete a record once confirmed.
 Figure 6.4.1
6.5 Calculations Settings
- Risk Rating Calculations for Risk Assessment pages will now be edited in a popup window by clicking on the Edit button for a particular Risk Rating.
 Figure 6.5.1
- Once clicked on the Edit button, ‘Rating Score Range’ details can be edited, and the ‘Status’ of a Risk Rating Calculation can be made active or inactive using an ON/OFF toggle button.
 Figure 6.5.2
6.6 Categories Settings
- Adding a new Category will be now done by clicking the Add New button found in the grid, which will open a popup window to add new details.
- Editing and deleting will be done by clicking the Edit button for a particular Risk Category, which will open details in a popup window to be edited and saved. To delete, click the Delete button for a particular Risk Category, which will open a confirmation dialog box to delete a record once confirmed.
 Figure 6.6
6.7 Treatment Settings
- Adding a new Treatment will be now done by clicking the Add New button found in the grid, which will open a popup window to add new details.
- Editing and deleting will be done by clicking the Edit button for a particular Treatment, which will open details in a popup window to be edited and saved. To delete, click the Delete button for a particular Treatment, which will open a confirmation dialog box to delete a record once confirmed.
 Figure 6.7.1
6.8 Risk Code Settings
- This settings page lets you define how a Risk record code numbering sequence is set up. You may set up different numbering based on Risk types, selecting the numbering sequence, adding a prefix and suffix if required, and defining a start number. Once details are specified, click the Save button at the top of the page.
 Figure 6.8.1
6.9 Field Configuration Settings
- Please see Section 5 – Modifications to enhance Field Configurations for details.
6.10 Register Configuration Settings
- Please see Section 4 – Flexibility to create custom Registers with one or more Risk Types for details.
6.11 Display Text Settings
- This settings page lets you define display text to be used within various pages in the product, for various labels according to the requirements of your organisation. Include help text, placeholder text, validation error text, and the plural form of the text.
- Adding a new Display Text will be done by clicking the Add New button found in the grid, which will open a popup window to add new details.
 Figure 6.11.1
 - Editing and deleting will be done by clicking the Edit button for a particular Display Text, which will open details in a popup window to be edited and saved. To delete, click the Delete button for a particular Display Text, which will open a confirmation dialog box to delete a record once confirmed.
 Figure 6.11.2
6.12 Review Frequency Settings
- Adding a new Review Frequency will be now done by clicking the Add New button found in the grid, which will open a popup window to add new details.
- Editing and deleting will be done by clicking the Edit button for a particular Review Frequency, which will open details in a popup window to be edited and saved. To delete, click the Delete button for a particular Review Frequency, which will open a confirmation dialog box to delete a record once confirmed.
 Figure 6.12.1
 Figure 6.12.2
6.13 Likelihood Table
- In the existing application, users were able to use the same likelihood descriptions across all risk types and in Risk Evolved, users are provided with the configurability to define descriptions risk type-wise.
 Figure 6.13.1
 - Further, in the existing application, in order to edit a description value, users had to click on the Edit button listed against each likelihood value in the grid and this behaviour has been changed in risk evolved, as users are allowed to save all changes at once using the main Save button at the top.
- This Save button will get enabled once a change has been performed to any of the description values.

Figure 6.13.2
6.14 Consequence Table
- Similar to the existing application, users are allowed to configure consequence descriptions risk-type-wise.

Figure 6.14.1
- Similar to the existing application, if the admin users have enabled the setting to filter consequence descriptions based on the linked hierarchy node, users will be able to filter risk categories based on hierarchy linkages (org, planning and custom hierarchies) and thereby provide unique descriptors against those categories.
6.15 Custom List Settings
- The number of custom lists available has been increased from 20 custom lists to 40 custom lists.
- Clicking the Edit button for a particular Custom List will open the details in a popup window that will allow you to edit the description of the custom list and save.
- To add values to a Custom List, click on the + expand icon of the respective custom list and click the Add New button.
 Figure 6.15.1
7. Risk Actions Functionality |
Several changes have been made to the Risk Actions Grid displayed on the Risk Assessment Page. Listed below are these changes:
7.1 Expand/Collapse Risk Actions Grid
- You will now be able to expand or collapse the Risk Actions Grid by clicking on the arrow icon placed at the left corner of the grid.
 Figure 7.1.1
7.2 Adding a Risk Action in an Add Risk Action popup window
- Previously, when adding a new Risk Action in the Risk Action Grid, it was done by adding details at the bottom of the grid and clicking on the Add button. Now, an Add New button will be available at the top of the grid, which will then open a popup window to add details and save.
 Figure 7.2.1
 Figure 7.2.2
 - When adding a Risk Action Title, already existing titles will be displayed in a suggestive dropdown to let you know when there are existing titles. However, it will not restrict you to enter an existing title.
 Figure 7.2.3
7.3 Editing a Risk Action using the Edit Action popup window
- A Risk Action can be edited using one of the following methods:
- Clicking on the Edit button placed at the right corner of each Risk Action record.
- Clicking on the Risk Action Title link at the left corner of each Risk Action record.

Figure 7.3.1
7.4 View only details in a popup window
- When no edit permissions are available for a user, instead of the Edit button, a View button will be available. The Delete button will be disabled.
 Figure 7.4.1
 Figure 7.4.2
 - When clicked on the View button, Risk Action details will be displayed in read-only mode in a popup window.
7.5 Select Existing Solutions
- A Select Existing Solutions button will be displayed on top of the Risk Action Grid for you to link a Risk Action which is already existing, to multiple Risks within multiple Risk Types.
- This gives you the flexibility to filter according to specific filtrations before selecting an existing Risk Action to be linked to a Risk.

Figure 7.5.1
7.6 Convert Actions to Controls
- You can now convert a Risk Action to a Control when the Action Status is ‘Completed’ or the Percentage Completion is ‘100%’.
- This can only be done once for a Risk Action.

Figure 7.6.1

Figure 7.6.2
7.7 Selection of a Control from the Risk Action Grid
- You can select a Control for a specific Risk Action from the Risk Action Grid to control a specific Risk Action.
- The Controls listed for selection for a Risk Action depicts from the list of Controls associated with that particular Risk only.
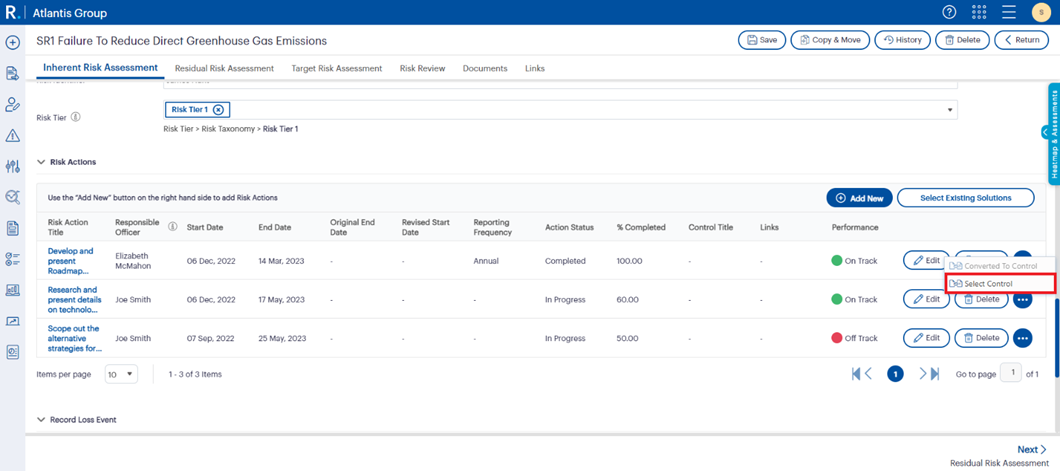
Figure 7.7.1
7.8 Creation of an Audit Recommendation via the Risk Action Links tab
- You can now create an Audit Recommendation from the Links tab of a specific Risk Action.
- In order to create an Audit Recommendation, an Audit and then a Finding must be selected for the Recommendation to be created for the specified selections.
- Creating an Audit Recommendation will create a linkage between the Risk Action and the Audit Recommendation. Further, the created Audit Recommendation will be added to the Audit Recommendations Register. This will only be applicable if the Audit Module is activated for your organisation

Figure 7.8.1

Figure 7.8.2
7.9 Field Configurations of Risk Actions
- You are now able to do your configurations for the risk action fields against the risk action grid, risk action details page and MQU page by mandating the required fields as well. Furthermore, you can have custom field configurations apart from the standard fields as well.
- The tab visibility of the ‘Links’ tab of the risk action details page too can be configured from the ‘Links’ tab.

Figure 7.9.1
8. Configuring Hierarchies to be loaded to the Hierarchy Links field in the Risk Details page |
This feature introduces a new Hierarchy field in the Risk Type popup window.
- Added under Menu > Risk Settings > Field Configuration.
- The Hierarchy Links field has been made a hyperlinked field.
- Upon clicking the link, a popup window will open to select hierarchies to be displayed on the Risk Details page.
 Figure 8.1
 - The Organisational Hierarchy will be selected by default, and you can further select other hierarchies from the dropdown.
 Figure 8.2
 - All selected hierarchies will be populated on the Risk Details page under the ‘Hierarchy Links’ field.
 Figure 8.3
9. Hierarchy Type link field |
This is an existing feature where a field has been introduced to segregate the database field from the field grid reference.
- Added under Menu > Risk Settings > Field Configuration.
- A new field has been added to the ‘Add New’ popup window, letting you refer to the field in the Field Configurations Grid by any name, segregating its field reference used in the Field Configurations Grid, to the name in the database, allowing you to have more than one hierarchy type field with the same field name

Figure 9.1
10. Changes in the Risk Aggregation Copy/Move popup |
If Risk Aggregation is enabled by setting Risk Settings > Risk Aggregation, the aggregation feature can be accessed via the Risk Details > Copy/Move button.
10.1 Introduced Primary Category field in Copy tab
- The Primary Risk Category field has been introduced in the ‘Copy Risk’ tab and in the ‘Move Risk’ tab.
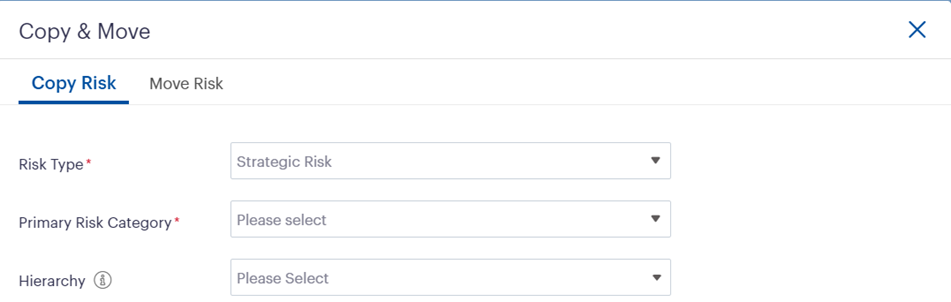
Figure 10.1.1
- The selected Categories and hierarchy nodes will be populated in the copied risk.
10.2 Action checkboxes changed to YES/NO toggles
- The action checkboxes have now been changed to YES/NO toggle buttons.
- Old screen
 Figure 10.2.1
 - New screen
 Figure 10.2.2
- Old screen
10.3 Mandatory fields were introduced to replace the fields ‘Action’ or ‘Project’ when selecting the Risk Type with entities
- Entity Type
- Entity Type Title
 Figure 10.3.1
10.4 Updated hierarchy field user interface
- The hierarchy field is now aligned with all other fields.
- A copy of the risk will be created for each selected hierarchy node when multiple hierarchy nodes are selected similar to the existing application and a tooltip has been introduced next to the Hierarchy field explaining its behaviour.
- Old screen
 Figure 10.4.1
 - New screen
 Figure 10.4.2
- Old screen
11. Causes and Consequences Bowtie Grids |
With this feature, you can now predefine a list of Causes and Consequences via Menu > Risk Settings > Bowtie.
- Two tabs will be available to configure Causes and Consequences.
- If a Cause/Consequence is edited within this section, it will be updated in all records it has been linked to.
- A Cause/Consequence cannot be deleted if it has been linked to at least one record.
- A Cause/Consequence once added, cannot be duplicated.
 Figure 11.1
 - The Causes/Consequences section can be expanded or collapsed within the Risk Details page.
- User interface changes:
- Causes and consequences grids will have pagination allowing the user to easily navigate through all the causes and consequences linked to the risk.
- The Delete button has been changed to ‘Remove’, as this only removes the Cause/Consequence from the Risk and does not delete the record.
- User interface changes:
 Figure 11.2
- Causes/consequences configured within the Bowtie section can be then selected when creating/updating a Risk, by clicking the Select Existing Causes/Consequences button.
- User interface changes:
- Filterable – Making it easier to filter through existing causes/consequences
- Pagination – Making it easier to navigate through all the existing causes/consequences
- Select all within each page – The user can select causes/consequences one by one or all at once by clicking on the ‘Select All’ checkbox.
- Selected Causes/Consequences will be shown with a tick
- Can select or unselect from the existing popup
- User interface changes:
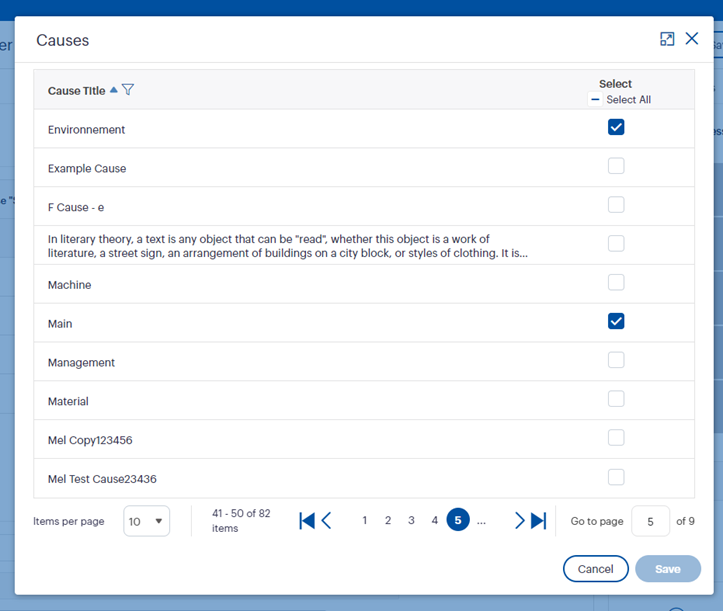
Figure 11.3
- From within the Risk Details page, a Cause/Consequence can be edited, only if it has not been linked to any other record.
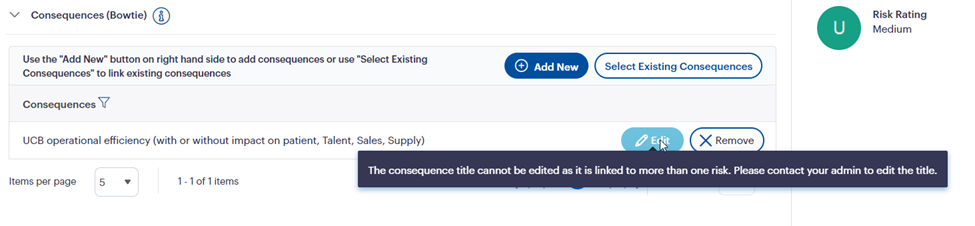
Figure 11.4
11.1 Causes and Consequences Permissions
- Two new permission nodes have been introduced to govern whether we would allow the user to create a new cause or consequence through the risk details page or only allow them to select from the existing bowtie causes and consequences list specified through Risk Setting > Bowtie.
- This can be governed by risk type.
- These permissions will be ticked and enabled by default as in the legacy application adding new causes or consequences were allowed to any user who could add or edit a risk.

Figure 11.1.1
 Figure 11.1.2
Figure 11.1.3

Figure 11.1.4
12. Individual Heatmap |
- Under Menu > Risk Register > [open a Risk] > in each Risk Assessment tab, the Heatmap will display at the top-right corner of the window.
- The Assessment legend and the Rating Type legends are now displayed, to improve their look and feel.
- If the Risk Ratings of assessments are the same, they will be depicted as overlapping bubbles in the heatmap.
- Hovering over the Risk Rating bubble will display the Assessment and Rating.
 Figure 12.1
 Figure 12.2
13. Register Excel Export |
- The label of the export button in the Register has been changed from ‘Excel Export’ to ‘Export’.
 Figure 13.1
 - All columns in the Register, including custom field columns can now be exported.
- If the register is empty, you will not be able to export the register.
 Figure 13.2
14. User Interface changes in Hierarchy Linkages |
- Previously, if you want to add/remove hierarchies, a popup will be opened when the Add/Edit Links button is clicked. However, with this update, a multi-select dropdown field is displayed.
- Previously, all hierarchy linkages were listed on the Risk Details page. However, with this update, a maximum of three (3) hierarchy linkages are listed and the remaining linkages will be displayed upon hovering over the +(more) tag.
- This behaviour is common to all standard and custom hierarchy link fields
- The old screen is displayed in the below figure:
 Figure 14.1
 - The new screen is displayed in the below figures:
 Figure 14.2
 Figure 14.3
15. Cross Hierarchy Filtering |
Previously, the hierarchy tree filter only allowed you to select a single hierarchy node, while the cross-hierarchy filtering feature lets you select multiple hierarchy nodes and filter across hierarchy structures.
Filtering syntax
- If two or more hierarchy nodes have been selected from the same hierarchy structure, a union (OR) of selections within the hierarchy is considered.
- If hierarchy nodes belonging to more than one hierarchy structure have been selected, an intersection (AND) between the hierarchy node selections is considered.
Example: User has permission to (View node with children)
By default it will load:
Selected hierarchy nodes from the filter tray
Risks along with hierarchy nodes the risks are linked to (when filtered):
|
Note: Permissions applicable to access risks will not be overhauled, as this filtering option is available to filter risks you have been granted permission through access management. |
- A separate hierarchy tree filter is available in EIS and the Heatmap Dashboard areas. The above filtering syntax is applied to EIS, Heatmap Dashboard, and Register areas.
 Figure 15.1
 - By default, when a node is selected, child nodes under the selected parent node will also be ticked. If you wish to filter only based on the selected hierarchy node, you can do so by ticking the ‘Show risks of the selected hierarchy only’ checkbox.
- Ticked hierarchy nodes will be visible under the ‘Filtered by’ area and you can unselect a ticked hierarchy node either by unticking in the hierarchy tree filter or by clicking on ‘x’ on the selected hierarchy nodes reflected in the ‘Filtered by’ area.
 Figure 15.2
 - If the filtered-by section exceeds two lines, hierarchy nodes will be shown up to the end of the second line and you will be able to view all selected hierarchy nodes by clicking on the Show More link.
16. Common Configurations |
- Previously, under the Register Configuration settings page accessed via Main Menu > Risk Settings > Register Configurations, the register types: Executive Intelligence, Heatmap Dashboard, and Dashboard drill-down popups were configurable for Label Names, Visibility, Searchability, Sequence, and Width of fields, under one location.
 Figure 16.1
 - The evolved Register Configuration settings page will have these fields configurable via Main Menu > Risk Settings > Register Configurations, under a separate Common Configurations tab within the page to ensure that common Register Configurations (i.e. Executive Dashboard, Heatmap Dashboard, Dashboard) are easily identifiable.
 Figure 16.2
 - You are now allowed to configure EIS, Heatmap Dashboard, and any dashboard drill-down field configurations by clicking on the Edit button, which will open the configuration grid.
- A union of all the fields made visible across the active registers will flow through to the common configurations ‘Configuration Grid’, and you will be able to change the Visibility, Searchability, Label name, Sequence, and Width wherever applicable, via the popup window.
 Figure 16.3
17. Executive Intelligence (EIS) |
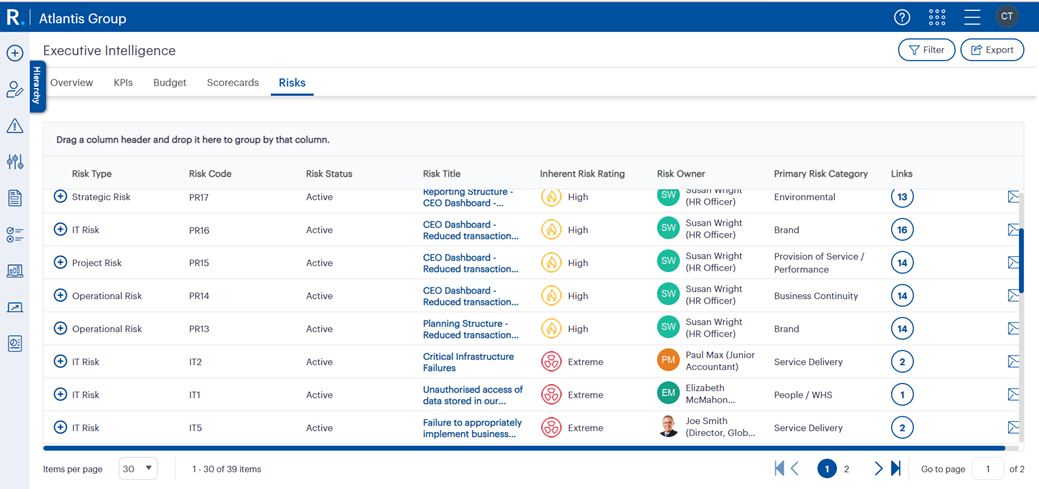
Figure 17.1
- The cross-hierarchy filter will be applied to the EIS window. (See section 17. Cross Hierarchy Filtering for more details on this.)
- EIS columns and filters can be configured via Main Menu > Risk Settings > Register Configurations > Common Configurations > EIS.
- The remaining functionalities of the EIS window will remain as it was previously.
18. Heatmap Dashboard |
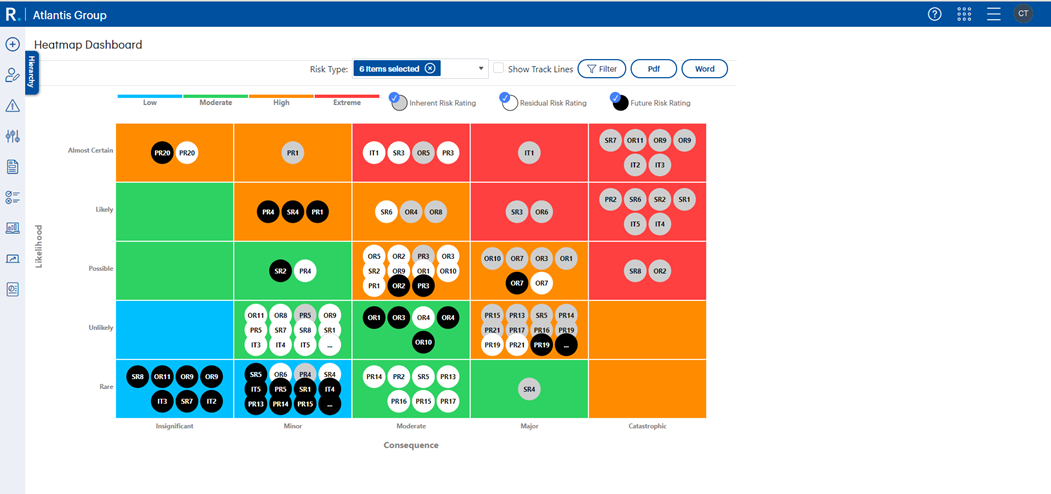
Figure 18.1
- The cross-hierarchy filter will be applied to the Heatmap Dashboard. (See section 17. Cross Hierarchy Filtering for more details on this.)
- The ‘Analysis’ page has been removed and the ‘Heatmap Dashboard’ page has been introduced as a separate item in the ‘Main Menu’ under ‘Workspace’. Further, in the left-hand side menu, the ‘Heatmap Dashboard’ can be accessed by clicking the analysis icon.
- The Heatmap Dashboard filters can be configured via Main Menu > Risk Settings > Register Configurations > Common Configurations > Heatmap Dashboard.
- The remaining functionalities of the Heatmap Dashboard window will remain as it was previously.
19. Risk Linkages |
- You can now add or delete already created linkages through the Links tab of the Risk Details page.
- Risks can be linked to Hierarchies, KPIs, Incidents, Compliances/Obligations, Actions, Controls, Audits, Audit Findings, and Audit Recommendations.
- Previously, to add a linkage, after clicking on the Add new button, you were requested to select linkages in the ‘Links’ page. In the evolved application, adding linkages is done via a separate popup window.
 Figure 19.1
 - All the added linkages will be displayed in the links grid under the relevant links type, and you are allowed to delete any linkages based on permissions granted to your account.
- The Save button has been removed from the ‘Links’ tab, as all the links added or deleted will be automatically saved.
- The Links grids will consist of expand/collapse icons, link type wise and by default, the grids will be collapsed.
 Figure 19.2
 - Further, the Links button available previously next to the Delete button has been removed, as you are now able to perform the same functionality via the ‘Links’ tab.
- Any links added to a Risk Record will be reflected in the Register View, if the ‘Risk Links Count’ column is made visible under Register Configurations (accessed via Main Menu > Risk Settings > Register Configurations > Relevant Register, for the relevant Register.
 Figure 19.3
 - Upon clicking the count, the Links popup will open consisting of all linkages.
 Figure 19.4
 - Similar to the Links tab, link type-wise grids will be, by default collapsed, and users are able to expand the sections and view linkages related details.
- You will only be able to view linkages via the popup window, and if you wish to add or delete an already created linkage, you will have to navigate to the Risk Details Links tab.
20. Risk History in Risk Details |
- Risk History audit details are now available in all Risk Details tabs and history details for Inherent/Initial Assessment, Residual/Revised Assessment, Target/Future Assessment, Review, and Document tabs have been released, while the Document tab requires further enhancements. The history functionality for the ‘Links’ tab will be available in an upcoming release.
- In the evolved application, history details will capture all field-related changes clearly, showing the ‘Current’ and ‘Previous’ values. When you click the History button, it will open up a popup window and a summary of all changes performed will be reflected, along with the timestamp the change was performed, and the user that performed the change.
 Figure 20.1
 - All records will be hyperlinked, letting you view more details of the changes performed. By clicking the relevant record, a comparison of previous and current values of all changed fields will be displayed.
 Figure 20.2
 - If you prefer to assess the current values and previous values more clearly, you can do so by navigating to the ‘Current Representation’ and ‘Previous Representation’ tabs in the popup window.
 Figure 20.3
21. Risk History Page |
- This page can be accessed via Main Menu > Risk Management > Risk History.
- Previously, Risk History had four separate tabs, Inherent Assessment, Residual Assessment, Target Assessment, and Risk Review. Changes performed in the selected Risk Types are captured tab-wise.
- In the evolved application, all changes performed across all tabs are reflected in one grid.
- Risk History will consist of the following and all the column headers will consist of a filter funnel allowing users to search easily:
- Risk Code
- Risk Title
- The user that performed the change
- Timestamp
- Description of the change performed
 Figure 21.1
- Risk History records will be shown as hyperlinked fields allowing you to view more details of changes performed by clicking on the relevant record. Upon clicking previous and current values, all changed fields will be shown in a popup.
 Figure 21.2
 - Similar to how Risk History in Risk Details functions, if you prefer to assess the current values and previous values clearly, you can do so by navigating to the ‘Current Representation’ and ‘Previous Representation’ tabs in the popup window.
 Figure 21.3
 - The Risk History report can be exported as a Microsoft Excel file by clicking on the export icon. Please note that the Word export functionality has been discontinued.
21.1 Existing History Button
- For clients who were upgraded to Risk Evolved, any history logs of existing risk records could be accessed by clicking on the Existing History button found in the history popup.
 Figure 21.1.1
22. Risk Appetite Setting |
A separate settings page under Risk Settings called ‘Appetite’ is introduced in the evolved application.
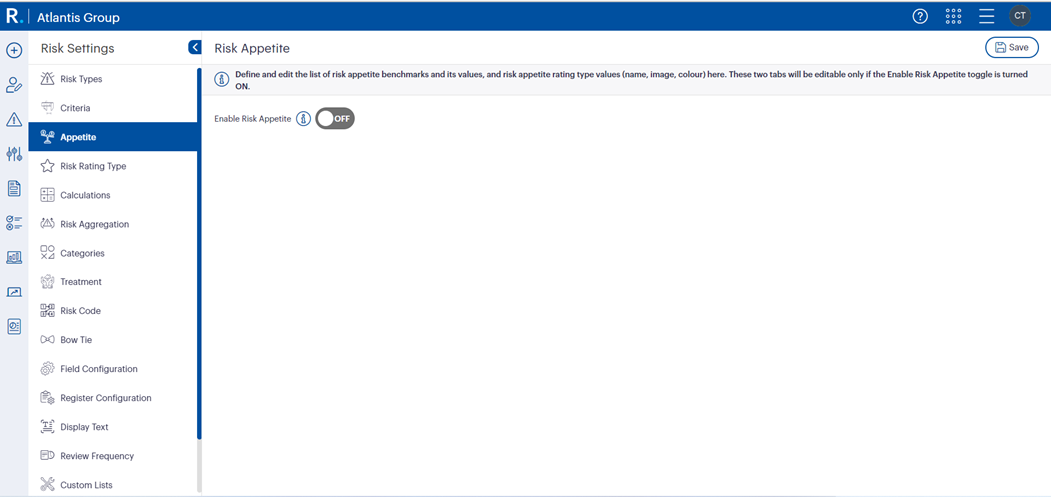
Figure 22.1
- Previously, enabling the Risk Appetite feature is a configuration setting. This is now moved to this section and by default, will be toggled OFF. A tooltip is added next to the field name to provide more details about this feature.
- Once this toggle is switched ON, you will be able to configure the Risk Appetite Benchmark values and Risk Appetite Rating Type-related configurations.
- Risk Appetite Benchmark configurations were previously available under Menu > Risk Settings > Criteria > Risk Appetite Benchmark.
- Risk Appetite Rating type configurations were previously available under Menu > Risk Settings > Rating Type > Risk Appetite.
- The above areas are introduced under the ‘Appetite’ menu to ensure that you are allowed to configure Appetite-related settings from within one page.
 Figure 22.2
 - In-line editing is now eliminated and a separate Add new button is introduced at the top-right corner of the grid. Edit buttons against each record are available to let you add or edit benchmark values in a separate popup window.
 Figure 22.3
 - In addition to the fields required when creating a new appetite benchmark in the previous application, a field called ‘Field Type Name’ is added to the popup window. This will request you to enter a unique database reference name to capture the entered appetite benchmark value.
- This field will be disabled in the ‘Edit’ popup window, as it will not be editable once saved.
 Figure 22.4
 - You will be able to edit ‘Risk Appetite Rating Type’ values by clicking the Edit button available against the two rating types.
 Figure 22.5
 - You will be able to edit via the popup window when the Edit button is clicked. Previously, when the Edit button is clicked, you are able to edit in-line in the Risk Appetite Rating grid.
 Figure 22.6
 - Previously, you were able to change the image by clicking the image, and a separate window will be opened as shown below.
 Figure 22.7
 - Users were able to select an existing logo or choose a file through the same window. In the evolved application, this is introduced in the ‘Edit’ popup window and you are able to either select an existing logo or a new one. If you prefer to use an existing logo, ‘select existing image’ needs to be clicked, and when clicked, all existing logos will be reflected in a separate popup window as below.
 Figure 22.8
 - Previously, the Risk Appetite Rating was included as a separate field. This has now been evolved to introduce the ‘Risk Assessment’ field under Field Configurations, as a toggle.
 Figure 22.9
 - This popup will additionally consist of a count stepper that requests you to configure the number of decimal places for Risk and Appetite Score values. Previously, configuring the number of decimal places for an Appetite was a configuration setting. This is now introduced to the ‘Risk Assessment’ popup, accessed by clicking the hyperlinked ‘Risk Assessment’ field. An info icon is added next to this field to ensure that the purpose of this field is explained.
 Figure 22.10
 - Previously, next to the Risk Appetite Benchmark field, in Risk Details, an Edit button is available. However, in the evolved application this is removed, as the Appetite Benchmark field will be enabled for editing only for users with the ‘Edit Risk Appetite Benchmark’ permission ticked, and for other users, it will be disabled.
23. Monte Carlo Analysis |
The Monte Carlo analysis fields will be available for the existing Risk types and any newly created Risk type under the Field Configurations Risk Setting.
- Similar to the legacy application, you are able to configure any Monte Carlo Analysis-related fields by accessing the hyperlinked Monte Carlo Analysis field via Menu > Risk Settings > Field Configurations.
- The below enhancements have been applied to the popup window:
- Monte Carlo Analysis sections have been segregated for better clarity and expand/collapse icons have been introduced for each section. By default, the ‘Best Case Scenario’ section will be expanded.
- ‘Show quantitative assumptions’ checkboxes have been replaced by toggle buttons.
- The below enhancements have been applied to the popup window:
 Figure 23.1
- If this field is enabled, it will be available under the Risk Details page and an expand/collapse icon will display the Monte Carlo section. By default, this section will be expanded.
- In the legacy application, you were able to access the configured description by clicking on the ‘i’ icon. However, in the Evolved application, you are able to view descriptions by hovering over the info text icon.
Legacy Application Figure 23.2
Camms.Risk Evolved Figure 23.3
 - The static graph has been replaced with a dynamic graph that visualises monetary values for each probability value starting from P5 to P95.
Legacy Application Figure 23.4
Camms.Risk Evolved Figure 23.5
 - Elements of the dynamically generated graph are as follows:
- The graph will be automatically generated upon providing values for each of the Monte Carlo fields and specifying a likelihood percentage.
- The X-axis will automatically change based on the generated monetary estimations and you can view the estimation values by hovering over the plotted graph.
- Vertical lines have been included for more clarity and to improve the readability of results.

Figure 23.6
- Further, you can have the Monte Carlo fields enabled as Register columns and Register filters, similar to the legacy application.
24. Introducing Standard Roles |
A new Standard Roles setting is introduced to provide more flexibility when managing inherited permissions for the Risk Responsible Officer, Secondary Risk Responsible Officer, Action Owner, Control Owner, and Control Authoriser.
Note: This release will only focus on the Risk Responsible Officer and Secondary Risk Responsible Officer roles. The other roles will be released in an upcoming release. |
- You can access the Standard Roles settings feature under Menu > Risk Settings > Standard Roles, and users with the relevant permission to the above area only will be able to access Standard Roles.
- This permission would work as a union with the permission granted through Custom Roles (Permission roles created via the Role Management area), once you are assigned as a Responsible Officer or a Secondary Risk Responsible Officer of a Risk record.
- The below-mentioned permissions have been removed from the role management area and introduced under the standard roles section:
| Permission Name | Existing application | Risk Evolved |
| View all Responsible Officer | Role management > Register permissions Role management > Risk Solution | Standard roles > Risk Responsible Officer > Register permissions Standard roles > Risk Responsible Officer > Risk Solution > View |
| Edit by Risk’s Secondary Responsible Officer | Role management > Details > Inherent Residual Target Review Document Link Role management > Details > Risk Solution | Standard roles > Secondary Responsible Officer > Details Inherent > Edit Residual > Edit Target > Edit Review > Edit Document > Edit Link > Edit Standard roles > Secondary Responsible Officer > Risk Solution > Edit |

Figure 24.1

Figure 24.2
25. Linking to the Planning Hierarchy |
You are now allowed to link to nodes of the Planning Hierarchy through the Risk Details, Links tab.
- This will only apply to users with Planning Hierarchies configured.
- Planning linkages will follow the same behaviour as other Risk Linkages. (Please see Section 21. Risk Linkages for more details.)

Figure 25.1
26. Critical Path Delay configuration for all Risk Types |
The Critical Path Delay feature will now be available for all Risk Types that are created linking to a Project and/or Action Entity type.
- Similar to the legacy application, you will be able to access the Critical Path Delay field’s property by clicking the hyperlink of the field under Field Configurations.
- If the configurations are made available within the Risk Details page, filter tray, and Register area, the field will be displayed.
 Figure 26.1
27. Moving Business Process and Legislation settings under Custom Lists |
In the legacy application, the list values for the ‘Business Process’ and ‘Legislation’ lists are configured via two separate Risk Settings pages.
With Camms.Risk Evolved, the functionality of these two lists, which is the same as any other custom list, has been introduced as two new Custom Lists in addition to the 40 Custom Lists already provided.
Legacy Application

Figure 27.1
Camms.Risk Evolved
 Figure 27.2
- By clicking on the plus icon, you can expand the list to view its values, add more list values, or edit/delete already configured list values. (This will be the same behaviour as a Custom List).
 Figure 27.3
 - Clicking the Add New button, will let you create list values to be populated within the relevant list.
 Figure 27.4
 - By clicking the Edit button, you can edit the list value name, whether the list value is shown or hidden, based on the active status, and the sequence order in which the list value is shown when the relevant list is expanded in the Risk Details page.
 Figure 27.5
 - Delete a list value by clicking the Delete button. However, this will be permitted only if the list value has not been used within any Risk record.
- The fields can be made visible under Menu > Risk Settings > Field Configurations within any of the three assessment tabs on the Risk Details page.
 Figure 27.6
 Figure 27.7
 - The fields can be configured as columns and filters in Risk Registers, EIS, and the Heatmap Dashboard by configuring it as visible for columns and searchable for filters under Menu > Risk Settings > Register Configuration.
- These columns and filters can be configured for each of the Risk Assessment phases for either list. For example, if the Business Process list is enabled for Inherent Assessment and Residual Assessment, you can have separate columns to show the Inherent Assessment’s value and the Residual Assessment’s values.
 Figure 27.8
 Figure 27.9
 Figure 27.10
 Figure 27.11
 Figure 27.12
 Figure 27.13
28. User-wise Register Configurations |
In the current application, the User-wise Register Configuration was only available in the Project Risk Register, where you can click the ‘Custom View’ button to open the Quick Settings page and customise the Project Risk Register fields.
With Camms.Risk Evolved, the User-wise Register Configuration will be available in all Risk Registers. The same Custom View button will be available in all Risk Registers. You can click the Custom View button to view a user-wise Register Configuration.
Figure 28.1
Below are the changes in the Quick Settings popup.
Legacy Application
 Figure 28.2
Camms.Risk Evolved
 Figure 28.3
- The popup name is changed from ‘Quick Settings’ to ‘<Register name> Register Custom View’.
- The ‘Restore Default’ button is moved to the bottom of the popup and renamed as ‘Reset’.
- The drag-and-drop icon and the checkboxes used for ordering the fields are removed and a ‘Sequence’ column is introduced to order fields.
- The ‘Visible’ column checkboxes have been changed to an ON/OFF toggle button.
- Filter icons are introduced for Field Name and Visible columns to filter fields.
- Sorting options are introduced for Field Name, Visible, and Sequence columns to sort columns.
Phase 2 features
29. Improvements to Controls |
- With Camms.Risk Evolved, we have introduced the possibility to link Controls to additional multiple Risk Types as well as have the ability to maintain a Control Grid within multiple Risk Types that will enhance your experience when using the Camms.Risk application.
29.1 Control Record Grid within all Risk Types
- Control Record Grid is now configurable within all Risk Types and any Risk Assessment tab as preferable
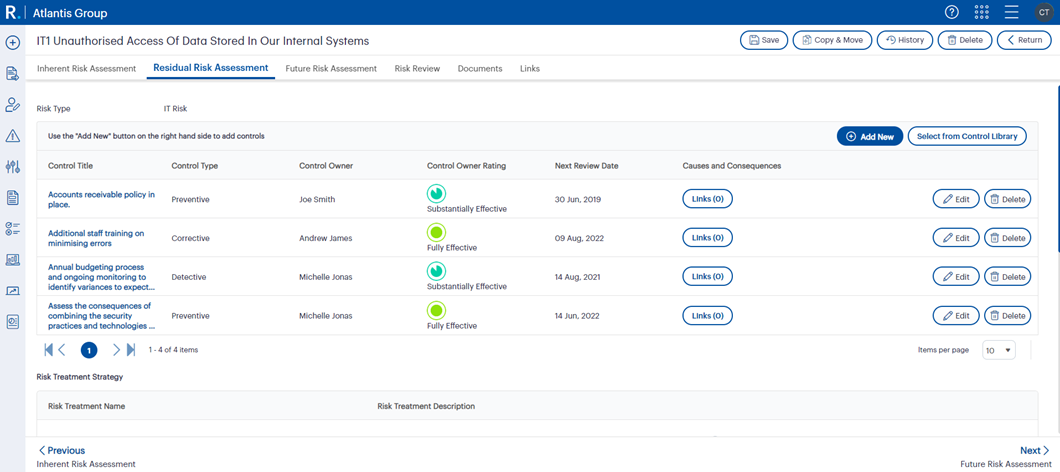
Figure 29.1
29.2 Control Linkages to Multiple Risk Types
- Controls can now be linked to multiple Risk Types as required, allowing you to maintain Controls across multiple additional Risk Types.
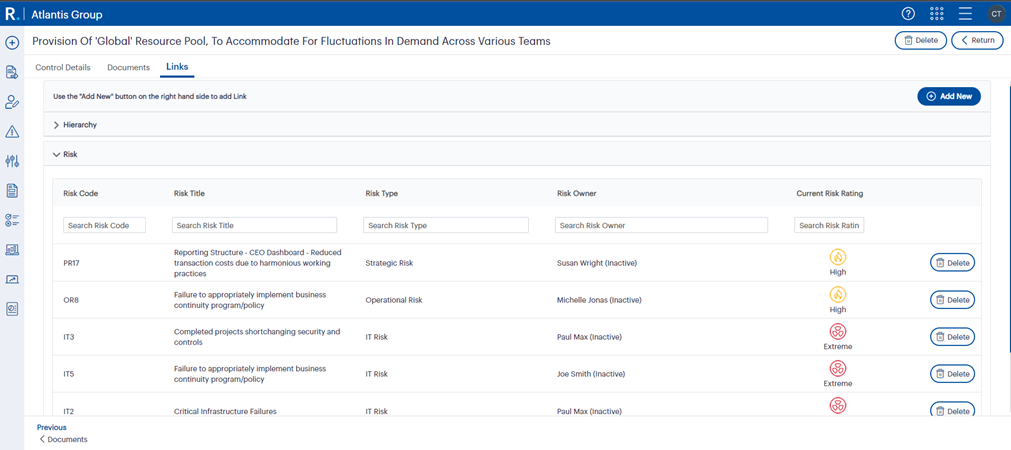
Figure 29.2
30. Region Settings |
- An Administrator can now define the date format, time zone, currency code, and the thousands separator format that the organisation requires to use across the Camms.Risk application under Menu > Administration > Localisation.

Figure 30.1
- An individual user can change the time zone set by the administrator for him/herself if required through My Settings. This will only apply to the relevant user and will not affect the administrator-configured values.
 Figure 30.2
- The relevant configurations will be seen across the Camms.Risk application in the below areas:
- Risk Registers
- Risk Details Pages
- Risk Audit History
- Actions Grids
- Actions Details Pages
- Actions History
- Executive Intelligence
- Dashboard
- Risk Heatmap Dashboard
- Risk Register Excel Export
- Risk Emails
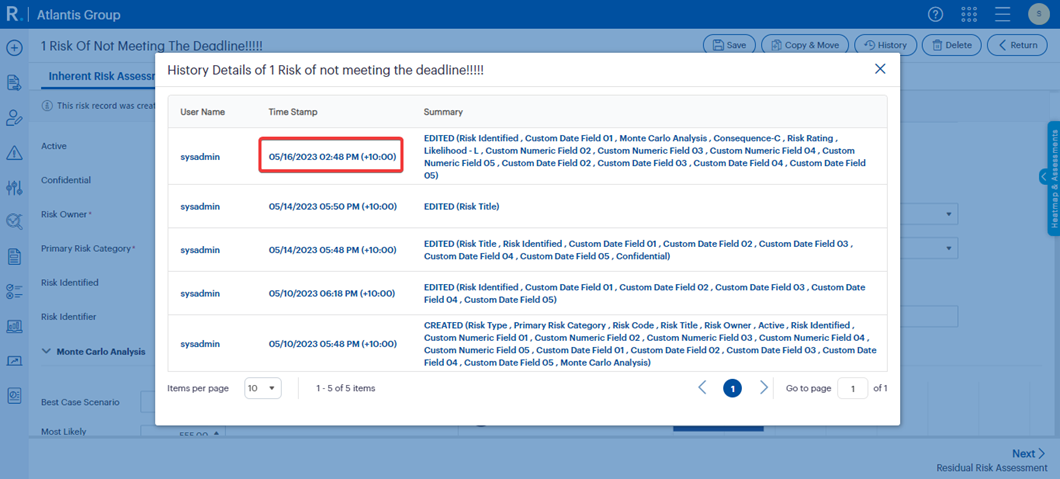
Figure 30.3

Figure 30.4
31. Risk Confidentiality |
- In the current application, administrators can enable confidentiality or risk-wise confidentiality via a setting that would apply to all the risk types.
- With Camms.Risk Evolved the administrator can configure either one of the risk confidentiality options per risk type-wise through Menu > Framework > Risk Settings > Risk Types.
- If the option ‘Confidential’ has been set, any risk created from the relevant risk type could be marked as confidential if needed. And only users with the relevant ‘Risk Confidential’ permissions will be able to see the risk.
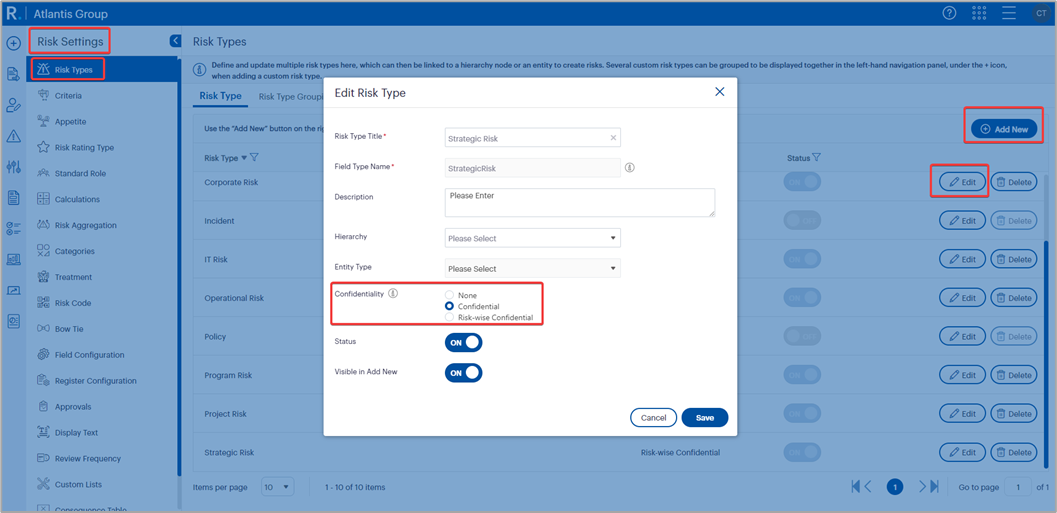
Figure 31.1

Figure 31.2

Figure 31.3
- If the option ‘Risk-wise Confidential’ has been set, any risk created from the relevant risk type could be marked as confidential if needed the user can specify the staff members who could see and access the risk.
Note: The user does not need ‘Risk Confidential’ permission to see these risks if they have been selected. |
 Figure 31.4

Figure 31.5
- Only for risk-wise confidential risk types, we have introduced a new super permission as ‘Show confidential risks’. Suppose the staff member has not been selected in the risk-wise confidential dropdown but has been granted this super permission. In that case, they will be able to see and access the risks in combination with their registered permission.

Figure 31.6
- Further, only for risk-wise confidential risk types, in Risk Settings > Field Configuration, we have introduced a field property for the ‘Confidential’ field for administrators to be able to specify which staff members should be automatically selected by default in the risk-wise confidential staff dropdown.
- By default, the risk responsible officer and the risk secondary responsible officer will be selected.
 Figure 31.7
- Based on the selected properties, the staff selected for each option will be selected by default and will be able to see and access the risk-wise confidential risk.
 Figure 31.8
32. Project-Specific Risk Permissions |
- The project-specific permission setting will work similarly to the current application in Camms.Risk Evolved static databases.
- Two permissions named 'Risk Editor' and 'Risk Viewer' in the Project creation area in Risk to provide a restricted view for risks created under the Project risk type will be available when this setting is enabled.
33. Audit Impacts |
- All the audit impacts for clients with the Audit module enabled have been covered in this release allowing users to access audit menus through the left-hand side menu and main menu based on permissions.
- Further, users will be able to access any linked audits, findings and recommendations through the risk details links tab and add any new audit linkages if required.
34. Record Loss Events |
- The Record Loss Events feature will only be available within the inherent assessment tab of all risk types. This feature cannot be configured via Field Configurations and will only be enabled if required by Camms.
- This section is now expandable/collapsible and by default the section should be expanded.
- To add records, the ‘Add New Record Loss Events’ popup would be displayed upon clicking the Add New button.
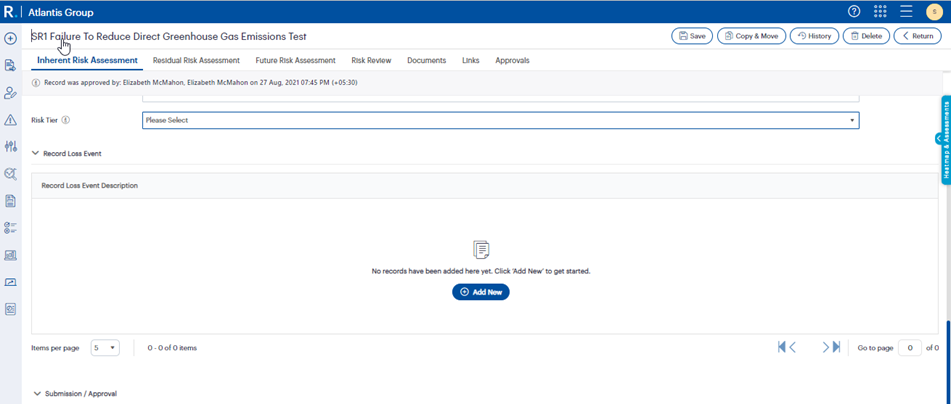
Figure 34.1

Figure 34.2
- Users can edit records by clicking on the Edit button relevant to the record.
- Further, users can delete records by clicking on the Delete button relevant to the record that the user is referring to.
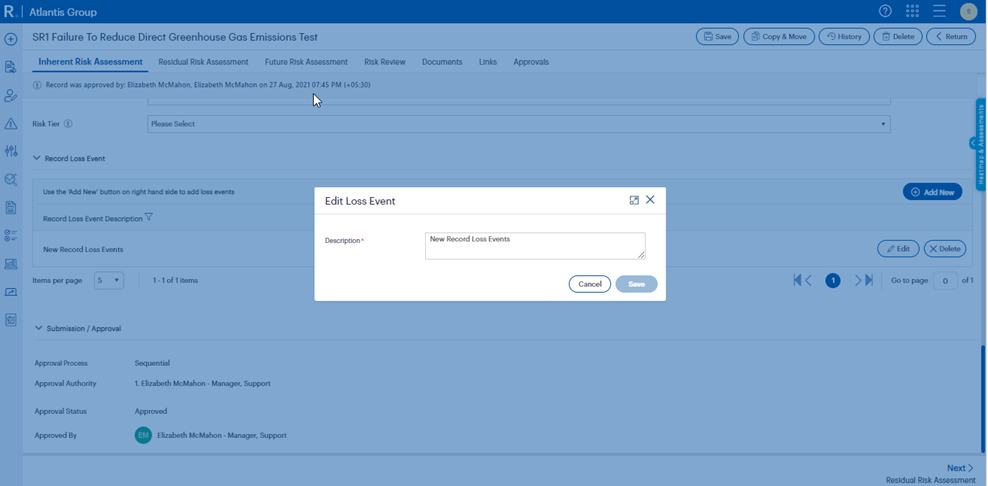
Figure 34.3
35. Additional Control Measures |
- Additional control measures feature can be configured via Risk Settings > Field Configuration will be available only within the risk residual assessment tab of all risk types.
- This section is now expandable/collapsible and by default the section should be expanded.
- In addition, users can add new records by clicking on the Add New button in the grid.

Figure 35.1

Figure 35.2
- Moreover, users can edit records within the ‘Edit Additional Control Measures’ popup which can be accessed by clicking on the Edit button relevant to the record.

Figure 35.3

Figure 35.4
- Further, users can delete records by clicking on the Delete button relevant to the record that the user is referring to.

Figure 35.5
36. My Settings |
- In the current application, users can access ‘My Settings’ either through the main menu or by clicking the profile icon in the Camms.Risk Evolved application, the ‘My Settings’ menu has been removed from the main menu allowing users to access it by clicking the user’s profile icon. The legacy application consists mainly of two sections namely, Change Password and Settings.

Figure 36.1
- In Camms.Risk Evolved, in addition to the above sections, three sections have been introduced as ‘Languages’, ‘Quick Update Settings’, and ‘Region Settings’.
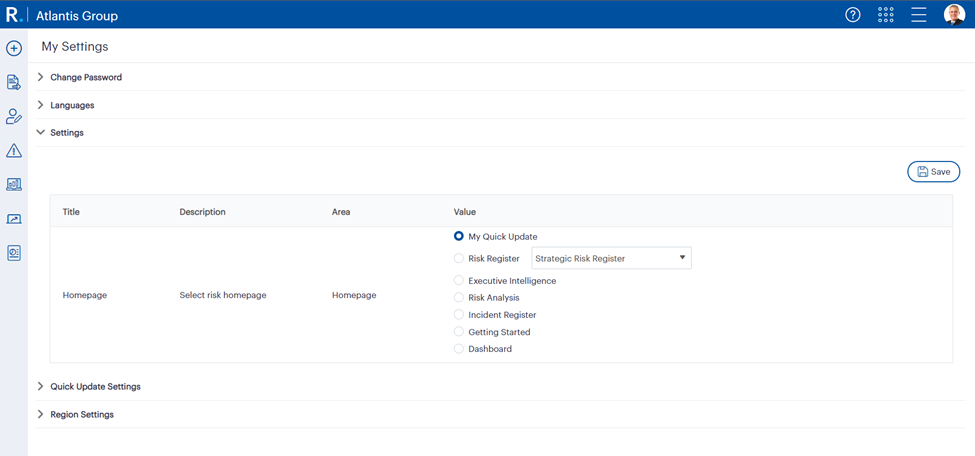
Figure 36.2
- Each section will have the ability to expand and collapse and by default ‘Settings’ section will be expanded while the other sections will be collapsed. Further, each section will be separated with a horizontal divider.
- The ‘Change Password’ section will consist of a Change Password button underneath the section title whereas, in the current application, the button appears on the right-hand side of the screen.
- Upon clicking the button a popup will open allowing users to change their password similar to the current application.
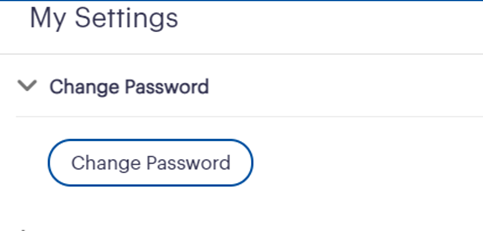
Figure 36.3
- The ‘Languages’ section has been introduced to support the multilingual capability and it will be further explained in the relevant release note that will be published in the future.
- The current application ‘Settings’ section consists of two sub-sections as ‘Risk graph’ and ‘Homepage’.

Figure 36.4
- The ‘Risk Graph’ section has been removed in Camms.Risk Evolved as that setting is no longer in use.
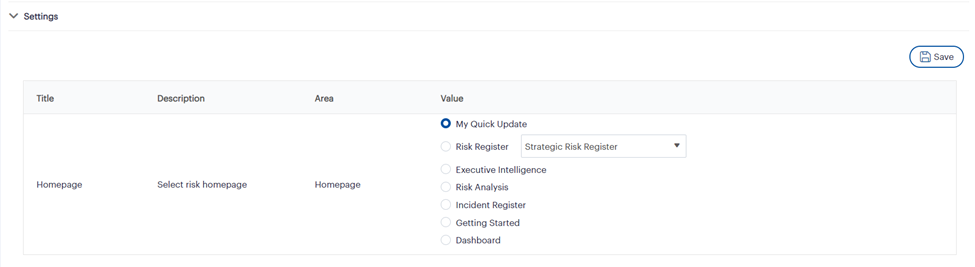
Figure 36.5
- All the risk registers created in the system will load in the risk register dropdown allowing users to select any standard or custom register as the homepage.
- The ‘Quick Update Settings’ section has been introduced to allow users to configure the visibility of each section/ widget in the ‘My Quick Update’ page and to allow users to set any section/ widget as the default responsibility in My Quick Update.

Figure 36.6
Note: Suppose there are no responsibilities assigned from a given responsibility type to the logged-in user, In that case, the respective widget will not be displayed in the My Quick Update even if the widget is configured to show via My Settings. |
- Region Settings section has been introduced to allow users to configure time zone and this has been explained under the ‘Region Settings’ section in the release note.
37. Mapping Static Permissions to the Flex Permission Framework |
Note: This section is only applicable to Static clients. |
- Static user permissions have been mapped to the flexible hierarchy tree in Risk Evolved.
37.1 Manage Users
- The below changes have been performed to the ‘Manager user’ page:
- The manage user page retains the common roles used across the CAMMS products.
- The Camms.Risk-specific user roles have been removed from the area entirely and listed under the ‘Role Management’ menu.
- The Camms.Risk-related permissions within the common roles have been removed from the common roles and mapped as roles in the flex framework.
37.2 Role Management
- The ‘Role management’ page has been introduced within the Main Menu > Administration for static clients and this is visible to all static customers as per user permissions.
 Figure 37.2.1
- For existing customers, all existing static risk-related roles have been populated.
 Figure 37.2.2
- Every role will be mapped against the permissions in the Flex permission tree.
- The flex permission tree will reflect permissions granted through the role for each register, permissions granted within the risk details page, actions (solutions) grid, administrative pages, and other common risk management areas.
- The common roles have been populated as roles with the prefix ‘Risk’ appended to them.
- The common roles BU Manager and Director have been populated as a single role named ‘Organisation node Manager’.
- This will inherit the permission of the BU manager or Director if the logged-in user is the Responsible officer of the respective Business Unit or Directorate (configured within Administration > Business Unit/Directorate)
- For every risk type created, two new roles will be populated as ‘Viewer’ and ‘Editor’ inheriting the relevant permissions to view and edit records created under that risk type similar to the existing viewer and editor roles.
- E.g.: if a risk type as ‘IT’ is created with two new roles as ‘IT Risk Viewer’ and ‘IT Risk Editor’ will be created and like viewer and editor roles in the existing system, relevant permissions will be ticked in the flex tree by default and users will be able to assign these roles through staff ‘Assign role’ tab if required.
- The ‘Product’ dropdown will only list ‘Camms.Risk’ and the dropdown is disabled for editing.
- For better clarity, administrators can view the permissions of each role.
37.3 Staff Page
- A new tab called ‘Assign Role’ has been added to the ‘Staff’ page and the staff ‘Details’ tab will not have any changes.
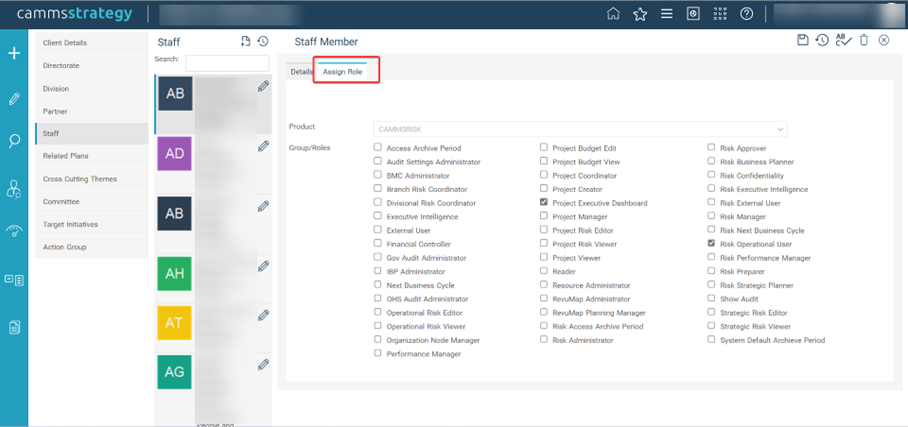
Figure 37.3.1
- The ‘Assign role’ page will list all the static roles with risk permissions in the database and users can assign roles by ticking the checkbox and clicking on the save icon.
- ‘CAMMSRISK’ will be selected as the product in the product dropdown and disabled.
- The ‘Organisation links’ field will remain as is on the details page and will list the directorates and business units to which the staff can be linked to.
- There will be a one-way synchronisation from this field to the Hierarchy page ‘Linked staff’ grid.
37.4 Hierarchy Page
- A ‘Hierarchy’ page has been introduced into Main Menu > Administration > Hierarchy.
 Figure 37.4.1
- This will be visible to all static customers as per user permissions.
- The page will only show the ‘Organisation hierarchy’ in the dropdown.
- Other hierarchy types will not be visible.

Figure 37.4.2
- The page will be read-only, and all the fields will be disabled.
- Users can select a hierarchy node and view the title, responsible officer, and staff linked to the selected hierarchy node/level.
- The Linked Staff grid for each node will depict the staff names linked to the organisation node via the staff page > organisation links field.
- This will be a one-way synchronisation from the Staff page to the Hierarchy page.
- The responsibility officer dropdown will be linked to the responsible officer dropdown in the respective Directorate/Business Unit/ Service Profile.
- This will be a one-way synchronisation from the Directorate/Business Unit/Service Profile pages to the hierarchy page.
- The Linked Staff grid for each node will depict the staff names linked to the organisation node via the staff page > organisation links field.
Phase 3
38. Reassign Staff Responsibilities Feature |
- With Camms.Risk Evolved, the ‘Reassign Staff Responsibilities’ feature supports reassigning responsibilities linked to all the risk types in the application.
- Similar to the current application, users can reassign responsibilities individually or in bulk from one staff member to another.
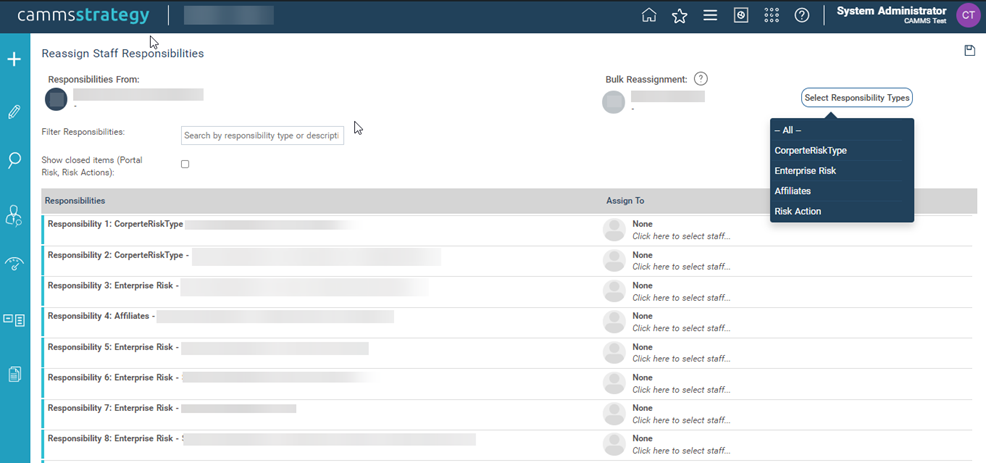
Figure 38.1
39. Incident & Compliance Impacts |
Note: This section is applicable only to the clients that have the Incident and/or Compliance modules activated. |
39.1 Incident/Compliance Consequence Table
- If the Administrator has enabled the miscellaneous setting ‘Display Risk Consequence popup for Severity’ within the Incident and/or Compliance modules, then the Consequence/Impact Table configured through Risk Settings will be displayed within the relevant module.
- In the current Camms.Risk application once the above setting is enabled the consequence table will load all the risk categories.
- However, with Risk Evolved we have improved the capability to configure which Risk Categories are to be considered in the consequence table for Incident and/or compliance without pulling through all risk categories.
- To be able to differentiate the categories that are to be considered for the Incident/Compliance modules’ Consequence Tables, there will be a static risk type created as ‘Incident’ corresponding to the Incident module and three risk types as ‘Compliance’, ‘Policy’, and ‘Authority Document’ corresponding to the Compliance module.
- These risk types will only be visible in Category and Consequence Table setting areas and not anywhere else in the Risk Evolved Application.
 Figure 39.1.1
- When creating/editing risk categories (Further referenced in the Beta 1 release note under the section ‘6.6 Categories Settings’), if the category is to be considered in the consequence table for incident/compliance then the relevant risk type should be selected in the ‘Consequence’ field of the popup.

Figure 39.1.2
- Once the category setting has been configured, the relevant categories will be available on the Consequence Table of the relevant Incident/Compliance risk types.

Figure 39.1.3
- Based on the configurations the consequence table accessed from Incident/Compliance will be shown with only the specified categories and descriptions.
39.2 Incident/Compliance Menus
- All the Incident/Compliance impacts for clients with the modules enabled have been covered in this release allowing users to access Incident/Compliance menus through the left-hand side menu and main menu based on permissions.
- Users with the compliance module enabled will be able to access the ‘Alerts’ section through the profile menu as well.
39.3 Incident/Compliance Linkages
- Further, users will be able to access any linked incidents, compliances (obligations), policy, and authority documents through the risk details links tab and add any new linkages if required.
40. Team & Responsibility Center Fields |
Note: This section is only applicable to Static clients. |
40.1 Team field
- This is an optional field that can be activated or deactivated by CAMMS upon request.
- The ‘Team’ field allows you to link a risk record to a configured team in your organisation.
- The current application shows the configured teams in the dropdown.
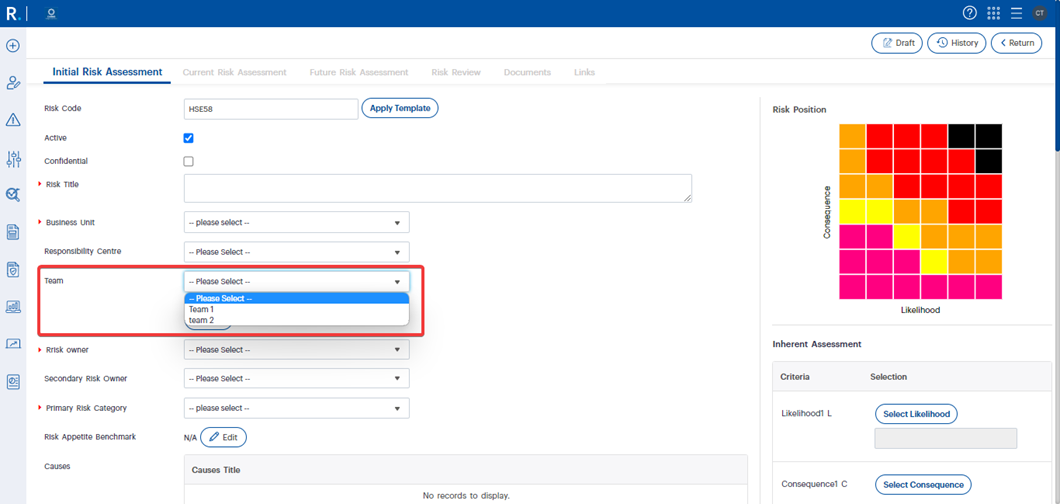
Figure 40.1.1
- In the Evolved application, it is populated as a tree view.
- In the first level, it will show the Business units.
- Upon clicking on the + and expanding the Business Unit level, it will show the Teams associated with the relevant Business Unit as the second level.
- Users can select a Team from the dropdown, like the current application.
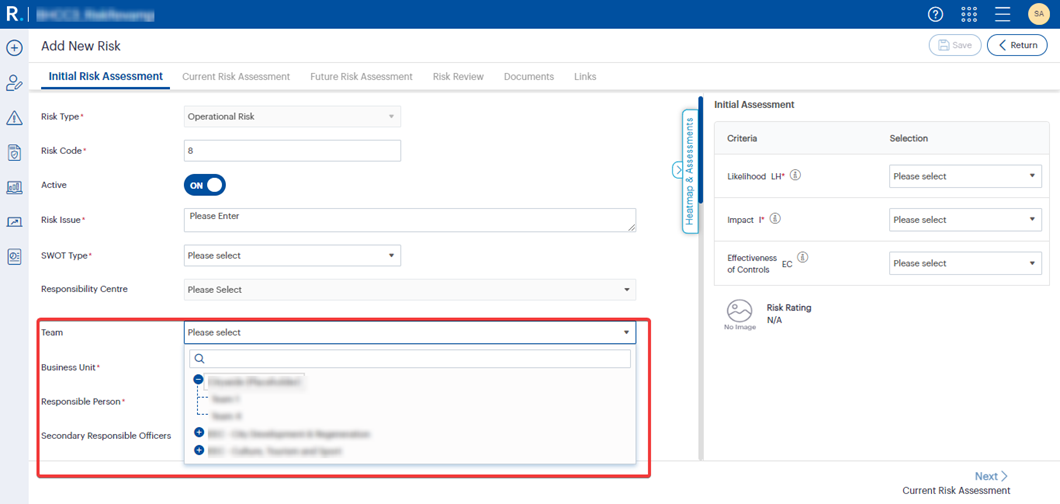
Figure 40.1.2
- In the current application, there is a Show All button against the ‘Team’ field, and It has been removed as, by default, it will load all the teams in the dropdown within the Evolved application.
40.2 Responsibility Centre field
- The Responsibility Centre allows you to link a risk record to any organisational hierarchy nodes allowing users to link to multiple nodes or levels of the hierarchy structure.
 Figure 40.2.1
- In the current application for Operational risk type, the ‘Responsibility Centre’ field listed only the Service profiles and the Teams belonging to the selected Business Unit from the ‘Business Unit’ field.

Figure 40.2.2
- In the Evolved application, for any risks created under the ‘Operational risk’ type, we have enabled the user to select multiple hierarchy nodes from the organisation hierarchy structure, and we have removed the existing cascading behaviour with the Business unit field allowing users to select multiple hierarchy nodes from any Business unit.
- The current application for other risk types listed the Organisation hierarchy structure consisting of all the Directorates, Business Units, and Service Profiles in Camms.Risk Evolved, users can select one or many hierarchy nodes from the Organisation hierarchy structure.
41. Business Unit Field |
- The Business Unit field gives you the ability to link a risk record to a Business unit.
- In the current application, the ‘Business Unit’ field is only available in the ‘Operational’ risk type and users are able to make this field visible through risk settings if required.
- In Evolved, this field will be enabled in the ‘Operational’ risk type, similar to the current application, but users will only be able to make this field visible when the ‘SWOT’ field is visible.
- This field will be hidden if the ‘SWOT’ field visibility is turned off and the selected Business Unit values will be ticked in the Responsibility Centre field.
- If the ‘SWOT’ field is marked as mandatory, then the Business Unit field will also be marked as mandatory.
- It will load all the Business Units available configured in the application.
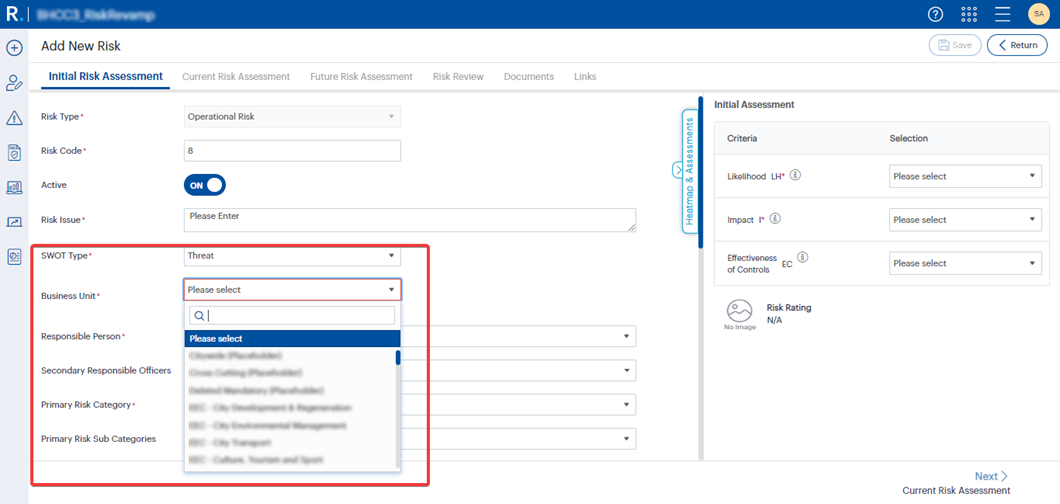
Figure 41.1
42. Additional Controls for Risk Actions |
- This allows you to maintain an additional risk controls grid within the risk action itself apart from the controls maintained in the instance to provide more control measures and maintain it individually against a risk action.
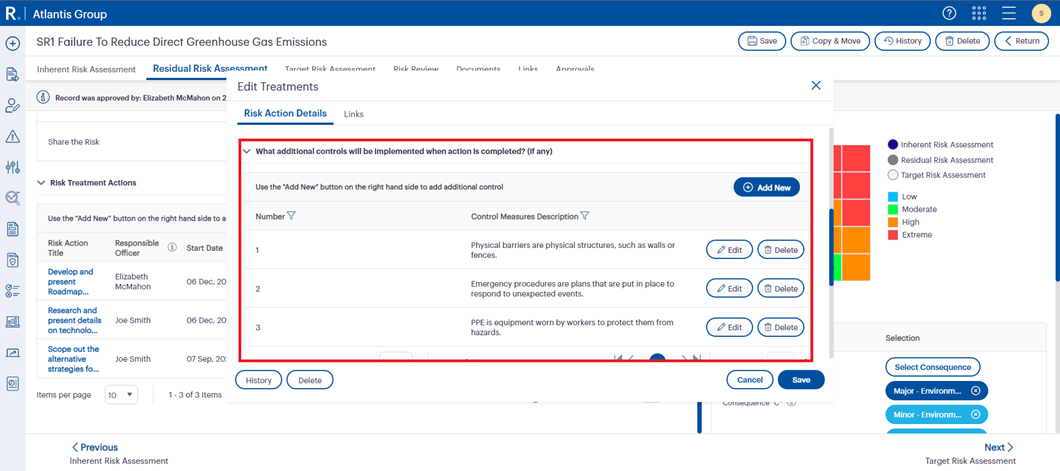
Figure 42.1
43. Linked Risks Grid for Risk Actions |
- This allows you to view the risks to which a specific risk action is linked to.
- This is of utmost significance when the risk actions are maintained commonly, when you can select from the existing solutions option to view the risks the action is linked to via the links tab of the risk action. action is linked.
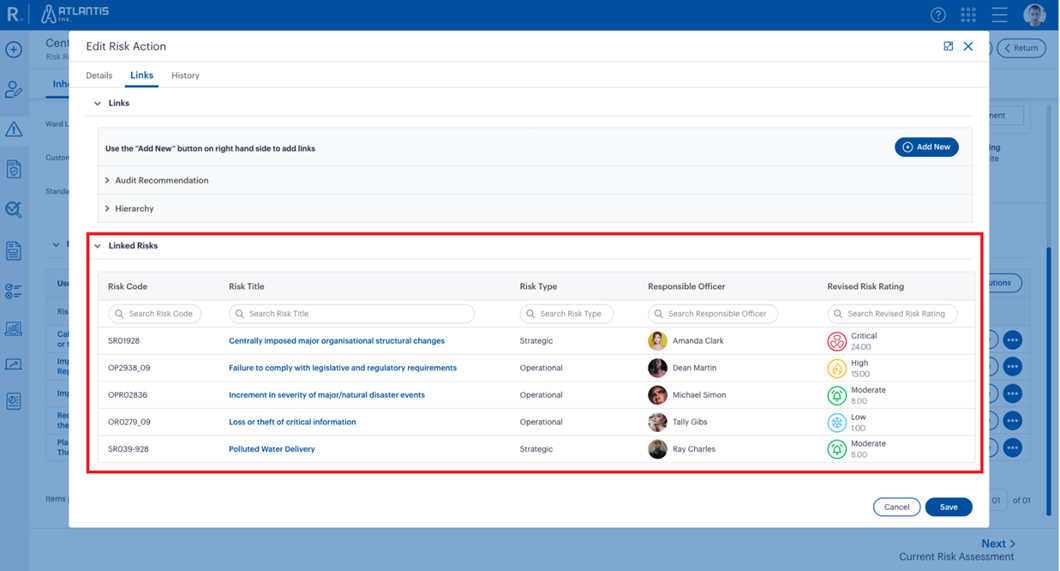
Figure 43.1
44. Email Service |
- Similar to the current application, users can continue using the email service with Risk Evolved.
- The term ‘Email’ used in the Risk administration page is now changed to ‘Notification’.
- In the current application, the risk type column showed only the four standard risk types, but now with the risk evolved it is enabled to configure emails for all new custom risk types.
- In the Current application, Triggered Risk Assignment and Risk solution were assigned without considering the risk type in the email rule, Now it has been improved to trigger the email as per the selected risk type in the email rule.
- In the current application the notification hyperlinks for Risk Actions were not received in the email, but now with the risk evolved, it is configured to receive hyperlinks with the Risk Actions.
45. SWOT |
- Any users currently using this function in the application will be able to continue using this feature in the risk evolved database and the only new feature being added to this function is that now users will be able to configure the ‘Show in environment analysis’ field in the field configurations area for ‘Strategic’ and ‘Corporate’ risk types.
- In the current application, this field was not included under field configurations and in risk evolved this has been included as a visibility unticked and disabled field that will be ticked and disabled only if the ‘SWOT’ field is made visible.
 Figure 45.1
- In the current application, this field was not included under field configurations and in risk evolved this has been included as a visibility unticked and disabled field that will be ticked and disabled only if the ‘SWOT’ field is made visible.
46. Dashboard |
- The dashboard consists of seven tabs in total: Overview, Risks, Incidents, Compliance, Audits, Actions, Controls, and the display of these tabs will depend on the products activated for you.
- No changes to widget logic, filter tray, Dashboard settings, export, or refresh function have occured with the Risk Evolved and the dashboard will support all risk types in the application.
- Cross hierarchy filtering feature will be introduced to the dashboard area in a future release, users can now filter using the single select hierarchy tree filter similar to the legacy application.
47. Risk Approvals |
- In the current application, the Risk approvals feature is enabled by the Administrator via a setting and the approval process gets applied to all risk types.
- With Risk Evolved, an Administrator can enable the approval process through a new Risk Settings section named ‘Approvals’ accessed via Main Menu > Framework > Risk Settings > Approvals which will enable approvals for all created risk types and be able to configure the approval process per risk type as required.
 Figure 47.1
- An administrator cannot switch off the approval process if risk records are already in the approval process of any risk type. In this case, the toggle will be disabled.
 Figure 47.2
- An administrator cannot switch off the approval process if risk records are already in the approval process of any risk type. In this case, the toggle will be disabled.
- Upon clicking the Edit button, the Admin can configure the approval process for a risk type with the details below.
 Figure 47.3
- Approval Process: Specify the approval process that is to be followed as either ‘Sequential’ or ‘Concurrent’.
- If both options have been selected when submitting/re-submitting a risk record for approval the user must select one option.
- If only one option has been selected, then all risk records of the relevant risk type will follow an approval process of the selected process.
- There has been no change to the existing behaviour of both processes.
- Editable Objects: The tabs that are editable before being approved.
- Irrespective of any permissions, a user with permission to submit/re-submit a risk can edit the relevant tabs before submitting/re-submitting the risk record.
- Any risk approver can edit these tabs before approving or rejecting the risk record. (Additional condition explained below)
- Submission/Approval Object: The assessment tab in which the submission/approval section will be shown.
- For this phase, the submission/approval section will remain in the inherent assessment tab similar to the legacy application. However, with the final rollout of Risk Evolved, the Admin could configure it to be in either of the three assessment tabs. (The respective release note will cover the feature once released)
- Status: Switch ON or OFF the approval process for the relevant risk type if there are no risks already in the approval process and have not been approved.
- If any changes are being made it will apply to only new risk records created after the change and will not affect any risks already in the approval process.
- Approval Process: Specify the approval process that is to be followed as either ‘Sequential’ or ‘Concurrent’.
- The ‘Risk Preparer’ permission node has been removed from the permission tree with Risk Evolved. Any user with ‘Add’ permission within a risk type will be considered a risk preparer (a person who could submit/re-submit a risk for approval).
- The ‘Risk Approver’ permission node has been brought within each risk type in the permission tree to specify risk approvers per risk type.
 Figure 47.4
 Figure 47.5
- The ‘Show risks prior to approved stage’ permission has been improved to work in combination with any register view permission. Ex: If the user has the ‘View node only’ register permission along with this permission s/he can only see unapproved risks applicable to his/her assigned hierarchy node only.
- In the legacy application, a risk approver cannot edit the details of a risk record. However, a new setting has been introduced to govern whether a Risk Approver staff member can edit a risk before approving or rejecting it or whether they cannot edit the details.
- An Administrator can enable this via Main Menu > Administration > Configuration > Settings > ‘Allow the risk approver to edit risk details’.
- If enabled, the approver can edit all the tabs specified in the approval configurations ‘Editable Objects’ field.
- In the current application, there is a gap where all risks created before enabling the risk approval process become ‘Draft’ risks. we have addressed this in Risk Evolved, where the relevant risk will be considered ‘Open’ and ‘pre-approved’.
- On the risk details page,
- The submission/approval section has been expanded and collapsible for a better user experience. By default, it would be expanded.
- A comment box for a preparer/submitter has been newly added for them to add a comment when submitting/re-submitting a risk record for approval.
- An information ribbon will be shown to indicate the stage of the approval process the risk is at.
- There has been an improvement to the UI placement of the Submit/Re-submit button and the Approve and Reject buttons being available in the top right corner button row as well as in the footer button row.
- The Save button will only be shown for ‘Open’ (pre-approved risks) and ‘Approved’ risks.
- Any risk not yet approved will have a Save as draft button available for anyone with permission to create or edit an unapproved risk record.
 Figure 47.6
 Figure 47.7
- The approval log table at the bottom of the Inherent Assessment tab and the submission/approval section in the current application has been moved to a new tab named ‘Approvals’ in the risk details page for better visibility.
 Figure 47.8
 Figure 47.9
 - Once a risk record has been submitted/re-submitted for approval, it cannot be edited or deleted until approved or rejected.
- A rejected risk record can be re-submitted by anyone who is a risk preparer (anyone with ‘Add’ permission) irrespective of being the creator of the risk or the one who submitted the risk previously.
- The risk approval or risk rejection behaviour has not been changed.
- The risk history function has been improved to capture all the risk approval-related fields and changes as well.
- The register configurations and view behaviours are similar to the current application, with the newest addition of considering the ‘Open’ approval status for pre-approved risks in the column and filter.
- Only approved risks will be shown across the application in reports and be available to be linked across the application.
- In the risk aggregation MOVE functionality,
- Only risks with the ‘Approved’ or ‘Open’ statuses can be moved to another risk type similar to the behaviour of the current application.
- If the destination risk type has the approval function enabled, the moved risk will be in a ‘draft’ state and will require to go through the approval process and be approved.
- If the destination risk type has the approval function disabled, the moved risk will be in an ‘open’ state.
- In the risk aggregation COPY functionality,
- The risk records with the ‘Approved’, ‘Open’, ‘Draft’, or ‘Rejected’ statuses can be copied.
- However, risks with the ‘Draft’, or ‘Rejected’ statuses will not be shown until the source risk (the risk that was copied) is approved.
- If the source draft/rejected risk record is deleted or never approved, a copy of it will never appear in the application.
- The ‘My Approvals’ bubble in My Quick Update and the behaviour of approvals from the My Quick Update section would be covered in the next release note.
48. Add to Business Plan |
- In the current application ‘add to business plan’ was maintained as a button within the risk and risk action details page where the user could drag and drop either a risk or risk action to link to a hierarchy node within either the organiSation or planning hierarchy.
- With the Risk Evolved application, we have reformed this feature and reassembled this into two counter parts where the risk can be linked to any hierarchy node via the risk links tab.
- Further, a risk action can also be linked to any hierarchy node.
- Additionally, if you require your strategy action and the risk action linked to sync with the progress information, you can now do so if the synchronisation parameter is on.This also ensures only one hierarchy node is selected and a one-to-one synchronisation is maintained.
 Figure 48.1
 Figure 48.2
49. Convert Risk Actions to Tasks |
- Risk Evolve application allows you to convert risk actions to tasks for any risk types created with the entity type ‘Action’.
- Hence, converting a risk action to a task allows you to sync the progress information and the action title and owner across the lifetime of the risk action and task once converted if you have enabled the synchronisation parameter for ease of use.
 Figure 49.1
50. Risk Templates |
- The Risk Templates feature can be enabled if required by Camms.
- In the current application, risk templates are commonly created across all risk types and have a fixed list of fields available when setting up a template.
- However, in Risk Evolved, if enabled, this will allow the Administrator to configure templates per risk type that can be later used when creating or editing a risk record.
- The Administrator can configure whether templates could be created from a specific Risk type through the Risk Settings > Risk Types Add/Edit popup by toggling on the ‘Enable Risk Template’ toggle. For risk types that this toggle has been toggled OFF, templates cannot be created.
- This toggle field will not be shown if the Risk Templates feature has not been enabled.
- Switching OFF this toggle field will hide any templates created from the risk type and there will be no option to apply the template when creating/editing a risk record from the risk type.
 Figure 50.1
 - Once this feature has been enabled, there will be a new Risk Settings menu called ‘Risk Templates’.
- By accessing this settings section an Administrator will be.
- Able to create risk templates as required by clicking on the Add new button.
- Able to edit an already created risk template by clicking on the Edit button.
 Figure 50.2
- In the template add/edit popup, only the risk types that were enabled to be considered for templates could be selected to create/update the template.
 Figure 50.3
 - Upon selecting a risk type, the fields that have been ticked visible for the Inherent assessment for the specific risk type through Risk Settings > Field Configuration should be loaded to configure the template and save.
- Label reference specified for the fields should be considered.
- Any properties of the fields (hyperlinked fields) should be considered.
 Figure 50.4
 Figure 50.5
- Only the below fields if made visible will be considered for templates and not any other fields.
- Risk Title
- Risk Owner
- Entity Type (Only for Risk type with Entities)
- Entity Title (Only for Risk type with Entities)
- Risk Secondary Owner
- Primary Risk Category
- Secondary Risk Categories (Field properties should be considered)
- Primary Risk Subcategories (Field properties should be considered)
- Consequences (Custom)
- Causes (Custom)
- Risk Identified
- Risk identifier (Field properties should be considered)
- Business Process (Field properties should be considered)
- Legislation (Field properties should be considered)
- Risk Treatment (Field properties should be considered)
- Existing Controls
- Future Controls
- Stakeholder
- Document Reference
- Audit Observations
- Custom Tick Box – 01- 05
- Custom Date Field – 01- 05
- Single line Custom Field - 01- 10
- Multiline Custom Field - 01- 10
- Custom Numeric Field - 01- 05
- Custom List Field – 01- 40 (Field properties should be considered)
- An administrator can duplicate a template for the same risk type or a different risk type by clicking on the three-dot icon and then on the ‘duplicate’ option shown.
 Figure 50.6
 - When creating/editing a risk record, if the risk type is enabled for risk templates, an Apply Template button should be available near the Risk code field.
 Figure 50.7
 - Clicking on the Apply Template button, the user creating/editing the risk record will be able to view all the templates created for the relevant risk type and select the required template.
 Figure 50.8
 - Clicking on the More Details button will simply allow the user to view all the fields and details of the template.
51. Standard Report Features |
Below Standard Risk Reports will be revamped to be compatible with Camms.Risk Evolved.
- Risk Register Report
- Risk Heatmap Report
- Bow Tie Report
- Executive Risk Report
- Action Summary Report
- Risk Attention Report
- Control Summary Report
- Risk Management Report (formerly Risk Executive Report; will be released as Risk Management Report)
Apart from converting the above Standard Risk Reports to the new architecture, certain additional features would be incorporated into these reports.
51.1 Key/General Features across all Standard Risk Reports
- All the above standard Risk reports will be enhanced to reflect the new branding of Camms, with a new outlook providing a clear visualisation of the content.

Figure 51.1.1

Figure 51.1.2
- Enhancing the Standard Risk reports reflecting data from custom fields configured within the application into the reports.
- Custom Fields can now be accommodated within the Standard Risk Heatmap Report, Bow Tie Report and Risk Attention Report without opting for individual custom reports.
- This will be maintained flexibly where the requested custom fields will be accommodated via a script in dedicated sections within these reports upon client request.
- A tick box filter will be introduced namely; ‘Show Custom Fields’ to control the visibility of this functionality as well.
- Custom fields for Risk Heatmap Report
- Custom fields will be accommodated within the ‘Risk Overview’ section.
- Below Organisational Hierarchy Linkages
- In the Controls Grid
- In the Actions Grid
 Figure 51.1.3
- Custom fields will be accommodated within the ‘Risk Overview’ section.
- Custom fields for Bow Tie Report
- Custom Fields will be accommodated below the key ‘Risk’ Details section.
 Figure 51.1.4
- Custom Fields will be accommodated below the key ‘Risk’ Details section.
- Custom fields for Risk Attention Report
- Custom fields will be accommodated in all the sections underneath each record as in the below sample image.
 Figure 51.1.5
- Custom fields will be accommodated in all the sections underneath each record as in the below sample image.
- All standard and custom risk reports will be updated to reflect the Region based on setting configurations introduced within the Evolved application, such as region-based date formats, the time zone, the currency code, and thousands of separator formats.
- All Standard and custom risk reports will be modified to include confidential risks configured within the application either against each risk type or risk wise confidentiality against each risk type.
- All standard reports will be modified with the ability to filter the risks by their ‘Entity Type’.
- Entity Type Title filter shows all actions (pulled from Camms.Strategy) and projects (Pulled from Camms.Project) allowing the user to select the Entity type they want to run the report.
- This is linked with the setting which will be enabled as the Entity Type which is introduced as a new feature within the Risk Configurations area.
 Figure 51.1.6
- All standard reports would showcase Only the risk records in the OPEN and APPROVED statuses and risk records in other approval statuses such as Draft, Submitted etc. will not be retrieved to any Standard Risk reports.
51.2 Additional Features
Moreover, multiple additional features have been incorporated into Risk Register, Risk Heatmap, Bow Tie, and Risk Attention Report.
Risk Register
- Ability to filter Controls by the Control Status within the Risk Register Report.
- A new dropdown filter for ‘Control Status’ will be introduced to the Risk Register Report, allowing users to generate the report to the desired Control Status – Active, Inactive or Show All.
- For example, the option ‘Active’ can be selected if the users want to retrieve the Risk records and their Active Controls by excluding the Inactive Control records.
- Enhanced ‘Show Fields Controller’.
- The tree filter listing all column names outlined below in the order except for fields hidden from the application has been enhanced where the categories of the fields have been changed as follows.
 Figure 51.2.1
 - Under Assessment Details all three assessment types enabled within the system will be listed. Once a respective Assessment type is expanded, all the fields configured under the assessment type will be shown.
 Figure 51.2.2
 - This will also bring in custom fields enabled within the system under each category, and upon ticking an option of the custom field, that particular field will be retrieved from the report.
- The tree filter listing all column names outlined below in the order except for fields hidden from the application has been enhanced where the categories of the fields have been changed as follows.
- Ability to retrieve the risks which is linked to an exact hierarchy node.
- A new tick-box filter named “Show Risks of selected Hierarchy Nodes” will be introduced to specify if the user needs to view risks linked to the exact node only or the risks linked to the selected hierarchy nodes' child nodes.
- Upon ticking, the user should be able to view only the risks linked to the selected hierarchy node on the Hierarchy Tree Filter.
- Defaults to the unticked scenario and in the default scenario, the risks linked to relevant selected nodes and underlying nodes will be displayed in the report.
Risk Heatmap Report
- Ability to number the Risks in chronological order – The ‘No.’ column within the Risk Summary section would be enhanced to depict the risks chronologically regardless of whatever sorting order is applied from the page. The current logic orders the risks based on the sorting filter, yet the number assigned under No. The Column is random. (Refer to the below images)
- The numbering order in the Risk Summary section will always start from one and sequentially increment for all the risks.
- The risk heatmap will also be updated based on this numbering order.
 Figure 51.2.3
 Figure 51.2.4
- Ability to control the visibility of report sections within the Risk Heatmap Report.
- A new multi-select dropdown filter, ‘Risk Section’ will be introduced, to show/hide report sections. The visibility of the three main sections of the Heatmap report namely, The Main Heatmap, Risk Summary and Risk Overview, can be controlled via this filter.
- By default, the report will run for the show all scenario where all the sections will appear in the report, Refer to the sample filter page and the dropdown filter.
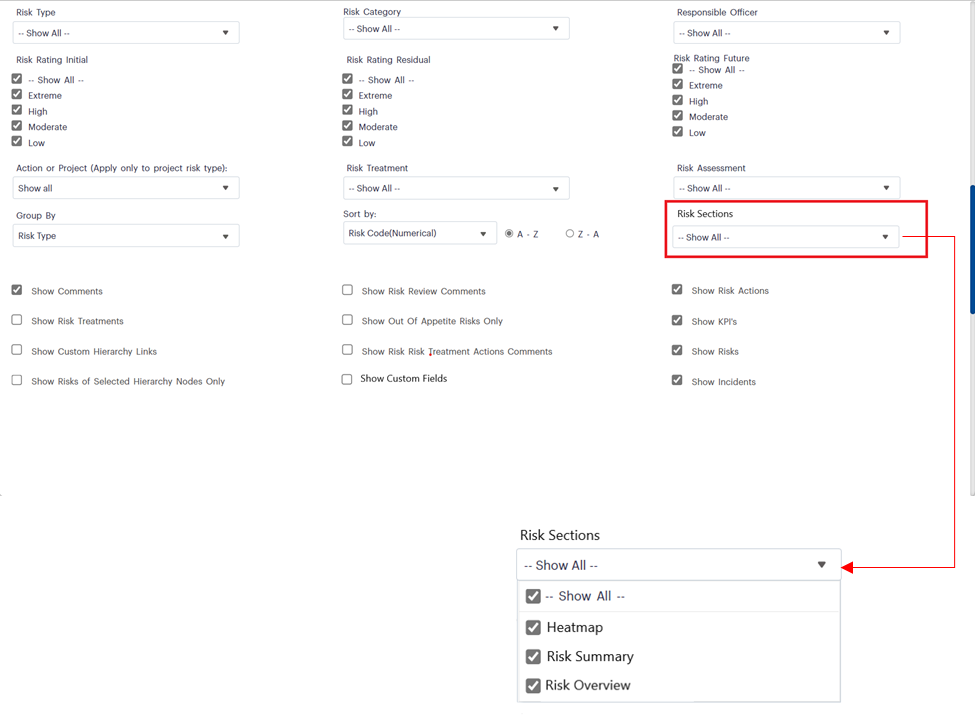
Figure 51.2.5
Bow Tie Report
- Ability to retrieve the risks that are linked to an exact hierarchy node.
- A new tick-box filter named, “Show Risks of selected Hierarchy Nodes” will be introduced to specify if the user needs to view risks linked to the exact node only or the risks linked to the selected hierarchy nodes' child nodes.
- Upon ticking, The user should be able to view only the risks that have been linked to the exactly selected hierarchy node on the Hierarchy Tree Filter.
- Defaults to the unticked scenario and in the default scenario the risks linked to relevant selected nodes and underlying nodes will be displayed in the report.
Risk Attention Report
- New Fields will be Introduced in Controls Overdue for Review section.
- ‘Control Type’, ‘Control Authoriser’, ‘Control Authoriser Rating’ fields will be added as new columns.
- The ‘Linked Records’ column will be added as a new row under each Control details where it will take the entire space of the row to retrieve the details.

Figure 51.2.6