Camms is pleased to bring you the Camms.Project Transformation, through the Product Release Note. We've got several exciting enhancements in the Project Workflow area designed to enhance, streamline, elevate responsiveness, improve performance and above all deliver an overall optimized user experience.
Beta Testing will begin on 20th January 2024 for three weeks and will subsequently be available in your Live environment on 10th February 2024.
Please Note: In order to ensure optimal performance and compatibility with the latest updates, we highly recommend clearing the cache after implementing each new release. To learn more about caching and how you can best manage it, please refer our comprehensive article HERE.
List of items
1. Introduction of the ability to view a Workflow Status
2. Enhancements to adding Phases into a Created Workflow
2.1 When creating the Initial Phase
2.3 Enable/Visible Conditions Tabs
3. Enhancements to adding Objects into the Created Workflow
3.1 What are Object Icon Legends?
3.2 Dragging and Dropping Workflow Objects
4. Introduction of the deleting Phases and Objects from the Workflow
5. Ability to view Signoff Templates Easily
5.1 Adding a sign-off for a Phase;
5.2 Adding Sign-offs for Objects;
6. Introduction of the Workflow Editor Zooming
7. Introduction of the Return Functionality
8. Compatibility of WCAG Design Principles

1. Introduction of the ability to view a Workflow Status |
A new 'Workflow Status' column is now introduced within the project workflow page, providing you to understand the status of your workflow immediately. With this release onwards, you can easily identify whether a workflow is 'Completed' or 'Not Completed.'
How does this work?
1.1 Finalized Status: If all compulsory objects are added into the workflow, the workflow is considered ‘Completed’ and marked as 'Finalized'. (Figure1.1)
| Note: The compulsory objects are listed at the top of the object list. |
1.2 Draft Status: If any compulsory objects are missing, the workflow is considered a 'Not Complete’ and will be marked as 'Draft'. (Figure1.1)

Figure 1.1 Workflow Status column
2. Enhancements to adding Phases into a created workflow |
Upon creating a workflow, once you navigate to the newly created workflow. We've introduced a new process of adding phases to the workflow offering control and convenience.
How do I add a new phase?
Once you click on the 'Add New' button. The 'Add New Phase' pop-up will appear, presenting available tabs as follows,
Details Tab: The first tab, 'Details' will allow you to specify the 'Phase Name' and 'Sequence' order of the phases.

Figure 2.1 Adding phases via Add New button
How do I add “Phase Names’ and set “Sequence’?
2.1 When creating the Initial Phase: The pop-up would present to you the first tab, where only the “Phase Name’ should be added/edited as the sequence will be default set to 1 which is non editable. 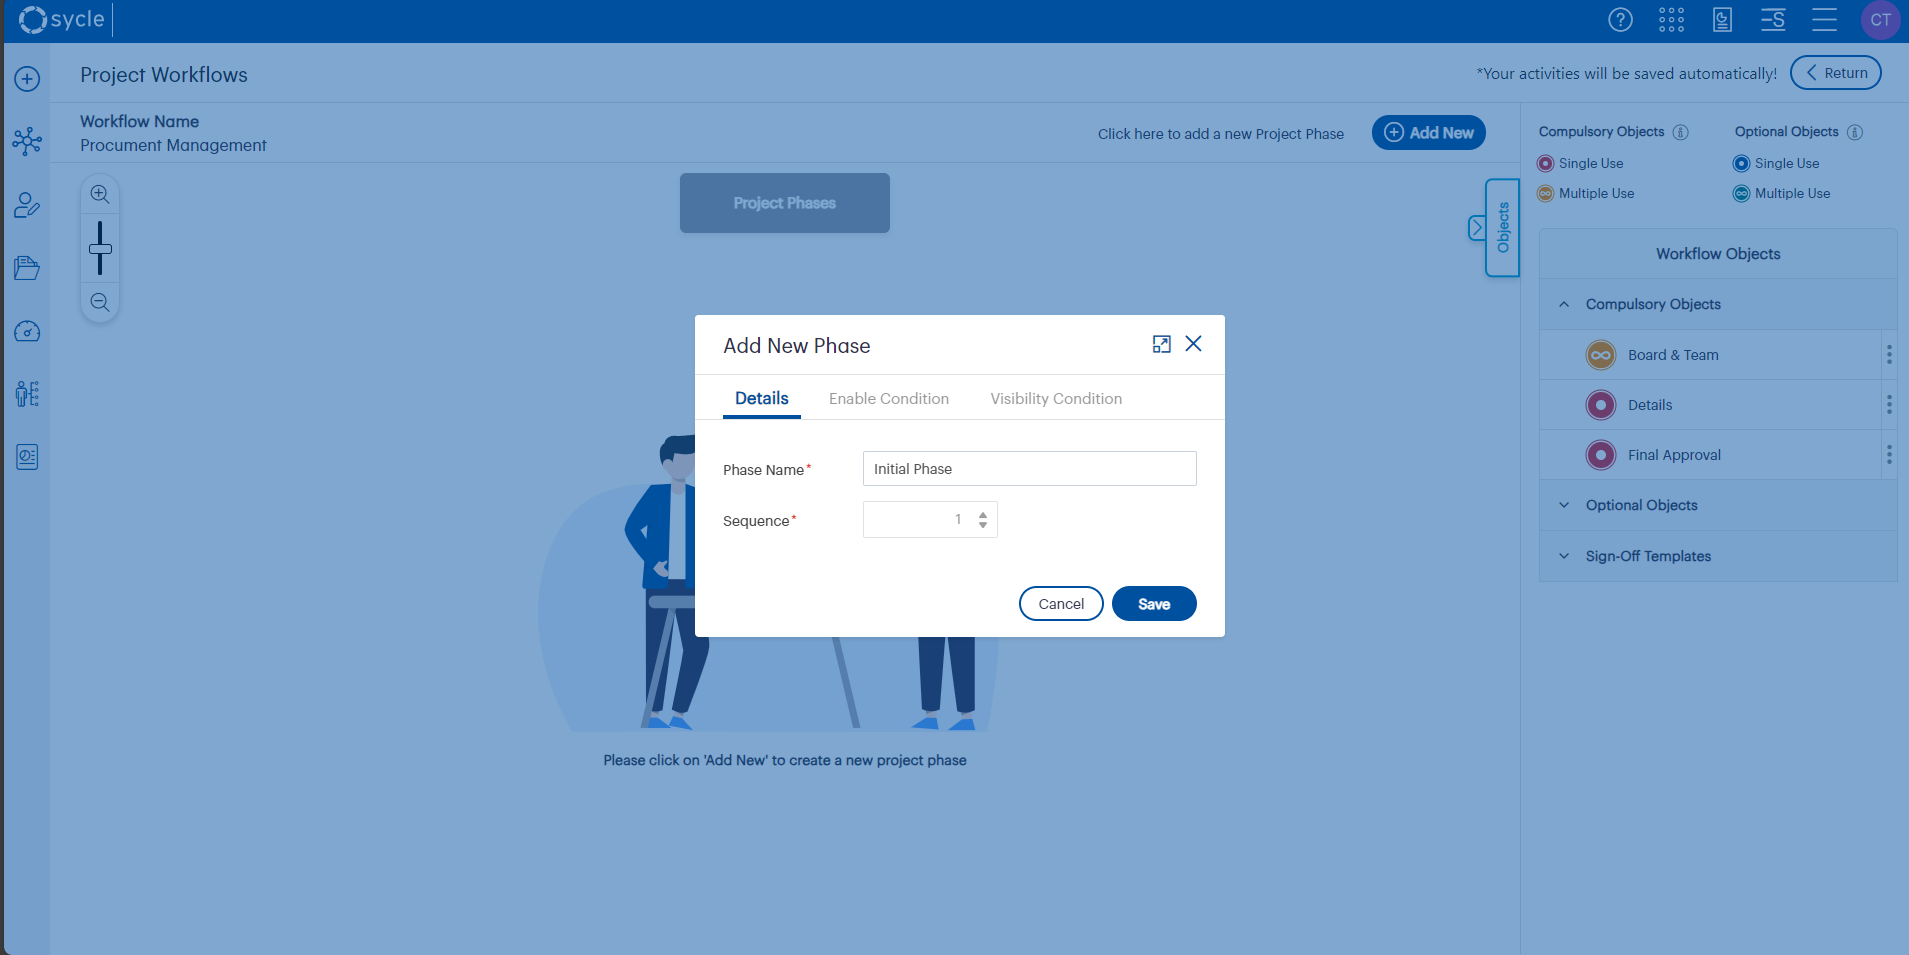
Figure 2.2 Adding first phase
2.2 For the Subsequent Phases: The 'Sequence' field dynamically shows you the current phase number and you can adjust the numeric value, to change the respective phase positions.

Figure 2.3 Adding second phase
2.3 Enable/Visible Conditions Tabs
The consecutive Tabs, once the fields are saved in the ‘Details’ tab, the next available tabs will be enabled to setup Enable and Visible conditions for the Phase.
Enable Conditions Tab: Allows you to set up required phase enable conditions by utilizing existing criteria or create new ones according to your preferences.
Visible Conditions Tab: This allows you to add necessary phase visible conditions using existing criteria or create new criteria as needed.
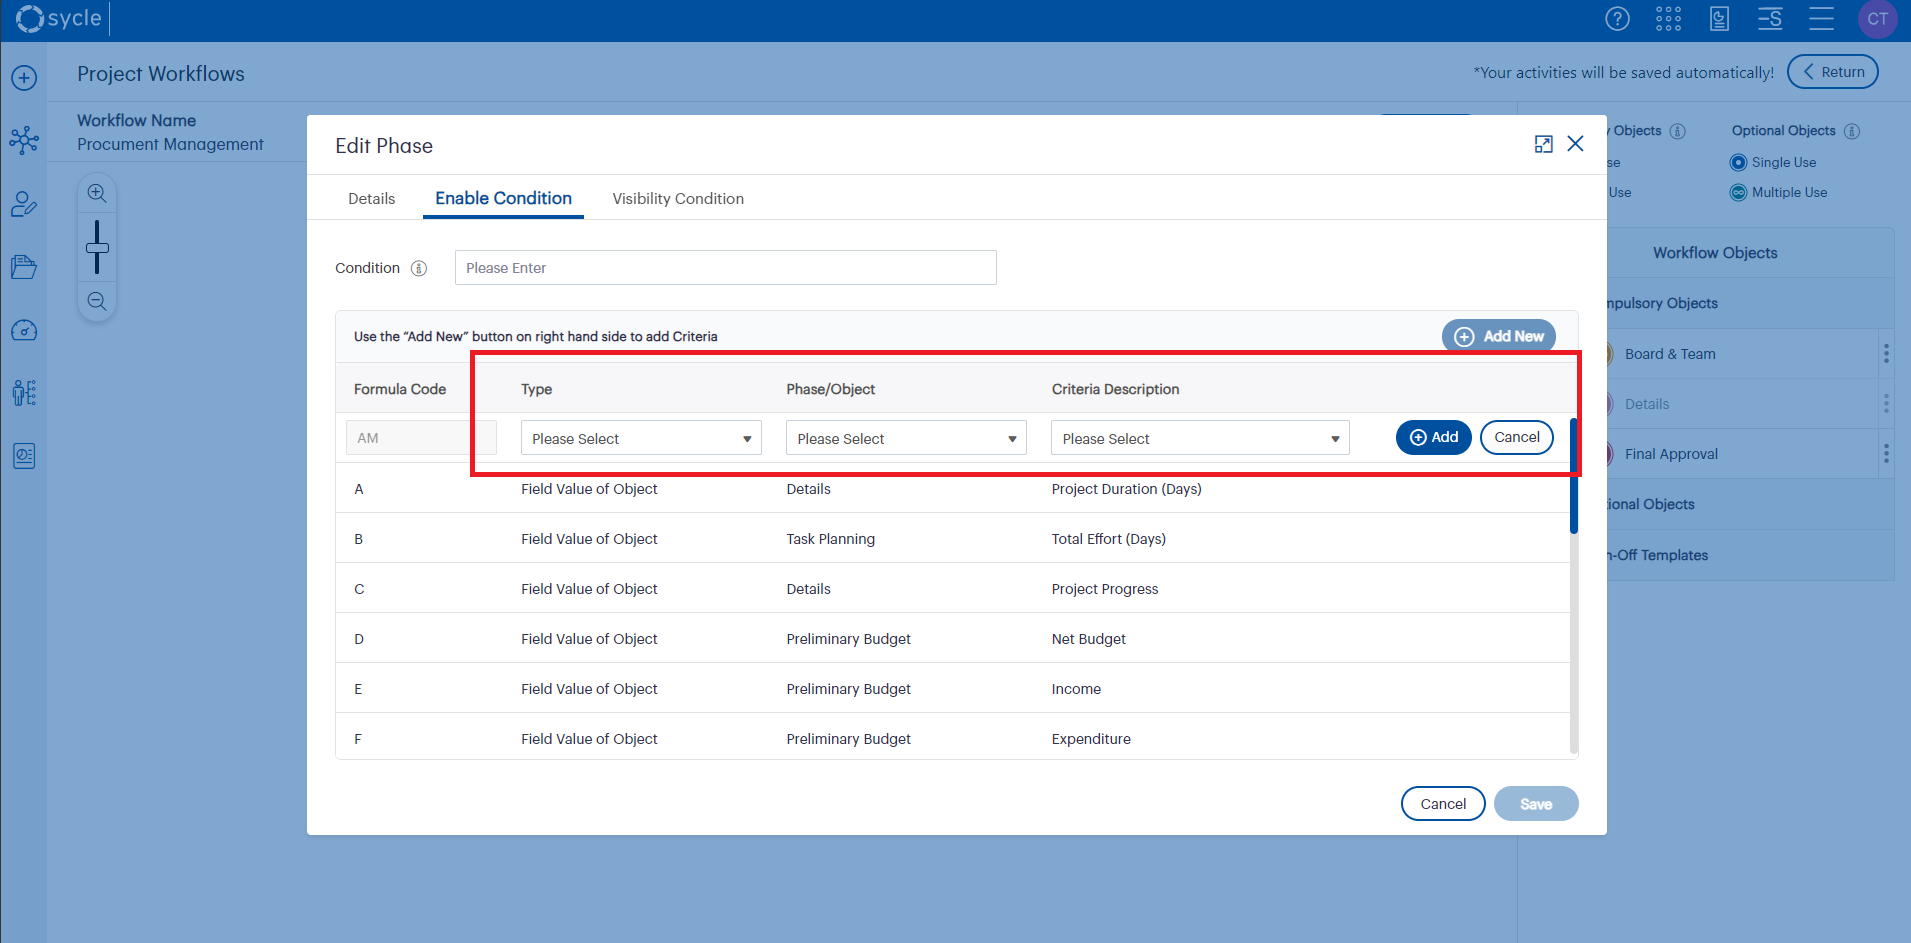
How do I add a New Criteria?
Once you click on the “Add New” button (for both Enable and Visible conditions), the dropdowns for columns 'Type,' 'Phase/Object,' and 'Criteria Description' will be automatically enabled.
Afterwards you would be able to add details to the dropdowns.
Once all the details are added to the grid, clicking on the “Add’” button will seamlessly add the details to the grid.
How do I add a New Visible/Enable Condition?
The 'Condition' text field provides you with the flexibility to add visible/enable conditions for each Phase currently.
 Figure 2.5 Adding VIsible Condition
Additionally, an information icon has been added next to the text field. Hovering over the Information icon will display helpful guidance for adding conditions.
 Figure 2.6 Helpful guidance shown in the information icon
3. Enhancements to adding Objects into the created workflow |
3.1 What are Object Icon Legends?
To further enhance your workflow creation experience, we have added an object icon legend at the crown of the workflow object list area.
 Figure 3.1 Object icon legend
This legend provides visual cues for the different types of objects available for use when creating your organization's project workflow.
What does the visually appealing color combination for displayed objects mean?
| Criteria | Description | Icon |
| Compulsory and can be used only one time | Red with dot icon |  |
| Compulsory and can be used repeatedly | Orange with infinite icon |  |
| Optional and can be used only one time | Blue with dot icon |  |
| Optional and can be used repeatedly | Green with infinite icon |  |
3.2 Dragging and Dropping Workflow Objects
You can continue to effortlessly drag and drop your selected objects into the chosen phases, providing you with greater control in organizing your workflow.
What happens when I drag and drop an Object to a Phase?
When an object is dragged and dropped onto a phase swim lane, it automatically attaches itself to the phase and is numbered accordingly
i.e.: “1.2” stands for 2nd Object within the 1st Phase.
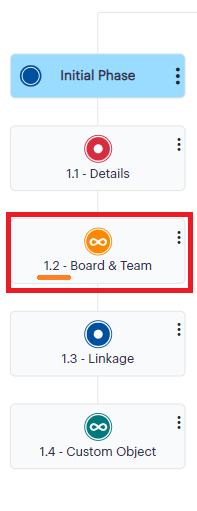
Figure 3.2 Arrangement of objects in phases
Notes:
|
How can I Expand and collapse the Objects panel?
Clicking on the ‘Objects’ button will allow you to expand and collapse the Objects panel providing you the ability to concentrate on created workflows.
However, on each navigation into the workflow area the Object panel can be viewed expanded.
 Figure 3.3 Object button
4. Introduction of the deleting Phases and Objects from the workflow |
All added phases and the objects dropped into the workflow area now feature ellipses (three dots) visible in the top right corner. By clicking on them, you will be able to view the 'Delete' icon for deletion.
Note: All existing validations for deletion are available in this release & the delete Icon will be activated only if the Object can be deleted in accordance with the configurations of the workflow. |

Figure 4.1 Display tooltip message for objects that cannot be Deleted
5. Ability to view Signoff Templates easily |
You can now find the 'Sign off templates' section conveniently located in the bottom corner of the workflow object area  Figure 5.1 Sign-off template section
| Note: All existing functionalities for adding, editing, and deleting sign-off templates are available in this release. |
5.1 Adding a sign-off for a Phase;
You can drag and drop a Sign-off object for a phase between the phase and the 1st object of the Phase where it will automatically attach the sign-off to the end of the phase, as the last object.
 Figure 5.2 Adding phase sign-off
Note: Any objects added after the sign-off object is placed in the workflow, will be added prior to the added Phase sign-off object. |
5.2 Adding Sign-offs for Objects;
You can drag and drop a sign-off onto an object, the sign-off will be displayed as a sub-object beneath the main object, and the object numbering will reflect accordingly.
i.e.: “1.2.1” stands for Sign-off Object of the 1st Phase placed after the 2nd Object

Figure 5.3 Added object sign-off
| Note: You are restricted from adding sign-off objects to any existing sign-off object already placed in your workflow. |
6. Introduction of the Workflow Editor Zooming |
Now you can easily zoom in and out your comprehensive workflows as we have introduced a zoom slider within the workflow creation area.
How does the zoom slider work?
By default, the zoom slider is centered. When you drag the slider towards the plus sign, you can increase the size of your workflow editor, providing a closer and more detailed view. Conversely, dragging the slider towards the minus sign decreases the size of your workflow, offering you a broader perspective on your screen.

Figure 6.1 Zoom slider
Furthermore, you can easily use the slider to zoom in or out of your workflow area using ctrl + mouse scrolling.
7. Introduction of the Return functionality |
We have introduced a 'Return' button. Simply click on it to swiftly navigate back to the Workflow Grid page.
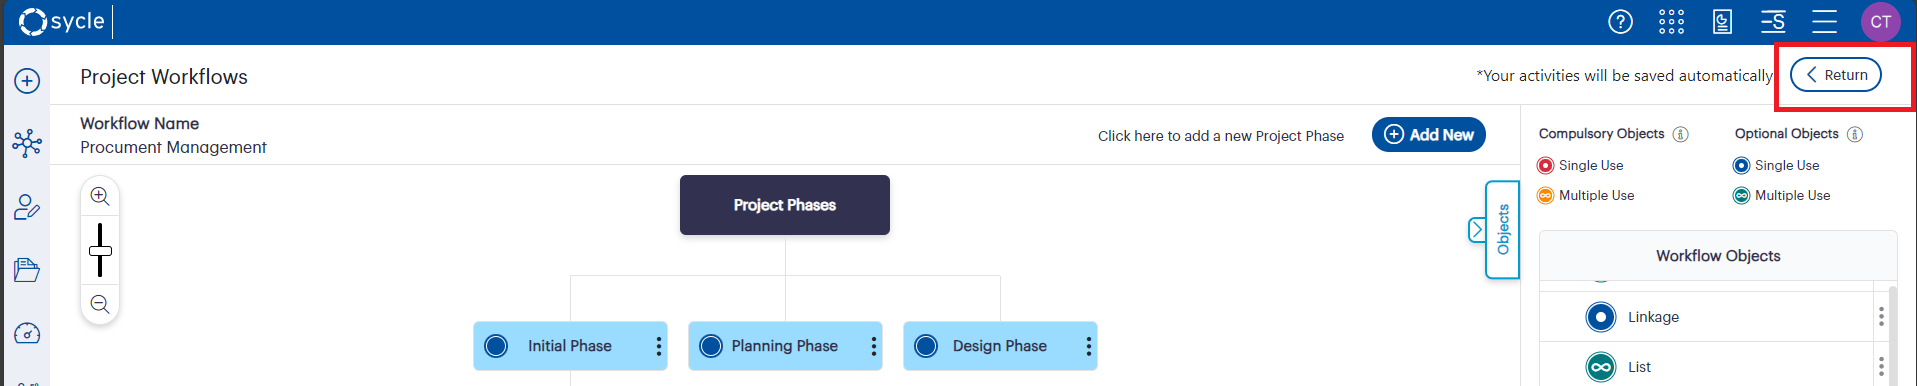
Figure 7.1 Return button
8. Compatibility of WCAG Design Principles |
In addition, we are pleased to announce that the project workflow area is now designed for WCAG compliance compatibility.
For Visual compliance; All colour contrasts are compliant for WCAG 2.1 AA standards.
For Accessibility compliance; you can seamlessly navigate and access the following features using keyboard commands & is compliant for WCAG 2.1 AA standards.
- Adding, Editing and Deletion of phases
- Changing phase positions
- Deleting workflow objects, signoff objects and signoff templates
- Expanding/Collapsing the workflow objects/sign-off template lists
- Zooming In and Out the workflow editor area
- Accessing the content within the information icon
- Accessing the Return button
- Accessing the Object button
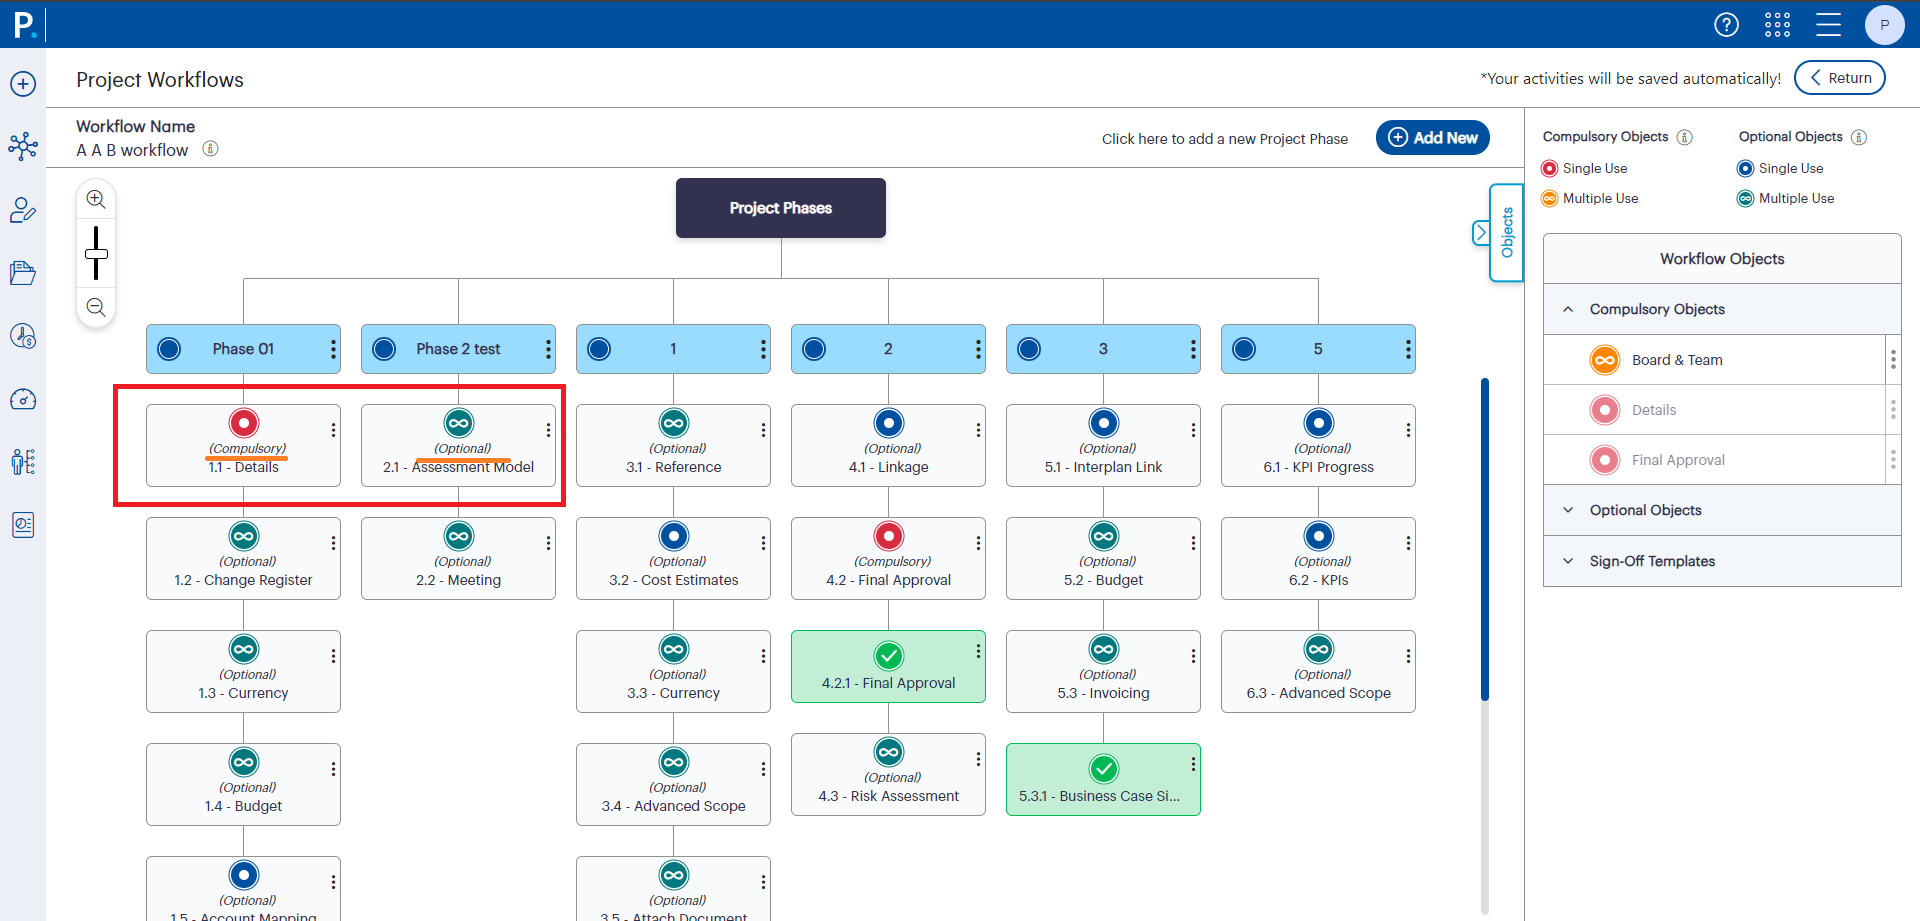
Figure 8.1 Display object status as Compulsory/Optional
9. Security Enhancements |
At Camms, we are committed to enhancing the security of our application. After thorough assessment, we have identified an opportunity to improve authentication token security. This involves the introduction of one-time tokens, these unique tokens are designed to provide an additional layer of protection against potential unauthorised access and with reduced expiration periods of those tokens, serving as mandatory security enhancement.
These measures represent a crucial and effective security enhancement, demonstrating our dedication to proactive security measures.
Benefits of secure tokens:
- Security: By encapsulating user identity and permissions, secure tokens reduce the need to transmit sensitive data with each request, minimising the risk of interception and unauthorised access.
- Statelessness: Secure tokens enable stateless authentication, meaning the server doesn't need to keep a record of tokens. This simplifies the architecture and scalability of applications.
- Flexibility: JSON Web Tokens (JWTs) are widely supported and can be used in a variety of applications, from web to mobile and even IoT devices.