Camms is pleased to bring you the Quarterly Product Update Notification for the Camms.Risk
This quarter we've got exciting enhancements to improve your user experience within the system, which will be available in your Test environment on 29 April 2024 and will be available in your Live environment on 20th May 2024.
1.Introducing an approval process for Risk Reviews - (Phase 2)
2. Allowing for consequence calculation to consider 'average' of all consequence selections
3. Introducing an approval process for Risk Actions - (Phase 2)
4. Enhancing the standard Risk Reports to support the Risk Action Approvals Modification
1. Introducing an approval process for Risk Reviews - (Phase 2) |
This feature introduces an approval process for Risk Reviews. When enabled, Risk Owners and Risk Creators can send Risk Reviews to Risk Managers for approval upon completion. Phase 2 expands the flexibility of configuration and introduces a concurrent approval process for risk reviews.
- A new setting has been introduced in the Administration > Configuration area.

Figure 1.1: Navigate to Configuration
- To turn on the Risk Review Approval process, the System Administrator should tick the setting for 'Enable the Risk Review Approval process'. Please note that the user should have Administrator permission to turn on this setting.

Figure 1.2: Enabling Risk Review Approvals in Configuration
- The Risk Review Approval can then be turned on via Risk Settings > Approvals > Risk Review Approvals > Enable Risk Review Approvals. Toggle the setting in ON position to activate the Risk Review Approval.
 Figure 1.3: Enabling Risk Review Approvals in Risk Settings
- Upon toggling ON the above setting, you now have the flexibility to configure the risk review approval process per risk type.

Figure 1.4: Enabling Risk Review Approvals per Risk Type
- Per Risk Type you will now have the flexibility to configure by clicking on the 'Edit' button against the required risk type. And the following configuration pop up will appear to configure as required.
- Select the Approval Processes that needs to be present for the risk owner/risk creator to submit the risk for review.
- Configure the 'Editable Objects' where the approval authorities will be able to make the changes as required.
- Status must be turned ON for the risk review approval process to take place.
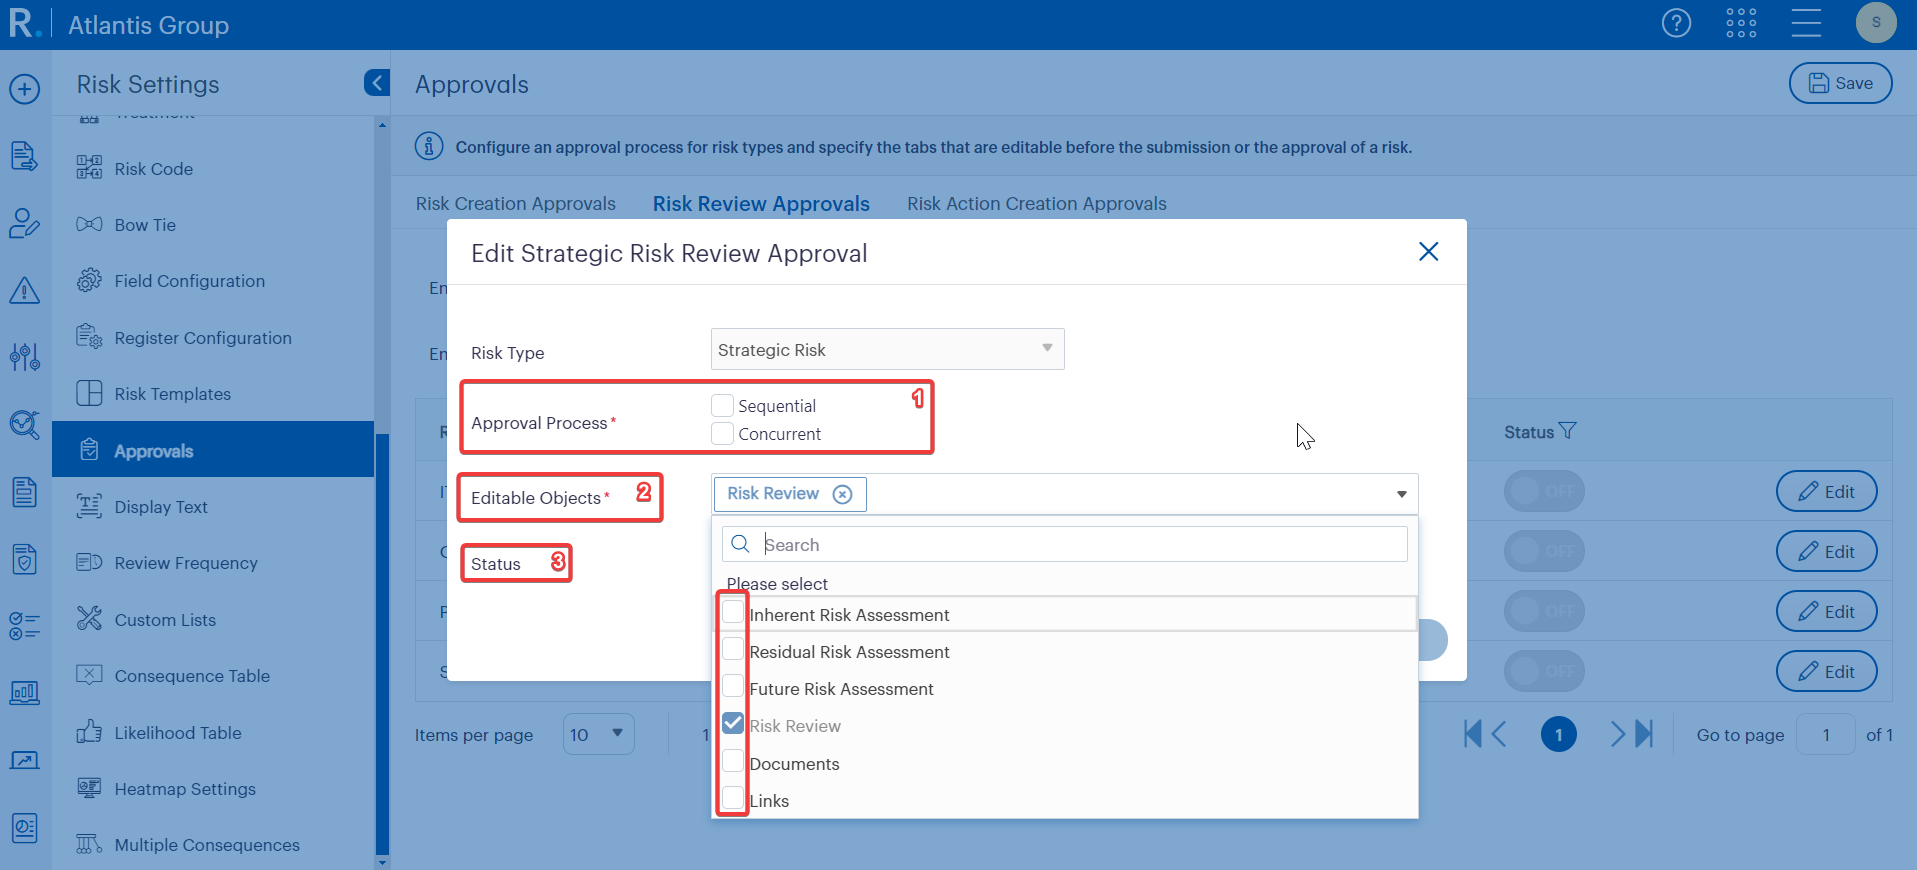
Figure 1.5: Configuring the Risk Review Approvals per Risk Type
How does this work?
- This enhancement facilitates a new 'Concurrent' approval process along with Sequential for this quarter for all risk types which is configurable for your liking. Users now have the capability to designate risk review approval authorities for the comprehensive risk review approval process and subsequent approval or rejection of the risk reviews. Risk Review Approvers can conveniently approve/reject the risk reviews assigned to them either from their MQU page or on the Risk Review tab from within the risk workflow.

Figure 1.6: Submitting for Approval; Sequential or Concurrent

Figure 1.7: Approving/Rejecting of the Submitted Risk
2. Allowing for consequence calculation to consider 'average' of all consequence selections |
This allows you to assess the risk rating by taking the average of all the selected consequences. It distributes all possible outcomes of the consequence values, rather than relying solely on the highest selected consequence value for the overall risk rating of the risk.
This will be a new setting page introduced in the Risk settings called Multiple Consequence setting allowing the system to take either Highest or Average value of the multiple consequences selected by the end user, and this consequence can be used to calculate the Risk rating.
Note: This will be a one-time configuration. |
How do you configure this?
- A new setting has been introduced in the Framework > Risk Settings > Multiple Consequences Settings area.
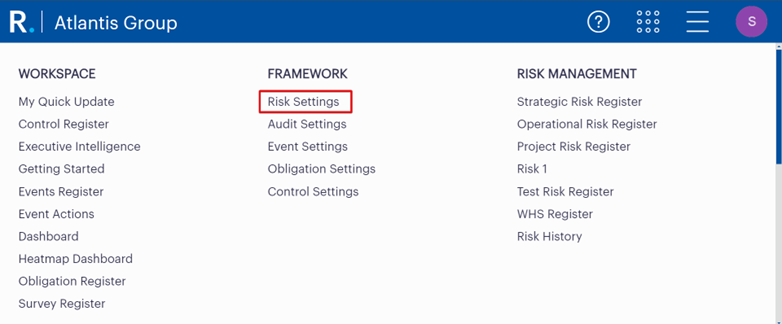
Figure 2.1: Navigate to Risk Settings

Figure 2.2: Navigate to Multiple Consequences
- For organisations who are already using Multiple Consequences (Highest Consequence Value):
- This setting will be already turned on and “Max” will be selected by default. Hence the existing configurations will already be preset without any impacts to the system.
- This setting will be already turned on and “Max” will be selected by default. Hence the existing configurations will already be preset without any impacts to the system.
- For organizations who wants to turn on this Multiple Consequences feature newly:
Note: This will be a one-time configuration only.
- Step 1: To turn on the Multiple Consequence Setting, its toggle button should be turned on and then from the dropdown, the preferred consequence type can be selected which can be Max or Average.

Figure 2.3: Multiple Consequence Settings ConfigurationNote: Select the Step 2 depending on the consequence type selected.
- Step 2: If you select ‘Max’ from the above dropdown.
- The system will consider the highest consequence value from the multiple consequences selected by the user.
- The system will consider the highest consequence value from the multiple consequences selected by the user.
- Step 3: If you select ‘Average’ from the above dropdown.
- The system will consider the average consequence value from the multiple consequences selected by the user.
- Within Risk Settings > Criteria > Criteria Configuration you should be able to see two new columns as, Min range and Max range. This is a mandatory configuration that MUST be configured properly for your Average consequence to be reflected as expected.
- Step 1: To turn on the Multiple Consequence Setting, its toggle button should be turned on and then from the dropdown, the preferred consequence type can be selected which can be Max or Average.
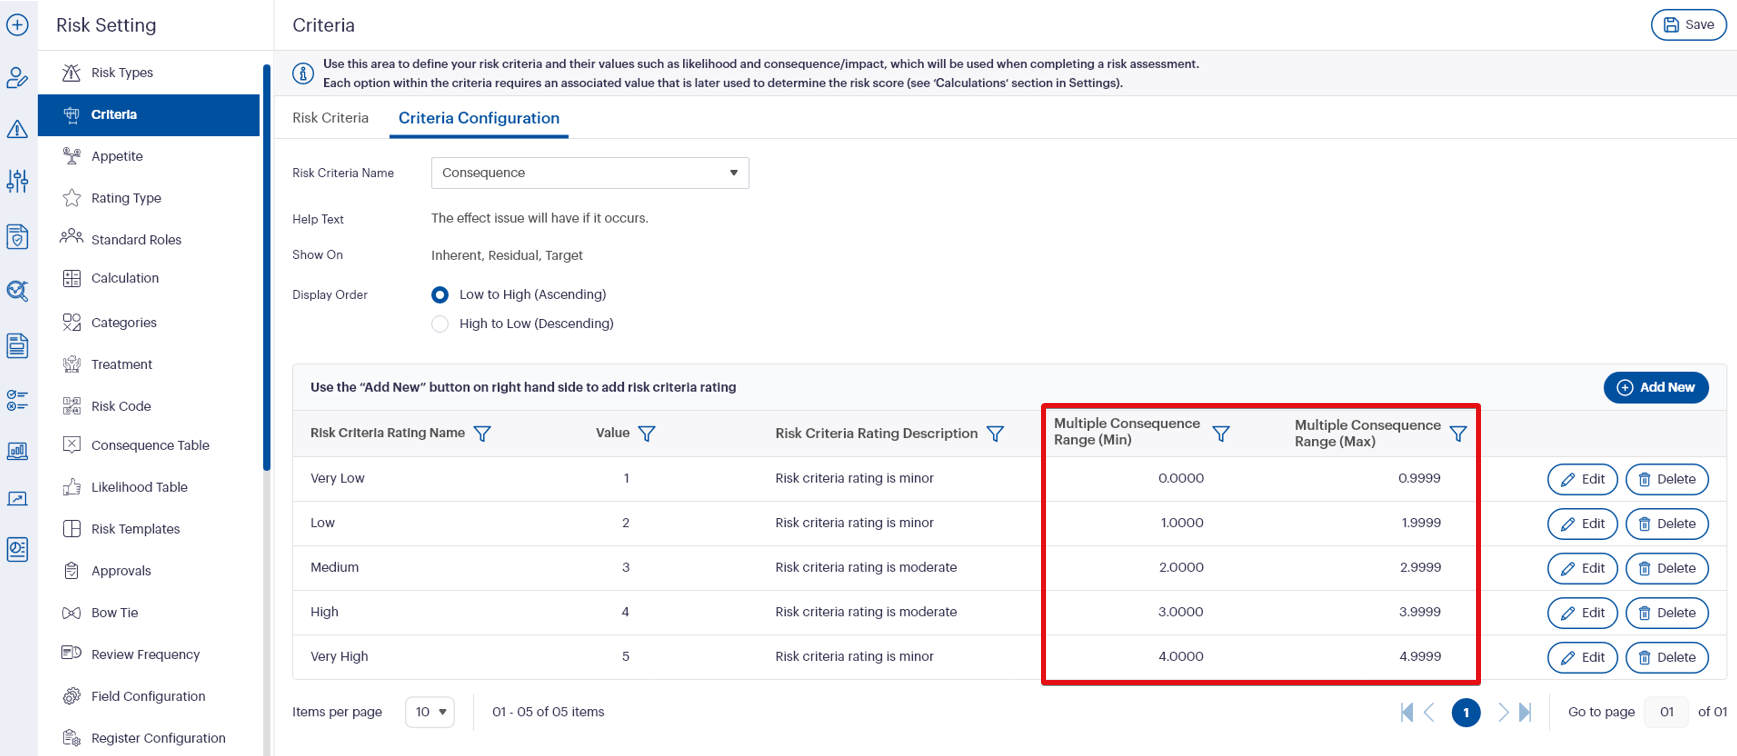
Figure 2.4: Criteria Configuration - Consequence Min - Max setup

Figure 2.5: Min - Max range setup
How does this work?
- This enhancement facilitates the system to take the max/average consequence value to derive the Risk rating score if the system uses the Consequence value (Impact value) for their Risk rating calculation formulas.
- If this setting is configured to be Average Consequence, the multiple consequence values that are selected will be summed and divided by the selected consequences to get the average consequence value. And it will be rounded up/down to the nearest whole number.
- Example: Selected consequence values will be Consequence Value 1 = 2, Consequence Value 2 = 4 and Consequence Value 3 = 5.
- Total Consequence Value = 2+4+5 = 11
- Average Consequence Value = 11/3 = 3.66 ≈ 4 (Rounded)
- The derived average consequence will be plotted accordingly on the heatmap as a result for your visualization.
Important Points/Disclaimers
- If you need to shift from max to average, or from average to max, this requirement must be logged as a service request to Camms so they will do the needful as requested.
- Upon this configuration change, all the existing risks will be recalculated automatically to the newly shifted consequence type of the Multiple consequence setting, resulting all the risk ratings to be changed and reflected on the system by default.
- Apart from the above configuration change, if any change is made to Consequence values or Likelihood values, the existing risks will be recalculated automatically as well.
- Disclaimer: As per the current design of the system, when there is any change made to this setting configuration, criteria values, criteria ranges (such as Consequence/Likelihood etc.) it won’t be captured in the history of the risk. Therefore, that’s why we have made this setting to be a onetime configuration explicitly for organisations. So, Changes are not recommended to be done from time to time to switch between the consequence type.
- Example: In a scenario where the consequence value/likelihood value has been changed from criteria configuration, how it will impact the risk scores and history data?
- Scenario: Updated the ‘Likely’ likelihood value from 3 to 1.5, so the risk ratings are updated automatically in the register as well as the heatmap. But this won’t be captured in the history of the risk. So, the organizations must be mindful of this behavior.

Figure 2.6: Risk Rating automatically updated as criteria values changed.
History view – it doesn’t capture criteria configuration changes in history.

Figure 2.7: History not capturing the criteria value changes
Register view – New risk rating is updated automatically in the register view as well.

Figure 2.8: Register view updated automatically as criteria values changed
3. Introducing an approval process for Risk Actions - (Phase 2) |
This feature introduces an approval process for risk actions at the point of creation, ensuring that they are reviewed before being added to the risk mitigation plan. In Phase 2, additional flexibility is provided in configuration, including a super action approver permission. General users also gain the ability to view pending actions for approvals, and a concurrent approval process for risk actions is introduced.
How do you configure this?
- A new section has been introduced in Risk Settings > Approvals > Risk Action Creation Approvals.
- You need to 'Enable Risk Action Creation Approvals' first and foremost.
 Figure 3.1: Enable Risk Action Creation Approval
2. 'Enable Information Description' is optional if you want to see the information as a ribbon on top of the risk action details pop up always to be aware of the status at a glance.

Figure 3.2: Information Description Visibility within the Risk Action Details Page
3. 'Enable Approvals Tab' will present the audit summary grid in a new 'Approvals' tab. If this is OFF, it will show underneath the Submission/Approval section of the action details page by default.
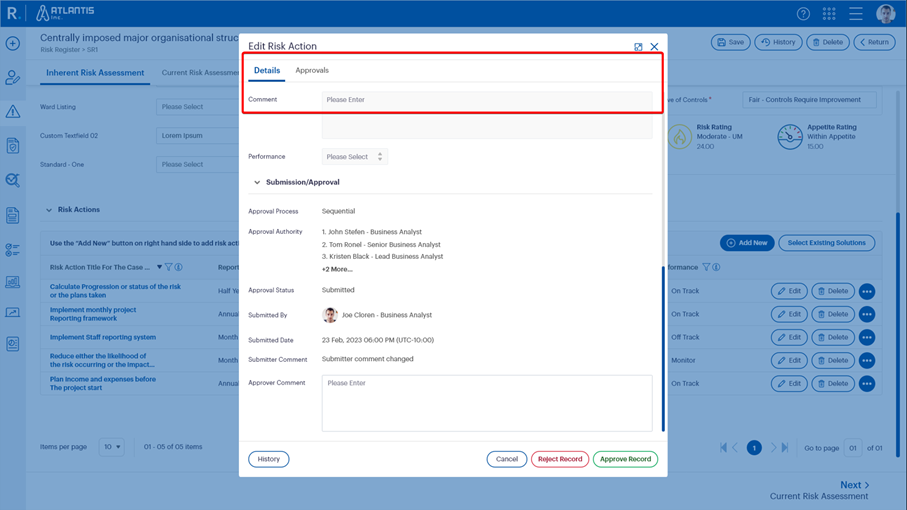
Figure 3.3: Approvals Tab within the Risk Action Pop Up
4. You now have the option to configure any approval process such as 'Concurrent' and 'Sequential' both or either of them to be picked by default.

Figure 3.4: Approval Process; Sequential and Concurrent
- We have further introduced two new permissions within role management of the risk product under the risk solution node.
1. Super Action Approver - Any user who has been granted with the super action approver permission has superseding permissions in terms of approval. This user will be able to approve/reject an action fully with this permission by resolving any obstacles in terms of approving/rejecting risk actions for the risks.
2. Show Actions Prior to the Approved Stage - With this permission users are allowed to see any pending actions from anyone in their respective risks which they are managing so they are aware of the actions pending for their risk mitigation plan.
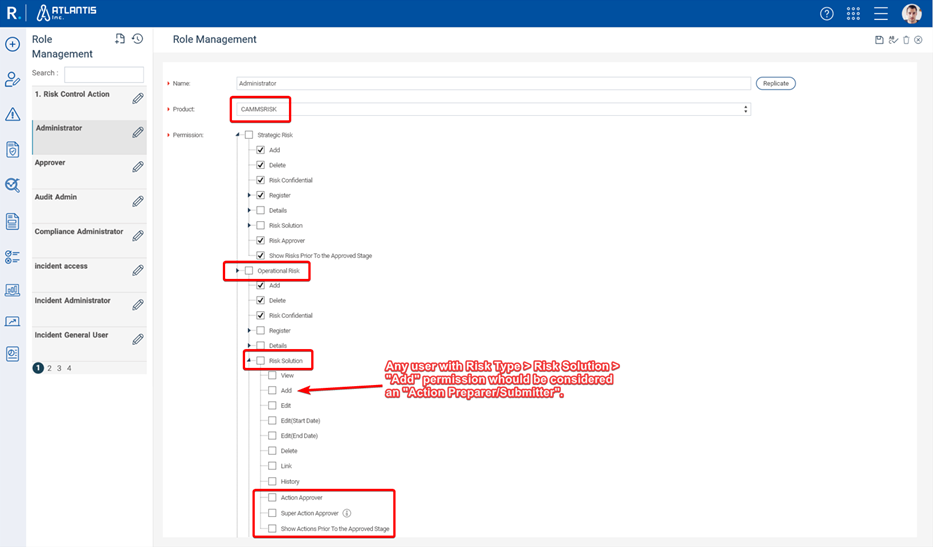
Figure 3.5: Show Actions Prior to the Approved Stage
Approval Process: Sequential and Concurrent
How does this work?
- This enhancement facilitates a new 'Concurrent' approval process along with Sequential for this quarter for all risk actions which is configurable for your liking. Users now have the capability to designate risk action approval authorities for your risk action approval process and subsequent approval or rejection of the risk actions. Risk Action Approvers can conveniently approve/reject the risk actions assigned to them either from their MQU page or on the risk details within the risk workflow.
 Figure 3.6: Submitting a Risk Action for Approval

Figure 3.7: Risk Action Approval/Rejection
4. Enhancing the standard Risk Reports to support the Risk Action Approvals Modification |
This modification will mimic the behavior of the Risk application, capturing only 'Open' and 'Approved' Actions within the following Standard Reports. However, it will not include any changes to the Report content or Filters.
- Risk Heatmap Report
- Executive Risk report
- Bow Tie Report
- Risk Register Report
- Risk Management Report
- Risk Attention Report
- Control Summary Report
- Action Summary Report
Note: This modification will not be included any changes to the content and filters of the above-mentioned reports. |
5. Introducing a multi-select hierarchy filter which enables cross filtering to standard Bow Tie and Risk Register Reports |
This enhancement will replace the existing single-select filter available within the standard Bow Tie and Risk Register Reports with a new a multi-select hierarchy filter which will enable the cross-filtering capability cross multiple hierarchy level.
How does this work?
- If two or more hierarchy nodes are selected from the same hierarchy structure, a union (OR) of selections within the hierarchy will be considered.
- If hierarchy nodes belonging to more than one hierarchy structure are selected, an intersection (AND) between the hierarchy node selections will be considered.
- If a user wishes to filter only based on the selected hierarchy node (without rollup), they can do so by ticking the 'Show risks of the selected hierarchy only' tick box.
- By default, all nodes will be 'unticked', meaning the report will run for the 'Show all' scenario. Consequently, all records will be retrieved for the report regardless of their Hierarchy linkage, subject to other applied filters and user permissions.

Figure 5.1: Multi-select Hierarchy Filter